Pin It button on image hover

Thursday 30 September 2021

Fiona Randall’s Galaxy by Zoe

Good morning Lovelies and welcome to my final post this month.
Today I’m showcasing the amazing new stamps that were designed by the very talented Fiona Randall.
Wow they are fab. So versatile and generic, fab for those “tricky to make for people” lol
I used some Stencils along side the stamps to create some depth and interest to the 2 cards.
Some masking off for the envelope and some washi tapes on my bookmark just to add some interest.


Thank you very much for visiting, I hope you liked my creations.
Have a wonderful day xx Zoe xx 


Wednesday 29 September 2021

Poinsettias - Christmas is coming ...


Poinsettias - Christmas is coming ...


 Today I am using a set  of DL Rubber Stamps the Poinsettia Script is a beautifully designed set and can easily be made into a 3d image should the mood take you. I have shown the front and the reverse of this heart which could be used on a gift or as a gift to someone special. Or maybe even a Christmas Decoration.
I used a blank Rice Paper to stamp onto and then coloured using Distress Inkpads a little water and paint brush, then once dry stamped the image using  A Versafine Clair Nocturne Inkpad. To add extra colour to the image I have used some watercolour brush pens. To seal the image onto the heart I have used Deco Art Decoupage. On the reverse I have used a pre-printed piece of Rice Paper, sealing once again and then after completing both sides of this heart I used a permanent black chisel tipped marker to go around the edge. Finally I used a suitable piece of organza ribbon making a loop and bow to hang the heart from.


Thank you for looking in today 

Love Doreen


Tuesday 28 September 2021

Celestial Dream by Rachel

 Hello there - Rachel here today with a couple more of my makes using the wonderful Celestial stamp set.

In this first one I have used a mop up background from a mica spray and stamped directly onto tht but then added the moon from a fussy cut image.
For the tag I started by using black gesso all over a board tag then once dry I stamped and embossed the images in gold. Next I painted in mica powders before finally adding the black and white moon to  the tag 

Hope you have a great day!
Hugs
Rachel x


Monday 27 September 2021

Twinchies be Brenda


Morning everyone, my final post for this month sharing more samples from last months TV shows.

Here I have used the Dragonfly and the moon and sun image from Sacred stamped onto four twinhcies inked with had been inked Oxides……I usually fix them togetehr with tape on the back to make stamping easier. Once dry the four were individually inked with Judikins embossing ink, this comes in a bottle with sponge top and is much easier for a smooth application, likewise it works well before adding distress glaze.


UTEE then added to each piece, heated and the same process repeated twice more. If you still see a few uneven areas or bubble you can re-heat so smooth. The four pieces where then reassembled into one and matted and layers onto a base card.


Blue is not a colour I tend to use much but I do rather like the vivid shade achieved here with blue, green and silver alcohol inks which were applied to the reverse of the sheet of vellum. Poinsettia Script then stamped with Versafine ? Blue, the Poinsettia then stamped again several times and hear embossed with detail silver EP, cut out and decoupaged.

Hope I have provided a little inspiration.


Saturday 25 September 2021

monochrome


 For my last post this month I have a couple of monochrome cards to share using two very different stamp sets.

The first card uses the lovely poinsettia script which I think does not have to be just for Christmas. I stamped it on grey card using black ink and clear embossing powder. It was coloured with koh-i-noor pencils using the white with blending solution on the flowers with yellow in the centre and green on the leaves.

I added silver and black mats before adding to a white square card blank with the sentiment stamped in blac

The second card uses the small geometrtic shape from Fiona Randall's sacred set, stamped four times on grey card and once on white in black ink and clear embossed.
The grey images were trimmed to square and mounted onto black card, with stickles glue on the centre triangles, although it doesn't show up well. The white image was closely trimmed and glued at an angle in the centre.

Friday 24 September 2021

Sacred Moth


Hello, I am sharing some more of my samples made for the August show on The Craft Store.

These are using the beautiful new stamps from Fiona Randall called Sacred

For this card I made a background using alcohol inks in shades of blue, purple and gold. I then stamped the words and geometric stamps and embossed in gold. I stamped the butterfly onto acetate and embossed with Verdigris powder, fussy cut it out and used the alcohol inks to colour on the back.


Next I have a wall hanging. 
I covered a piece of grey board in papers and stamped the geometric elements in VersaMark. I have then brushed mica powder over. This gives a lovely, subtle shine to the stamped images. 
I then made my layers for the centre. 
First, I have a black mat of card. On this I have a piece of corrugated card which I have brushed with gesso. I then had a scrap of muslin which I have stained with Distress Ink. I stamped the moth and embossed in white. I then fussy cut this out. I used distress ink on a small wooden frame, I cut a piece of card to fit behind the frame and stamped and embossed one of the geometric stamps in gold. I assembled all the pieces together and added the word stamp. I made two holes at the top and added some string.

 
Thanks for looking
Sandra x

Wednesday 22 September 2021

Butterfly (by Gerrina)

Today my last post this month as a Guest Designer at Chocolate Baroque, so you can see my card/Art Journal page here and at my blog as well. As it looks like we are getting some Summer after some wet summer months, I couldn't resist to use this beautiful big butterfly one more time. I again used an edge liner to draw the stripes and a circle stencil that I have for years to draw the circles. That's how I got a simple background to let the butterfly 'pop'.


Used materials:

Stamps: Patchwork Butterfly

Ink: Versafine Onyx Black

Other: White aquarel paper, black fine pointed brush, straight edge and colour brushes


Creatieve groetjes,


Gerrina


Tuesday 21 September 2021

Christmas Rose Wreath (by Judith)

 Hello everyone, I am sharing my final post for September with you today, showcasing another of the stamp sets featured on last month's TV shows. I have chosen to pick one of the little worker stamps from the Christmas Rose Script stamp set to create a wreath. These are always popular projects, and I enjoy making them.

I drew an oval lightly onto a piece of kraft paper with pencil and a die, before stamping the image several times. I used Versafine Clair in a dark brown tone. I added a sentiment in the middle from the Holly Script stamp set. I cut a couple of masks for the little flower image, and moving around the oval, I added some sprigs of foliage from the Robin the Spruce stamp set to fill in the gaps, moving the masks as I went along.

I coloured the flowers with pencils, starting with the lightest colours first. Finally I added some white dots with liquid colour to lift the whole piece. You could use white acrylic paint to create this effect.


Thanks for stopping by. Take care,

Judith xx

Monday 20 September 2021

Christmas Ensembles part 2 by Zoe

Good morning Lovelies and welcome to my second post this month.
I’m showcasing a couple of the samples I made for the show last month featuring these amazing script stamps.
I created some matching Christmas cards with tags and envelopes. 
I hope you like them.


Thank you so much for spending time visiting today, I shall be back later in the month with my final set of samples.
Have a wonderful day xx Zoe 


Sunday 19 September 2021

Heaven and Earth

Heaven and Earth 


Today I will be sharing some of my samples from last months newly launched designs by the talented Fiona Randall there are two A4 sets and to choose a favourite is nigh on impossible,


The first of my samples is using the Celestial Set, using Alcohol Inks and a Lift Out Inkpad which quite literally does as the name suggests.
Using Yupo and a selection of Alcohol Inks I used 3 different shades of blue. 
Ink up the stamp of choice with the Lift Out Inkpad as you would with any other Inkpad and stamp onto the prepared and dry Alcohol Ink background. Lift off after a few seconds which will have allowed the Inkpad to do its work. Do not waste what you have lifted from the background stamp it onto a spare piece of card or into a journal. Two for the price of one, that can't be bad can it ?? 


The next photo is from the Sacred Set using the same technique but a different colourway.


For another look you can also use Versamark and White Embossing Powder on the Heavyweight Yupo but add the heat in short bursts as because the Yupo is basically a plastic paper it tends to buckle if too much heat is applied to it.


These are fairly quick and addictive techniques but very effective, I hope you have enjoyed looking today.

Love Doreen


Friday 17 September 2021

Christmas Script - samples by Rachel

 Hello there,

Rachel here today with some cards I made using the Christmas script series of stamps. All three were done in a similar way - by stamping in black ink and then heat seating this with clear embossing powder or stamping in versamark and heat setting in white embossing powder. They all use small stamps from the set to create a background and all were coloured using water colour pens. 


In this final one I stamped in versamark and heat set with clear embossing powder then painted using mica powders. 
Hope you have a great day!
Rachel x


Thursday 16 September 2021

Tarot Cards by Brenda


Morning everyone, I have some more samples from last months TV shows.


As soon as I saw Fiona Randall’s new stamps they yelled out Tarot Cards to me so I have to create some, not a who deck of 78 mind you as they have in the Venetian and Piedmontese tarot. In this case I just made the four with a band to hold them.


Using black cardstock which I cut to 5”x7” and rounded the edges, I stamped images from both Sacred and Celestial with Versamark and heat embossed with detail gold EP.  Using an italic nib gold pen I went round the edges of each card and flicked some watered down gold paint. The band was made with wide wired gold ribbon  and the word Tarot added using some chipboard letters which I also heat embossed with gold EP.


Using the worker stamps from Holly, Mistletoe, Christmas Rose and Poinsettia Script sets I created a wreath stamping in Versamark and heat embossing with details gold EP. Colouring was done with Distress Markers and glitter pens, a sentiment from the same bundle of stamps, a bow, some  bells for a bit of fun and a few red gems.


As always, thank you so much for your visits and words of encouragement.


Wednesday 15 September 2021

Autumn Poppy Variations (by Gerrina)

Hello everyone, we are welcoming our regular Guest Design Team member Gerrina back this month with some of her creations to inspire you. Today we are sharing her first two projects, and she will be back with another post next week:

Cape gooseberry and toadstools

My first post this month as a Guest Designer at Chocolate Baroque, you can see my card here and at my own blog as well. It feels so good to make posts twice a year with the beautiful stamps from Chocolate Baroque. I don't need to use the newest stamps, but can enjoy getting some older stamps out and letting them see some ink again...

I used the Cape Gooseberry and Toadstools from the beautiful Autumn Poppy stamp set this time and kept it simple by just colouring them in and making some splatters in the background with that ink, water and a brush.

Used materials:

Stamps: Autumn Poppy

Ink: Versafine Onyx Black, several Distress Inks

Other: White aquarel paper, masking paper, waterbrush, brush and water.


Coloured Squares

My second project can also be seen at my own blog. I played again with the Cape Gooseberry stamp from the Autumn Poppy stamp set and used a straight edge and fine pointed marker to draw some lines and coloured the squares with a waterbrush and ink, so the flower would pop.


Used materials:

Stamps: Autumn Poppy

Ink: Versafine Onyx Black, Several Distress Ink colours

Other: White aquarel paper, masking paper, waterbrush, brush and water, black finepointed marker and straight edge.

Creatieve groetjes,


Gerrina

Tuesday 14 September 2021

2+2+2 = 4 by Magda - Butterfly Flourish Swirls, Sketchy Doodle Landscape

 Hello

are you asking yourself what 2+2+2 = 4 means ?  Well here is the answer, it isn't an error          but the use of  two colors Blue and Yellow, two stencils and two stamps                            Butterfly Flourish Swirls and Doodle Landscape for the result of 4 cards. 

I used the two colors both for coloring the background and for stenciling,  stamped the       flowers of Doodle Landscape with Archival Ink Jet Black  and the "Hello" sentiment of         Butterfly Flourish Swirls. 


My cards are now ready for the Post Office and I  hope you liked them.
Thanks for passing by, hugs

Magda  


Monday 13 September 2021

dragonflies (by Veronica)

Today I am sharing more cards using the sacred stamp set designed by Fiona Randall.

The first card began life as an 8" square card blank, with the front cut in half and both the front and inside sponged with grey and lemon distress oxide inks. The geometric design was randomly stamped in grey, as well as one of the leaf  stamps from the  walk tall stamp set along with the words from sacred.  The dragonflies were stamped in black on the front flap and coloured with marker pens. The one on the back was stamped in grey onto spare card, coloured and cut out

For the second card the dragonfly was stamped four times in grey ink using a stamping platform. I again used the pva/mica method to make four more dragonflies using black ink and blue and silver mica powders. These were glued in place in the gaps between the stamped ones. The word was stamped onto scrap card and die cut then glued into the centre - I'd like to say this was to give a focaL point, but if I'm honest it was more to hide the overlapping wings!
 

Sunday 12 September 2021

Sacred

Hello I'm sharing some more of my samples from the August show on The Craft Store. 

These feature the fabulous new stamps from Fiona Randall called Sacred.

On my first card I have made a background using Brushos using two shades of blue. I have then used two of the geometric stamps in the background using archival ink. Once it was dry I used VersaMark to stamp the words, the moth and the dragonfly. I then embossed in white embossing powder. I used a Distress Ink to blend around the edges.


For my next card I used Kraft card as the base, stamped one of the geometric stamps off to one side. I then coloured with pencils and used a blending solution to soften  the colours. I used the word stamp Sacred to stamp repeatedly down the opposite edge.


Although I have used the same stamps on this card, I think it has a completely different look. I have used black card as a base and a Verdigris embossing powder. 

 Thanks for looking,

Sandra x

Blog: Is That the Time?

Saturday 11 September 2021

Bright Christmas Scripts (by Judith)

Hello everyone, I am sharing some projects showcasing stamps from last month's TV shows on The Craft Store. It has been a pleasure to use these beautiful script stamps, some favourites of mine, and to try looking at them in a different way. I have used them a lot, and wanted to give them a different feel this time around. I chose mainly pencil colouring, which I love, but chose different coloured card, or bold colours to create an alternative colour choice, to make these stand out Christmas cards for the mantlepiece.

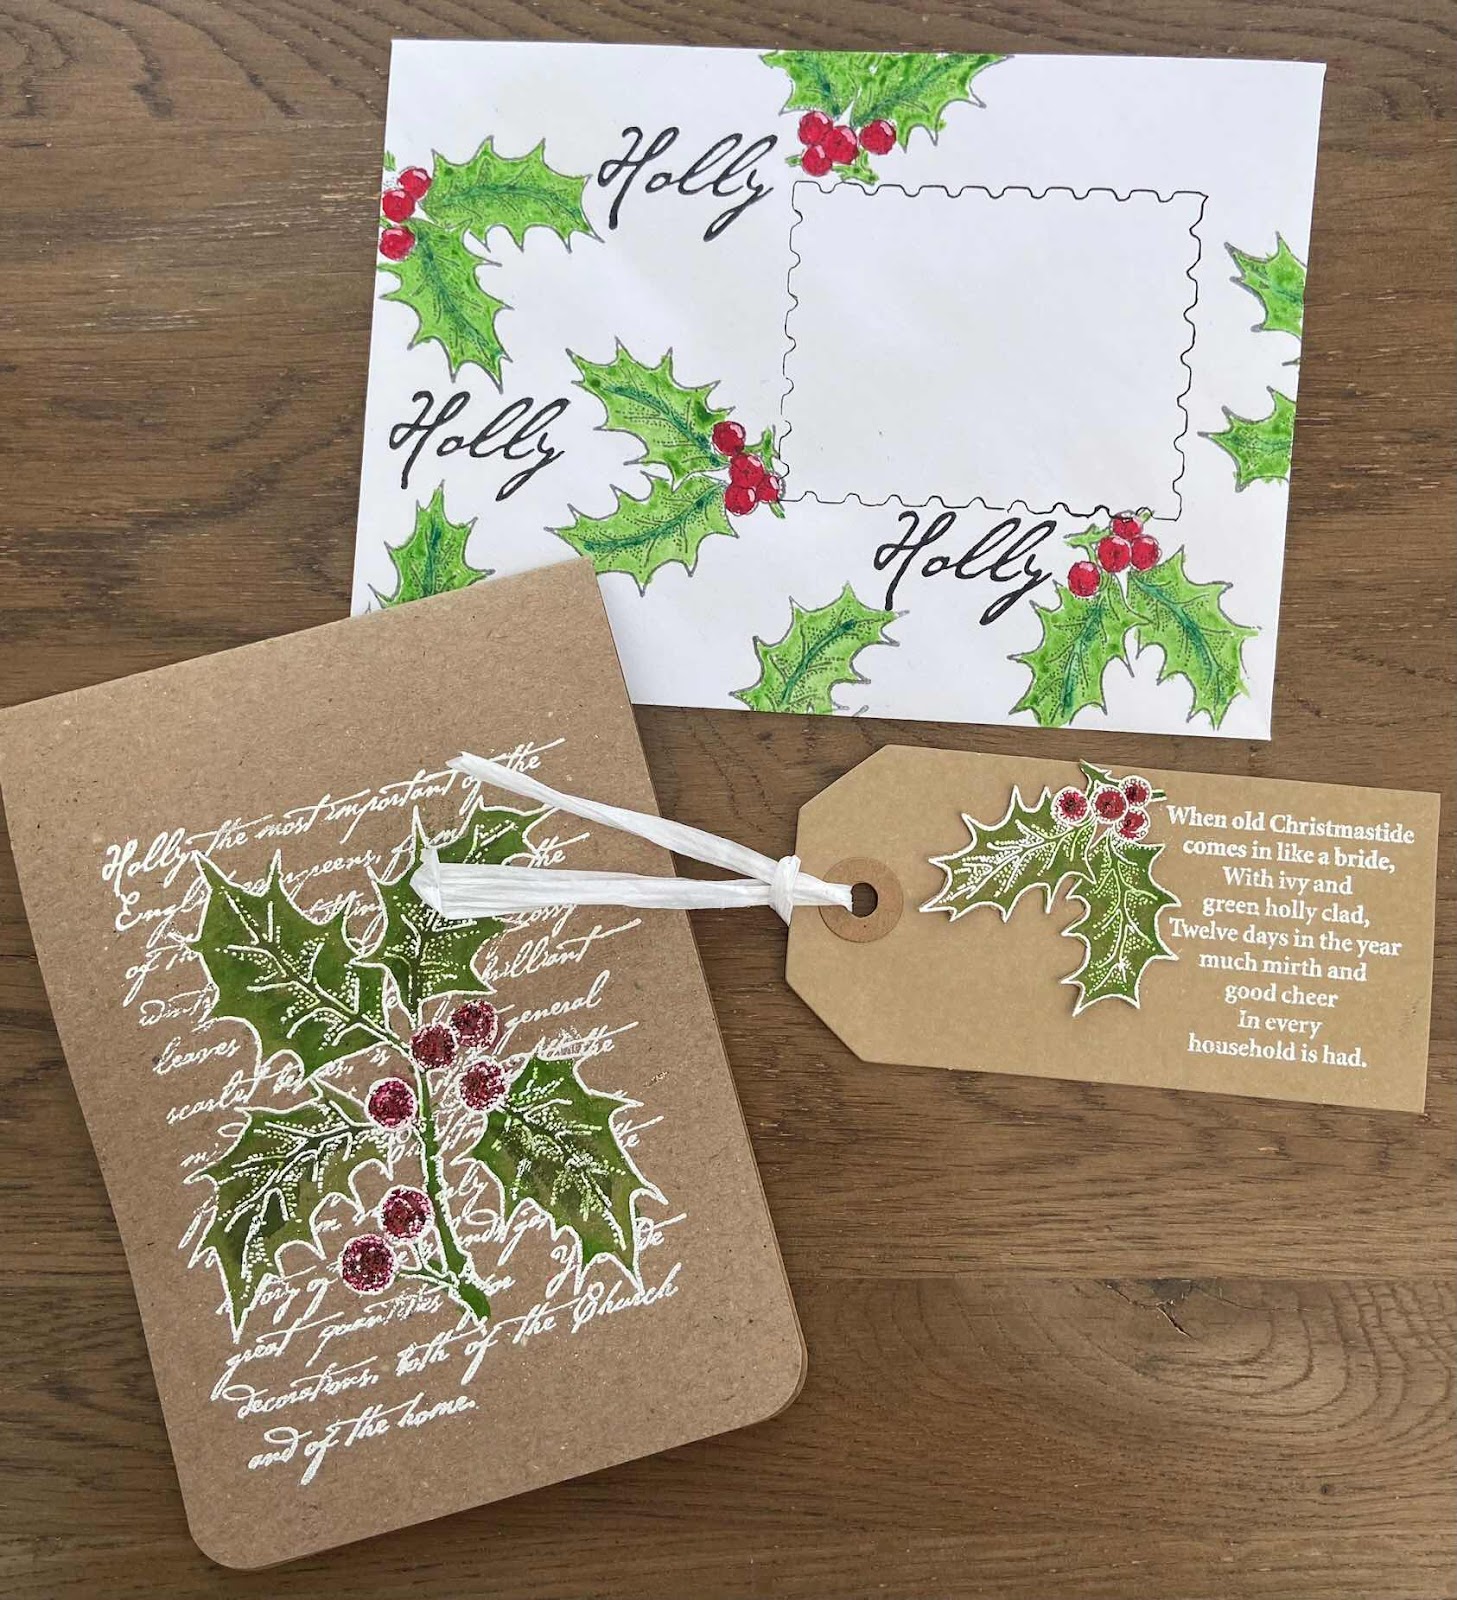
My first card was created using Drawing Cartridge, a go to surface for me. I added Distress Ink to a larger background, and then stamped the script from the Holly Script stamp set all over the background, to resemble a book page, using a dark brown ink. I added the holly leaves randomly over the top in first and second generation stamping.

I die cut a smaller piece of Drawing Cartridge, and stamped the image, edging the card with the same colour Distress Ink as I used for the background. I coloured the image with pencils, and edged both pieces of card with the brown ink before I adhered them to the card blank.

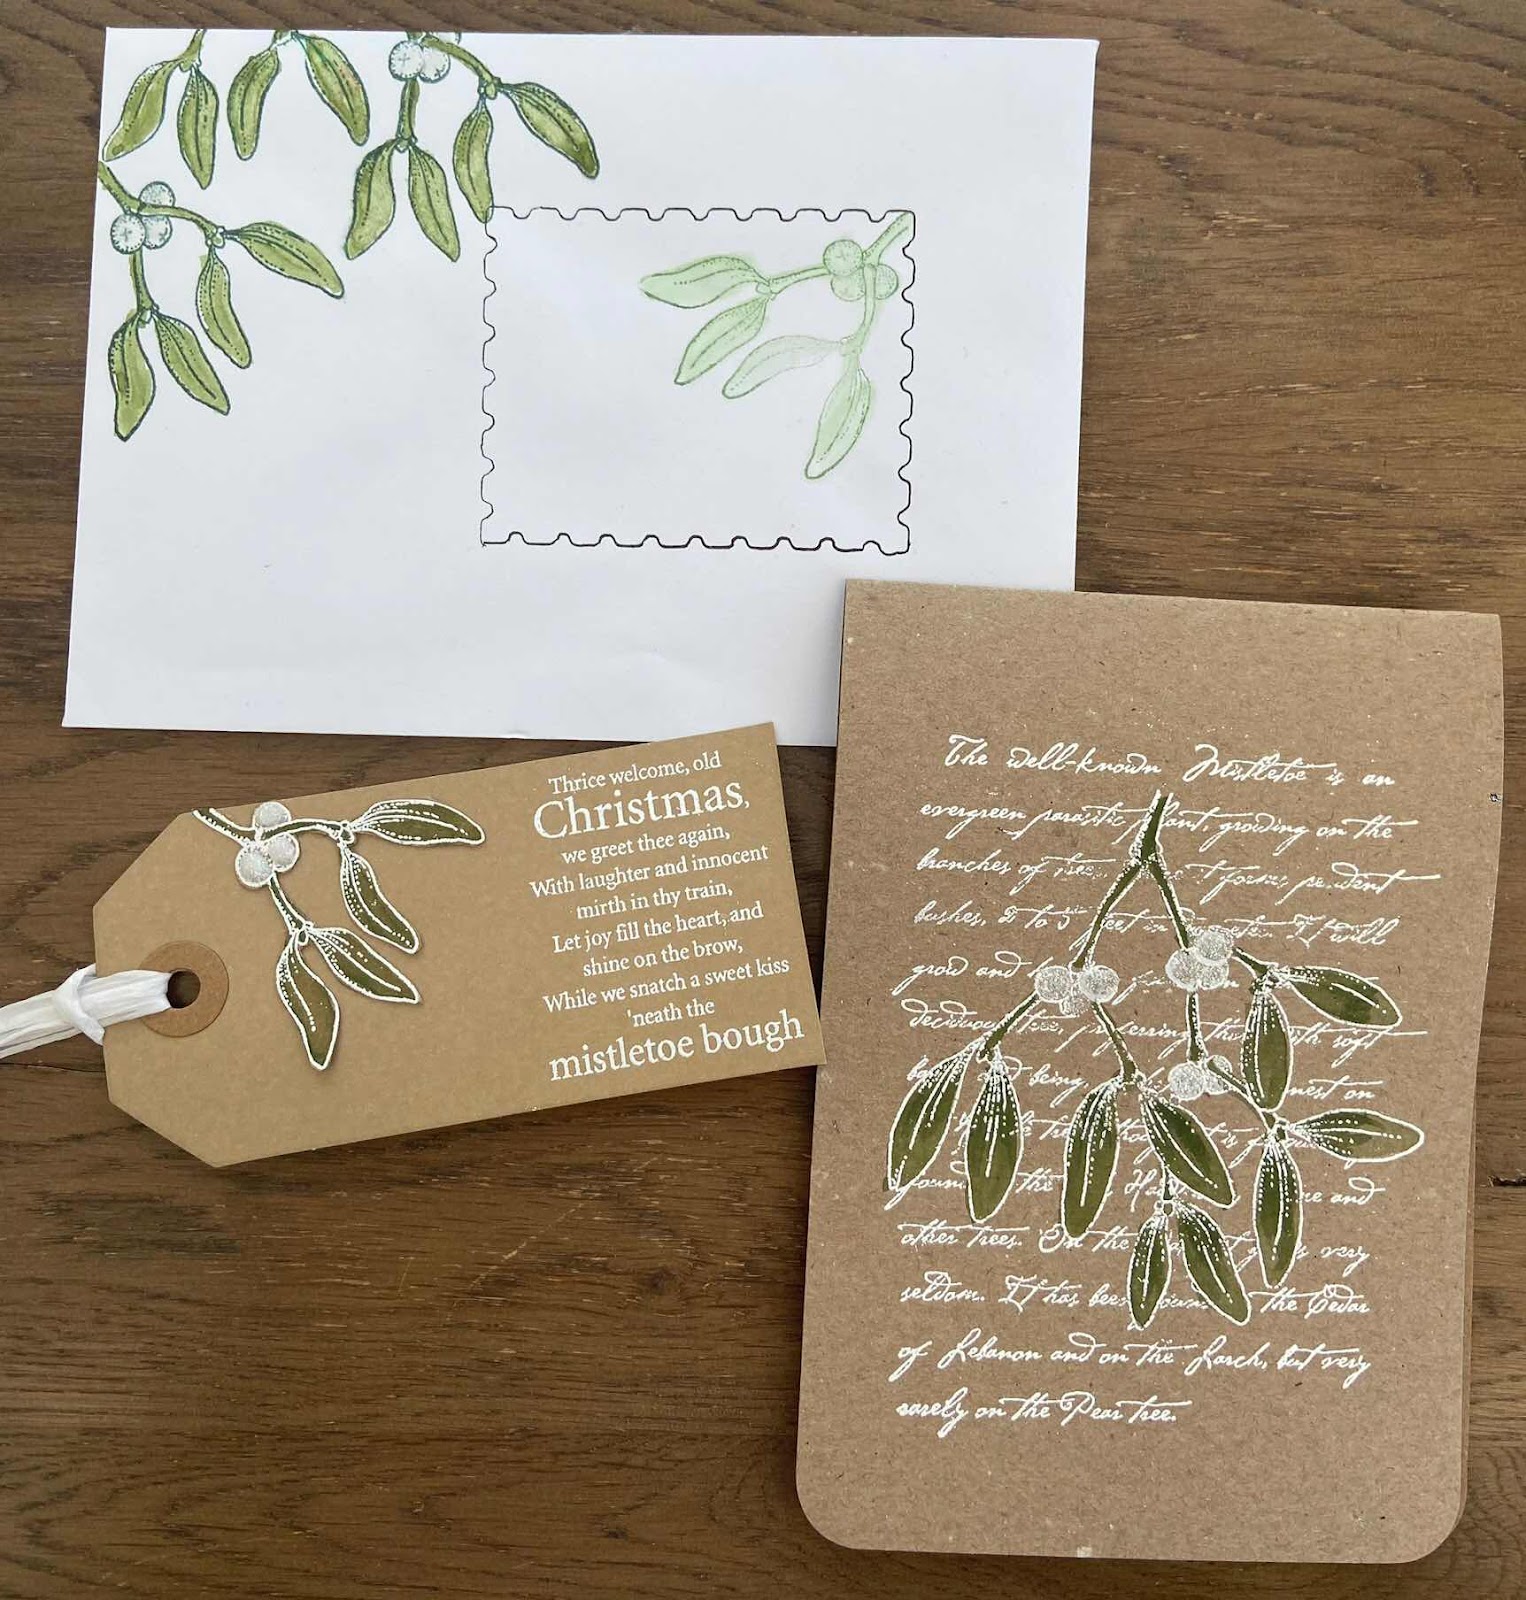
For my second project, I again used brown ink, but this time, I stamped onto kraft card. I used the small mistletoe stamp from the Mistletoe Script stamp set to stamp all over a larger piece to create a background, then die cut a smaller piece and stamped the main image. Starting with a white pencil, I coloured the images, adding yellow, bright green, then a darker green, to build up the colours. Adding white first onto a coloured background helps with colouring with pencils, and if you remember to leave an area untouched by the darker colours, you have highlights in your leaves and berries. I edged both pieces of card as before with the brown ink before adhering them to the card blank.

We seem to be hurtling through this year so fast. Hopefully I can get a few more of these cards made before December! Thanks for stopping by, take care,

Judith xx