Pin It button on image hover
Showing posts with label Punky Hearts. Show all posts

Monday, 28 October 2019

Music For Halloween - by Magda

Hello girls,
in few days it will be Halloween and this time I have combined music with bats and spiders.

For the first Journaling page " Music for Halloween "   I used  
Stencils, Clear Gesso, Gelli Plate, Acrylic Paints, Archival Jet Black , Distress Ink Pad  and            the stamps of Chocolate Baroque
Music Fanfare, Twilight Zone and Put a Spell on You.


The second journaling page has nothing to do with Halloween, it is a "Doodling around Watercolor".
I used the Pareidolia Art Technique for discovering and outlining the figures in the watercolor stains.
The items for this project are  :  
Brusho, Stencils, Black Charcoal PencilArchival Jet Black, Distress Ink Pad, and two stamps plates


Have a nice Halloween Party and see you in November again, hugs
Magda


Tuesday, 24 September 2019

Let's play hide and seek- (by Magda)

Hello girls,
The second post of this month is a selection of 3 cards and three ATCs and I hope you will like them.

For this Simple Card I used :
Dutch House and its sentiment, Punky Hearts stamp,  Archival Black Jet, Archival Red, Faber Castel Art Grip Aquarelle


For Rainbow card :


Let's play hide and seek card:


ATCs :
Italian House stamp, Turret House, Dutch House,  and their sentiments. stencil, Faber Castel Art Grip Aquarelle


Thank you for passing by
Magda

Saturday, 27 April 2019

Amber Butterfly by Brenda


Hello Peeps, Brenda here again with my last post for April and today I have another collection of Steampunkery hearts and flowers starting with a rich amber offering. My starting point was an Oxide base piece over which I randomly stamped the harlequin from Punky Hearts using Verafine Clair, followed by Punky Romance using Versafinre black and around the edges the little accent worker stamp from Punky Hearts. Finally I stamped, coloured and cut out the Butterfly from Fluttering Hearts and placed focally.


I used a sun ray stencil and several colours of Distress Inks to create the background, rotating the stencil from a central point until I achieved a full circle around the page, it takes a little while but worth the effort for the finishes effect. I the stamped the heart from  Punky Hearts in the middle and a sentiment from A Heart Full of Love.


Using a brayer and Distress Inks I created a random background onto which I stamped the floral image from a A Heart Full of Love, stamping some off the page too balance out the piece. I then coloured in with pencils, if you don't use too much colour on the background there is no need to bleach out the colour before colouring in the flowers.


This one was quite time consuming but fun, I stamped various hearts from Floral HeartFluttering Hearts and Hearts Full of Love with Versafine and embossed with various colours of EP, cut out and fixed at an angle and placed a small twine bow on each. The sentiment is from Punky Romance and embossed with one of the EP's.

As always many thanks for your visit and I hope you have a lovely weekend.

Saturday, 13 April 2019

A Little Bird Told Me by Penny

Good morning peeps, I hope you are all well and looking forward to the Easter break.  Here is my first post of this month to share with you today, one of my samples from last month's shows.  For this project I have used stamps from the Fluttering Hearts and Punky Hearts sets, CB Useful Leaves Mask/Stencil, two tone acrylic paints, Distress Inks, gold embossing powder, Versamark ink, white pen and gold pen.


I took a piece of white card and stamped the large floral heart image and the bird and butterfly images using Versafine ink and embossed them with gold EP.  I masked the images before blending inks over the card then sponged the acrylic paints all over.  When dry I stamped another heart image in 2nd generation ink randomly, then added some leaves with the stencil.  I removed the masks and coloured the images. 


On another piece of card I stamped and embossed another bird, coloured it and cut it out.  I used a white pen around the leaves and a gold pen around the edges of the panel.  I then matted the panel onto green card.  I took a cream base card and stamped the floral heart randomly, twisting the stamp, to create a border around the edges of the card.  I attached the focal panel to the base card then added the bird with 3D foam.   


I stamped and embossed a sentement onto a piece of white card, die cut it, added DI and gold pen before attaching it to the card with 3D foam. 

Thank you for popping by, I hope you like this project.  I shall be back later in the month with another creation to share, but my team mates will be here in the meantime with lots of lovely artwork.

Take care and Happy Easter,


                        xx  Penny  xx

Friday, 5 April 2019

My Heart's All of a Flutter (By Julie)

Hello, today it is my turn to show a couple projects.
My first card is stamped with the brand new stamp set, A Heart Full of love.


To start with I stamped the floral corner design and coloured with Polychromus pencils. 
 Apply green and blue inks through a dotty stencil all over the background, but try to avoid the corner design and when dry take the sentiment from Floral Heart and stamp it in the bottom right corner. Cut your panel so that it fits your card blank, leaving approx. 1cm border all around the edge. To finish off, stamp the heart design, colour with the pencils, cut out and then mount in the centre with 3D glue gel.


My second card is stamped with both Punky Hearts and Fluttering Hearts. Both of these sets are brilliant and work so well together.
 I stamped the Butterfly Heart from Fluttering Hearts onto my card blank, starting with the image at the top, followed by the bottom image and then the left and finally the right image. You then need to make a mask. I did this by stamping onto copy paper and then folding the paper so that when I cut out the image I had two copies. Place your masks onto the top and right hand side images, ink up your Butterfly Heart, stamp onto scrap paper and then stamp onto your card, over the top of your masks. This is second generation stamping and you need to repeat this step until you have stamped in between all of the butterflies. Colour with Polychromus pencils.
Ink up the cluster of hearts from Punky Hearts, stamp around the background and finish off with Distress ink blended into the background.

Thanks for stopping by and please call again soon for more Design Team inspiration.

Julie xx

Wednesday, 3 April 2019

Steampunk Panel - (by Magda)

Hello everyone
I am back with my April posts.

For my first project "Steampunk Panel"  I used a heavy craft cardstock, on which I stenciled gears with dark brown and black soot Distress Ink Pad .  For the front panel I used a white cardstock on which I layered at first white gesso then  acrylic paints and stamped with Archival Jet Black the image of Punky Romance . I coloured the butterflies, flowers and highlighted the machine with Faber Castell Art Grip Aquarelle Pencils. 


For my second project I used Fluttering Hearts rubber stamp

1. On a white cardstock stamp directly yellow, greens, blues and violet Distress Ink Pad
2. Stamp on it randomly with Versamark  the flowers-hearts with bird and butterfly of Fluttering  
    Hearts rubber stamp
3. Spread pearl mica on the background and remove the excess.  You will see the stamped images
    glitter on the background.
4. Stamp the big heart of the same plate with Archival Jet Black on a second piece of white cardstock
    and color it with the same colors used at point 1.
5. Cut out the image and glue it  with Cosmic Shimmer PVA glue on the background
6. Stamp  with Archival Jet Black in third generation all around the border the little hearts of the
    same plate Fluttering Hearts
7. A nice ribbon and a gem-heart complete the card.


Thank you for passing by.
Magda


Wednesday, 21 September 2016

Birthday Calendar Part Two (By Gerrina)

It is time for Gerrina's second visit to the Gesign Team Blog this month, and she is continuing with her lovely Birthday Calendar project that she introduced to us last week:

Gerrina writes:

Of course I made some more months for my Birthday Calendar for my second week as Guest Designer here. You can find the frame and first two months here on my blog and here on the Chocolate Baroque Design Team blog.

Used Materials:

Stamps: Nature Table, Lace Fragments, Artistic Affirmations
Inkpads: Versafine Onyx Black, Memento Tangelo and Lady Bug, Distress Ink Brushed Corduroy and Gathered Twigs
Other: Postcards and waterbrush
Used Materials:
Stamps: Sparkling Trees
Stencil
Inkpads: Versafine Onyx Black and Vintage Sepia, Memento Danube Blue and Summer Sky
Other: Postcard, masking paper, gelli plate, brayer

Used Materials:
Stamps Sparkling Trees, Artistic Affirnmations
Handmade stencil
Inkpads: Versafine Onyx Black,and Crimson Red, Memento Dandelion and Lady Bug, Distress Ink Lucky Clover, Silver pigment ink
Other: Postcard, gelli plate, brayer, blending tool, silver paintbrush
 
Used Materials:

Stamps: Punky Hearts
Inkpads: Versafine Crimson Red, Memento Lady Bug, Tangelo and Cottage Ivy
Other: Postcard, masking paper, colouring pencils

Next week I will be back with more months for you!

Creatieve groetjes,

Gerrina.

Thanks so much Gerrina for more fabulous pages for your calendar. We will look forward to the final instalment next week,

Sunday, 31 May 2015

A supporting role (posted by Judith)

Hello everyone, I have a couple of cards to show you today using the sewing stamps in a supporting role, stretching their uses and hopefully letting you see how versatile they can be.

My first card uses one of the lacy borders on a wrinkle free distress background. I added some background stamping using a stamp from the Harlequin Fragments stamp set. I stamped a heart image from the Punky Hearts stamp set onto a piece of scrapbook paper, colouring in some of the details with watercolour pencils, and finally added a sentiment from the Sweet Nothings stamp set onto a die cut.


My second card uses another one of the borders to create a masculine romantic card using the Key to my Dreams stamp set. I stamped one of the locks onto the background before adding the border on either side. I coloured the background with an acrylic wash, and added some shading with Distress Ink around the edges. I coloured the images with pencils and added some background detail with a stamp from the Lace Fragments stamp set.


Thanks for stopping by, Judith xx

Saturday, 31 January 2015

Steampunk Valentines (by Shirley)

Hello everyone, I hope you are doing well.

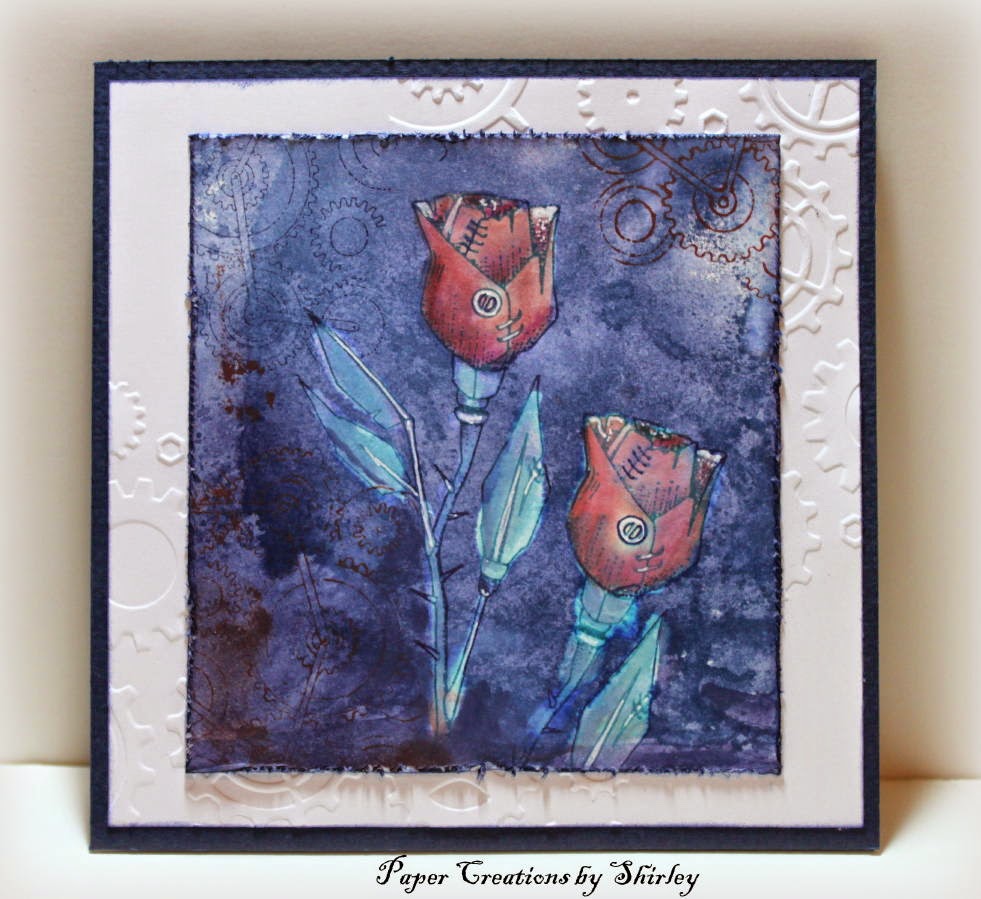
I have two designs to show today using the fabulous new Punky Hearts set.


The card above has a batik painting look to it (at least to me it does).   I used Sapphire Distress spray in the background.  I stamped gears from Steampunk Butterfly with Sapphire & Mahogany Distress Inks.

Next I stamped the roses with Cobalt Archival ink and bleached (using bleach, water & brush and blotting with a paper towel roll) where I wanted to paint.   I used Distress Paints to colour and highlighted a little with a white pen.   I embossed with a cog folder on the white mat.

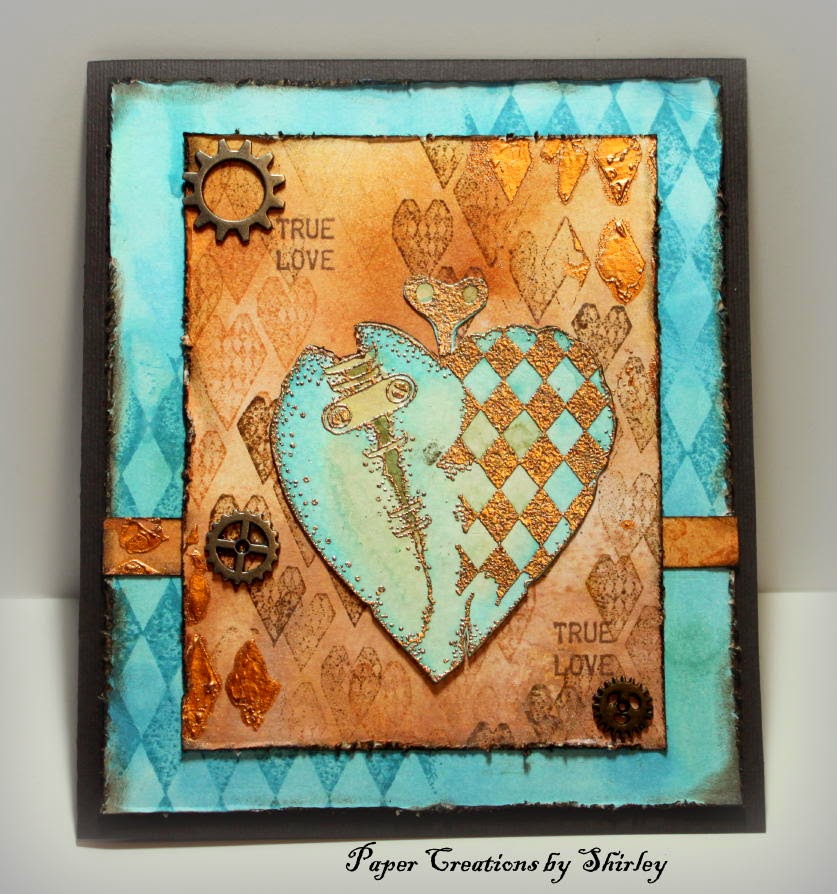
 And below is the large steampunk heart from the fabulous set:


I created the small background with Tea Dye, Tattered Rose and Bronze Distress Stain Sprays but you could also use Distress Inks.     I stamped using the hearts with Walnut Distress Ink and painted with copper acrylic paint using a harlequin stencil.

The large heart was embossed with copper and painted with Tumbled Glass and Broken China Distress ink (using water and ink on my craft mat).

The large background was created with Broken China Distress Paint and stamped with a fragment from Harlequin Fragments with Broken China Distress Ink.

My husband likes both of these designs, I think I'll give him the bottom one.

Thanks for your visit and have a great Valentines Day!
Shirleyx

Friday, 30 January 2015

Gelli Heart (posted by Claire)

Good morning, Claire here with a Valentine card made using 'Punky Hearts', I love these new stamps and had a lot of fun making this card.


I began by taking making a background using my gelli plate and brayering on some Rhubarb Stalk Memento Ink. I used the 12x12 Prima 'Flowers' stencil and took some prints. I used one as a base for this card, over stamping with the heart background stamp and also inking in some of the flowers using the same stencil. I used a corner punch to round the corners and matted on white and then black card.

To create the topper I stamped and embossed the clockwork heart stamp with Gold Embossing powder and added colour with pencils before inking around the edges with Rhubarb stalk and black ink. Again I matted on white and then black card.


I used a red card blank and popped the heart topper up on 3d foam pads and added a red bow topped with a black button to finish off.

Thanks for visiting today
Claire xx

Wednesday, 28 January 2015

Guest Post - Butterfly Canvas by Julie Smith

How soon the weeks pass, we are already at Julie's last post as a guest designer and this week she has a stunning canvas to share with us.


Hello to you all, today I have a canvas for my third and final post as January's guest designer which I have created using the fabulous Punky Hearts and Fluttering Hearts stamp sets.

I started by covering the canvas board with Golden Molding Paste and dragging a contour tool through the paste to create texture. I added jute, wooden butterfly and bird charms, micro glass beads and a chipboard die cut cog to the wet paste and then set aside to dry.

Once dry I painted it with light pink and mint green acrylic paint so that the base was as light in colour as possible. Once dry I darkened the canvas by stenciling green dots and adding a variety of distress inks over the top. The flower was created by stamping the smaller heart four times from the Punky heart set. The centre of the flower is a small die cut circle layered up with a cheap bracelet charm picked up from Primark!
The butterfly and heart was stamped onto Clearly For Art Modeling film, I then sprayed alcohol pens on the reverse and then painted over the reverse with white Gesso to make the colour pop.

I stamped the jewelled heart using black Versafine and coloured with green and red chalks. I then punched a hole to add an eyelet and jump ring so that I could attach the chain to the steampunk style heart.

The steampunk heart was created by spreading Iridescent Paste over the rubber stamp and leaving over night to dry. Once dry I coloured the heart by spraying various alcohol pens and then attaching an eyelet to the key so that the chain could be attached.

Thanks to everyone that has left a very kind and very appreciated comment, I have really enjoyed being a guest designer and you have all made me feel very welcome.

Thank you for this inspiring project Julie and for being our guest for the last three weeks.  I am sure you will want to show your appreciation for Julie's final work of art and remember to check out her blog, Julie's Crafty Bits.

Tuesday, 27 January 2015

Love is in the air (by Debbie)


Good morning. We take inspiration from many different places and my card today
was inspired by our Design Team member Doreen. She has made a couple of cards using her Gelli Plate and it prompted me to find mine and have a play.


I like to use Adirondack dye ink pads as the ink doesn't puddle on the Gelli Plate.
I inked the plate with a brayer using Stream coloured ink pad then place the heart stamp from Fluttering Hearts onto it. Each time I cleaned the stamp with kitchen paper to remove the ink.
 When I had filled the plate I laid the card onto it, taking a print. The advantage of using the ink is that the plate is much easier to clean.
The topper is stamped with Black Memento ink and coloured with alcohol pens. I love the blue and red together so matted onto red card.
 
At the end of last year I attended a journal class. I decided I would use it for techniques that I love
 and would be able to catalogue my favourite bits and bobs.
The background for these pages was a sheet of card that I had sprayed inks and shimmer sprays.
I glued it into my journal ready to add to at a later date.
I stamped the hearts with red ink and stencilled onto the pages.
The words are from Artistic Expressions and I think they fit well with the Rose and Punky Heart which were stamped onto card, coloured then cut out and glued onto the pages
 
 
Thanks for visiting
Debbie

Monday, 26 January 2015

A Wooden Door Plaque by Doreen

Hello to you all, I am  back sharing a sample made from the new stamps
 that have just been released for January .

"Punky Hearts and Fluttering Hearts"

I have decorated a wooden Plaque this time,first covering this with blue and white acrylic paint and sanding it down before stamping my image on.this was then coloured with distress inks Mustard Seed and Mowed Lawn.


 The butterflies have been stamped onto paper coloured with distress ink Mustard Seed and Peacock Feathers and fussy cut.

Sunday, 25 January 2015

True Love (by Asha)

Good morning, friends! Today I have 2 more card projects to show you, featuring the Punky Hearts and Fluttering Hearts stamps.


First up is an easel card, made using the the big heart stamp from the Fluttering Hearts A5 sheet. I heat embossed in white, blended some the Distress Inks and fussy cut to create His and Hers hearts. More Distress Ink for the background with some tone-on-tone stamping using a leaf from the Autumn Poppy A4 sheet. To finish this card I added some bling and ribbon.


For my second card I wanted to "soften" the punk in Punky Hearts. I started by creating a faux vellum feel for the background - made entirely with Distress Inks and a stencil. I also did some zigzag stitching to bring back some edginess. I coloured the rose with alcohol markers, fussy cut and adhered it to the card base. To bring back the punk - Metal!  Silver marker, silver eyelets and silver thread offer the perfect finishing touch.  The sentiment is from the Loving Sentiments A5 sheet.


With Valentine's Day just around the corner these love-inspired Punky Hearts and Fluttering Hearts stamp sheets will get plenty of use! As always, details of inks, colours, tools and other products used to create these cards are available on my blog. Don't forget to swing by regularly for more crafty ideas from the rest of the DT.

Beijinhos,
Asha

Saturday, 24 January 2015

Valentine Rose (posted by Judith)

Hello everyone, I have a project to show you today using the Punky Hearts stamp sheet, currently on offer on the website.

I began my project by stamping and masking the punky rose on a piece of smooth watercolour paper. I then covered the background with a stencil, and using a light brown inkpad, I coloured through the stencil. With the stencil still in place, I stamped the crackle stamp from the Echoes of Italy stamp set all over the background, using a darker brown ink. I stamped the image onto scrap paper each time first, so that I got a lighter image. This is called 'second generation stamping', as I did not want the ink to be too dark. Once the ink was dry, and with the stencil still in place, I brushed a layer of acrylic wax over the top, and allowed this to dry.

I removed the stencil, and covered the rest of the background with a soft lilac, and then added a darker colour around the edges. The wax acts as a resist, protecting the area that was covered earlier. I buffed the wax areas, to remove any of the lilac ink, and the contrast between the two areas became much sharper.

I removed the mask from the rose, and coloured the image using co-ordinating dye ink stamped onto an acrylic block, which I picked up with a waterbrush. I picked out the 'metal' areas of the rose using a gold pen. I added a die cut sentiment, and matted the project onto green card.


Thanks for stopping by, Judith xx