Pin It button on image hover
Showing posts with label Village Life. Show all posts

Friday, 30 March 2018

New Home by Brenda


Hello all, Brenda here and it's my turn to share a few more creation using the houses from the recent Hochanda show.

My first card used three of the houses form the Town Houses, stamped with Versafine black and just the doors coloured to carry the colour from the stenciled sunrays. The sentiment is computer generated and fixed in place with some twine and a button.


This one is a quintessential English cottage and I am quite sure the occupants have afternoon tea and scones of the lawn ! After stamping the cottage from English Cottages I added some trees from Town Houses along with the fence and built up the colour and sky with Pan Pastels and Distress Inks along with a flower border.


This one has one of the houses from Village Life stamped in Versafine Toffee and coloured in with Distress Markers along with two Topiary trees from English Cottages. A masked sun and Pan Pastels for the sky and trees from Magical Landscapes stamped with Versafine sepia.


One final card using the Church and trees from Village Life stamped with Versamark and heat embossed with details white powder onto a background created with Distress inks and water splatters.

Many thanks as always for your visits.

Saturday, 24 March 2018

Cards and ATCs (by Magda)

Hello girls,
as my third and last blog post for this month, I would like to inspire you with some cards and ATCs.


The background of this first card was created by blending Distress Ink Pad on which I stamped with Versafine Onyx Black, different stamps from Chocolate Baroque  and coloured them with watercolour pencils.
The collections are : Landscape Edges ( sun and wall), English Cottages (house and tree), Village life (tree)


Here is a very clean and simple card
I just stamped  with Versafine Onyx Black, two stamps from Village life  and the birds from Landscape Edges  on a blended  Distress Ink Pad background, using  the beautiful 250gr A4 white cardstock


On Your Birthday card
has as focus points the red label with the sentiment from the  Words to Dazzle and Sparkle  stamp plate and the glittered Stickles light coming behind the clouds. In Landscape Edges  you can find all the stamps for this card. The background is again blended with Distress Ink Pad  on A4 white cardstock


Three ATCs from the same  A4 white cardstock wiped with Distress Ink Pad and water. The stamps from Landscape Edges are stamped with Ranger Archival Inkpad Jet Black, as well as the sentiment from the Amazing Mackintosh Words collection. 


Thank you for passing by and I will see you next month with another Chocolate Baroque stamp series
Magda 


Friday, 23 March 2018

Village Street Scene (by Anne)

Good morning. Today I am sharing a village street scene created with various scene building stamps from Chocolate Baroque. I have included a step by step of how I stamped and masked to build up the scene from the various stamped elements.

Materials:

How to build the scene:
The first thing that I do with scene building stamps is to stamp them all out onto copy paper, trim around and lay them out to decide on placement of the elements.
Once I have chosen which elements I want to use I then carefully trim around the images to create masks. I add just a couple of dots of temporary adhesive onto the back and leave to dry to give a tacky surface to hold down the elements while masking and stamping. If you have masking tissue this is already self-cling/tacky so you don’t need glue.

Next the foreground images are stamped.

Next the foreground images are covered up with the masks and the images that you want to sit behind are stamped.

Further masks are added to cover the stamped images while working backwards through the scene.
Here I left the foreground tree and bush masks in place while stamping the houses. Then I covered the houses while stamping the background. It is not necessary to mask the background silhouette trees as they are solid stamps.
The masks were then removed and a fine tipped marker used to draw in extra elements such as texture on the street and to fill in and extend the solid background trees (i.e. coloured in between the houses).
Extra trees were stamped onto spare card to decoupage onto the foreground.

Wax crayons were used to add a little texture to the roof tops and brickwork. The wax will resist subsequent watercolour.
The scene was then coloured with watercolour pens and a damp brush used to drag out colour and add shading. Extra colour was also painted on by picking up pen colour scribbled onto a craft mat or palette.
The additional trees stamped onto spare card were trimmed and lightly shaped with a ball tool to create foreground bushes and more depth to the scene.


Saturday, 17 March 2018

"The house in the middle of nowhere" by Brenda


Good morning, today it's my turn to share more creations of Lesley's Hochanda show which was all about cottages and houses. The title of my posts refers to the name given to the top card by Hochand's presenter Dave Bradford which I think it sum's it up pretty well.

My stating point was to stamp the house from the Town Houses but I think it works OK as a Country house, in fact it's not unlike the remote location where I live in the Fens on a single track road to nowhere. Only difference is we don't have any hills, it's totally flat as far as the eye can see and on a really clear day you can see Ely Cathedarel.

The sky has been done with Pan Pastels then the skyline, house and garden coloured with Distress inks and markers, the fence and trees added from English Cottages and Village Life and a pond and patch in the front garden also done with DI's and finally a flower border across the the front. 


I used the same house as above from Town Houses, stamped in black Versafine and added some colour to the front door before placing inside two die cut hears. Some tiny hears stamped and cut out from and sentiment from Words of Love all stamped in Versafine red.


Monochrome all the way with this one, a background created with the key form English Cottages and Versafine black, the the house from Town Houses stamped with the same, then a masked sun/moon and Pan Pastes to add some sky and a path before stamping some trees and bushes.


For my final card I used just the trees from Village Life stamped onto cardstock coloured with sparkle pain, cut each out and arranged into a flower. The corners are from Baroque Corners and inked with Distress Markers.

Many thanks for popping in to take a peek today.

Tuesday, 13 March 2018

Village Scenes (by Julie)


Hello, the two cards I have for you today are based around scene building. All of the sets used are so versatile as they can be used on there own or mixed with many other Chocolate Baroque sets, giving you great value for money.


My first card is stamped with Sunburst Scenes , Village Life and English Cottages
Start by taking some stamping card and stamp the cloud and hill scene from Sunburst Scenes and then further down the page, to the right hand side of the design, stamp the house. Take the little wooden fence from English Cottages and extend the fence that is already next to the house in your stamped design.
You should be left with a gap between the cloud and house scene, so it's a perfect place to stamp the fir tree from Village life. I decided for this scene the fir tree would look better without it's trunk so once you have inked up the stamp, wipe any excess ink from the trunk with a wet wipe before you stamp onto your card.
Once you are happy with your design, colour with water colour, cut to size and mount onto your card.


My second card is created with Sunburst Scenes, English Cottages and Birthday Words.
Take some stamping card and towards the top of your page, stamp the bridge scene, next to the sky scene from Sunburst Scenes. To make them fit together, use a fine liner pen to draw in a cloud so it looks like the sky continues behind the tree in the bridge scene.
In the foreground of your design, stamp the house, fence and trees from English Cottages. 
Colour your design with pencils and water-colour and then over-stamp the foreground with the birthday sentiment from Birthday Words. For added interest I have added a dotty border created with black and white paint pens.

Thanks for stopping by and please call back for daily Design Team inspiration.

Julie xx

Saturday, 10 March 2018

Country Cottage Scene (by Anne)

Good morning. This is one of my recent show samples with the scene building stamps. I have created a step by step for you, ‘warts & all’ as I made a bit of a mistake with masking! I think that I disguised it reasonably well – tee hee.
Materials:
  • Stamps: Landscape edges (wall and background skyline), Village Life (trees), Townhouses (trees & bushes), English Cottages (cottage, trees & bushes, post box)
  • 8 X 8 inch card blank and stamping card (smooth white)
  • Scrap copy paper (needs to be thin) and temporary glue adhesive (such as zig 2 way glue) or masking tissue
  • Watercolour pens and inks (yellow, orange, brown, turquoise, bright green, olive green, red, pink, grey and black)
  • Fine tipped water resistant pen (black and opaque white)
  • Alcohol marker (black)
  • Versafine (Onyx Black)
  • Pebeo Drawing Gum (masking fluid)
Step by Step:

Planning a rough layout.
The first thing that I do with a set of scene building stamps is to stamp all the elements onto scrap copy paper and roughly cut them out. I then use these to plan a scene, laying them out onto my project to decide on placement. Individual elements that may be needed to create masks (e.g. buildings, trees, bushes etc.) I cut around carefully. Any elements that are silhouette stamps (e.g. solid black trees, branches and foliage) don’t need to be masked so I just cut around roughly. I keep all these cut out elements to use again for future projects.

Stamp the post box and cover with the mask before stamping the wall. Using masking you work progressively from foreground to background. Masking ensures that element sits in front of the one behind. Don’t worry too much if you get a few gaps in the image around the masked elements, these are easily corrected with a fine tipped pen.
I put a couple of dots of zig glue onto the back of my masking pieces. It goes on blue and dries clear, and is then a tacky temporary adhesive for holding elements in place while stamping. If you are using masking tissue this already has a tacky backing.

Next stamp foreground trees and bushes. The foreground bush on the left was masked before stamping the ones behind. Cover the trees with masks.

Continue stamping and masking trees and bushes as you work backwards through the scene.

Continue stamping and masking as you work backwards through the scene.

Continue building the scene using masks as needed. Now can you see where I went wrong? I forgot to mask the bushes on the right hand side of the cottage! You can see the base of the house through the bushes. Eeek! I decided to leave it and try and cover up the mistake with the colouring.

Stamp the clouds along the top and the birds into the sky.  Mask the foreground tree and stamp the silhouette tree on the right.
Use the fine tipped pen to draw in elements and extend the background. Try to ‘go with the flow’ and just quickly draw. Rather than solid lines try and be a bit sketchy with light touches, dots & dashes. To give the illusion of perspective draw the path wider as it gets nearer the front of the scene. Draw a letterbox and scribble text onto the post box.
Next cover the cottage and trees using the Drawing Gum. This masking fluid is brilliant. I had always been used to the older stinky rubbery style masking fluid that ruins your brushes. This fluid is fabulous, it paints on easily and washes out instantly with water (treat it as you would an acrylic paint and wash brushes immediately – it will ruin your brush if you let it dry on).
It is not essential to mask before colouring but this makes it much easier to slap colour across the background and leave the elements protected.


Apply ink colours (or watercolour washes) across the background. Work freely working ‘wet in wet’. I used intense coloured inks to create a vibrant scene.

When the background is fully dry rub away the masking fluid.

Now colour the rest of the scene. I used watercolour pens and a damp brush, picking up colour scribbled onto my palette.
Use the fine tipped pen to draw in a few extra details, adding grasses and texture to the path. To keep perspective draw them slightly larger towards the front and reducing in size as you go back. Use the opaque white pen to add a few highlights.
Finally edge the scene with black marker to frame and mount onto the card front.

Monday, 5 March 2018

Village life by Brenda


Good morning Peeps, Brenda here with some creations using the houses that featured on Lesley's Hochanda shows last month.

My inspiration for this folded book card came from a small village just a few miles away called Abbots Ripton where the majority of houses and even the pub have thatched roofs, even the limited number of new properties which have been built in recent years have been kept to the same style.


I started by cutting from a good quality A3 card, two strips 6" deep x 18" long, scoring each to give three 6"x6" sections and then joining the two together in the middle.  To create the shy I gave a wash of blue Distress Ink and then bleached out some clouds, making sure I extended some of the clouds across the score lines.


Next I stamped the houses and church from Village LifeTown Houses and English Cottages sets and masked the buildings before stamping various trees from both sets and then building up colour using Distress Markers. I added some 'paving' using Large Crackle Background, hand drew some birds and finally drew a skyline linking each section and a few random stamped flowers.


This was a fun creation to make, not a quick make but really enjoyable and I hope I have offered a little inspiration for you to try something similar.


Saturday, 3 March 2018

Trees For Leaves (by Julie)

Hello, today I have two cards to show you.


My first is stamped with the Townhouses set and the leaves are from Take it or Leaf it.
I stamped the leaves on my plain white card blank with green Versafine ink and then on separate card-stock I stamped the trees from Townhouses to form the flowers. Each flower is made up of two sets of three trees, so I stamped the first tree at 12 o'clock the second at 4 o'clock and the third at 8 o'clock. You can overlap the base of the trees in the centre as this will be covered up by a flat back gem. Do this twice for each flower, cut out, colour with Distress ink and then arrange so the tree petals don't overlap each other before gluing together with pva glue. 
The card is finished off with a sentiment from Birthday Words


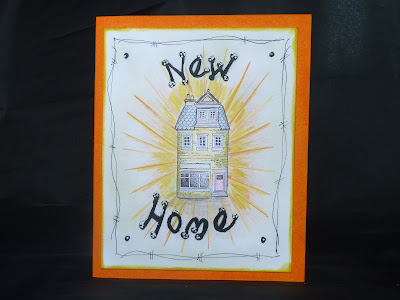
My second card's cute house comes from Village Life. I stamped the house with Onyx black Versafine and then coloured with pencils. The sun-rays were created with a ruler and a yellow and orange colouring pencil. I wrote the New Home sentiment freehand with a fine liner pen. It started off as just a single pen line but I gradually thickened the line with my fine liner pen so it stood out. I drew a border around the outside with the fine liner before cutting out and mounting onto my base card.

Thanks for looking and please call back for daily Design Team inspiration.

Julie xx

Thursday, 1 March 2018

Shopping Bag (by Magda)


The houses of Chocolate Baroque inspired me for this shopping walk and afterwards, I went shopping with my decorated "Shopping Bag". It was really nice to see the expression of the shop assistant when I inserted what I bought into my bag!

The project asks for some patience as all the houses are a cut from the
Village Life and Townhouses stamp sets.  I used Versafine  Onyx Black ink  on White Cardstock and Aquarelle Pencils for colouring just the one house, that I wanted to be the "Shopping Centre". Everything is glued with Ranger Triangular Collage Glue, which is perfect for decoupage.


I hope you liked my project and I thank you for passing by.
Magda

Monday, 25 April 2016

Creating a Scene with Street Life (by Anne)


Good morning. I have a couple of scenes to share with you today. I love playing with scene building stamps and have created two completely different scenes mixing elements from Town Houses, Village Life and English Cottages (Street Life multi-buy set). The first is a traditional tree lined street, and the second is a fantasy Fairyland. I hope that you like them.

 
Tree Lined Street

Fairyland


Tree Lined Street:


The trees were stamped directly onto the card front. The row of houses was then stamped using masks to cover the trees in the foreground. Masks were created by stamping onto waste copy paper and cutting them out. The fine tipped pen was used to draw in extra details to complete the scene and ‘anchor’ the trees. The scene was then coloured with aqua markers. The alcohol pen was used to edge the card to frame it.


Fairyland:


Stamping card was trimmed to fit the card front. The scene was then stamped with Versamark and heat embossed with the purple powder. Masks were used to cover the foreground as the scene was built. Masks were created by stamping onto waste copy paper and cutting them out.

Aqua markers were used to colour the scene and to stamp the sentiment. The card was edged with alcohol pen to frame and then glued to the card front. Faux stitches were drawn with the fine tipped pen and glitter glue was used to add sparkle.