Pin It button on image hover

Saturday 31 August 2019

Christmas in August part 2 by Zoe

Good morning Lovelies and welcome to my final post this month using the fabulous Xmas themed stamped that our fabulous Lesley and Judith brought to Hochanda last month.

Here are my samples from the show.

Mostly clean and simple, the stamps speak for themselves I think? 

I used Inktense pencils for my first and the third cards.
My second card I inked the stamp using different coloured inkpads.
Various greens in the Versafine Claire inkpads for my fourth card (tag card)
Simple gold heat Embossing and few glitter dots for number 5.
White heat Embossing on some papers I had in my stash.


I hope you like my creations. Thank you so much for spending time to visit and comment, it means a lot.
Have a wonderful day xx Zoe xx


Friday 30 August 2019

Monochromatic Christmas by Brenda


Hello all, Brenda here again with some more Christmas inspiration. And for my top card I have used the lovely new Christmas Garden, there is so much detail and interest in it I wanted to keep this one simple. After stamping with Versafine I heat embossed with a black glitter EP mixture which I made up from several different colours to achieve a sparkly finish. All I then did was pick out some elements from the image and add crystal glitter and mat and layer onto the base card.


The Tomte stamp set proved to be very popular and sold out of the initial and backdated stock. I stamped this little fellow with Versafine Clair, coloured him in with sparkle pens and added some white puffy embossing powder to his hat and coat and matted onto a die cut frame and some Christmas DP.


Using one of the images from Shaded Baubles I stamped with Versafine and heat embossed with a deep blue sparkle EP, cut out a section of the card and cut out with a scalloped die. I then created a shaker card.............absolutely ages since I made one of those, added a sentiment and some sequins and mounted onto the base card.

As always, many thanks for popping by our blog today.

Wednesday 28 August 2019

Autumn Abundance (by Miranda)


Hello there,

It's me again with another Autumn inspiration using the gorgeous Toadstool Garden stamp set.
I have stamped it on a colorful inky background using a dark purple ink. Than I did die cut it with an oval shape die.
I colored the image with color pencils and some acrylic markers.
I had the idea of stamping around the shape using a small leaf stamp from the Toadstool Garden. 
I did use several colors of Memento die inks. Than I searched for more small stamps on other sheets..........there are lots of sheets you can use......I did use a small leaf from the' Nature table' and a nice wavy line from the 'Wisteria Lane'


I did also decoupage some small flowers and die cut some feathers from the left overs of the inky background.  I had the intention to add these on the card but it was too much!
So I had a little play but did not finish it as a card......what do you think?


Well, hope you did enjoy my Autumn inspiration and this technique......so take out your ' mini' stamps and create a frame around your focal image. And of course I would like to see you creations too!

Thanks for your visit and till next week,

Tuesday 27 August 2019

Christmas Baubles

Hello everyone
This is my second post this month showing the wonderful Christmas stamps that were on Hochanda recently.
My first card is from the Shaded Baubles set.


I stamped the snowflake bauble with Versamark Ink and embossed in silver embossing powder. I then stamped the image again with a clear glue.I was able to to do this exactly over the first image as I was using a stamping platform, and this time I used glitter. This gave it a lovely sparkle!  I masked a strip across my base card and stamped the small snowflake from The Christmas Garden set in different shades of blue and grey Distress Inks. I stamped the sentiment, Happy Christmas Birthday in this  case.  I then mat and layered  my bauble and added some gems.
If you saw my last post you will see that the snowy bauble stamp is perfect for the little gnomes in the A Tomte Christmas stamp set.
My next cards are from Christmas Circles set.


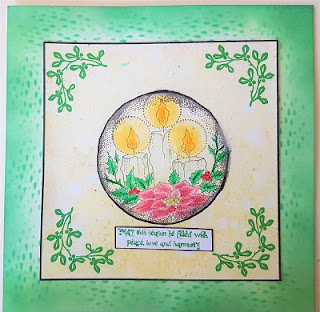
I stamped the robin and candles onto card stock in black archival ink and coloured with the Koh I Noor Brilliant Water Colour Palette. I then mat and layered onto some circular cards.

Thank you for looking,
Sandra

Monday 26 August 2019

In The Garden At Christmas (by Julie)

Hello, thanks for stopping by. I have two more Christmas themed cards to show you.


My first features a very cute robin from Christmas Circles. I inked up the robin image and stamped onto spare stamping card and then coloured with a mixture of pencils and Distress inks. White paint pen was added for a bit of a snowy effect. I then cut the image out with a circle die cut and layered it onto some toning green card stock cut using a slightly larger circle die.I inked up the foliage stamp from Christmas Garden and stamped directly onto the card blank, making sure that the design would be visible once the circle panels were in place. 
To finish off attach the circle panels to the front of the card with 3d foam pads.


My second card comes courtesy of Christmas Garden. I stamped the main image onto spare card-stock and coloured with a mixture of coloured pencils and Distress inks. I then stamped the snowflake and foliage stamp around the edges of the card blank. The Christmas Garden image was cut to size and then mounted onto the front of the card blank with 3d foam pads.

Please call back for more Design Team inspiration.

Julie xx

Sunday 25 August 2019

More Christmas makes by Rachel

Hello there! Rachel here with you today and I have some more makes from the July Christmas show to share with you today. This time I used the other stamp sets from the show - Christmas Garden, Christmas Curcles and shaded baubles.


In this one I used the candles from the christmas circle set and coloured the image in using water colour pencils. I used one of the sentiments too and added the corner from the Christmas garden sheet. I also overlayed a shaded baubles stamped onto acetate.


In this one I used versa mark and the Christmas Garden stamp and heat set the image using white detail embossing pwder. I then used metallic pencils to colour the image.


The Christmas garden image here was coloured with water colour pencils.


In this sample I used packing paper from a well known company and made some environmentally friendly gift wrap...


In this one I used the robin stamp from the Christmas Circles stamp and colouredin water colour pencils. Finally I added the shaded bauble on acetate again. Finally I used part of the Christmas Garden Stamp to surround the central portion.


Lastly a tag made using part of the Christmas Garden stamp again - its such a fabulous large stamp but its ok to just use a section of it!

I do hope this has given you a little inspiration!

Hugs

Rachel xx

Saturday 24 August 2019

Gnomes, Gnomes & More Gnomes by Debbie

Hi everyone it's my turn on the Chocolate Baroque Design Team blog today with some samples from the July Hochanda show when the Christmas stamps were launched. 
So today I have gnomes for you, namely A Tomte Christmas

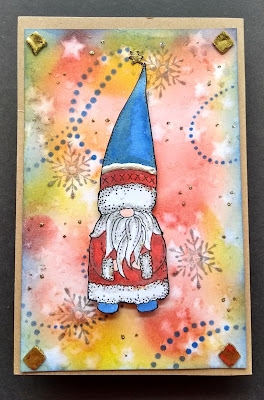
My first design is a tri fold card made from Kraft card. For the backgrounds I have taken a piece of  White Silk Board and I have sponged with Distress inks Wild Honey, Fired Brick and Chipped Sapphire. I splattered with water and mopped with kitchen paper to remove the ink. I then over stencilled with a swirl and snowflakes. The gnomes were stamped with a black inkpad & water coloured with Distress inks. I stencilled snowflakes onto the centre panel before adding the sentiment which was stamped onto a punched label. The embellishments at the corners have been made with clear 3D pads and transfer foils.


For my second design I have taken 2 stamps and made them work together which they do so beautifully. I've taken a piece of White Silk Board  again & stamped with a black inkpad. I water- coloured this time with mica paints to give a lovely pearly look. I have stencilled over the sky with a star stencil and grey ink. The image was mounted onto silver mirror card and then onto a wider piece of black sparkle card before attaching to a white 5" x 7" card blank.


Next we have a monochromatic look which gives a night time look to the design. I created the back ground by giving a piece of card a fairly wet wash with blue Distress ink and then sprinkling with rock salt. Leave to dry naturally and then brush off the salt. I love this technique as you never quite know what you'll get. I've coloured the 2 stamped images with water based pens in a selection of blue and grey shades and highlighted the white areas with white gel pen. The 2 panels  have been mounted onto navy card before attaching to a white 5" x 7" card blank and I've added some punched snowflakes to finish.


For my last design I have used  the trio of gnomes and stamped with a black inkpad. I stamped the first 3 at the centre of the card and then masked this using Pebeo drawing gum. I then stamped more gnomes to each side and then rubbed away the drawing gum before colouring with water based pens. Then sky has been coloured with Distress inks and then I used a stencil  and a baby wipe to remove some of the ink to give a snowy effect. I edged the image with blue ink before attaching to a 6" x 6" white card blank. The sentiment was stamped at the top and bottom using a blue inkpad.


That's all from me for this time. Thanks for visiting today.Debbie

Friday 23 August 2019

Three Xmas Cards (by Magda)

Hello,
Here I am with three cards and hope to inspire you

Christmas Garden Card
1. Use a white cardstock  and color it with a wash of Brusho
2. Stamp The Christmas Garden stamp with Versamark
3. Emboss hot with gold Embossing Powder
4. Use a watercolour brush to take color off in the stamped image to highlight the bird and some
    lights.


The new Shaded Baubles stamp with the snowflakes is perfect for a simple monochromatic card, adding more single snowflakes from the The Christmas Garden stamp.  The images are stamped with


This colourful card is as contrast to the other two projects.
I used Archival Jet Black for stamping on a Distress Ink Pad blended background. I coloured
the bird and the leaves of Christmas Circles stamp with Faber Castel Art Grip Aquarelle Pencils and stencil rays with yellow Distress Ink Pad.


Our next appointment is in September, happy crafting 
Magda

Wednesday 21 August 2019

'Mir'acle Toadstool garden (by Miranda)


Hello there,

I am happy to be here again and having fun playing with these wonderful stamps!
I did use the beautiful' Toadstool Garden' stamp. What a beautiful design and so many things to see......I also will play with the other huge stamp called 'Folk Art' but that will be another post.

I did use it as a background stamp. First I did make an inky background using Distress inks and a bit of salt. Always like the texture of that.......
I embossed 2 fragments of the stamp using clear matt dull embossingpoeders in each corner. 
With some darker blending it really pops out and comes alive........then some stamping using some matching Memento colors.

There is a light spot in the center of the card and I thought it would be great to use a matching stamp....of course some toadstools too from another great sheet' Autumn Poppy'
I did color the toadstools with color pencils and some accents with an acrylic marker.
The sentiment is also from  the Toadstool garden stamp.

Here it is.......


a close-up of the resist embossing......


Well, this was my first take on this stamp, next week there will be more!
Thanks for your visit, hope you did enjoyed it and till next time,


Tuesday 20 August 2019

brusho robins

 There has to be a robin for Christmas, and this little chap is on the Christmas circles stamp set.
I stamped him onto white card using black versafine and clear embossing powder, and then added the brusho powders in lemon and green, trying to keep the background behind the stamp light. Did end up with a steak of green where I didn't really want it, but that is part of the fun with brushos, you never know what you are going to get!
Coloured everything with pencils, ordinary ones this time that I had forgotten I had - probably because I wasn't too happy with the quality after the initial set (hasten to add they did not come from Chocolate Baroque, and they weren't cheapo ones). I used the holly leaves part of the stamp to stamp the random background onto the base card bewfore adding black and gold mats to the robin.
My second version used a scrap of previously coloured card which was much darker in tone. Again stamped in black and clear embossed and coloured with the pencils and a blender pen. Cut out using a fancy die and mounted straight onto a white base card. sentiment is from the same set.

Monday 19 August 2019

Tomte Christmas Carols by Penny

Goodly morning peeps, I hope you are all well and not too wet lol!  It's my turn to share some craftiness with you today, another of my June CB samples.  Like my teamies I absolutely loved the set of Gnomes stamps and this was the first card I made with them.


Tomte Christmas Carols.


  I used stamps from the A Tomte Christmas and A Christmas Flourish sets; CB Masking Tissue, CB Luxury Smooth White paper, alcohol pens, Distress Ink, fluffy fake snow, a die, a stencil and an embossing folder from my stash and some silver gilding wax.     


I stamped a large gnome onto the smooth paper in grey Versafine ink, masked the image and stamped it twice more to create a group.  I removed the masking tissue then coloured the images in.
I took a die from my stash and cut a vintage style lamp post out of black card.  I also cut a single lantern and added silver gilding wax to the lamps.  I stamped some candles from the Christmas Garden set onto another piece of card.  I coloured the images and cut around them, then attached them to the back of the lamps.


I took a stencil from my stash and added rays of light with yellow DI.  I used the embossing folder with a piece of black card to create a border for the focal panel which I highlighted with silver wax.  I then attached the panel.  On spare card I stamped and embossed two sentiments then cut around them.  I attached them to the card and added some music notes, a single lantern hanging from a shepherds crook made from black card and some fluffy snow.


Santa Gnome's Bauble


I took a papier mache bauble from my stash and painted it both sides with dark blue and white acrylic paints to creat a snowy nightime scene.  I then took a piece of smooth white paper and stamped and embossed two images of gnomes, one with a reindeer and one with a sleigh.  I coloured them with alcohol pens then fussy cut them.   


I added some falling snow by dipping the end of a paint brush into white paint and dotting it randomly over the sky.  I added some glitter to the snow and attached the stamped images, one on each side.


Thank you for dropping in today, I hope that I've given you a few ideas for your Christmas makes!
I shall be back next month with some more crafty fun, in the meantime check out the projects of my teamies on this blog.

Take care,


                             x x Penny x x