Pin It button on image hover
Showing posts with label The Christmas Garden. Show all posts

Monday, 17 January 2022

Using worker stamps in card designs by Natalie Ballard


Today's sample features The Christmas Garden Rubber Stamps by Chocolate Baroque; this project is perfect for beginners. While Christmas may seem oh so far away, I like to do a few backup projects before putting away my Christmas stash.

This time, rather than using the main image, we are going to focus on the smaller worker images to create our design.

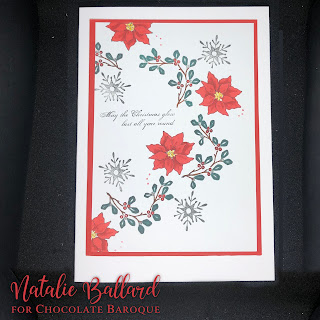
Start with a card panel a little smaller than your chosen card base. Use a large circle or semi-circle die/stencil/template to mark a guide line that features a half circle curve just shorter than the height of your panel. Mark this in an erasable pen or lightly in pencil as you will need to remove this guide later in the process.

Starting with the garland stamp, use a pigment or hybrid ink pad to get a good solid stamped image. You are going to stamp in black ink if you want to replicate the sample, but you could use green as an alternative. Rotate each impression so the design flows around the guide line.

Next, you want to stamp your sentiment onto your card panel. By stamping this next focal element first, you can clearly see the space that needs to be "filled". 

Use the snowflake and poinsettia stamps to infill the wreath design, positioning your images to emphasise the flow of the wreath.

Then, I added colour to the garland and poinsettia images using alcohol markers. Trim the panel slightly and adhere it to a red card layer to add a fine border around the panel. Adhere this to the card and then add sequins, gems or even dots of gel pen to add a touch of Christmas shimmer.


Monday, 3 January 2022

In the Garden by Sandra

 Hello everyone, I hope you had a lovely and peaceful Christmas and I wish you all a Happy New Year.

I am showing some of my samples from the Craft Store show that was on in December.
These cards feature the Garden range of stamps. 
I have used 8x8 card bases for mine.

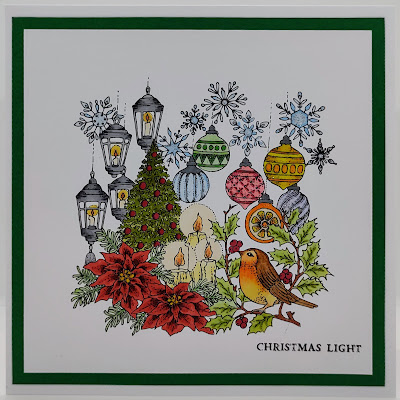
My first card is The Christmas Garden, because it's never too early to start your cards for next Christmas!
I stamped in Memento Ink and coloured in alcohol markers. I added a sentiment from the set and layered onto some dark green card and then onto my card base.


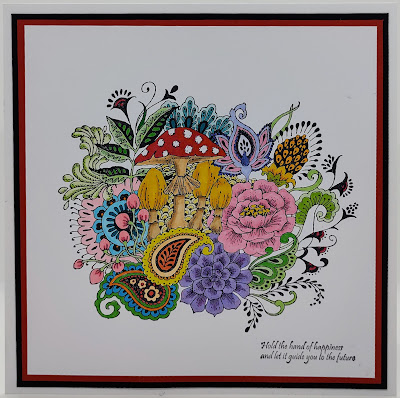
My next card is The Toadstool Garden
There is so much detail in these stamps and are a delight to colour. I have used Memento ink and alcohol markers again as I love the vibrant colours. I added some white gel pen on the toadstool. I have mat and layered in red and black and then onto my card base.


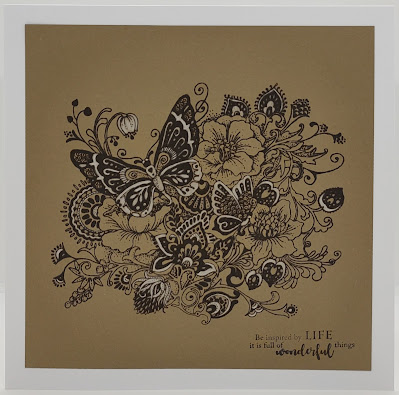
The last one from me today is The Folk Art Garden set.  I stamped onto Kraft card with Archival ink using my stamping platform. I picked out some parts of the design and coloured with a white pencil. I then re-stamped in the Archival to neaten it up
 

These are lovely large stamps that can be used whole or in parts.

Thank you for looking
Sandra x


Tuesday, 27 August 2019

Christmas Baubles

Hello everyone
This is my second post this month showing the wonderful Christmas stamps that were on Hochanda recently.
My first card is from the Shaded Baubles set.


I stamped the snowflake bauble with Versamark Ink and embossed in silver embossing powder. I then stamped the image again with a clear glue.I was able to to do this exactly over the first image as I was using a stamping platform, and this time I used glitter. This gave it a lovely sparkle!  I masked a strip across my base card and stamped the small snowflake from The Christmas Garden set in different shades of blue and grey Distress Inks. I stamped the sentiment, Happy Christmas Birthday in this  case.  I then mat and layered  my bauble and added some gems.
If you saw my last post you will see that the snowy bauble stamp is perfect for the little gnomes in the A Tomte Christmas stamp set.
My next cards are from Christmas Circles set.


I stamped the robin and candles onto card stock in black archival ink and coloured with the Koh I Noor Brilliant Water Colour Palette. I then mat and layered onto some circular cards.

Thank you for looking,
Sandra

Friday, 23 August 2019

Three Xmas Cards (by Magda)

Hello,
Here I am with three cards and hope to inspire you

Christmas Garden Card
1. Use a white cardstock  and color it with a wash of Brusho
2. Stamp The Christmas Garden stamp with Versamark
3. Emboss hot with gold Embossing Powder
4. Use a watercolour brush to take color off in the stamped image to highlight the bird and some
    lights.


The new Shaded Baubles stamp with the snowflakes is perfect for a simple monochromatic card, adding more single snowflakes from the The Christmas Garden stamp.  The images are stamped with


This colourful card is as contrast to the other two projects.
I used Archival Jet Black for stamping on a Distress Ink Pad blended background. I coloured
the bird and the leaves of Christmas Circles stamp with Faber Castel Art Grip Aquarelle Pencils and stencil rays with yellow Distress Ink Pad.


Our next appointment is in September, happy crafting 
Magda

Saturday, 17 August 2019

Quick Batch cards (by Judith)

Hello everyone, it is still a while before we get to the busy Christmas season, but this month, we are sharing some of our projects created using stamps designed by the lovely Sue Page, featured on last month's Christmas shows on Hochanda. Batch card designs are always useful at Christmas time, because we need to make lots of cards for friends and family. I have used several of the stamp sets to russle up a few quick cards to share with you today.

For my first card, I stamped and embossed the dotty circle from the Shaded Baubles stamp set onto a piece of card using white embossing powder. I also added some snowflakes from The Christmas Garden stamp set, also embossed in white. I covered the circle with a piece of Masking Tissue, and coloured the background with Distress Ink. I removed the mask, and blended the ink slightly into the circle to show the fine dots of the embossing more clearly. By masking the area first, you have more control with the coverage, and can colour the background a lot quicker. I added the sentiment with a darker ink which complemented the background colour. This card was very quick and could be made in a range of colours and different sentiments.


Using the same circle and snowflake, I created a very Scandinavian style card next, by stamping and embossing the snowflakes onto a piece of grey card. I added some red card behind and used a piece of red ribbon as an embellishment. The circle and sentiment were stamped using silver embossing powder on this occasion.


I stuck with the grey card for my third card, adding dots of Stickles over the card and allowed them to dry. I added a large glittery snowflake, some stripey ribbon, and stamped the sentiment using grey ink onto a die cut. I edged the die cut with the same grey ink.


For my final card, I took the mistletoes sprig and created a wreath by stamping around a pencil drawn circle. I added Stickles on the berries, and then stamped a sentiment using red ink.I rubbed out the pencil lines once everything was dry.


I hope that my simple cards will have given you some inspiration for some quick cards to try out for Christmas. Try looking at the smaller stamps on the stamp sets and see how quickly you can make backgrounds, add a sentiment within the dotty bauble, and you will have a lovely card to send. Try unusual colours, bold and bright, or go for a vintage theme, whatever you prefer.

Thanks for stopping by,

Judith xx

Monday, 12 August 2019

Is it Christmas yet?...... (by Sandra)

Hello everyone, I'm sharing some of the cards I have made with the new Christmas stamps.

The first one is from The Christmas Garden stamp set. What a gorgeous stamp this is, you can use all of it or just parts.
For this card I stamped in Archival ink and coloured with pencils.


My next card I stamped and embossed in gold and filled in selected areas with red glitter glue.

The next card is using the small Mistletoe sprig and sentiment from the the same set. I used a stamping platform and two shades of Distress Inks, Forest Moss and Bundled Sage, to make a pretty frame for the sentiment. Finished with some 3D liquid pearls.


My next pieces are from the fabulous A Tomte Christmas set. Who could resist these quirky gnomes?

This one is on a piece of grey board.  I made a background with gesso and dark blue acrylic paint. I added branches from Howling Moon stamps and embossed in white. Using Kraft card, I stamped and cut out the large gnome, coloured him with water colour pens and added the sentiment.
My next cards are little 4x4 cards.  These are so cute! I stamped with Archival and coloured with water colour pens and used the Shaded Baubles stamp to frame them.


This is the last card I am sharing with you today.  I cut 3 different sized circle apertures into a piece of card and popped the Tomte gnomes behind. These were coloured with alcohol markers.

Thank you so much for looking at my first DT cards and I'll be back soon with some more,
Sandra

Friday, 9 August 2019

Tomte tomte tomte tom (By Rachel)

Hello there! Rachel here today with some more gorgeous Tomte makes - these wee guys really are sooooo much fun - I love them to pieces!!! Here's some of my makes with them from the July shows:

When I first got the A Tomte Christmas stamps - they screamed 'scene' to me - so this was my first make - I stamped the wee tomte then coloured them with water colour pencils before masking them and the moon. Then I used torn paper and inks and brushes to create the landscape.


Next I stamped the triple Tomte trouble stamp...they are so very cheeky! J just coloured them with water colour pencils then masked them plus the circle underneath them and finally used distress inks to create the background and then finally used water to spritz and flick and get the splatter effect. 


In this third card I used a gelli background that I created using some of the other stamps from the show (a christmas garden set) and inks and added a circle of card stamped with the snowflake bauble stamp (from shaded bauble set). Finally I added the small Tomte in the foreground. 


.....and finally for today the largest Tomte, stamped onto a mat and coloured using water colour pencils. I added a pen line around this and added the mat to a card I had stamped with the small leafy stamp from the show (from a Christmas Garden).


I do hope I have given you some inspiration of ways to use your Tomte stamps.... big hugs!
Rachel xx

Tuesday, 6 August 2019

Gnome for Christmas (by Magda)

Hello,
These new gnomes are so cute, that I thought to use  A Tomte Christmas plate of Chocolate Baroque for a Menu Card, for Toppers and for an Invitation card

I have listed here for you below the items for the three projects
1.  White Cardstock
2.  Distress Ink Pad for the background
3.  Archival Jet Black for stamping, the images and sentiment
4.  Water color pencils Faber Castell Art Grip Aquarelle Pencils
5.  Modeling paste for the snow


For the invitation card I stamped with water on the background also the baubles of The Christmas Garden stamp


I am sure you will love using the gnomes too,  thank you for passing by.
Magda


Thursday, 1 August 2019

Gnomes and Baubles (by Judith)

Hello everyone, we have been having some really hot weather recently, so it's the perfect time to share some of our recent Christmas projects with you that we featured on last month's TV shows on Hochanda. It feels so strange to be preparing Christmas projects at the hottest time of the year but we always need to be one step ahead as crafters, don't we?

I have a few projects to show you today, and thought that I would start with some of the cards that I made featuring the delightful A Tomte Christmas stamp set. I stamped the large gnome and masked him before adding a background using a torn paper mask and Distress Ink in blue and grey tones. I added first and second generation stamped trees from the Trees a Crowd stamp set.

I removed the mask and coloured the image with Koh-I-Noor pencils and added some soft pencil shading around the base of the trees to ground them.

For my second card, I used the trio of gnomes, and started by colouring a die cut oval using Distress Ink. I stamped the image onto a spare piece of card using brown ink and I coloured the image with Distress Ink and a water brush, adding pencil shading over the top. I fussy cut the image and attached it to the oval.

I created a little tag and stamped the sentiment, adding some baker's twine. To assemble the card, I used a piece of music paper as a background, added brown card as a matting layer and some pretty red ribbon to finish.

I liked the vintage colours on this card, and made a matching tag using one of the circular acrylic baubles that we had on the show. I used Archival Ink to stamp the image, acrylic paint to colour the image, and again used music paper for the background.

My final project for today also features the acrylic tags. I coloured them with alcohol inks, and stamped on top of them using white acrylic paint. I used images from the Shaded Baubles stamp set and The Christmas Garden. As long as you clean your stamps straight away, you can use paint to stamp with, no problem.

I chose a mixture of bright colours for the tags. These would look great on the tree at Christmas, or as beautiful sun catchers hung in a window.


I added matching twine and a bit of Stickles for a bit more bling.

I will be back later in the month with a few more projects to share with you. Thanks for stopping by,

Judith xx