Pin It button on image hover
Showing posts with label koh-i-nor watercolour. Show all posts

Thursday, 20 August 2020

same, but different (by Veronica)

 This is the very last-minute card I made for the TV shows last month - having done all my samples, I  had a midnight inspiration....I suddenly realised that there was a small fire in among the teepees (it can take me a long time to see the obvious sometimes!) so the idea for a night time card came.
I started with grey card base for speed, the only one I had was a bit dark, and  came out rather dramatic. 

I thought I would try to recreate it , and take some photos as I go, to give an idea of how I made it. It wouldn't be the same, but something similar....
 I had more grey card to choose from this time, and chose a more midtone colour. 
Despite coming from a same-make pack of card as the original, it didn't take the watercolours as well so the shades are not as well blended
I started with a 7" square of card, and stamped the large cactus  in black versafine clair ink and clear embossed it, then stamped the tepee in black without the embossing.I used a fine liner pen to extend the hills
The sky was created using smoothie sponges and white Ranger pigment ink pad for the moon and the lighter clouds and black soot distress ink and hickory smoke distress oxide ink for the clouds. I used Koh-i-noor watercolour palettes for the rest of the colouring, starting with black in the shadows of the cactus.


I used a  paintbrush and clear water to draw out the colour to give a dark grey, adding more black if it ended up too light a colour as most of the cactus would be in the shade, with just the tips catching the light.
Using a grey base card gives a medium grey automatically, which saves time.

 I used very duluted paint to cololur the landscape and the camp, with white paint on the tips of the cactus flowers and on the tents, blended in with water again. 

i addded tiny dabs of red and yellow paint into the fire

The last bit of highlighting was done with a white posca pen before the grey card was mounted onto an 8" square cream card blank
As you can see, definitely different and not as dark as the original.

I hope this gives you some ideas..... you can just as easily start with the lighter colours and go to the darker ones, I just think it is easier to start with the dark

Tuesday, 19 May 2020

concertina blueprints

 My turn today to show you something different using the lovely blueprint sets of stamps - I wanted to try to use as many of the stamps as I could and combine them with my current passion for concertina cards.

I started by using a sheet of 12x12 white card, and cut it into 4" wide strips. The background was created using splodges of peeled paint and broken china distress inks on to a craft mat, spraying with water and dragging the card through it. Needed repeating several times to cover all the card (well, mostly, i didn't worry about the blank bits)


Once it was all dry, I scored the strips at 4" intervals to create the pages, and cut one strip down to 2 panels to use to fix the other strips together 


Then I stamped some of the  smaller technical images randomly using mostly the blue ink, but a few with the green. I also used some of the stamps from make your mark as well.   


The main images were stamped using black versafine ink and clear embossed, then coloured with watercolour pencils or watercolour paints.
Some extra images were decoupaged , and sentiments added as well.


 Hopefully you are all managing ok so far, and keeping well and safe - and sunshine does help to make me at least feel better , so I wish you all have sunshine to brighten your days.


Sunday, 23 February 2020

techno florals

 My first card uses the main stamp from the sweetpeas set stamped over a distress oxide background - I used a red and a yellow onto a mat and lots of water to create the background, then coloured the image with distress marker pens.  I stamped the colours separately, using a stamping platform to make sure the images matched up.
I then used a waterbrush to add more colour


Same background technique for this one, using the wild cornflower set - have to admit that I thought this was a thistle, as it didn't look anything like a garden cornflower! - and purple and green inks.
Stamped just in black, with some extra colour added using a waterbrush and ink picked up from the mat.


Same stamp again, this time on a brusho background, stamped in black and clear embossed.
Base card uses a couple of the smaller images stamped in blue with green brushed round the edges to take the white down and tone in with the brusho


I seem to have missed scanning some of the lily samples I did, but this one I did find.
Grey brusho powder on watercolour card,  main image stamped in black and clear embossed before adding colour using watercolour paints.
background images added using grey ink, and the sentiment stamped in versafine and white embossed

Friday, 7 February 2020

Natural Reflection and a selection of Hearts by Penny

Good morning everyone, I hope you are all well, warm and prepared for storm Ciara.  I didn't make any samples for the January shows so I have a few  samples from some of the other shows.  


Natural Reflection.


For this card I have used stamps from the Harmony Tree, Sunburst Scenes and Landscape Edges sets; Versamark ink, white EP, Koh-I-Nor watercolour paints, Distress Ink - Vintage Photo, white paint pen.


On a piece of Kraft card I stamped the Harmony Tree, windmill and tiny tree using Versamark and embossed them with white EP.  I used a white pen to link the images and create a scene.  I then stamped and embossed some birds and words in the sky.  On another piece of card I stamped and embossed the stone wall image twice, then painted them.  I painted the whole scene then blended DI around the edges.  I cut out the walls and attached them with 3D glue along the bottom edge of the panel. 


I took a white base card and stamped the stone wall around the edges using DI,  then used water to move the ink on the stamped images.  Finally I attached the focal panel to the base card. 


Artists Trading Hearts.


Here are a few of the ATHs that I have created as samples.


Thank you for popping in today, I hope that you have enjoyed my first post of this month,  I'll be back later with some more inspiration for you.


In the meantime take care,


                                  x x  Penny  x x

Friday, 25 October 2019

Heart of the Garden and Butterfly Bouquet by Penny


Good morning peeps, I hope you are all keeping well and dry!  What's with all this rain?  My garden has gone from parched to swamp in such a short time!  
It's my last post of the month today and I've got a piece of home decor and a card to share with you.

Heart of the Garden.

For this Home Decor piece I have used stamps from the Filigree Trading hearts and Celebration Bouquet sets; Distress Inks, texture paint, chalk paint, black Versafine ink, clear EP, CB stencils  Seasonal Elements and Useful Leaves, a gold pen and Koh-I-Noor paints.  


I stamped and embossed the filigree heart image in black Versafine and clear EP three times onto white card then cut them out.  I painted them and added dots with a gold pen.  I did the same with the bouquet.


I took a canvas board and painted a background with chalk paint, then used stencils with DIs and texture paint to add some foliage and flowers.   I attached the hearts to the board then attached the bouquet on top.


Butterfly Bouquet.

This is a quick and pretty piece of artwork that would suit many occasions.  I have used stamps from the Celebration Bouquet and Happy Flowers Day sets; grey Versafine ink, alcohol pens and DIs.  


I took a piece of CB Luxury Smooth White Paper and stamped the bouquet in grey ink.  I coloured the image with pens and added a shadow line.  I then took a spare piece of the paper and stamped a butterfly in grey ink.  I coloured it with the pens then cut it out.  I matted and layered the focal panel onto a white base card, then I stamped a sentiment along the bottom of the card and added a couple of foliage stamps.


I really like this quick card, it is ideal for when you need a hand made card in a hurry!  


Thank you for dropping by today, I hope to see you next month when I'll be back with some more crafty fun.  

In the meantime take care everyone,


                            xx  Penny  xx 


Thursday, 10 October 2019

magnolia (by Veronica)

  The stamps for the September shows were all lovely, but I am sharing my absolute favourite today , the magnolia from the the happy flowers day sheet. It is a large image, just perfect for colouring, and suitable for so many occasions - I never got round to making the sympathy card version.
Both of these card are 8" square, so that gives you some idea of the size of the stamp. very similar technique for both. The first version began with white card, spomged with distress oxide inks, mostly using antique linen and wild honey, with a heart shape masked off (I used the heart stamp to create the mask) after stamping the heart from geometric trading hearts. I randomly stamped the same heart stamp in the background using it hand held. The m   agnolia was stamped in versamark and white embossed before colouring with koh-i-nor watercolours. The sentimnent and butterfly were stamped with black versafine

The second card has a base of kraft card, stamped with various small wordstamps from the sets in the show, using vintage photo distress oxide ink, which was also sponged round the edges.
Magnolia again white embossed and watercoloured - the colours were those in the first card, but the darker base really makes them pop. The sentiment was also white embossed.

Sunday, 15 September 2019

Spring into Summer by Penny


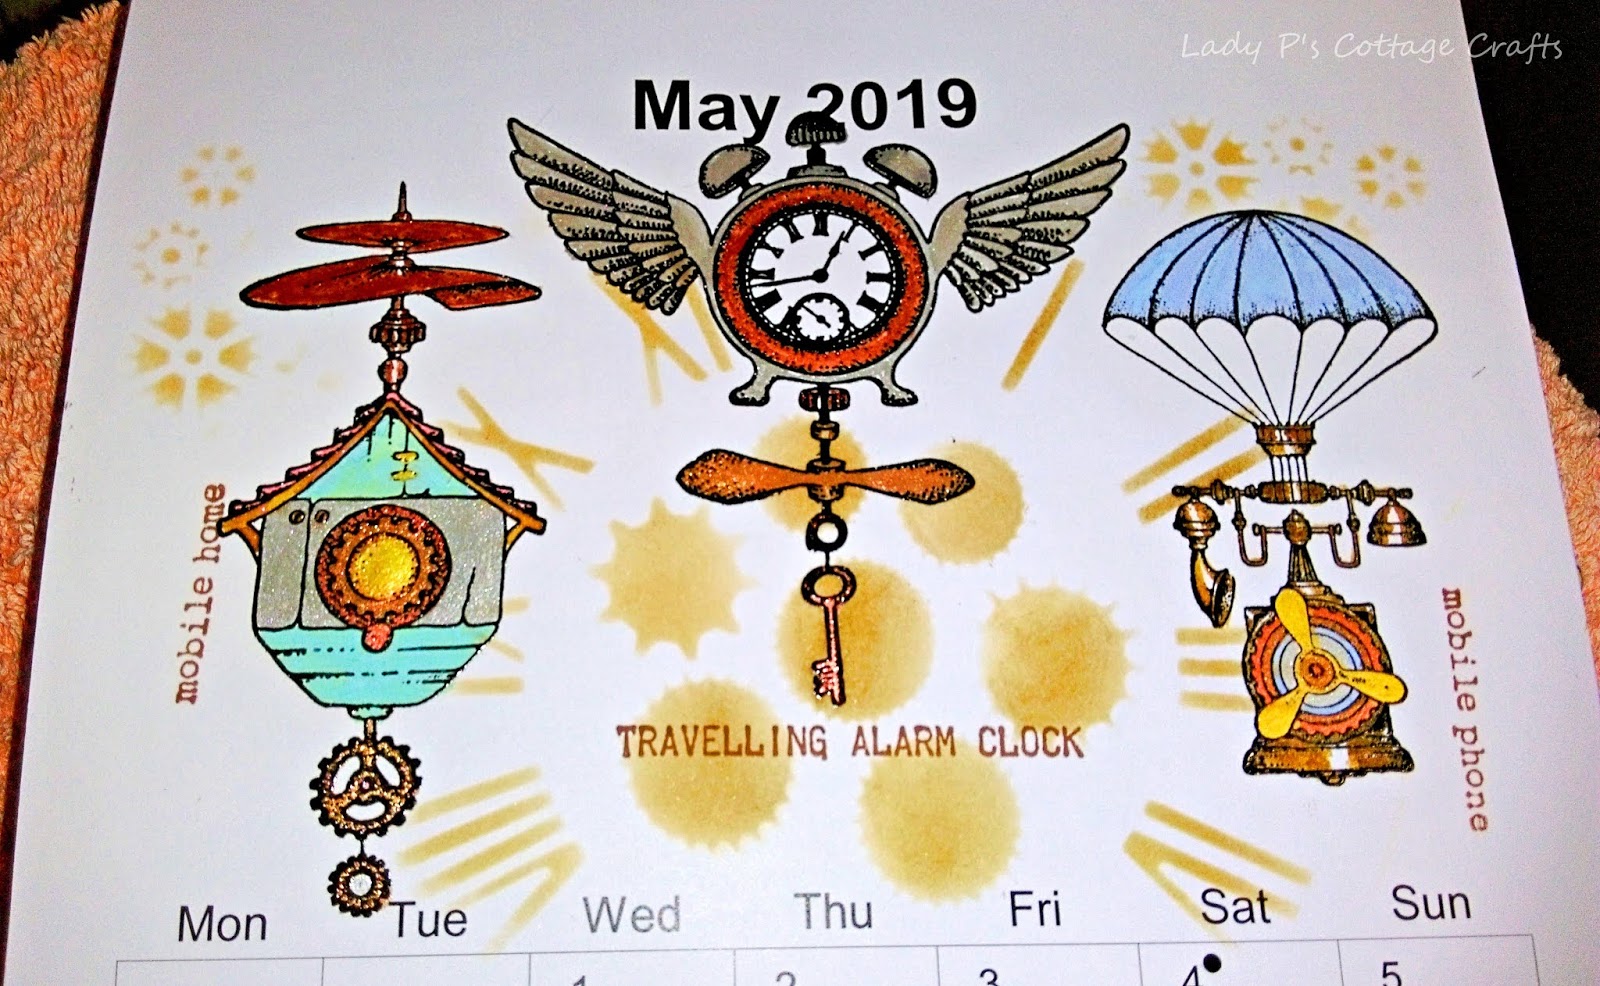
Goodly morning peeps, I hope you are all well.  I'm back again with my second post this month and I've chosen four mini projects to share with you today.  Last year Chocolate Baroque added blank calendars (Blank 2019 Calendar/Planner) to their range and I decorated several for Christmas presents and one for myself.  

For the first project I have used stamps from the ButterflyDaisy Collage set, Distress Ink, purple Versafine ink, alcohol pens and a stencil from my stash.  I stamped a large collage image in the center of the picture area, then stamped a couple of daisies and butterflies.  I used alcohol pens to colour all the images.  I then used a stencil and DI to create the background.


For this one I used stamps from the Steampunk Travel  and Steampunkery sets, metalic paints, Distress Inks, alcohol pens and a couple of masks from my stash.  I stamped several images using black Versafine and embossed them with clear powder.  I used paints, inks and pens to colour them, using metalic paints for the metal parts.  I then used the stencils with a DI to create a back ground.


This project uses stamps from the Underwater Kingdom and Seadragon sets, Distress Ink, Koh-I-Noor paints, black Versafine ink, clear EP and a stencil from my stash.    I began by stamping and embossing all the images and then painting them.  I took a stencil from my stash and applied DI through it to give the picture a watery background.


For this month I decided to go sunny and hot!  (Well I can dream can't I?)  I used stamps from the Indian Elephant and Paisley Elephant sets, Distress inks, black Versafine ink, clear EP and a gold pen.  I stamped and embossed the elephants first then masked them.  I then stamped and embossed the Palace silhouette image between the elephants, and stamped it again in second generation ink.  I then stamped a script image repeatedly across the page and used one of the worker stamps to fill any spaces in the background.  I used a black fine liner pen to ground the Palaces and the elephants then removed the masks and coloured in the elephants.


Thank you for dropping by today, I hope you have found my little collection enjoyable!  I'll be back again next month with more craftiness to share with you  :) 


                                 xx  Penny  xx

Monday, 5 August 2019

Christmas garden quartet (by Veronica)


 It didn't feel a bit like Christmas making these in blazing sunshine...but this BIG stamp made it so easy!
I did three versions in the end, it was so easy to keep playing.
First one was simply stamped in black versafine ink and clear embossed. I coloured the robin, lanterns, tree and poinsettias using koh-i-noor watercolour paints. The sentiment from Christmas circles was stamped at the top before addin a mat of black card. The white base card was randomly stamped in grey ink using the baubles bit  and holding the stamp in my hand.


As a brusho addict, i just had to try with brushos and this was the result. Background was a mix of yellow and turquoise powders well spritzed with water. Once it was dry, the image stamped in black versafine and clear embossed. I used bleach and a paintbrush to lighten the lanterns, candles stars and baubles. The robin, holly, poisettias and the candles were painted with watercolours again - the background was fairly light behind the poinsettias and the robin, and the watercolours easily covered it up. The card was edged with black marker pen, and added to narrow gold and black mats before adding to a white base card.
 This one was simply stamped on black card with versamark and embossed in white before painting the candles and poisettias with watercolour paints. Gold and red mats before adding to a white base card.


Number four took  a lot longer, but most of that involved fussy cutting the poinsettias out.
I used the small mistletoe sprig and used my stamping platform to create a wreath, stamping in two different green inks. The poinsettias were stamped in black versafine onto white card and clear embossed before colouring with marker pens - I think I stamped them six times altogether, but it could have been more. The sentiment comes from the Christmas circles set

a little bit different, and while there are probably not too many people with Christmas birthdays, they do deserve a birthday card!


Sunday, 4 August 2019

Baubles Galore by Penny

Hello peeps, I'm here again with my first post of the month.  What better subject for the middle of summer than....Christmas!  I have three cards to share with you today, all were samples for the Christmas shows in June and all of them focus on Christmas Baubles.  


The first card features stamps from the Shaded Baubles and Christmas Circles sets; Koh-I-Noor paints, Distress Ink, gold EP and white EP.  I stamped both baubles onto Drawing Cartridge and embossed one with white EP and the other with gold.  I then painted them and cut them out. 


I stamped and embossed the Robin and foliage in gold and painted it as before, then fussy cut the image and attached it to the plain bauble with 3D foam.  I stamped some Pine branches from the Robin the Spruce set using DI onto a white base card.  I attached the snowy bauble flat on the card and attached the other bauble in 3D.  I added some ribbon and a couple of bows to give the impression of baubles hanging on a tree, and stamped a sentiment.


The second card features stamps from the same sets as the first; grey Versafine ink, alcohol pens, Distress Ink, Luxury Smooth White Paper, a couple of dies and some coloured paper from my stash.  I stamped the empty bauble image in grey ink onto a piece of smooth white colouring paper and coloured it in with pens then added some glitter.   I stamped Pine branches around the edges of the panel and added silver pen around the edges before matting it onto coloured card. 


I used a die to cut some Pine branches from coloured card and another one to cut a lantern.  I attached all the die cuts to the card and added glossy accents to the lantern to look like glass.  I used silver peel-offs to add a chain to the bauble, stamped and embossed a sentiment onto coloured card then matted it and attached it to the card. 


I used the same stamps as in the first two cards; a piece of smooth, Kraft paper, alcohol pens, Versamark ink and white EP, brown DI and a circle die from my stash.  I stamped and embossed all the images in white then coloured them with pens before die cutting them.  I attached both circles to a cream base card then stamped a sentiment.


Thank you for dropping by today, I hope that you have enjoyed this post.  I shall be back later in the month with some more Christmas craftiness! 

Take care all,


                              xx  Penny  xx

Saturday, 20 July 2019

Stand out from the Crowd and A Partridge in a Peartree by Penny

Goodly morning everyone, I hope you are all well and enjoying some beautiful weather.  I have a couple of cards to share with you all today, the first is one of my samples from the April shows and the second is a Christmas design from last year.


Stand Out from The Crowd.

I have used stamps from the Heath Robinson House and Tagtastic sets; Koh-I-Noor paints, copper soft relief paste, Distress Inks, alcohol pens, copper EP, Versamark ink, gilding waxes,die cuts and a stencil from my stash.


I began by creating the tag, I stamped it with Versamark onto white card and embossed it with copper EP.  I then stamped the house and embossed it and cut the tag out.   I coloured the house with my pens then painted the background before mounting it onto black card.


I created the background by spritzing paints onto white card through a stencil.  When dry I used some copper paste through a small cogs stencil in each of the corners.  I blended black DI around the edges and mounted it onto black card.  I attached the panel to a white base card, added some die cut cogs that I had coloured with gilding waxes then attached the tag with 3D gel. 


I stamped and embossed a sentiment onto a spare piece of card coloured to match the background and matted it onto black card before attaching it to the card.


 A Partridge in a Peartree.


For this card I have used stamps from the Christmas Song set; alcohol pens, black Versafine ink, clear EP, Distress Ink, an embossing folder and some glitter from my stash.


I stamped the Peartree image in black ink onto smooth white card, and embossed it with clear EP.  I coloured it with pens and added glitter to highlight.  I used a couple of nesting dies from my stash to cut out the focal panel and a piece of black card.  I blended some DI around the edges of the focal panel then matted it onto the black card. 


I took a piece of Kraft card and embossed it in a Christmas folder from my stash.   I then die cut it and added DI to the edges. I added some ribbon to the bottom of the focal panel then  I attached both panels to a white base card overlapping them slightly.  I stamped and embossed a sentiment onto white card and cut it into a banner, added DI around the edges before attaching it to the card. 


This is a slight variation of the design.


Thank you very much for popping in today, I hope that you've enjoyed this post.  I'll be back next month with a few more crafty projects, in the meantime my team mates will be bringing you lots of crafty inspiration!  


Take care peeps until next time,


                             xx  Penny  xx