Pin It button on image hover
Showing posts with label Chequered Flowers. Show all posts

Monday, 11 March 2019

Chequered Flowers (by Corine)

Well it doesn't seem six months since our latest guest designer was here on our blog.  But it is and we warmly welcome back Corine who has designed something really colourful for her first post this month.  Think you will enjoy this.


Hello!

Here I am again. In March I will post three cards as your guest deisgner. I am very pleased to do this. 
My first project is a card with a watercolour background.


I used stamps from Chequered Flowers, Dusky Damask and the text from Fresh Blooms.

  • Make a back ground on watercolour paper with three colours of Aquatint (red, yellow and green). Allow the paper to dry well.
  • Splash water on the paper with a fan brush and dab dry with tissue or kitchen roll.
  • Stamp the background stamp (from Duksy Damask) with Peeled Paint and Spiced Marmalade.
  • Stamp the Chequered Flowers with black, water resistant ink.
  • Stamp the text with Ground Espresso.
  • Colour the flowers wioth Aquamarkers.
  • Sponge the edges with Distress Oxide Peeled Paint and Ground Espresso.
  • Mat and layer onto toning card.

Kind regards
Corine van Kuilenburg 

What a fabulous impact of colour to help us through a winter's day. Thank you Corine and we look forward to your next project.

Please remember to check into our Design Team blog for lots of inspiration and creativity.


Friday, 12 October 2018

Just a Note (by Corine)

Hello everyone, today sees the first of three posts from our regulat Guest Design Team member, Corine van Kuilenburg. Corine has created a beautiful card in stunning shades of green and lilac for your inspiration.

Corine writes:

Hello!

Here I am again. In October I will post three times a card as guest designer. I am very pleased to do this. My first project is a card made with Memento Inks and embossing powder.

I used stamps from the sheets:
Chequered Flowers Single rubber stamp
Gothic Fragments

Apply Memento dewdrop Gray Flannel, Espresso Truffle, Bamboo Leaves, Lavender and Elderberry to an acrylic block. Spray wet. Print the acrylic block on watercolour paper.
Stamp the background stamps with the colours you have already used.
Emboss the flower with gold powder on watercolour paper. Colour it with markers. Cut out and stick on your paper.
Stamp the text on the card with Elderberry.


Kind regards,
Corine van Kuilenburg


Friday, 13 July 2018

Checkered flowers (by Miranda)


Hi there lovely people,


It's been a while.......but I am happy to write a guest design post and get the chance to play with my beautiful CB stamps!
 This time I've used the stylish Chequered flowers. I stamped on the beautiful patterned paper from Crafty Individuals. So no need to create a background this time.......

I stamped using a stamping tool. I used several soft ink colors from Memento. Than the fun starts.......colouring with coloured pencils. One of my favorite techniques.

I've added some extra dots on the upper flower and embossed the lovely leaves from the Take it or Leaf it set. Really love that one!

Than I stamped the word ' Love' from the Artistic Expressions sheet.


Here is the full version of the card........

Maybe you are inspired to take out your patterned paper and have a play? 

Thanks for watching and till next time,

Monday, 28 August 2017

Chequered Flower and Baroque Corners (posted by Claire)

Good morning, Claire here with some cards made for Lesley's shows on Hochanda. I've used Baroque Corners for my first sample

I love corner stamps as they are such versatile stamps, obviously great for decorating corners but also great for pattern building. I also love white embossing on kraft card so I combined the two to make this card.
It can be a little tricky to stamp exactly where you want and I don't have one of these fancy stamping platforms so  I used a pencil to lightly mark the centre of the card (horizontally and vertically) as this makes it loads easier to position the stamp. It also helps to trim your stamp very close to the image for this technique.

 I stamped the large corner 4 times with versamark, carefully lining up the centre of the stamp with my pencil mark and rotating the image to create a pretty doily effect. I heat embossed each corner before moving on to the next as this also makes it easier to see where you are stamping. I used the smaller corner stamp in the corners and then used it to create a border in between the corners, again embossing with white embossing powder. I didn't want to cover the pretty effect but I did want to add a sentiment so I tore a strip of vellum and stamped and embossed the sentiment (from Mackintosh Words.). I attached the vellum with a couple of pearl brads.

My second card features Chequered Flowers, such a beautifully detailed stamp. I've stamped and embossed it with silver embossing powder on a very sparkly Caught in Crystal background and it was very hard to photograph so apologies for the poor photo. 


I'd made the background a while ago, using shimmery inks, lots of glitter and some floor polish (the clear stuff for a shiny finish, I can't remember the make but it was from the pound shop) on tissue paper and then applying a layer of acetate I just stamped the image with versamark, embossed with silver EP and layered a die cut frame over the top. I find it's really handy to batch make backgrounds like this so they are ready to go when you want a quick card.

Last but not least I've made a tag using the same stamp. I created an inky background using Wilted Violet, Picked Raspberry and Peacock Feathers distress ink. I stamped the flowers along the bottom of the tag with versamark and embossed with gold EP. I also stamped the large Baroque corner along the top of the tag and again embossed with Gold EP.

I added some colour with watercolour paints and splashed some paint here and there too. Once it was dry I stamped the sentiment (from Artistic Affirmations) and again embossed with Gold EP. I edged the tag with gold gilding wax and used a scrap of eyelash fibre to decorate the tag.

Thanks so much for visiting today, 
Claire xx

Friday, 25 August 2017

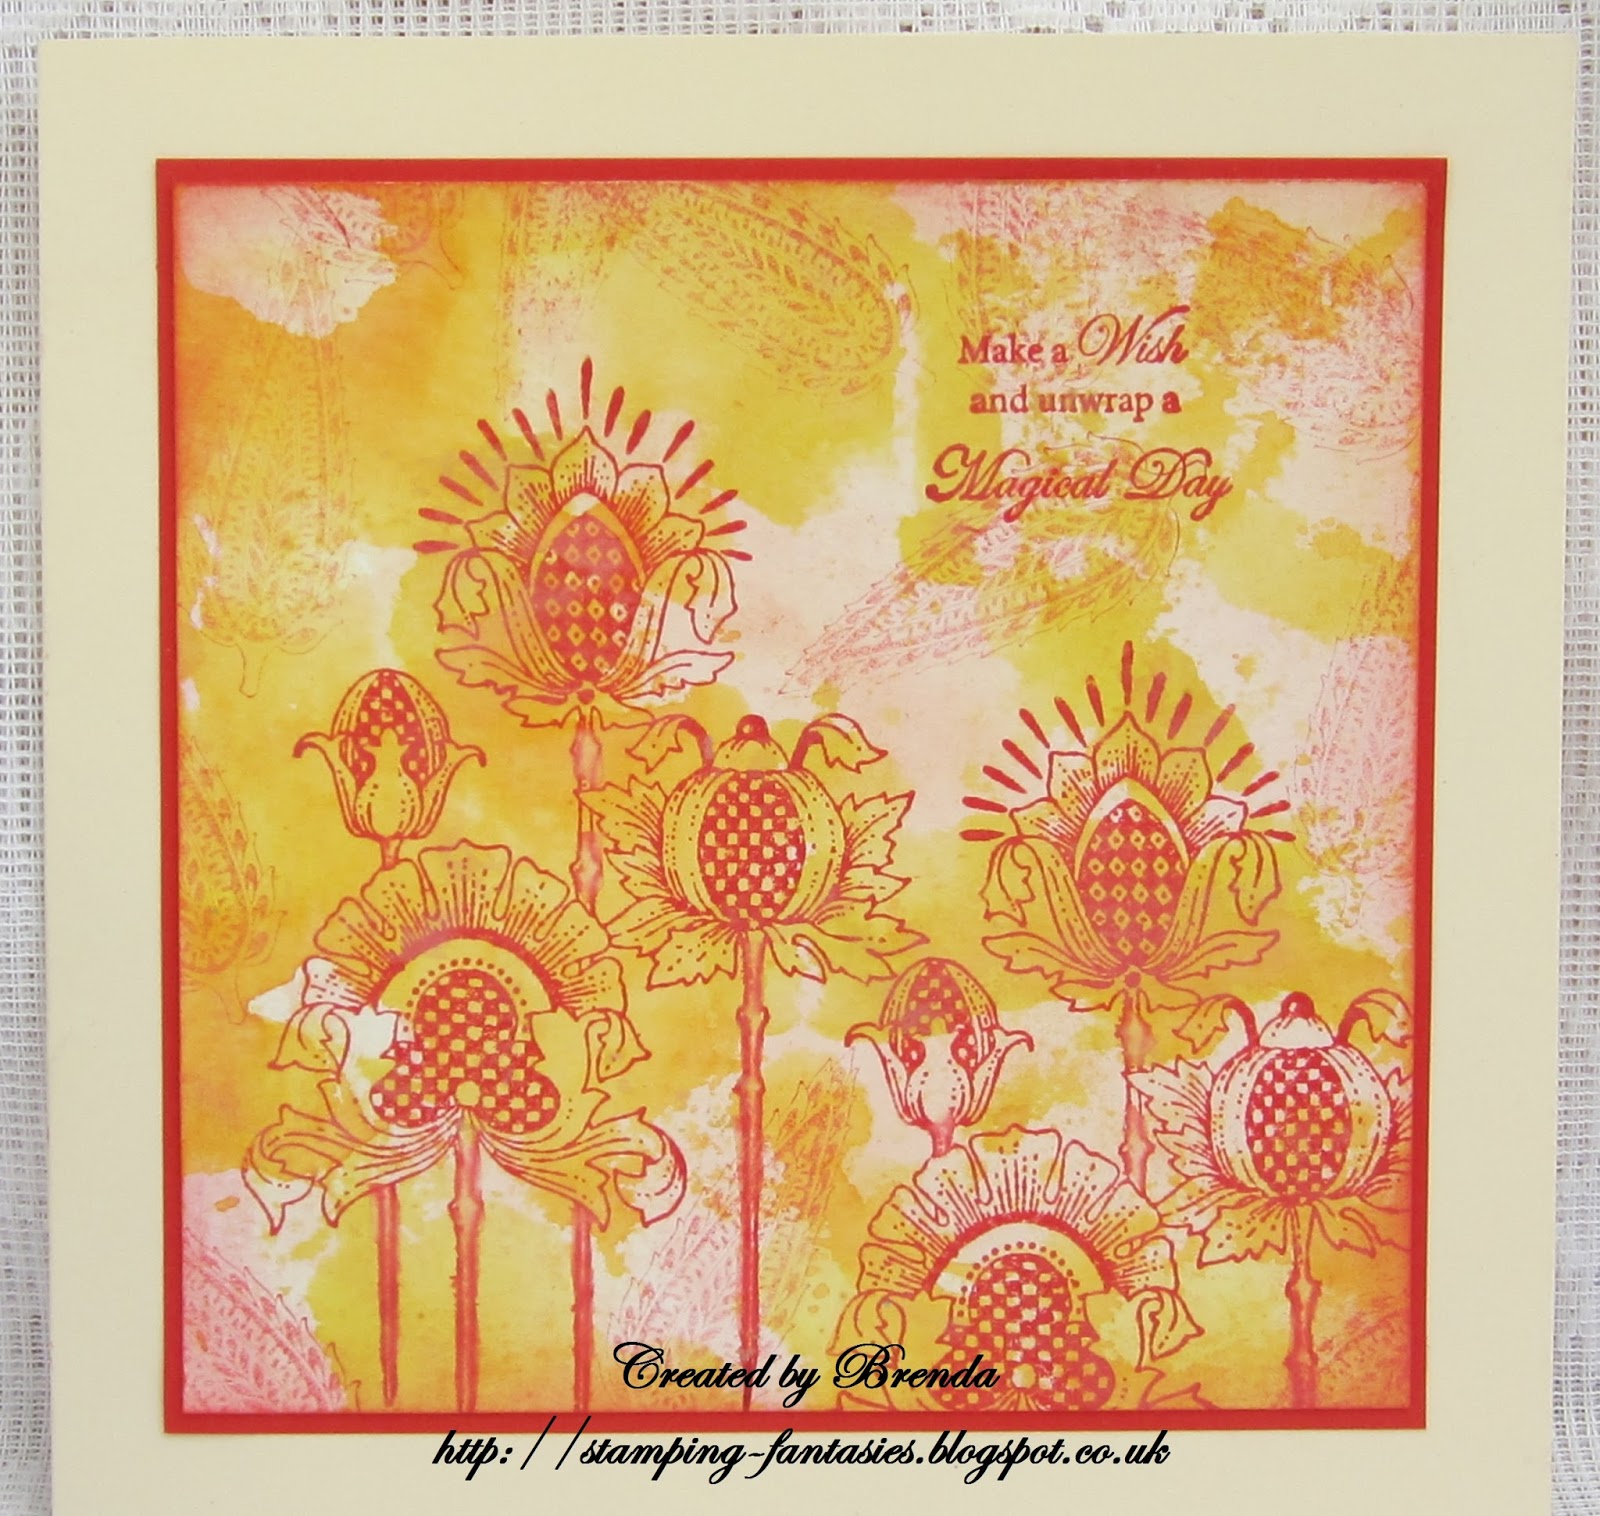
Make a Wish (by Brenda)


Morning Peeps, I am back again with a few more shares using the lovely new stamps Lesley launched on Hochanda a few weeks ago.

The background of the above card is actually the leftover from another one which I mopped up from my craft mat and rather likes the the muted colours. Using the small leaf from the Take It Or Leaf It set I randomly stamped the background with second generation stamping and a red Distress Ink, I then used the first generation ink to stamp the Chequered Flowers which I have to say I just love, they remind me of Thistles but with so much more interest going on. Finally I added a sentiment from Words to Dazzle and Sparkle.


A canvas now which I primed with Gesso, then acrylic paint and crackle glaze before adding leaves and 'spots' using Useful Leaves and Seasonal Elements stencils and texture paste. When dry I placed the stencils back in place and coloured with acrylic pain, then using the same paint coloured some elements from one of the colouring pages from the Colouring Collection which I then cut out and added to the canvas. I added three chipboard Butterflies painted with the same colour and stenciled some leaves onto the largest. Finally some gold Gilding Wax here are there and a sentiment from Amazing Mackintosh Words.

My thanks for popping in today and I hope you have a lovely weekend.


Tuesday, 22 August 2017

Summer Leaves (by Julie)

Hello Crafters, today I have another couple of cards to show you that I have made with Chocolate Baroque's newest stamps. I am really loving them as they are so versatile, I hope you agree. 


Floral Harmony  and Take it or Leaf it  were used for my first card. I simply coloured my blank DL card with Distress inks, dabbed on with a wet wipe. Then on a piece of spare stamping card I stamped out the decorative leaves from Take it or Leaf it and the flower from the centre of Floral Harmony, before colouring with pencils and then cutting out. Next I loosely arrange the stamped pieces on my card before deciding where to stamp the swirly leaves from Take it or Leaf it.
Once the leaves have been stamped adhere the loose leaves and flower in place with 3d glue gel and then finish off with a sentiment from Amazing Mackintosh Words.


For my second card I cut some Kraft card to fit the front of my card blank. Next I inked up Chequered Flowers with grey Versafine ink and and stamped in the centre of the card, before colouring with pencils. The swirly leaves from Take it or Leaf it were stamped around the edge with grey Versafine and white acrylic paint. I then dabbed Picket Fence Distress stain around the card and quickly smudged it with a wet wipe before it had chance to dry, to create the misty effect. The design was finished off with white paint pen highlights and dabs of Crystal Stickles.

Thanks for stopping by and please pop back soon for some more Design Team inspiration.

Julie xx

Sunday, 20 August 2017

Card For my Friend ( by Magda)

I hope my friend will be happy and surprised when she receives this card.
It is a quick card to colour and here below is the step by step:

You need Masking Tissue for points 1, 2 and 3 as you have always to mask the part
 of the stamp you don't want

1.  Stamp on white cardstock with Versafine Onyx Black half of the stamp Hanging Flowers
      on the fold of the card
2.   Apply Versafine Onyx Black on the unmasked part of stamp Chequered Flowers and press it
      where decided
3.   Stamp with Versafine Onyx Black only  the unmasked leaves of the stamp Hanging Flowers in
      order to balance the card
4.   Colour all with the Watercolour Brush - detailer Tip using Brusho as watercolours.
5.   Stamp on a white piece of cardstock the sentiment of the set Words to Dazzle and Sparkle,
      cut it as decoration and glue it.


Thanks for passing by,
Magda


Friday, 18 August 2017

Glow! (by Asha)

Hello again, friends! Time my monthly Art Journal post featuring Chocolate Baroque stamps. Today I'm featuring 2 new products: the Chequered Flowers Single A6 stamp and the Useful Leaves Mask / Stencil.

I've gone with bold colours for the background: intense shades of red and gold, and to add contrast I chose deep blue.

The glittery swirling leaves are texture paste coloured with metallic gold acrylic paint, spread over the Useful Leaves Mask / Stencil and sprinkled with fine gold glitter dust. I also used the same paint to splatter the background. To add depth to the stencilled leaves I added shading with a gold glitter pen.

The main attraction is the Chequered Flowers Single A6 stamp. I kept it very simple by heat embossing it in white ... and left it at that.

These new floral singles are so versatile. They work so well for all sorts of projects.

As always, I have details of the tools and products used on my blog. Thank you for stopping by and drop in soon for more designs by the team.

Beijinhos,
Asha


Thursday, 17 August 2017

Chequered flowers (by Veronica)


 I loved playing with this stamp, and - surprise- my favourite brusho powders.
All the images were stamped , embossed and masked using masking fluid before sprinkling with brusho powders.

The first one I used leaf green , purple and truquoise powders, not that you can see much of the turquoise.
Once dry, it was trimmed down and mounted onto a 5"x7" white card blank.
 The second one is much the same, except that I only used the purple this time, and the image was gold embossed.
The powder didn't spread as far this time, but it looked a bit like a torn edge, so i left it  as it was. Trimmed down rather more, and added to another 5"x7" white card blank with a gold mat and a gold embossed sentiment


The final one was my favourite, a more dramatic version just using the black brusho powder  - I love the mutli-colour effect you get with this.
This one wasn't trimmed as closely, and mounted onto a 7" square white card blank using white and black mats.

There were some fantastic samples from the team on the shows last month, so keep checking to see some of them over the next two weeks

Sunday, 13 August 2017

Leafy Florals (by Judith)

Hello everyone, I have three projects to share with you today showcasing the new stamps recently featured on the July TV shows on Hochanda. These floral stamps are really fabulous, suitable for all sorts of occasions, and styles.

For my first card, I used a favourite technique, stamping on a piece of book paper, and colouring the image with pencils. I stamped the Hanging Flowers image using Versafine Onyx Black Ink, and then edged the book paper with Distress Ink. The larger background was from my stash, and I used the same stamp to stamp around the edges with dark green ink to create a frame. I used kraft card to mat and layer the edges, giving a more natural feel.


For my second card, I used some background card from my stash, and simply stamped and embossed the main image using Versafine Onyx Black Ink and clear embossing powder. I stamped the two leaves randomly over the background to create a very quick design. Black matting layers give a very bold feel to this monochrome card.

For my final card, I used masking to combine an image from the Take It or Leaf It stamp set with the Chequered Flowers image, and coloured the images with pencils.

Thanks for stopping by, Judith xx

Thursday, 10 August 2017

Chequered Flower (By Marga)

Hello all, today it's my turn to show you a card. And I love the new stamps that Lesley has showed you in her last tv show.


I have stamped this stamp by using the a stamping platform. Because I used different colours it's easy to use this. I also used water colour markers to colour the stamp. And when I stamped it all I used a waterbrush and went over the edges and took some colour in to the open areas.

I used the stamps : Chequered Flowers and the Words to Dazzle and Sparkle

Hugs

Marga

Tuesday, 8 August 2017

Summer Leaves (by Julie)

Hiya, hope you are all well. For my post today I have a couple of cards created using a selection of the brand new stamps that Lesley recently launched on Hochanda.


For my first card I cut some kraft card to fit my card blank and then inked up the small Baroque Corner with a terracotta dye ink before stamping at right angles to create the grid style background. Next I inked up the leaf stamps from Take it or Leaf it with a teal dye ink and stamped in the frames created from the Baroque Corner. Remember to mask your stamped background with Post-it Notes or something similar so that the leaves are just stamped in the centre of each frame. To finish off I die cut a circle from kraft card and mounted a couple of the flowers from the Chequered Flowers stamp that I had coloured with pencils.


My second card is made with Take it or Leaf it and Floral Harmony.
Start by getting some spare card and stamping two small leaves and one large leaf from Take it or Leaf it. Colour with pencils before cutting out. The flower taken from Floral Harmony was also stamped onto the spare card before being coloured and cut out.
Ink up the swirly leaf stamps from Take it or Leaf it and stamp around the top and bottom of your DL card blank. Colour the background with a wet wipe that you have dipped into Distress inks and then arrange your stamped cut outs onto your DL card blank before gluing into place with 3d gel.
The card was finished off with a sentiment from Amazing Mackintosh Words.

Thanks for stopping by and please call back soon for more Design Team inspiration

Julie xx

Saturday, 5 August 2017

Chequered Golden Flower ( by Anne )


Good morning. This is another of my recent show samples using the Chequered Flowers stamp.

Materials:
How to make it:
  1. Spread the relief paste over the stamp with a palette knife and leave to dry. Drying time depends on room temperature and humidity but it will need at least a day. Mine took 2 days to fully dry. When dry gently peel away from the stamp and trim around to neaten up any messy edges.
  2. Stamp the image with Versafine and heat emboss with gold powder. Colour with watercolour pens and a damp brush. The embossed lines resist the water and make colouring quick and easy.
  3. Apply a couple of drops of glycerine to a blending sponge and work in well. Now use this to pick up watercolour from your craft mat. Blend colour around the edges of the card. The Glycerine make the watercolour behave more like a Distress Ink making blending easy.
  4. Apply Versamark Ink along the card edges and heat emboss with gold powder.
  5. Glue down the paste embellishment. Attach the ribbon and bow, then glue panel to the card front.
  6. Finish with PVA pearls