Pin It button on image hover

Thursday 30 June 2022

Not Just For Cards by Doreen

 Not Just For Cards


Hello everyone, I would like to share a very useful set of stamps with you today and although I have only used the stamps for cards and quite simply used them too, their potential is endless.

Slim Word Strip 1 is the stamp set I am talking about. They can quite simply be stamped onto printed backgrounds, onto plain card with clear inkpads and apply any colour embossing powder to give a subtle or elegant effect, or perhaps an inked background then stamped with any contrasting colour inkpad. But then of course they could be stamped as a background or even used in a journal page. Cover with relief paste leave to dry until it peels off with ease and use as part of a mixed media piece, honestly the uses are endless.

Well enough of my waffling I will be back next month with more posts for you but until then do take care

Love Doreen


Tuesday 28 June 2022

Make your own journal by Natalie


Here's a quick way of creating a small journal using supplies you are likely to have around the house. This technique is useful for time limited projects or where your journal theme only has a finite amount of space required.

You will need:

  • Card blank measuring A5 or less (Kraft card used here) (or 2 for a thicker cover)
  • A4 paper (could be copier paper, cartridge paper or more quality focussed paper such as mixed media or watercolour paper)
  • Themed stamps: Making More Marks, Not More Flowers and Slim Word Strip 1
  • Permanent and water reactive inks and matching watercolour pens and pencil crayons.

Making the journal

  1. Starting with your card blank, decorate it as the cover for your journal. Start by stamping the "Journal" stamp for Slim Word Strip 1 with a chocolate permanent ink. Use a white pencil crayon or gel pen to highlight the detail in the word Journal.
  2. Blend around the edges of the card blank on all sides to age the cover if you wish. I used a combination of blending brushes and sponges to vary the texture and colour depth. If you are using two card blanks, blend on the outside of your stamped cover and on the inside of the remaining card.
  3. Depending on your card blank size, score and trim the papers to fit inside. Optional: you can round off the corners using a corner punch if you desire.
  4. Next, fold your pages into one signature and fix this into the inside card of your cover (if using two) and you can even cut slots in this card for pockets if you wish. Use double sided tape to fix the card cover together. If using one card, then just staple in for the outside in.

Decorating the journal

Here's a few example pages for you along with a few little ideas along the way.


Stamped the dandelion image using permanent ink and doodled splash shapes using coloured pencils. The splurges are coloured darker on the outside to give them a wet blob appearance.


I pulled in some other stamp sets on a few pages and used masking to stamp mark images from Making More Marks into the background. The "Nature" stamp from Slim Word Strips 1 was stamped onto copier paper and torn along the long edge. It was then run through a Xyron sticker maker to turn it into washi style tape.


Again using the "Nature" word strip onto copier paper, but this time blend in inks into the background to add texture. Pull out individual words from the strip to use as titling or journalling.


As part of my signature, I mixed up paper types including a sheet of translucent paper as well as marker paper. Marker paper is great for avoiding bleed through, while translucent paper is great for effects such as layering and increasing contrast. You should also consider the reverse of any elements stuck to the translucent page - a great place for hiding journaling.


You can use repetitive stamping to create a background by staggering the placement of the image. I created a full sheet and then trimmed to fit my page. 


In the centre spread, I mimicked the first page this time using the daisy image; this time blending two colours per main blob. The "ribbon" stamp was stamped using a light grey ink, and then coloured using the watercolour pens to give a rainbow effect.


The rainbow effect for the paint splodge was done directly onto the stamp using watercolour markers and a light spritz of water to blend. It was stamped onto the reverse of the translucent paper while the text was stamped onto the front. Stamp your text first as its the bigger stamp being careful to remove any excess ink prior to stamping.


For the colour border first stamp the strip background in light grey and blend the watercolour pens for a rainbow effect. Allow to dry completely before stamping the word stamp.


In the above image, colours were applied to the paint stroke image and then prized with more water than the previous image using this technique. The colours will blend more, but be aware more warping to your paper can occur.
Multiple impressions will give you a lighter colour. I would apply these coloured images first and then align your detailed images over the top to make the most of the textures.


The border here was stamped with background strip inked first with lighter ink using kiss stamping to add the flower image into the background using a darker ink. Over this impression, then stamp your word image, this time with a water creative ink for a softer finish.

Monday 27 June 2022

Letters & numbers (By Tracy Thompson)


I'm here again with my final post for this month showing you creations from May's shows.  And oh wow I just love tyhis first stamp set Alium collage, maybe that's because I grow them in my garden.  To create this card I stamped the main image, then using Brusho's I sprinkled purple over the flower part of the image, then sprinkled green  over the stem part.  I stamped a sentiment from the set and made it into a tag and added some string to add it to my image.  Then just mounted it up onto black card, this is a simple way to add colour.


This next creation is quite different for me, I started with an inky background using Oxide inks.  All the stamps on this are from Just Useful, so I started with an Inky background in Oxides, then I stamped the numbers in the centre of the card in black and a notebook edge along the top.  Taking brown ink I stamped some splodges around the outer edge,  Using some Gilding flake glue I added some to the top edge of the card, then to the numbers then dotted some around the edge,  then added the Gilding flakes.  Love using the Flakes for that bit of luxury.  All that was left was to mount it onto some black card.

Well that's me now for this month, see you next month for more Chocolate Baroque makes.
Happy crafting
Tracy x

Sunday 26 June 2022

dragonfly dreams (by veronica)

For my last post tjhis month I have used the beautiful dragonfly from fragile wings, and just for a change, not cards....

The coasters were created from circles of grey board, painted with gesso and then sponged with distress oxide inks. The dragonfly was stamped using black versafine ink, and once dry the coasters were covered using modge podge adhesive as a sealer. 

Went back to my favourite candles for the second sample. The whole image was stamped onto the smooth side of white tissue paper using black versafine ink, and painted on the rougher side using shimmer watercolour paints. Brush with water round the image, tear out carefully and heat set onto the candle.


Saturday 25 June 2022

Bold and Beautiful (by Sandra)

Hello, I am sharing some more of my cards from the May shows on Create and Craft.

My  cards feature stamps from Not More Flowers!

First I used my stamping platform and stamped the larger leaf  four times in a green archival ink on a 7x7 card base. I then used one of the smaller leaves and filled in the gaps with a different shade of green archival ink. I stamped the sentiment onto a die cut circle and layered this onto a slightly larger circle. Finally I mat and layered the card onto a 8x8 card base.


For my second card I used a 6x6 satin card. I stamped the Dandelions, twice, and the sentiment with VersaMark. I then used a brayer  and Distress Inks over the top. The VersaMark resists the ink and I am always amazed how crisp the stamping is with this technique. Once it was dry I buffed the card with some tissue and stamped some more Dandelions in the background in archival ink. I mat and layered onto some silver card and then onto an 8x8 card base.


Thanks for looking

Sandra x
 

Friday 24 June 2022

Blue and Green (by Judith)

Hello everyone, I hope that you are keeping well. I have a couple of projects to share with you today, showcasing stamps that we brought to you on last month's TV shows on Create and Craft.

My first card uses a variety of stamp sets, but the hero of the card is the lovely dragonfly collage from the Fragile Wings stamp set. I decided to stamp this image on a coloured background, a deep teal colour, for a change. We often use black, kraft, grey, etc., but I wanted to reflect the wonderful dragonfly colours in the card background. I used Versafine Clair Nocturne to stamp the image, and Koh-I-Noor pencils to colour the image. I used white pencil first to create a base to add the rest of the colours, and to give a real sense of light to the image.

I created a background using green and blue Distress Ink, and then added stamps from Just Useful and Ace Card, using blue, green and black ink. I matted both layers using black card.

To create my second card, I coloured some Drawing Cartridge using tea, a favourite technique of mine. It's a really quick way of adding colour to a background and creates a vintage feel to a project. I stamped the playing card from Ace Card randomly over the background, and added a touch of turquoise around the edges using a watercolour pen, brush and water. I stamped the large image onto another piece of the rawing Cartridge and coloured the image in the same way using turquoise, green and brown watercolour pens. I edged the layers with the same dark brown ink that I had stamped all of the images with.

I chose to use a piece of scrap corrugated packaging as a mount; I dry brushed the edges with paint to match my colour scheme. Always keep that packaging, you never know when it will come in handy!


I had great fun creating these cards. I hope that they have inspired you. Thanks for stopping by, take care,


Judith xx


Wednesday 22 June 2022

Canary Bird Rose (by Carole)

Hello fellow crafters.

My final contribution for this month, for the Chocolate Baroque GDT slot, uses the very pretty Canary Bird Rose stamp.

It is stamped and then I cut an oval around it. Half of this was cut away.

The flower was coloured with water colour pencils and Distress Inks.

The background uses an embossing folder covered with Versamark and then put through the embossing machine with a piece of card. Pearlescent powders were then brushed over the design. This is a lovely method which I haven't used for ages.

The background was then sprayed with cheap hairspray to seal it.

The message is from The Folk Art Garden set.

Hope you have enjoyed the samples I have shown you.

Please visit my Pinterest board to see other Chocolate Baroque samples that I have made: https://www.pinterest.co.uk/carolecann/_saved/

Many thanks for visiting.

Happy crafting until next time.

Carole 😍


Monday 20 June 2022

Your Card Has Been Marked !! by Doreen

Your Card Has Been Marked !!


Hello everyone I hope you are all well and welcome to my second blog of June.
Today I would like to share this rather randomly stamped card which was intentional of course.
Using the stamp set Making More Marks which I have to say is very versatile and leaves itself open to interpretation.

I think this card is definitely one for the men in our lives, nothing soppy in this is there ?? even my hubby likes it and he does not like cards and can't see the point in them. (How  rude).
Using Distress Oxide Inkpads colours I used are Crushed Olive, Picked Raspberry, Peacock Feathers and Squeezed Lemonade, using the bubble wrap and herringbone looking stamp I stamped some structure lines then added the squares randomly turning the stamp as you go.
I next used the Versafine Clair Nocturne to add not only straight lines but some string like images along with the exclamation marks  and some randomly stamped words.

Finally a few bits of Zentangle to enhance the shapes that the images of the stringy stamp gives us.

Here is another couple of cards using this set and the background of the final one also uses the Blank from the Slim Word Strip 1 


Thanks for looking in today

Love Doreen 


Let us dance ( by Magda) - Butterfly Dress, Words to Dazzle and Sparkle

Good Morning, 

The idea that summer offers us long evenings led me to create this page. What could be nicer than to wear a light, flowing dress for dancing till late? I used for this page: Butterfly Dress, Words to Dazzle and Sparkle, Distresss Crayons, stencil, baby whipe, Archival and watercolor pencils.


Summer hugs to you all,  Magda


Saturday 18 June 2022

Beautiful Backgrounds by Natalie


You will need Not More Flowers and Making More Marks for this card. You will also need a piece of printed paper suitable for stamping on, ideally in a square format. You will also need: white card, A5 card blank and a piece of chocolate coloured card. You will also need distress inks and a paintbrush.

The background

Select your printed paper for texture but try to choose a neutral design with little contrast. Crop the paper, if needed, into a square. Using a stamp platform, insert your chosen paper up against a corner. Align your first leaf stamp so the image is positioned vertically and aligned centrally to your paper. Stamp this first image in Walnut Stain Distress Ink. Rotate your paper 90 degrees and stamp again; repeat for all sides. Blend any excess ink using a slightly damp paintbrush.

For the next image, align the stamp diagonally towards a corner. Stamp this image in Peeled Paint using the same technique as the first image.

Use another leaf design (or one you have already used but upside down) to infill using Saltwater Taffy Distress Ink.

Once your panel is dry, you can ink blend around the edges using the same colours to pull out more detail from your background or add lighter stamped images for added interest.

The card

Stamp your circle image onto your white card in brown ink and align and stamp your sentiment centrally. Using the string like image from Making More Marks, stamp in green ink. I really love this stamp for adding texture without having to worry about adhesion methods for fibres.

You can then cut out the circle and adhere it to your background panel directly, or add more depth with extra cardstock layers beneath.

The panel is then mounted onto chocolate card with a thin border to the top, right and bottom edges. Mount this onto your card blank as preferred and the trim the left hand edge of the chocolate card accordingly.

Friday 17 June 2022

Nature In Ink (By Tracy Thompson)


Here I am with my second post for this month, bringing you samples from May's shows.  In my first creation I used the stamp set Fragile Wings, it's a really beautiful stamp set with a very good wood panel, which I've used several times with Inks.  I used Ink sprays for my background, some were Mica sprays with some shimmer in.  Therefore so that the image would show over the Mica I used embossing powder and for a nice subtle look went with white embossing powder.  I stamped a sentiment and mountede it before adding it to my creation.


For this piece I chose my Ink colours in both Distress Oxides and Versafine Clair, getting the colours as near as I could. So the background with the leaves on I stamped with Versafine Clairs, all I did using Not More Flowers I took a couple of different leaves and added two inks to each stamp making the image multi toned.  I then mounted that background onto a coloured background which was inked with oxides.  I used a gold Posca pen to edge the background.   I created the strip using Slim word Strip 1 with the Nature words on it, stamping in brown Versafine Claie and then embossed on top of an Inky background created with Distress Oxides.  I edged the strip again with gold posca pen.

I will be back with a final post for this month near the end of the month.
Happy crafting
Tracy x

Thursday 16 June 2022

Pretty Pastels 2 (by Miranda)


Hello crafty people,


Miranda here with another pastel creation for you. Again not my usual colorscheme but I am pleased with the results.

I have worked on a slimline size card and used the beautiful 'Floral grunge individual stamp'. For the background I have used the same stamp as before ' Make your mark stamp set'  and for the words I have used the 'Artistic Expressions stamp set'. Still one of my favorites.....


The coloring was done with Distress inks and some Tombow markers. For the final touch I have used some colored pencils and silver embossing.


I have extended some of the lines of the 'lightning' stamp using an embossing marker and embossed it with silver embossing powder.


Also some spattering using silver acrylic ink.


Thanks for your visit and see you next time,

have a lovely day,


Wednesday 15 June 2022

Retro Grid (by Carole)

Hello again,

My second contribution for this month has a bit of a retro feel to it. I have used 'worker' stamps from a variety of stamp sets to do a grid pattern. This involved a lot of masking as I decided where the stamps were going. It is stamped with Sepia Versafine ink. The grid evolved as I went along and each section was lightly drawn around as I went. The grid could be drawn out first and the stamped areas masked and stamped. This would probably be easier to build up.

I decided to add a touch of colour with the butterflies and mounted it onto the dark blue, as I like blue and brown together.

Very different cards emerge if you alter the grid pattern and change the colours. I have enjoyed using this technique and it is a good way to use some of the smaller stamps which are often only used for backgrounds. 

Hope you have enjoyed my card and I will be back again next week with my final sample for this session.

Many thanks for looking.

Happy Crafting.

Carole 😊


Tuesday 14 June 2022

flower power (by Veronica)


 Here I have used flower images from Chocolate Baroque to create three cards.

My first is a bit grungy, using the alium collage as the main stamp, stamped in versamark ink onto black card and white embossed.. I used stamps from just useful and paisley elephant stamped randomly in white pigment ink to create the background. (Paisley elephant is on the list of retired stamps since I made this card, any fancy script stamp would be just as good)

The remaining cards are very similar, both use a background created using distress inks splodged onto a mat and spritzed with water and mopped up with card. Once piece of card was dry, I stamped the nature themed words from slim word strip 1 several times in distress oxide ink across the card, staggering repeat stamping.  Once it was dry, I cut two pieces to fit  a DL card blank and stamped two different images from not more flowers. The dandelion was clear embossed after stamping in black versafine, and the gerbera(?) was coloured with alcohol marker pens. 

Both stamped images were matted onto black card and then added to the white DL card blanks


Monday 13 June 2022

Blended Colours (by Sandra)

Hello, I am showing some more of my cards from the May show on Create and Craft.


My first card uses the Alium Collage set.
I started with a piece of watercolour card and stamped the Allium stamp in archival ink. I coloured the Allium with two shades of purple water colour markers. I added splashes of colour around the image and then spritzed it all with water so that the colours merged.  I added a border from Making More Marks and a sentiment.


My next card uses stamp from the Just Useful stamp set.
 I stamped the brush strokes using Versafine Clair inks using my stamping platform. I then stamped the splatters using the same inks. I used the letters to spell out ART on another piece of card and blended around the edges of both cards. I mat and layered the pieces onto some toning card stock.


For my last card today I used Ace Card stamp set. 
I started with a 7x5 card base and trimmed about 1/2" off the front side. With  the card open I stamped the script along the edge so that this could be seen when the card was closed. I then stamped the Ace card over the front of the card, masking each layer. I stamped the collage stamp onto some silk card in VersaMark and embossed in clear. I then used a brayer and 2 colours of Distress ink over the top blending them in the centre. Once the inks were dry I buffed the card with some tissue to remove any ink over the embossing. I mat and layered the collage piece and glued it to the front of the card.


 Thanks for looking

Sandra x

Sunday 12 June 2022

Creating a Journal Page (by Judith)

Hello everyone, I hope that you are keeping well. I have a project or two to share with you today showcasing stamps from last month's TV shows on Create and Craft. 

My first project is a two page journal spread, created in a large journal, almost A4 size. It is an American size, so not exactly the same measurement. I like to experiment in a journal, as I can often get ideas for cards and other projects when I am messing about creating journal pages. If I do not like what I create, I can just turn the page, and start again, there is no judgement, my journal is just a place to try out ideas.

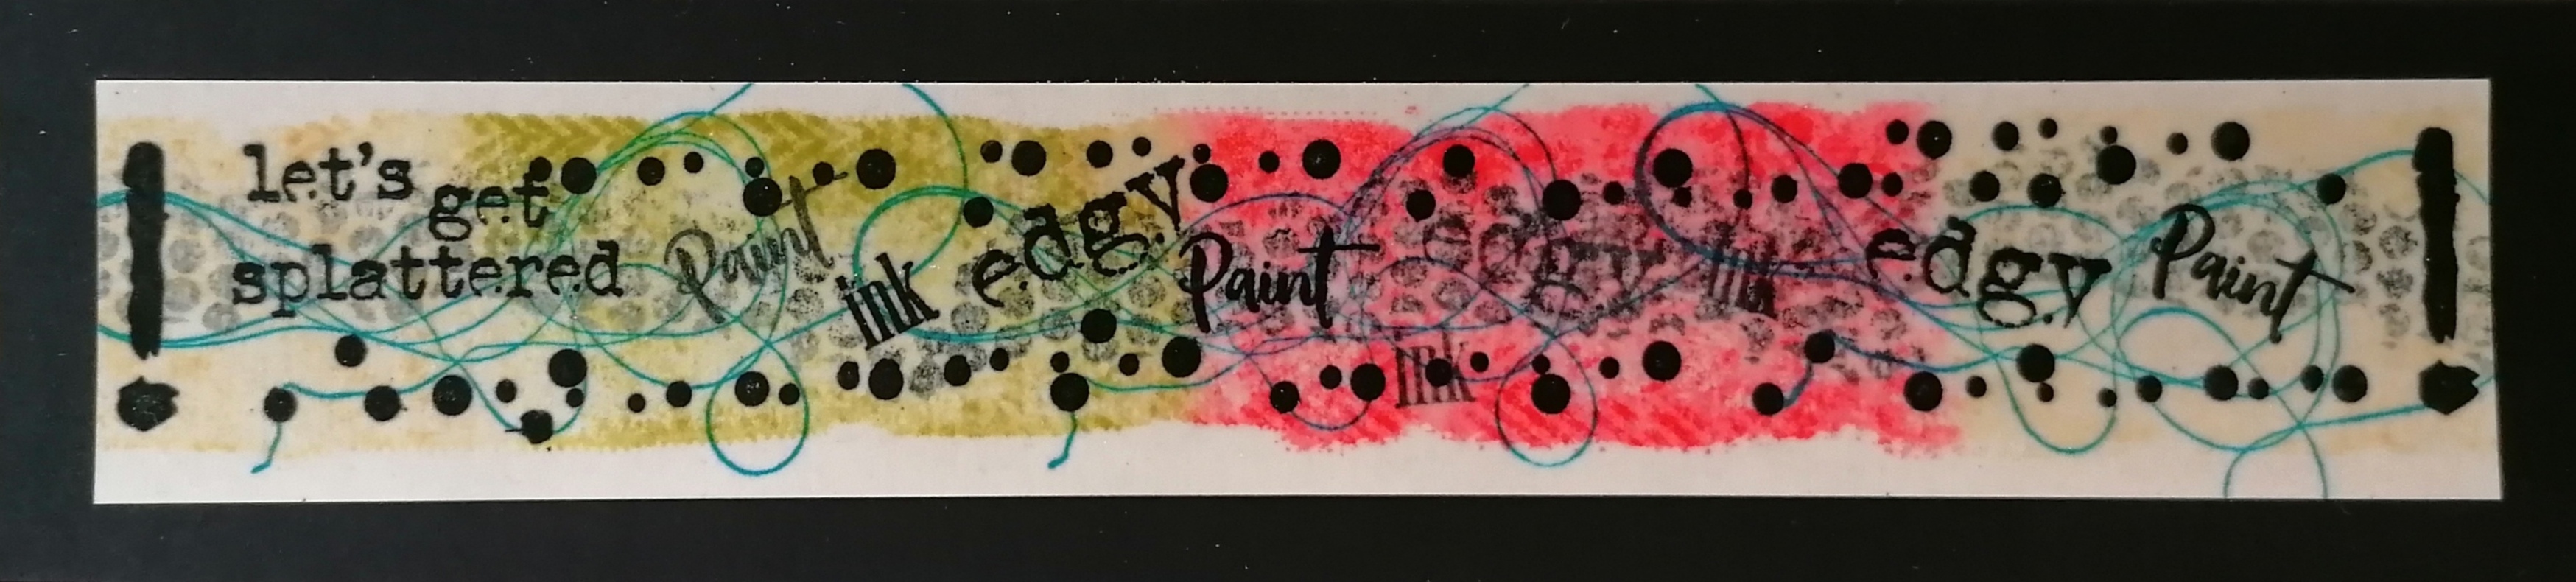
I started both sides of the journal spread by inking up the large blank stamp from Slim Word Strip 1 with Distress Oxide, and spritzing it lightly with water. I pressed the stamp down the edge of each page. I chose a lovely moss green. I also stamped the stamp again onto a piece of scrap Drawing Cartridge for later.

Once the edges were dry, I stamped a couple of the word strips over the coloured edges using Versafine Clair Nocturne. I chose random stamps from Making More Marks, and Not More Flowers! using a combination of black orange and green ink to create a background over the pages. I stamped the lovely dandelion clock into the centre of the large circle on both pages, and added some of the olive gree ink within the circle to highlight the flower.


I also added some colour to the flower using watercolour pens, a brush and some water. Finally, I masked up the strip word stamps, and inked up two of the large words on the stamps, before stamping them onto a piece of the spare Drawing Cartridge that I had coloured previously. I cut them out and scrunched these for a bit of added texture before adhering them to the page. 

I did not add any background colour to the page, the stamps themselves were enough I felt, but you could add more colour if you wish, I like the white space, it gives the stamps room to breathe.

Also available on the show were some fabulous embellishments. The first were some really useful acrylic rings, that could be coloured and stamped over. I created a card using the pretty echinacea style flower, which I stamped onto a Distress Ink background. I coloured this with watercolour pens for a soft finish. I added a sentiment from the same stamp set, and then I coloured both pieces of acrylic with alcohol ink. Once they were dry, I stamped the large ring with script from Ace Card, and the little circle with a bee from Honey Bee. These embellishments are just so useful for highlighting a key area of your project, but light enough not to add to your postage costs.

Finally, we had a new sheet of shapes from Tando in three different shapes and two different sizes. These word pebbles are very versatile and can be painted, coloured, textured to create all sorts of effects. I have three samples here to show you just how effective they can be. The first example has had Drawing Cartridge added over the top, and I have added a word from one of the strip stamps, plus the little bee from the Honey Bee stamp set once again.   

The second has another word from one of the strip stamps and the Large Crackle Background over a simple painted background. 

Finally, I added coloured texture paste to  the last pebble and stamped the word strip directly into the paste. Once the paste was dry, I added some black paint, which I rubbed away after a moment or two.


I hope that you have enjoyed my projects, and will be inspired to try some of these ideas out for yourselves. Thanks for stopping by, take care,


Judith xx

Thursday 9 June 2022

Not only Ink Pad ( by Magda) - Pretty Poppies, Birthday Words

 Hello,

I share with you today the result of my curiosity and consequently my attempt. After I draw a sunflower with charcaol, I had the idea to see how this medium would react  stamping with it instead of using an  Ink Pad.  Well, I am  satisfied and here below I post the outcome of my "strange idea" 

I rubbed the willow spindle on the stamps Pretty Poppies and Birthday Words and stamped. I used  charcoal pencil for coloring the poppy and scribbled in the background. 


Thank you for passing by and have a go if you had loved this idea, hugs

Magda