Pin It button on image hover
Showing posts with label harlequin rose. Show all posts

Thursday, 24 February 2022

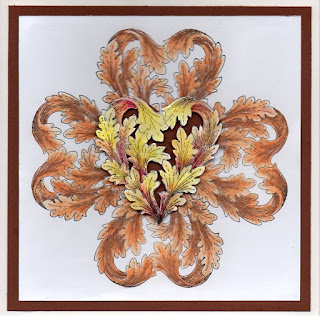
heart flower (by Veronica)

I had a play with the leafy heart stamp from the Harlequin Rose stamp set, just to see if i could use it to create a wreath......short answer was no, it was just too large, but i could use it to create a sort of flower.

I used my stamping platform to stamp it four times onto  a 7" square piece of white card using black versafine ink, and once onto a spare piece of white card. All the images were coloured with watercolour pencils in autumnal shades, with the brighter colours used on the single image.

The single image was fussycut out and backed witha heartshaped piece of the same brown card used for the mat, then glued into the centre of the four images. I covered it with glossy accents to make it stand out a little more from the 'petals'
 

Monday, 14 February 2022

Metallic Rose (by Tracy Thompson)


Hello I'm back with another post showing you another fantastic stamp set, this time I have used Harlequin Rose.  This was one of the first stamps I bought from Chocolate Baroque and absolutely love it.  I love yellow roses, so went with that colour for this, I started with smooching DI squeezed lemonade over the image, then coloured the image and built up with various shades for depth.  I splattered with white and gold Posca pens.  I layered it onto a background I made with metallic paints from Chocolate Baroque, I just did a thin wash then sponged on thicker paint in three colours.
I love the effect of the paints and need to get them out more often.

Thank you for  popping by, see you at the end of the month with another creation.
Happy crafting
Tracy x

Sunday, 13 February 2022

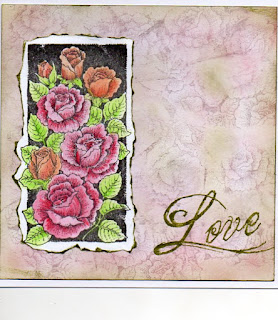
red roses

Carrying on the Valentine theme, some more samples this time using the main image from the Rose and thistle stamp set as well as the sentiment from words of love

The main image was stamped in black versafine ink and coloured with watercolour pencils, then torn out and edged with versafine ink. The background was sponged wiith distress inks in worn lipstick and peeled paint and parts of the stamp were randomly stamped in worn lipstick.. Sentiment stamped in versamark and gold embossed.

Same stamp stamped in grey versafine and part coloured with watercolour pencils. To make the coloured roses stand out more i added some elderly stickles with a brush and then covered the coloured areas with glossy accents. Once it was really dry i fussycut it out and added on to a distress oxide background. The diecut sentiment is from  rose stem script stamp set


My last card uses the main image from the rose stem script set stamped in versafine again and coloured with watercolour pencils, torn out aned added to torn mat of green card.  
The background was made with the rose stamp coloured with Koh-i-nor brush pens , randomly stamped then spritzed with water to make the colours run.
Sentiment from harlequin rose set stamped in black versafine ink


Friday, 4 February 2022

heartfelt (by Veronica)


For my first post this month I chose the  Harlequin Rose and Words of Love stamp sets - I thought they would be appropriate as Valentine's day is approaching......

The first one  is 7" square, the background is distress oxide inks  squeezed lemonade, peeled paint and salvaged patina sponged randomly and part images from the Rose Stem Script set and  words from Tall Trees set also used to overstamp.The sentiment is from Words of Love, stamped in black versafine and candy apple distress oxide inks. The main images were stamped onto spare card with verxafine ink, coloured with watercolour pencils and fussy cut out. If you snip  the leaves carefully you can weave two images together. I glued just the bottom halves onto the card, so the the centre pieces will stand up slightly


The second card is a very simplified version of the first, with red and black lines drawn with marker pens round the image and no sentiment - this is a 6"square card


Another  6" square version, again coloured with pencils this time trying to get a rainbow effect - in hindsight I think it would have been better to start the rainbow at one side of the image and not do individual leaves....

this was a single image, fussy cut round the edges of the design only and glued onto a distress oxide background. Background was stamped with the rose from Rose Stem Script coloured with marker pens and randomly stamped over the card, thne spritzed with water to blend the images. Distress oxide inks were then sponged over the dried card , sentiment added in black versafine and the wobbly lines drawn with a fineliner.


Tuesday, 20 April 2021

Live, Laugh, Dream by Brenda


Brenda here again for more shares of work from last months Hochanda shows. 

I went for a bit of bold contrast with the above creation using Flora Musica stamped onto an oval and coloured in with Koh-i-Noor paints and placed over the edge of a card. The border to the left is from Harlequin Rose, a strip of red ribbon to carry the colour of the blooms and a sentiment from my Life is so much Better inspirational quote set which featured in the show.


I have used one of Lesley's new Say it Vertically sentiment sets down the side of this one and Landscape Collage stamped in black and colour added just to the sun with matting and layering to carry that colour.

May thanks for your kind visits and words of encouragement.

Sunday, 21 July 2019

Roses in July part 2 (by Magda)

Hi and welcome back.
Are you ready for my second Post? This time I decided for a blurred background of this Love Journaling page.

Step 1:
As you can notice all the first stamping and coloring has been covered with a light coat of white gesso.

Step 2:
On the dry surface I stenciled several layers of colour using randomly different stencils

Step 3:
I stamped directly on the pages and colored the roses I have chosen

Step 4:
I cut some decoupage-roses and sentiments and glued on the journaling pages, I attached Washi-tape too.


For this page I used the following products :
Rose and Thistle
Rose Set
Harlequin Rose
Loving Sentiments
White Gesso
Distress Ink Pad
Watercolour Pencils


Heartfelt Thanks card :   the only difficulty in this card is to stamp in a reflex way the stamp you will find in Rose and Thistle using Archival Jet Black.  Both backgrounds are dabbed gently with Distress Ink Pad,  the flowers are coloured with Watercolour Pencils and the sentiment Words to Dazzle and Sparkle is stamped with Archival Jet Black


Thank you for passing by, hugs
Magda


Tuesday, 16 July 2019

A Bit of Romance (by Judith)

Hello everyone, I have a couple of projects to share with you today, both with a slightly romantic feel, showcasing stamps used from last month's shows on Hochanda.

My first project features a beautiful image from the Harlequin Rose stamp set. I love this image, and it has proved so useful for Weddings and Anniversaries. It can be used on its own, or linked with another one, as I have done on this card.

I chose a piece of patterned paper designed by Lesley, and stamped and embossed the image twice, using white embossing powder. I fussy cut the images, and cut one of the hearts where I needed to join them together. I simply slipped the 'broken' heart through the gap in the other heart. I used a piece of the same paper as a background, and cut a slightly smaller piece of kraft card as the forground. (If you are trying to stretch your papers as far as possible, you can use what would be hidden underneath for the hearts). I embossed the sentiment using white embossing powder once more, and added faux stitching using a white gel pen.

The addition of the kraft card makes this a great Anniversary or Valentine's card for a man.

To create my second card, I coloured some Drawing Cartridge using Distress Ink on a craft mat, spritzing it with water, and patting the Drawing Cartridge into the ink. I dried the paper with a heat gun, and then blotted up some of the remaining ink before drying the background once more. I stamped the Tagtastic stamp at one end of the background and cut this out, the remainder of the background was sufficient to create a background for the card.

I used words from the Amazing Mackintosh Words stamp set to create a random background on the tag, stamping them in black ink. I stamped some horizontally and some vertically, making sure that they were straight, whichever direction I was stamping. I stamped a rose from the Rose and Thistle stamp set onto a spare piece of Drawing Cartridge, coloured it in and fussy cut it out. I attached this to the tag, and added some bright red ribbon to the tag. I attached the tag to the larger background, added a Birthday sentiment, and used some black card as a matting layer. You could add some of the tiny rosebuds from the Rose and Thistle set to the background if you feel that the background is too plain, but I did not mind it like this. I had added some red spatters to the tag as a contrast anyway.

I hope that you will try some of my ideas out for yourselves, thanks for stopping by,

Judith xx

Friday, 22 February 2019

Katya Messenger Bag (by Anne)


Good morning. I was so excited about the launch of the new fabric panels from Chocolate Baroque – enlarged images from my favourite stamp company printed onto fabric ready to paint and stitch – yay!
I have been working on a bag design big enough to carry A4 folders plus craft stash for when I am out & about. The large bag flap was a perfect place to feature the Katya panel. You could create similar using a commercial bag pattern (messenger style or tote), or by applying the panel to a ready made bag front.
I have used fabric painting, stamping, applique of stamped images, stencilling, machine and hand embroidery – but don’t despair if you are a non stitcher. I have included an idea for decorating a ready made tote bag with no stitching involved. The panels are also fabulous to use in mixed media projects such as book covers or canvases too – just stick it down with some gel mat medium or book binding glue. Then add stamping and embellish as for other mixed media work.
Materials used:
  • Printed fabric panels (3 Ladies)
  • Stamp sets: Take It or Leaf It, Large Crackle Background, Artistic Affirmations, Harlequin Rose, Bold Blooms
  • Stencils: Silhouette Palace 1 and Silhouette Palace 2
  • Range of fabric paints from my stash – all fixed by ironing: silk paints (fluid), transparent and opaque fabric paints plus multi surface paints (off white, cream, red, orange, yellow, blue, turquoise, pink, purple, metallic pink/purple, transparent pearl and green glitter)
  • 3D fabric paint (pearl green) – such as Appliglue or similar
  • Alcohol ink pens (yellow, turquoise, pink, green)
  • Archival Inkpad (Jet Black)
  • Tonertex foiling fabric glue and foil (gold)
  • Cotton quilting fabric scraps for applique (white, purple, lilac, cerise, plus waste strips of printed batik)
  • Cotton fabric (black) for backing and framing panel
  • Machine embroidery threads (black, variegated pink/blue plus green/orange)
  • Hand embroidery threads: Stranded cotton (variegated pink/purple and orange/yellow), Pearl 5 cotton (variegated blue/green/turquoise)
  • Iron on paper backed glue mesh (such as Bondaweb or similar) and Fray Check Glue
  • Paint brush and Cut-N-Dry Foam
  • For making the bag I also used: sewing thread, heavy weight cotton fabric (blue), light weight linen patterned fabrics for lining (blue & cream), plastic sink drainer (for base), Bosal foam stabiliser (one side iron on), bag feet and magnetic clasps (silver colour), zipper (blue), shoulder strap (recycled from old bag)
How it was done:
I first made a lining using my heavy weight cotton and linen printed fabrics. I wanted a heavy weight long lasting lining so layered my fabrics and treated as one layer. I also included plenty of pockets. I haven’t included details of my pattern here – sorry – but it’s something I am working on for my own business. You could choose a commercial pattern for a messenger bag with a large front flap to decorate, or a tote style bag to feature the panel.
I painted the Katya panel using transparent coloured paints so as not to obliterate the black outlines.
Fabric paints designed for light coloured fabrics are best suitable. Opaque colours (designed for dark fabrics) would obliterate the printing so you need to bear this in mind. I also used some paints designed for multi surfaces (including fabrics). These can sometimes leave a stiffer finish than those specifically designed for fabric. However, for a bag this can actually be a bonus and it is not essential to keep a soft fabric feel. If you are not intending to wash your fabrics then you can use just about anything that you would use on paper. However, I would recommend heat fixable paints for a bag as you don’t want colours to transfer from the bag or run if caught in the rain! Painting was fixed by ironing.
Tip: I like to leave my fabric painting overnight before heat fixing with an iron (follow the manufacturer’s directions). The panel is silk/cotton so can be ironed using a cotton setting safely. I usually iron from the back.
I did test the panel for compatibility with alcohol markers and found that if over wet and rubbed with alcohol the printing did bleed slightly so I would avoid these, or use with care (i.e. without flooding close to the printing).
I then applied some of the Tonertex glue, left to ‘dry’ (goes tacky as dries clear) and applied gold foil to elements of her headdress.
If you are not a sewer you could stop at this stage. As with card making the panel benefits from ‘mat & layering’. Black fabric provides a nice frame. You could back the fabrics with fusible web and iron onto a ready made bag. Heat fusible webbing does not always provide a strong hard wearing bond so gel mat medium, book binding glue or a fabric decoupage glue could be used to prevent the panel lifting off or fraying with extensive use. There are also several types of 3D paint that could be applied around the fabric edges too (e.g. Appliglue).
I found some lovely strips of batik fabric in my ‘waste’ scraps bag (I knew that they were too nice to bin – ha ha) so I had to include them in my bag panel design. Nothing was stuck down yet.
Next I stamped various colour fabric scraps to use as applique elements, using an Archival Inkpad. The images were dried and then heat set with an iron. Colour was then added using alcohol ink pens. Again colours were heat set. 
Fusible web was applied to the back to prevent fraying and the stamped and coloured images were cut out.
When stamping with paints I prefer to apply them to my stamps using Cut-N-Dry Foam. I find that it gives a more even application with less clogging of the stamp than brushing or using kitchen sponges etc. In addition if placed paint side down in a plastic tray (recycled) they stay wet for longer. This is particularly so for multi purpose paints that can dry out very quickly. I also spritz the tray lightly with water to help keep them wet while working.
The fabric background was first coloured using the fluid silk paints (they are like an ‘ink’ formulation rather than thicker paint) – encouraging them to bleed and blend with a light water spritz. As with card making I tried to create a darker blended edge to frame the scene.
Next the bag panel was stamped and stencilled. The applique elements and panel were ironed down (using the fusible web backing). I used the border stamp across the top edge and lovely crackle stamp in the background. I had to add a little bling with the metallic colour too (you know me! – ha ha).
Tip: Stamping onto a darker fabric you will need to use darker or more opaque paints (or they won’t show up). Metallics work well too.
I added some 3D glue ‘pearls’ to Katya’s headdress and overlayed some areas with transparent pearl paint for extra shimmer. I also added glitter paint to some areas. Simply wasn’t enough bling already.
The panel was backed with foam stabiliser before embroidery (I wanted a quilted effect). I stitched down the panel and fabric strips and then used free machine embroidery to stitch down and decorate the applique. Hand stitching was added for additional texture.
Note: The fusible web backing does help prevent fraying but some areas may benefit from a little Fray Check along the fabric edges (e.g. my batik strips were not backed with webbing before stitching down so are likely to fray with wear).
Detail showing stencilling, stamping and embroidery.
I used free machine embroidery and black thread around the applique motifs, then further embellished with hand embroidery. The stamped smaller flowers were free machined with variegated thread.
Here you can see the stencilled palace with additional hand embroidery to highlight. 
The back panel was also decorated.
Love this sentiment stamp – describes me perfectly.
So happy with my decorated bag (back).
The pockets on the front panel were also decorated (sits under the front flap).
Detail – love this sentiment too.
The finished pockets with magnetic snap closures (to hold down the front flap).
I also decorated the little side pockets.
Texture added with hand embroidery.
Here you can see a little more detail of the free machining and hand embroidery on the main Katya panel.
I hope that you have enjoyed my latest creation.

Hope to be back with more soon, Anne xxx.


Sunday, 25 February 2018

Beautiful Bird and Fanciful Flowers by Penny


Hi there - Penny here again with three projects to inspire and hopefully encourage you to have a go at creating them yourselves.  The first is a little mixed media canvas featuring the gorgeous Bird of Joy stamp, a couple of stencils including the Useful Leaves, and some metallic paints and texture paste from my stash.
I took a small canvas and painted it with black gesso.  When dry I stamped and embossed the image using clear ink and powder in the centre of the canvas.  I then painted it with acrylic paints,  adding gold paint around the words to make them pop.  I added some more paint using a sponge to give the piece more texture, then stencilled some glitter texture paste over the sponged areas.
I used the Useful Leaves stencil across the top of the canvas and attached some die cut foliage as well to frame the focal image.  To complete the piece I punched a couple of holes in the top and threaded some cord through to be able to hang the canvas up.


My second project for you today is a pretty, romantic card featuring the lovely French Heart stamp, a small heart from the Harlequin Rose set and a sentiment from the Loving Sentiments set, colouring pens, Distress inks, the Useful Leaves stencil, a tag die, a script stencil and and some ribbon from my stash.
I began by stamping the heart in grey ink onto colouring card and coloured it with pens in muted colours.  I die cut the image into a tag, embossed it and added ink around the edges.  I stamped a sentiment onto the tag, then punched a hole at the top and threaded some ribbon through.  I added some glitter to the flowers and set the tag aside to dry.
On a white base card I created a background of leaves and script with inks through the stencils, and stamped some small hearts randomly over the card.  I blended some ink around the edges of the card and attached the tag.


My final project for you today is a mixed media card featuring the beautiful Medici Flower stamp, plus images from the Gothic Fragments and Butterfly Poppy Collage sets, Distress inks, white charcoal, grey Versafine ink, colouring pens, texture paste, a die cut, gold Liquid Pearls and a gold pen from my stash.
I stamped the Medici Flower in grey ink onto colouring card and coloured it with the pens.  I die cut and embossed the image with a circle die, added ink through the die like a stencil and edged it with a gold pen.  I put dots of gold pearl drops into the middle of the flowers as stamens then set it aside to dry.  Next I created a background on a piece of white card, blending a few Distress inks together.  I then stamped some Gothic windows and Latin script randomly over the panel, faux bleached parts of the windows and added highlights with white charcoal.  I used gold pen around the edges of the panel then matted it onto black card.
On a white base card I applied black texture paste through a brickwork stencil to compliment the Gothic windows, and let it dry.  I then stamped a sentiment onto a spare piece of background card, cut it into a panel, edged it with gold pen and added some gold pearl drops.  When everything was dry I attached the background panel to the base card then added the focal and sentiment panels in 3D onto the card.

I hope you have all enjoyed these projects today, they are all great fun to create and can all be adapted with different colours to suit any requirements.  Thank you for dropping in, I'll see you again soon,

                                                         
Penny

Wednesday, 22 November 2017

Roses in Red (by Penny)

Well here we are already at Penny's last week of her current Guest Design Team posts.  And this last project is a veritable feast for the eyes, a real study in red. So without further ado it's over to Penny.


Hello everyone, Penny here for my third and final GDT blog post this month - I've had so much fun bringing you these three projects!  Today's post is a lovely card that features a couple of Chocolate Baroque's many beautiful floral stamps - Floribunda Net, Harlequin Rose, and words from the Loving Sentiments set.  I have also used grey Versafine ink, Candied Apple Distress Ink, clear Sparkle pen, alcohol pens, and a gold marker pen.  

I began by creating the focal panel, stamping the rose in grey ink onto white card then colouring the image with alcohol pens.  I added clear Sparkle pen to the net in the background and die cut the image to create a panel.  I added distress inks through the die, using it like a stencil, then added gold pen around the outer edges of the panel.  To complete the panel I matted it onto black card.  

I stamped a single rose image using distress inks into each corner of a white base card.  I then used water to pull the ink out and paint the roses, and added Sparkle pen. I then stamped a sentiment at the bottom of the card and attached the focal panel. 

This is quite a simple design from me for a change, but it is still as much fun to create as other more complex  projects.  I think this pretty card would be great for many occasions and for any age.

  
Thank you for reading this post, I hope you've enjoyed it.  I know it's early but I'd like to wish you all a Merry Christmas!  

Penny  xxx

You know I think roses are right for any season, including Christmas, so thank you Penny for this beautiful finish on your final week.  We have loved having you as our guest and look forward to what you will bring us in the New Year.

Well that's all from me too but don't foget we have a new piece of inspirational artwork everyday from one of our lovely, and talented, design team. So please do join us again soon.