Pin It button on image hover
Showing posts with label Butterfly Dress. Show all posts

Tuesday, 9 March 2021

Flutter with me (by Magda)

 Hello girls,

I like to see the first butterflies flutter in the mild spring air and this feeling of joy inspired                       me to create these three cards with Chocolate Baroque stamps. 


Happy Dance 

On a blue Brusho colored white cardstock I stamped Butterfly Dress and colored it with                          Pan Pastel. The little butterflies and the decoupage butterfly are in Just Butterflies, while                        you can find the sentiment in the Butterfly Perfumery plate. I used Distress Ink pad   for                    coloring the butterfly, blending through the stencil and stamping the sentiment Happy Dance. 


Hello

Here I just played with Distress Ink pad   for the background wash, stenciling several                       layering with matching and contrast colors and for coloring the butterfly. You can find                                the butterfly in the big selection of Just Butterflies and the sentiment in                                                Butterfly Flourish Swirls


Spring

For this card I prepared several stamped script paper pieces, I cut them randomly and glued                     on the cardstock.   
I blended with different green and red shades of Distress Ink pad  and colored the decoupage            butterfly of Just Butterflies with watercolor pencils. 
"Spring" of March Fairy was for me perfect to be used for the label 


I hope you liked my butterflies card of today, I wish you all a very nice spring, hugs
Magda


Sunday, 28 October 2018

Red Tag (by Magda)

Hello, it is time for my last post of October.
I used for these two projects some of the stamps Lesley featured in September on Hochanda.

I stamped Auricula Script with Versamark , embossed it hot with gold Embossing Powder and coloured all around with a light coat of red Distress Ink Pad, while I stenciled roses with more colour on the background. This let the Auricula flower stand out quite well on the tag.


For the Journaling Page I stamped with Versafine Onyx Black,  Butterfly Dress.
I used a very saturated watercolour Brusho to highlight the flowers and the butterflies of the dress in contrast to the pale Background.


Thank you for passing by. 
Magda


Wednesday, 24 October 2018

Autumn Ball by Penny

Hello peeps I hope you are all well.  I'm here again to share another of my samples from last month's
shows, so grab a cuppa and spend a few crafty minutes with me.


 I have used several stamps for this design, Butterfly Dress, a sentiment from Loving Sentiments, and some flowers from Floral Edges.   I also used Distress Inks, alcohol pens, glitter, black Versafine ink, clear EP and a die from my stash.


I stamped the Butterfly Dress image onto white colouring card using black ink, and embossed it with clear powder.  I coloured the image with pens and added some glitter to the flowers. I masked the image and blended Distress Inks onto the card to create a background.  I then used an edging die along the top and bottom of the panel, and blended ink on the outer edges of the panel.


I matted the focal panel onto black card and set it aside.  I stamped and embossed the floral edges image onto white card and coloured it with the pens.  I cut some of the flowers out as embellishments.  I coloured a white base card with Distress inks, stamped the Floral Border along the top and bottom edges using one of the colours then stamped a sentement in black on one side of the card.  I attached the focal panel and the flowers to the card using 3D foam pads to complete the design.  

Thank you for dropping by and taking a little time to join me today.  I hope I've tickled your crafty taste buds, take care and happy crafting,


                                 x Penny x  

Tuesday, 23 October 2018

A Collage of Colour (by Judith)

Hello everyone, I have a mixture of projects to share with you today, showcasing the stamps featured on last month's TV shows from Hochanda.

My first project uses the lovely Birdcage Collage stamp as my focal point. I created a colourful background using Brushos spritzed with water, and pressed a piece of crumpled cling film over the top, to add a bit of texture to the background. Once the Brushos had dried, I removed the cling film, and stamped some of the words from the Amazing Mackintosh Words stamp plate over the top, using black ink.

I stamped the Birdcage Collage onto a spare piece of Drawing Cartridge, and coloured the image using water based markers and a water brush. Finally, I cut out the image, and attached it to the background.

For my second card, I created a piece of background using Distress Inks, which I had added to my craft mat and spritzed with water. I picked these up on the Drawing Cartridge a couple of times, drying each layer in between. I coloured a piece of Stampbord with the same colour of inks, and the stamped the deco edge from the Decorative Edges stamp set on both the Stampbord and the background, using a plum coloured ink. To finish, I added a piece of ribbon, and some Little Birdie flowers.

My final sample is a reproduction of one I made a long time ago, however I liked the design, so why not? I stamped the Butterfly Dress image onto a piece of smooth card, and masked the image. I stamped the Floral Edges image across the bottom twice. I added clouds using a stencil and blue ink, but you could use torn paper or a frilly die cut to achieve a similar look.

I stamped the Butterfly Dress image twice again onto spare card, and then coloured the flowers and butterflies, plus the main images all with pencils. I added the extra butterflies to the background flying around the lady, and along the floral border.

Thanks for stopping by,

Judith xx

Sunday, 21 October 2018

Colourful Butterflies (by Zoe)

Good morning Lovelies, I'm back with my final post for this month featuring these beautiful stamps.

My first card I created the background by laying down Sparkle pens onto my mat, spritzed with water and picked up the colour onto my card. Istamped the image twice, once onto my background and second onto a spare bit of card. I coloured both images using Sparkle pens and cut out the flowers and butterflies from the spare card and decoupaged. I used the floral border stamp for the edges, it matches the flowers on the dress perfectly.

Second card I used Distress Inks to colour the card. I then used the Butterfly stencil and used a coordinating colour, dried well then stamped all the sentiments which I carefully stuck to an acrylic block, and heat embossed using white embossing powder. I then used the border stamp to finish it off, again in white embossing powder.

Third card, I made the background using the Shaving Foam technique and simple stamping using Versafine Black ink. I coloured the image using watercolour markers and added glitter to the centres of the flowers. The mat I layered onto was Brushos spritzed with water in coordinating colours.

Thank you so much for visiting. Have a wonderful day xx Zoe xx


Saturday, 20 October 2018

Monochromatic Butterflies by Brenda


Hello everyone, Brenda here and I hope you are ready for some more inspiration using the stamps Lesley showcased on Hochanda in September.

I rather fancied the idea of making monochromatic card with the lovely Butterfly Dress image so I started by stamping her with Versafine black onto my cardstock, followed by one of the stamps from Floral Edges along the bottom and another from Decorative Edges across the top. Next I used some sticky noted to roughly cover the focal image, masked a sun/moon and flicked some watery Distress Inks. I then stamped the image a couple more times, cut out the Butterflies and added to her skirt, three more fluttering past and some shading around the moon.


A grey board tag was my starting point here which I inked with Distress Inks and used Floral Edges along the bottom and around the top stamped with Versafine Majestic Blue. Some stencilled bricks and flowers stamped from the same stamp set, coloured and arranged on the tag. Finally some ribbon and sentiment from Amazing Mackintosh Words.


After masking a sun I used stamps from Floral Edges joining them to extend across the card using Versafine Olympia Green, sponged some sun rays using a piece of torn paper.........I find it easiest to start from the top and keep moving the paper down so that you can see where you have been. Finally a sentiment from Words of Inspiration, I have had this set for years and it remain a firm favourite which I use repeatedly.


For the background panel I used one of the stamps from Floral Edges, stamped with Versamark, heat embossed with detail white powder and then added Distress Inks. Lady's Slipper Orchid has been stamped with Versafine black onto a piece of card coloured with the same inks. A bow and sentiment from Amazing Mackintosh Words.


Finally one more using Butterfly Dress stamped with Versafine black onto a Distress Oxide background, coloured with pencils and some random background stamping using Decorative Edges. Again the sentiment of from Amazing Mackintosh Words.

I hope I have inspired you to go and check out these lovely stamps on the website.

Sunday, 14 October 2018

Beautiful butterfly dress (by Rachel)

Hello there! I do hope you are well! Its Rachel here today with more inspiration from the September shows. These are some of my samples using the butterfly dress and floral edges stamp sets.


In this one I created an oxide background and overstamped before painting in the details . I stamped the floral edges repeatedly to create a border and added colour similar to the image.


This is a wrap around journal that I created using the beautiful dress stamp in black and white to contrast with the paint colours on the journal.


This final piece is a mini box card that I created. All the colouring has been done using distress inks. Such pretty stamps - I hope I have given you some inspiration in ways to use them. 

Have a great day!

Hugs

Rachel x

Saturday, 13 October 2018

Magical Day - (by Magda)

Hello everybody,
I had lots of fun doing this card and I want to share with you the instructions.

Step By Step:
1. Stamp Butterfly Dresswith Versamark on the first white cardstock mat
2. Colour the mat using Distress Oxide Blue Print and Fired Brick
3. Stamp randomly with Distress Fired Brick in second and third generation Butterfly Dress
4. On a second white cardstock mat stamp twice the same stamp again as you will have to cut out the
    dresses
5. Cut one piece of the dress, on which you will stamp with Versafine Onyx Black the sentiment of
    Amazing Mackintosh Words
6. Cut the second piece of the dress in order to follow the design of the dress stamped at point 1,
     where you want to glue it
7.  Glue the two pieces on the first mat
8.  For the background mat colour the white cardstock with Distress Ink Chipped Sapphire and stamp
     with water all around the border.
9.  Assemble the card as shown here below.


See you next time, hugs
Magda

Tuesday, 9 October 2018

Tranquil Times (by Judith)

Hello everyone, I have two projects to share using the stamps featured on last month's TV shows on Hochanda.

My first project is a piece of home decor which I created by colouring two pieces of drawing cartridge with Distress Ink in tones of blue and green, blending the colours where they met. To the larger piece, I added background stamping, adding the harlequin edge from the Decorative Edges stamp set, and the bubbles image as well.

On the smaller piece, I created a mask from masking tissue in the shape of the headdress, and placed it on the the background, and stamped the bubbles image through the mask. I then used some blue Koh-i-Noor paint to paint the rest of the image freehand, adding some blue, green and orange shading to complete the image. I added some orange shading around both panels before attaching them to a piece of grey mountboard.

Finally, I stamped the Butterfly Dress image onto a spare piece of card, and coloured the butterflies using green and orange tones, before cutting them out and attaching them to the panel. Some words from the Amazing Mackintosh Words stamp set complete this project.

For my second project, I wanted to create a tranquil scene with a coloured panel spotlighted in the centre. I used torn paper to create the hills and ensured that they lined up on the background and extra panel. I used grey/lilac tones for the larger panel, and greens and blues, with a hint of lilac for the foreground panel. I then added the foliage from the Floral Edges stamp set to complete the project, with a sentiment from the Amazing Mackintosh Words stamp set, as before.

I hope that you have enjoyed my projects today, I will be back later in the month, with more ideas to share with you. Thanks for stopping by,

Judith xx

Saturday, 6 October 2018

Butterfly garden by Brenda


Good morning Peeps. Brenda here with some more inspiration using the lovely stamps Lesley showcased on Hochanda last month.

My first creation is one using lolly sticks which I glued together to form a stamping case and then coloured with Acrylic Paint after fixing a masked sun in place. Next I stamped the beautiful Butterfly Dress image and stamped her again a few more times so I could decoupage her dress. Using one of the stamps from Floral Edges I added some leaves across the bottom to ground her. Next I coloured everything including the additional flowers and Butterflies and built up her skirt adding a few more flying around her garden.


The next one below features Auricula Script which I stamped onto cardstock coloured with Distress Oxides and heat embossed with Lapis Lazulite embossing crystals. The sentiment strip across the bottom is from Amazing Mackintosh Words.


Some more inkiness with the next one using Distress Oxides and the harlequins from Decorative Edges to create a background and I was fairly liberal with the water spritzed onto the inked stamp to achieve a rather messy and random finish and then inked the edges and heat embossed with detail copper powder. I used the same inks to create a background for the Lady's Slipper Orchid image, stamped with Versamark and used the same embossing powder and bleached out the colour from the bloom.


The background on the next one was a bit of an experiment using a piece of kitchen tissue and alcohol inks to create a background. I then stamped Birdcage Collage with Versafine black and added a little white highlighting.


Thank you so much for popping in today, myself and my team mates always appreciate your kind comments.

Monday, 1 October 2018

echo of summer (by Veronica)

 I can't believe how quickly this year is going, October already!
To remind us of the lovely summer, I have chosen the lovely butterfly lady.
The dusky background was created using iced spruce distress ink, blending sponge and a leaf from the garden - a very effective technique learnt from Elaine, one of the original DT members, if I've got it right, the link should take you to her how-to post.
The lady was stamped with black versafine ink, and her hair coloured with watercolours.
I stamped the bottom half of image again on to scraps of left-over bru  I can't believe how quickly this year is going, October already!
To remind us of the lovely summer, I have chosen the lovely butterfly lady.
sho card, cut the flowers and butterflies out and decoupaged them onto the original image.
I added clear wink of stella to the butterflies, though it doesn't show up on the scan.
There are some stunning samples coming up from the team over the next few weeks, so keep dropping in for some inspiration.


Thursday, 16 April 2015

Lucky Butterflies (posted by Judith)

Hello everyone, I have another card using the beautiful Butterfly Dress cling mounted stamp to show you today. I decided to incorporate a bit of an Irish theme into my card, so used a palette of mainly greens to create my card.

I started my background, by adding some colour to a piece of scrapbook paper through a Prima Mask, and then added some script using a stamp from the Mini Scripts stamp set. I stamped the main image onto a die cut oval, and again onto a spare piece of scrapbook paper, and coloured the images with pencils. I decoupaged the butterflies from the spare image onto the main image. I added some of the flowers, along with some shamrock style die cuts to a sentiment taken from the Patchwork Butterfly stamp set.


Thanks for stopping by, Judith xx

Friday, 10 April 2015

Fly Away With Me (by Asha)

Hello and Happy Friday, everyone. Today I want to show you a card I made showcasing the Butterfly Dress individual cling stamp.

I stamped the image onto a piece of bleed-proof paper and coloured it with alcohol markers. The extra sunflowers are from the July Fairy DL stamp sheet. I masked the images to get the flowers to overlap. The sentiment is from the Butterfly Dreams A4 sheet.


Here's a close up of the Butterfly Dress project. With a sharp craft knife I cut around the wings of the butterflies to expose the blue layering card stock below. The butterflies look like they are about to take flight...


Butterfly Dress is undeniably a gorgeous image, which can be worked in so many different ways. I hope you'll find time to play with your stamps this weekend. As always, on my blog you will find more pictures and details of products used.

Have a super crafty weekend!

Beijinhos,
Asha

Tuesday, 31 March 2015

Flowers and Butterflies (posted by Judith)

Hello everyone, I have been working with one of the new individual cling mounted stamps currently available on the website, Butterfly Dress. The image is full of my favourite things, flowers and butterflies, and I had great fun creating this card.

I stamped the flower edge from the Floral Edges clear stamp set across the bottom of the piece of smooth white card. I needed to stamp the image twice to fill the space. I stamped the image again onto a piece of spare card a couple of times, so that I could colour some extra flowers to decoupage onto the original image. I stamped the Butterfly Dress image above the flower border, and cut a mask of the image and covered it over. I used a cloud stencil and Memento Summer Sky to create clouds across the background. I stamped the Butterfly Dress image twice more onto a piece of spare card so that I could decoupage the butterflies.

I coloured all of the images with pencils, and cut out the extra flowers and butterflies before adding them to the card. Finally, I added a layer of green card to correspond with the grassy green of the lady's skirt and the grass of the border.


Thanks for stopping by, Judith xx

Thursday, 26 March 2015

Stunning new stamps launched today (by Lesley)

It is almost the end of another month so today is the launch of our April stamp sets and are you in for a treat.

When we launched our first individual cling mounted stamps back in December the response was terrific and now we are adding four more to the collection.

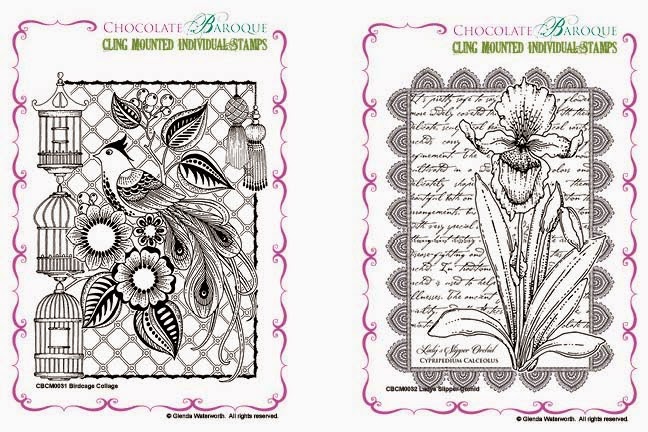
First we have Birdcage Collage and Ladys Slipper Orchid


All four stamps are available individually or as a money saving multi-buy.

Here is a stunning card made by Glenda using the Birdcage Collage


Stamped and then painted you can see this design is ideal for colouring and many of the elements are crying out to be decoupaged. And coming soon on the Shop Blog will be a post from Glenda on how she made this beautiful card, so watch out for that.

Our other stamp launch for April is an A5 clear set entitled Awesome Orchids.

This clever set features two orchid flower images and a sentiment plus a single stem and four individual orchid heads. Now you can design your own flower, how cool is that?
Here I have created three mini cards using the single stem and a selection of the orchid heads, which have then been coloured with watercolour pencils. The backgrounds have been stamped with the crackle and speckled patterns from the Natural Eggs set and the ART letters are from our Newsprint Alphabet clear set.

I just know you are going to have fun with these new stamps and keeping checking back on a daily basis for some truly inspiring projects created especially for you by the Design Team. 

Told you you were in for a treat.