Pin It button on image hover

Monday 29 February 2016

Cards and flowers

Hello
Have you seen these wonderful DT's achievments ? They are stunning.
And as this year is a leap year I can offer you a set of cards with these beautiful Chocolate Baroque stamps.
I am found of using old books to make cards.
I made my backgrounds with a Gelli plate. Then I stamp on a page of book and here are my new cards.

Avez-vous vu les magnifiques réalisations de la Dt ce mois-ci ? C'est grandiose.
Et comme cette année est une année bissextile, je vous offre un set de cartes avec ces très beaux tampons Chocolate Baroque.
J'aime beaucoup utiliser des pages de vieux livres pour faire des cartes.
J'ai fait mes fonds à la Gelli plate . Et j'ai tamponné sur les pages de livre. Voici mes cartes.


I used Floral Musical, Crackling rose, Harlequin Bouquet and Floribunda Net.

It was a pleasure.  Ce fut un vrai plaisir.

See you. A très bientôt.

Sunday 28 February 2016

Floral Musica and Harlequin Bouquet Cards (by Anne)


I have two cards to share with you today using the lovely new floral collage stamps – Floral Musica and Harlequin Bouquet.
 

I hope that you like the new stamps this month as much as we all have on the DT.

Happy crafting, Anne x.

 Materials:


 How it was done:

The images were stamped onto watercolour card with Versamark (Black Onyx). They were then masked with Pebeo Drawing Gum. I love this masking fluid. It is so easy to apply, and remove. Also brushes are cleaned easily with water.

The background washes were created by scribbling ink onto my glass mat and picking up with a wet brush and painting onto dampened card.

The masking fluid was then removed and the flowers coloured with watercolour markers, using a damp brush to blend.

The images were then cut out with dies. Seedless Preserves Distress Ink was blended in from around the edges to frame.

Harlequin Bouquet:

The topper was edged with black pen and a little glitter.

Pale blue card was embossed with harlequin texture on the top left and bottom right corners. The flat areas of the background were stamped using the floral stamp and Tumbled Glass Distress Ink. Faux stitching was added with black marker. Seedless Preserves Distress Ink was blended in from the edges. Organza ribbon was attached and the mat glued to the card front. The topper was attached with foam pads for added depth.

The butterflies were stamped onto pale blue card, coloured with watercolour pens, cut out and glued to the card front. The card was finished with a little more glitter glue and PVA pearls.
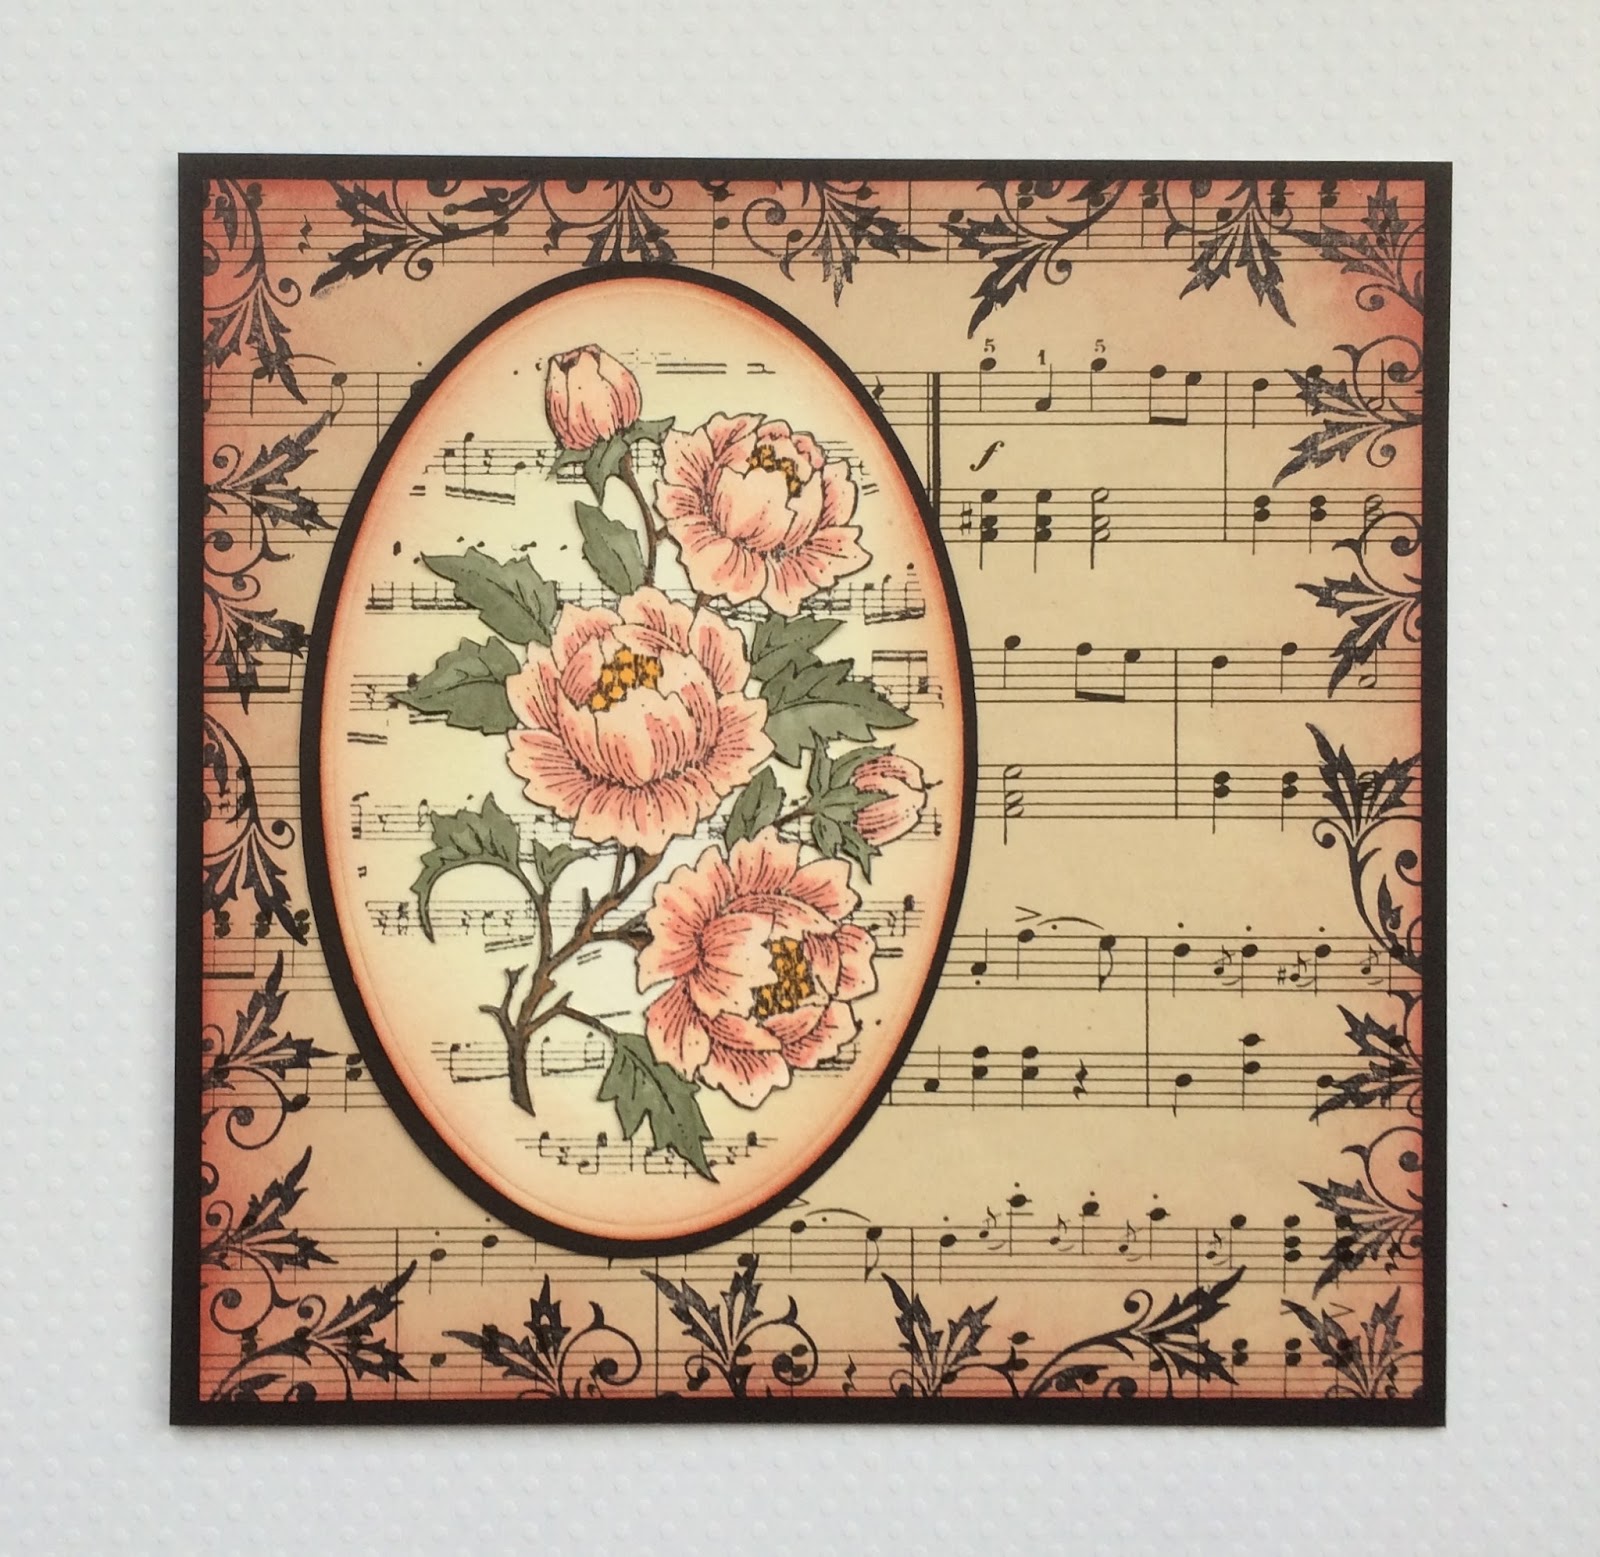
Floral Musica:

The topper was edged with black pen and a little gilding wax.

Cream and purple card were embossed with a script embossing folder. The dark card was sanded back to enhance the texture. Seedless Preserves Distress Ink and a little gilding wax were then used to further enhance the texture. The pieces were glued to the card front.

The sentiment was stamped onto a die cut tag using pink and purple watercolour pens to give varied shades when stamped.

Foliage was cut from gold card and glued to the card front along with ready made flowers and butterflies (these were in my CB Stash Box special offer that was recently available). The topper and tag were attached with 3D foam.

The card was finished with faux stitching and some gold PVA pearls.

Saturday 27 February 2016

Canticum Flores (by Asha)

Good morning, friends. It's my turn to share a project with you featuring a stamp from the new floral single stamps collection. You have seen my team-mates create some amazing projects. Each stamp in this set is beautifully drawn with so many delicate details. They are perfect for colouring and they make striking focal images on cards.

Today I bring you a card showcasing the new Flora Musica stamp. I'm calling this the "Canticum Flores" - Singing Flowers.  In keeping with the musical theme, I've paired it with a gramophone from an older set called Music Fanfare.

Just 5 easy steps to make this card:

1. Stamp the images with Versafine Vintage Sepia 
2. Colour the images with Faber Castell Polychromo pencils.
3. Ink the background with Distress Inks
4. Matt and adhere to card base.
5. Add sequins and subtle shimmer with a few strokes of Wink Of Stella Bush Tip marker. 

All these products are available from the Chocolate Baroque on-line store.


As always, more details on tools and products used are available on my blog. And be sure to stop by often for more fabulous projects by the rest of the team. Have a brilliant day!

Beijinhos,
Asha


Friday 26 February 2016

Sending Smiles (by Judith)

Hello everyone, I'm back again with another project created using one of this month's featured stamps. I hope that you are enjoying the Design Team inspiration using these lovely stamps, we have been really enjoying creating our artwork for you.

I decided to create a piece of collage in the style of an old postcard as the focal point for my card, and so I cut a piece of scrapbook paper to the correct size, and gathered a selection of stamps that I could use to create my postcard. I chose a couple of butterflies, and two stamps from a great little mini set found within this collection.

I stamped the butterflies first, and covered them with a mask, before adding the large flower stamp. I then added the little postage mark, and the postcard sentiment last. I coloured the images with pencils, and edged the piece with Distress Ink.

I created a little tag from a piece of scrap card to fit a small paper wallet, and stamped a fitting sentiment, taken from the Amazing Birthday stamp set. I added some stamps from the Mail Art mini stamp set as before to complete the tag, along with some dark brown ribbon.
If you would like to know more details about my card, then hop along to my blog. Thanks for stopping by, Judith xx


Thursday 25 February 2016

roses (by Veronica)


It is hard to choose a favourite from among these flower stamps, but I think the crackling rose has to be one of them, such a beautiful image and a delight to colour in.
I started with a piece of card that had been givwen the shaving foam with brusho treatment, and stamped the image onto it using black memento ink. My favourite watercolour pencils came out again to colour the rose. I stamped the 7"x7" base card with a light green adirondack ink using the studded lattice stamp, and sponged the dges with more of the ink. The mat for the rose is a dark green


For my second card I used a 5"x7" white base card blank and the floribunda net stamp. This was stamped in versamark ink onto green card and embossed with white. I used diluted white reinker to paint the flowers and leaves, and once that was dry I coloured the image with marker pens.
I used mats of pink and green card

I have really enjoyed playing with these stamps.

Wednesday 24 February 2016

Guest Post - A Little Hint of Summer by Lesley Ebdon


Hello everyone, today is my last Guest Designer post for the blog for this session.  I can't believe it's the end of February already but it does mean we are that bit closer to Spring which is my favourite season of the year.  As we have had such dreary weather for what seems like months on end now I decided to make my final card a reminder of warmer sunnier days which hopefully aren't too far round the corner.


This is a bit more of a mixed media card and uses acrylic paints and crackle glaze on the background together with tinted texture paste through a stencil and I used pencils to colour the image from the beautiful Honeysuckle Butterfly set.

As always, more details are available on my own blog.

I hope you have enjoyed my cards this month along with the fab inspiration from the DT proper and I'll be back again later in the year.

Hugs
Lesley  Xx

Tuesday 23 February 2016

Crackling Rose Collage (posted by Claire)

Good morning, crafting is a wonderful escape from everyday life which can get a little bit too hectic at times and I had a lovely time creating this collage which features the beautiful new stamp Crackling Rose. I've used one of the Greyboard 15cm squares as a base for this collage, it doesn't look very exciting but its perfect for mixed media projects as it takes lots of wet mediums without buckling.


I began by stamping the rose image on smooth white cardstock and colouring with pencils before distressing the edges with Black Soot and Worn Lipstick distress inks. I applied a layer of Matte Gel medium to the greyboard to adhere the image and then took some tissue paper, crumpled it up and layered it over the image. I tore a hole over the image and pulled the tissue back, scrunching and crumpling it up and applying more matte gel to secure it. Once the whole image was visible I left it to dry and then added shades of pink and burgundy paint (I used a mixture of acrylic paint and some emulsion tester pots). Once that was dry I applied lots of gold gilding wax to highlight the texture and then added a big bow and lots of embellishments. To finish off I added little pearls to the corners.

I hope you're enjoying all the DT's gorgeous projects with this month's new stamps. Each time I stamp one I think its my favourite, well that is until I stamp another lol.
Thanks so much for visiting today,
Claire xx

Sunday 21 February 2016

Harlequin Bouquet by Zoe

Good morning Lovelies, today I'm back sharing a little wall plaque I made using the stunning Harlequin Bouquet stamp from the new Florals stamps.
I used alcohol inks and surgical spirit on Yupo paper, if you haven't used it or heard of it you must give it a go it's really unique and fun, it's a Synthetic paper, bit like plastic but not, it means there is a lot of "open time" using alcohol inks, you can move them around more freely to create some amazing patterns, but because of its nature you do need to use Stazon to stamp with.

I created my background and once dry I stamped the stamp twice and cut out the flower heads of one lot to decoupage, I added some white and gold gel pen and glitter glue to add some highlights here and there, my plaque is simply a piece of a box which I stripped back in places and generously covered with gilding wax.

I hope you like my plaque and it gives you some inspiration, have a wonderful day xx Zoe xx


Saturday 20 February 2016

Crackling Rose in full bloom (by Debbie)

Good morning, a quick make from me today.
 
The background for this card was a play day make that had been sat on my desk waiting to be used. I had been playing with my Blueprint Sketch inkpad from Ranger and a gold mica spray.


The ink was applied with a sponge and sprayed with the gold mica. I wasn't happy at the outcome so covered with the blue ink again. Next, I stamped the crackle egg shape from Natural Eggs Clear stamp set with the same blue. I wiped the edges of the stamp with a baby wipe so the oval shape was not visible. The Crackling Rose was stamped directly to the card and embossed with black powder. For the rose head it was stamped onto white card and coloured with water soluble crayons then cut out. To finish it was mounted onto black card and a birthday greeting was added.

Many thanks for visiting
Debbie

Friday 19 February 2016

Beautiful Bouquets (by Julie)


Hello, it's my turn today and I have two cards made with a couple of this months brand new individual cling mounted stamps.

My first card's main image is Harlequin Bouquet, which I have stamped with Onyx Black Versafine and then water-coloured with brush markers. The butterfly is from Honeysuckle Butterfly and the background stamps are from Harlequin Fragments and Floral Eggs. Peacock Feathers and Spiced Marmalade Distress ink was sponged over the background and the eggs were highlighted with a white pen.


My second floral card has been stamped with the brand new Floribunda Net. I have used watercolour card, which I first stamped using Onyx Black Versafine and then covered the roses with masking fluid. Once dry I spritzed the card with water and then dropped on various colours of Brushos. 
After everything was dry I removed the masking fluid and coloured with a very light-grey brush marker and added a light touch of green to the leaves. 

Thanks for stopping by.

Julie xx

Thursday 18 February 2016

Flowers and flowers and flowers

Hello
How can I say ? Flowers in art are not really my cup of tea. But when you have in your hands stamps like Crackling Rose or Harlequin Bouquet it is impossible to resist.

So I used background made few days ago with my Gelli plate and acrylic paints. The stamps are painted with watercolors.
And here is the result.


I definitively like these new Chocolate Baroque Stamps. They are simply gorgeous.

Thank you to watch here. Kind regards.
Dompinike

Wednesday 17 February 2016

Guest Post - Brushos, Book Pages and Doodle Bugs by Lesley Ebdon


Hello Again Chocolate Baroque fans, Lesley (E) here again with my second design for this month.

I need quite a few birthday cards at the moment and what better to make them with than beautiful Chocolate Baroque stamps, so my offering today is another card but completely different from last week's.


I used a Brusho background and stamped most of the images, which are from the Sketchy Doodle Landscape set and the single stamp SKF Leaf Stem (snapped up in the recent CB sale ;D), onto old book pages.

More details available on my blog if you would like to drop by.

I hope my card gives you a little inspiration and I'll be back next Wednesday with my final piece for this Guest Designer spot.  Hope to see you then.

Hugs
Lesley  Xx

Tuesday 16 February 2016

Crackling Rose and Floribunda Net (by Anne)


I have two cards to share with you today using the lovely new floral collage stamps – Crackling Rose and Floribunda Net.


The images were stamped onto white watercolour card with Versafine (Black Onyx). The images were then masked with Pebeo Drawing Gum. I love this masking fluid. It is so easy to apply, and remove. Also brushes are cleaned easily with water.

The background washes were created by scribbling ink onto my glass mat and picking up with a wet brush and painting onto dampened card.

The masking fluid was removed and the flowers were then coloured with watercolour markers, using a damp brush to blend.

The Crackling Rose was mounted into a vintage die cut frame highlighted with gilding wax. This was then mounted onto a crackle embossed background with 3D foam pads for added dimension. Sparkly organza ribbon was used to ‘ground’ the frame. Stickles glitter glue (Diamond) added some extra sparkle to the rose petals and frame.
 

I used a 7X7 card blank and decorative script paper from my recent Stash Box purchase to make up the Floribunda Net card. I embossed the card blank with a net embossing folder and used some pearlescent gold paper for layering. I finished with organza ribbon, glitter glue and PVA pearls. The sentiment was from the Card Sentiments stamp set.

I hope that you like the new stamps this month as much as we all have.

Happy crafting, Anne x.

Monday 15 February 2016

Thanks a bunch (by Lesley)

Hi everyone, I hope you have been enjoying all the wonderful inspiration from the Design Team. Today is it my turn to put the spotlight on one of our new single cling mounted stamps and I have chosen the glorious Floribunda Net for my artwork, working with Distress Stains as a painting medium.


This was a really much quicker to do than you might think.
  • Stamp and emboss the image on an A6 piece of watercolour paper.
  • Using the wet on wet technique, a water brush and Distress Stains in Wilted Violet, Dusty Concord and Stormy Sky paint each rose head in turn, followed by the buds.
  • Repeat the same technique for the leaves and rose stems with stains in Crushed Olive and Forest Moss.
  • When thoroughly dry roughly cut around the image and then use an Edge Crimper to distress the edges.
  • Take another piece of watercolour paper, slightly larger than A6, tear two edges with a ruler and the third by hand. Make sure the paper remains large enough to use as a mat for the main image.
  • Wet the paper thoroughly with a brush and then paint over with Stormy Sky and Dusty Concord stains, allowing the colours to bleed into each other. 
  • Whilst the paper is still wet use Wilted Violet stain around the edges and add more water if necessary to bleed the inks together.
  • To finish mat and layer according to taste either on a black card for a dramatic effect or toning coloured card.

Embossing the image allows you to colour it in very quickly and the shading happens as the inks bleed together using the wet on wet technique, so you can afford to be less than precise.

Thank you for stopping by today and remember there will be lots more fabulous ideas from the DT girls to inspire you to get stamping and playing.


Sunday 14 February 2016

Love In Full Bloom (by Asha)

Happy Valentine's Day! On this day dedicated to love I want to show you what I''ve done with the new Crackling Rose individual cling mounted stamp. I stamped it with VersaFine Onyx Black and coloured it with Faber Castell Polychromo pencils.


I trimmed the image, did some fussy cutting and mounted it on to a stencilled background. To finish - sheer cream ribbon for a soft, feminine look.

As always, more details on tools and products used are available on my blog. And be sure to stop by often for more fabulous projects by the rest of the team. Have a brilliant day!

Beijinhos,
Asha

Saturday 13 February 2016

Vintage Flowers (by Judith)

Hello everyone, I hope that you are enjoying the floral inspiration provided by my Design Team mates this month. I have a couple of cards to share with you today using the current stamps of the month. These beautiful large stamps make lovely focal images for cards, and they are suitable for so many occasions in the card giving year.
For my first card, I have chosen to use the Flora Musica stamp. I used a piece of vintage music paper, which I trimmed to size, and coloured the edges, using Fired Brick Distress Ink. I then stamped around the edge using an image from the Decadent Brocade stamp set. I cut an oval shape from a piece of smooth card, and coloured this with Antique Linen Distress Ink, and edged it with Fired Brick, as before. I stamped the Flora Musica image onto the shape. I stamped the image again onto another piece of card, and coloured it with alcohol markers, before cutting it out, and attached it to the oval background. I chose black card to mat and layer the panels, as it highlights the pretty edging stamp.

This card would be suitable for lots of different occasions, and for now I have left it without a sentiment.

My second card uses the lovely Crackling Rose individual stamp, and I have stamped this onto some mosaic stickers to create a tiled effect. If you would like to see how I have made this card, you can hop over to my blog to find out all of the details. The sentiment comes from the For Mum clear stamp set.

I hope that you have enjoyed my little bit of inspiration, keep popping back for more lovely projects throughout the month. Thanks for stopping by, Judith xx


Friday 12 February 2016

floral musica (by Veronica)

 These lovely new single flower stamps are perfect for colouring in, and they really don't need anything else to make a card.
I have used the floral musica stamp for these two cards.
The first one the image was stamped with brown ink and coloured with watercolour pencils, cut out with a die, and the cut out edged with promarker. Base is a 15x15cm kraft card blank, the dark brown panel was embossed with an embossing folder and rubbed with a very ancient golden gilding wax
This time the image was stamped in black versafine ink, coloured with pencils again, and a light wash of old paper distress ink across the music background. None of my oval dies was right for this, so I had to handcut the oval out! The mount was diecut from a dull gold card. the base 15x15cm white card blank was randomly stamped with the rose image using the old paper distress ink, with a bit more sponged rouind the edges.

Keep an eye on the blog, there are some gorgeous cards coming up from the others!

Thursday 11 February 2016

Flowers Galore (posted by Claire)

Good morning, Claire here with  two cards to share today, both using some of this month's new releases .


This first card features the beautiful Flora Musica, I've coloured the image with Graph'It markers and as I didn't have an oval die to fit I went for it and cut it out. It was a wee bit wonky but I dusted on a little Black Soot distress ink and distressed with a craft knife. I drew round the image on black card and cut that out too,  I create the background with Festive Berries and Aged Mahogany distress inks applied to my craft mat, misted with water and then swooshed the card through a few times. Once that was dry I stamped with some of the stamps from Music Fanfare and again distressed the edges before mounting on black card. To finish off I've added some faux gold pearls in the corners, a shabby red seambinding bow and a brass button from my stash.

My second card features Harlequin Bouquet, I've got a bit of an addiction for harlequin stamps so  I'm sure this one will be a firm favourite. I began by creating the background, I used black texture paste through a harlequin stencil on white card. Once that was dry I distressed with Black Soot distress ink and a craft knife and layered it on black card. I stamped the focal image with Memento Tuxedo Black ink and coloured with Graph'It Markers.


I cut the image out, distressed with a kraft knife and layered it with 3d foam, adding a bow and paper flower to finish off.

I hope you're having as much fun with this month's new stamps as we are. 
Thanks for visiting today
Claire xx

Wednesday 10 February 2016

Guest Post - Take one Flower by Lesley Ebdon


Hello Again Chocolate Baroque friends and a belated Happy New Year to you all!

It's time for my second stint as a guest designer on the blog and today I have a pretty, fairly simple card to share with you.


The stamps used for the flower and leaves are from the Tangled Garden set with the sentiment coming from my much loved and used Amazing Birthday clear stamp set.  I've used pencils to colour the flower and leaves and a stencil with inks and a spritz of Glimmer Mist for a touch of sparkle for the background.

Full details can be found over on my blog...

I'll be back to share with you again next week and until then have a good week and enjoy the wonderful inspiration from the DT proper.

Hugs
Lesley

Tuesday 9 February 2016

Floral Musica by Zoe

Good morning I hope you are all well? Today it's my turn to share with you one of my projects using one if the gorgeous new stamps, there are 4 in the floral selection all with a really unique background, I've used the Floral Musica which I stamped using Black Archival inkpad onto an inked background, I used Dusty Concord, Faded Jeans and Evergreen Bough, I spritzed some water which I cupped into my hand first then clapped my hands together to get a more splattered effect, I dabbed with a dry cloth and heat dried before stamping. I stamped the image onto another piece of card and coloured it in using Picked Raspberry distress ink which I added a touch of mica powder to the water and painted and then adding shade using the same colour Distress marker, the leaves and foliage I "Faux Bleached" using a water brush and dabbing dry and adding a white gel pen on the edges just to make it "pop" some more.

I used a die to cut out my image and mats and fussy cut out just the flower heads which I used a blob of hot glue to get some dimension, the sentiment is from the Birthday Words stamp set.

I've added a close up photo with hopes you can see some of the subtle shimmer from the mica.


Have a wonderful day, don't forget to pop back to check out what the wonderful Design Team have created xx Zoe xx


Monday 8 February 2016

Painted Flowers (by Debbie)

Good morning.
I have a card and a tag to show today. Both using the same colours of paint and technique but look different because of the change of amount of each colour.
 
 
The Crackling Roses stamp is a fantastic size for cards, I used a 15cm x 15cm. I painted the background using Decoart paints randomly and when dried stamped the Rose with Versamark ink and embossed with black powder.  The rose was painted with well watered white paint, more colour was added with coloursoft pencils. Green was painted onto the leaves.
 
 
I wanted to keep the washed out look to the tag so didn't add any colour other than white to the flowers of the Flora Musica.
 
Many thanks for visiting
Debbie

Sunday 7 February 2016

Floral Beauties (by Julie)


Hello and welcome! The four new stamps Chocolate Baroque have to offer you this month are a real treat, so today I have chosen two of them to show you and they are Crackling Rose and Floral Musica.


This first card is Crackling Rose, which I have stamped onto watercolour card using Onyx Black Versafine and then water-coloured with brush markers. I cut the design out using an oval die and layered onto another oval matt, coloured with Hickory Smoke Distress ink which I then over stamped with the crackle egg from the clear, Natural Egg set. The birthday sentiment is from Amazing Birthday, which again has been cut using a die. I then finished off the card by running Crystal Stickles around the edges of the die cut pieces and to the rose design.


Floral Musica was used to create my second card and was stamped and water-coloured as before.
The base card was stamped with the heart from Music Fanfare and coloured with Marigold and Mustard Seed Distress inks and then finished off with touches of a white high-lighter pen.

Many thanks for stopping by and hope to see you again soon.

Julie xx

Saturday 6 February 2016

An handful of flowers (by Dominike)

Hello
Today I will like to play with the beautiful Leaf stem stamp and the Dotty Rose stamp.


  1. Make the background with carmin and gold acrylic paints on the Gelli plate.
  2. Stamp one flower.
  3. Stamp another one on a piece of paper.
  4. Hide the first flower with this paper.
  5. Stamp the flower.
  6. Repeat step 3.
  7. Stamp the Dotty Rose for the 3th time.
  8. Stamp a part of the leaf on the top of the flowers and the other part on the bottom.
  9. Write a word, a sentence. What you want.
This is a page to introduce my new Art Journal around nature.

I wish you a good week. Take care.

Friday 5 February 2016

January Blog Comment Winner

Hello everyone, I hope you are doing well.

Once again we would like to thank you all for your visits here at the Design Team blog.  We truly appreciate the time you take to let us know your thoughts about our designs.  
Each comment in January was assigned a number and we used Random Org to draw a winner.  Congratulations to Akkina Van Steen  you have won a £15.00 voucher to spend on Chocolate Baroque stamps!  Please send a quick email here to confirm your email address and Lesley will send you your gift certificate.
Lesley will be giving a £15 gift voucher to another lucky winner drawn from February's comments.

The newly released individual floral stamps, Crackling Rose, Flora Musica, Harlequin Bouquet and Floribunda Net are being shown by the Design Team, so keep popping in to see them displayed beautifully and don't forget to comment.
The more comments you leave the better your chances to win!
 
Thank you for your kind words and comments,
Good luck from the Design Team!


Floral Steampunk Stepper Card using Punky Flowers (by Anne)

I was lucky enough to grab the special offer ‘Stash Box’ from Chocolate Baroque before they flew off the shelves. There was so much stash included I couldn’t believe it. The Lucky Dip stamp sets that I received were right up my street, Steampunk and sewing themed sets, and I didn’t already have them. How lucky was I! I got all of this for just over the cost of one A4 stamp sheet. I will be busy for some time with this lot.

 
I just had to create something using the Punky Flowers stamp set included. I made this stepper card for a friend and he loved it.
 
 
Materials: Summary of Methods Used:
  1. I used dies to create the stepper card and mats for layering and stamping. Small gears were die cut from Kraft card for embellishing. I used an embossing folder to create the gear textures.
  2. Images were stamped with Versamark and heat embossed with fine gold powder.
  3. The main image was masked using Pebeo Drawing Gum. I really love this masking fluid. It is water soluble while wet so cleaning up brushes is so easy and there is no nasty rubbery ammonia smell that some masking fluids give.
  4. I coloured the backgrounds with Distress inks. I also randomly heat embossed some of the textured gears with a mix of the gold, copper and verdigris embossing powders.
  5. When completely dry I removed the drawing gum (it rubs off really easily) and coloured the main image and smaller images using Distress Inks and water on a brush. The smaller images were cut out for decoupage.
  6. Layers were then glued to the card blank. 3D glue gel was used for the embellishments to give added depth.
  7. As this was for a friend I created a personalised sentiment mini tag to finish the card.
 

Thursday 4 February 2016

Blooming New Stamps launched today (by Lesley)

Where did January go?  Did you blink and miss it too, because I can't believe it is February and I am telling about a fabulous new stamp launch.

We are still in individual stamp mode here at Chocolate Baroque towers, although I promise you that we have not abandoned our A4 and A5 sets but you will just have to wait and see what we have in store on that front. I'm an awful tease aren't I!

Anyway, back to the single cling mounted stamps that are on release today and all I can say is that they are delicious. There are four stunning florals, each set on a different background, available as individuals and our usual money saving multi-buy.

Crackling Rose

Flora Musica

Harlequin Bouquet

Floribunda Net


Sue has once again drawn us some glorious images and I have combined them with a selection of backgrounds. These are large stamps, with three of them measuring over 5", so they will make a real statement on your project. Great for a good selection of occasions and just excellent for playing with!

On the four samples shown here I have stamped on to die cut hearts and coloured with watercolours and I think you will agree that these beautiful images just speak for themselves. The Design Team are busy stamping, colouring and creating as I write this so be prepared for some amazing samples over the course of this month from our talented girls.  

One last thing. If you are a member of our Chocolate Baroque Facebook group then why not show us what you have created with these new stamps, or any of our stamps for that matter. We love to see your work and you never know, you could feature in our Readers' Gallery

Bye for now.