Pin It button on image hover

Tuesday 30 June 2020

Only Tags - (by Magda) Landscape Patchwork , Butterfly Flourish, Mail Art, Just Butterflies

Good morning,
My second post of this month is an "Only Tags" one.  For two of them I used the same stamp
Landscape Patchwork and Butterfly Flourish

"For You" tag has a shade of Distress Ink Pad colors and touches of Stickless Glitter Glue, the tree is stamped with Archival Jet Black


"Tomorrow is a New Day" has a background of several mixed media layers.
I used Distress Ink Pad, white tissue paper glued with Glue n' Seal and Archival Jet Black


"Each Day is a Gift"  has a swept colour wash background with a stenciled relive pasted textures and a decoupage cuts from "Mail Art"  and "Just Butterflies" 


I hope you are keen of tags and enjoyed my post today,  hugs
Magda

Monday 29 June 2020

life is incredible (by Veronica)


Good morning everyone, today I have yet another concertina book to share - sorry, but i got hooked on making these, and the advantage is that I can use lots of stamps in the the same project.. Life at the moment is definitely different, but nature stays much the same thankfully and I enjoyed making this tree-themed mini book.
I made the base first, using distress oxide inks onto a craft mat with loads of water - one side came out paler , but that didn't matter 


. I added stamps from make your mark randomly using the same distress inks to stamp with to add a bit more interest to the background.


All the main images were stamped using black versafine clair ink, and I added colour to some  using brusho powders and watercolours.


The sentiment on one of the covers comes from the tall trees set, which I thought went well with the other stamps

Sunday 28 June 2020

Birthday Mail and Peaceful Dreams

Hello everyone, I hope you are all safe and well.  For my last post of this month I have a couple of quick cards featuring the lovely stamps from last month's shows on tv.

Birthday Mail.


I have used stamps from the Kingfisher Song, Sticks and Stones and Birthday Words sets, Versamark ink, gold EP, pearlescent paints, gold glitter paste, CB Strip Stencil, blue Versaclaire ink and clear EP.  


I used a Gelli plate plate background that I had in my stash of backgrounds and added some gold glitter paste through a stencil.  When it was dry I trimmed the background card , added a border with a gold pen and blended some gold gilding wax along the edges of the card.  


I stamped and embossed the large Kingfisher image on a piece of black card, using Versamark ink and gold EP.  I then painted the image and cut it out. 


I took a white base card and stamped a sentiment and a small image in blue Versaclaire ink.  I used a blue Distress ink to colour the small image.  


I attached the focal panel to the base card to complete the project.  This is a nice quick card that would be suitable for both male and female recipients.

Peaceful Dreams.

I have used stamps from the Kingfisher Song and Trees a Crowd sets, black Versaclaire ink, alcohol pens and a few die cuts from my stash.


I wanted to create my own twist on a black and white card with a splash of added colour, so I opted for a selection of grey tones with bright spots of green.  I took a piece of white card and stamped the stone bridge image in black ink, then added the tall tree scene to one side.  I positioned the images to create scene and perspective and I used a black fineliner pen to add and extend the lines of the scenery.  I then coloured the whole focal panel with my pens.  


When that was done I stamped a sentiment in black then I matted the panel onto black card.  I took a white base card and stamped one of the tree images repeatedly along the top and bottom edges of the card front.  I attached the focal panel and added a few die cuts. 


Thank you for dropping in today, I hope that you have enjoyed this post.  I shall be back next month with some more crafty fun to share with you. 

Until then stay safe and well,


                                     x x Penny x x


Friday 26 June 2020

Patchwork Sunset (by Judith)

Hello everyone, I hope that you are enjoying this warm weather! I thought that I would share a brightly coloured project with you today, showcasing some of the stamps from last month's TV shows on Hochanda. These colours probably reflect the tropical temperatures right now!

I started my project with a background created using Distress Inks and water. I stamped some images from Patchwork Landscape using Versafine Clair ink. I added some lines using a fine liner pen to complete the scenery, and coloured the images with Koh-I-Noor Polycolour pencils. I stuck to a limited colour palette, and coloured the grass, adding shading using the same colours that I had used in the foliage and flowers, (pinks and blues). This stamp set is really great for scene building, and is so useful for lots of different purposes. You could vary the colours and create quite masculine cards by using grey, terracota and ochre, for example. Stamp and emboss in white on kraft card for a completely different look, there are so many possibilities.

I will be back next month with some more projects to share with you. Take care, and thanks for stopping by,

Judith xx

Wednesday 24 June 2020

Katya, goddess of the sea(by Miranda)


Hello there,


Today is my 3rd and last guest post  for this batch. I did enjoy working with these lovely stamps.

A while ago when I just got the Katya stamp I was thinking to make her more versatile......leaving out her headdress, then she could be every lady you would like her to be.

And then I saw recently Judiths' lovely take on that too.......Oooh, I was thinking I can't do the same......In the days/years I was a member of the DT team it happened often that we had the same thoughts about a stamp then we used to say to each other ' great minds think alike' so with that in mind I started changing her.......trying to do something else......

I used the stamping tool for this, it will be easy using that. I only removed a part of her headdress. So it could also be a crown or decoration .....I wanted to do something with a sea theme so I changed her into a goddess of the sea.......IMAGINE........

I had an inky background in my stash and it was perfect for the colors I wanted to use...


First I did stamp Katya using Memento Londog Fog, it's a very neutral color and you can easily color over it with pencils. I left out the upper part of her headdress. I draw some wavy lines that could be her hair......Then I stamped and masked several of the large scalloped shell. And one tiny shell.......and at the right side the beautiful seahorse......

Then the fun coloring started using pencils.......I used Derwent color soft. And some highlights using a white acrylic marker.

I missed some structure so I added the square bubbles here and there using Memento summer sky. Than in the lower parts of the card I stamped the bubbles using Versamark and brushed some mica powders over it.....it creates a lovely shine(see photo's below)


I did use:
Underwater rubber stamp set-A5(seahorse and large scalloped shell)


Well, these were my ' adventures' with Katya, hope you did like them.
Of course I will be here again somewhere in the future.....(if life is not playing ball)
Thanks for your comments,

Stay safe and be creative,


Monday 22 June 2020

Tree-Mendous Stamps part 2 by Zoe

Good morning and welcome to my final post for the month, using the wonderful Trees a crowd stamp set.
Such a lovely set of stamps, can be all seasons with these.

So my Bookmark I used a stencil and mask to create the moon/sun then I simply blended Distress inks and splashed a little water, blotted and dried, some torn paper to create some hills and ground the wonderful tree.

I used Distress Oxides for my door hanger.

My two final projects I brayered on Distress Oxides in one colour then using very watered down Brushos in various colours and a fan brush, sprinkled on the colours and allowed to dry, simple stamping, first and second generation to create perspective.


Thank you so much for popping in, I hope you like my creations.
Have a wonderful day xx Zoe xx

Saturday 20 June 2020

F is for..........by Brenda


Good morning everyone, today I have a couple of shares and the first at the top features F is For....... stamped in Versafine Clair onto a shaving foam background and some colour added to the flowers I have also used one of the worker stamps from Small Graph Paper to create a border and added some splats using another worker stamp this time from Butterfly Mind.


Here I have one of the MDF tags which I coloured with Distress Oxides, then stamped flowers from Doodle Birds in Versafine Clair, added some Butterflies from Just Butterflies  and the sentiment from has been stamped onto some Aida embroidery fabric.

Thanks as always for popping in today.

Friday 19 June 2020

Vintage Iris

Hello
I am sharing a couple more cards from the May Hochanda show.

The first one uses the pretty Iris stamp which is found on the Kingfisher Song stamp set.  I stamped the image and coloured with alcohol markers. I then aged it with a crackle stamp and Distress inks. I die cut a frame and used a variety of acrylic paints in blue, grey and gold to give a tarnished look. I layered it onto some pretty paper and some card which I also tarnished the edges. I added some of the ephemera from Baroque Ephemera 1 and Baroque Ephemera 2.


My next card uses the large tree stamp from Trees a Crowd set . I took a piece of card and sponged inks through the Squarely Stencil.  I used different inks and kept turning the stencil until I was happy with the background. I inked over the whole card with Distress Ink Antique Linen.  I then stamped and embossed the tree and sentiment.


Thanks for looking
Sandra x

Wednesday 17 June 2020

More 'Katya' inspirations(by Miranda)


Hello there,

Today I have more inspirations for you, made with the beautiful Katya stamp. This time some work with alcohol based markers and not to difficult as in coloring techniques.. I certainly am a colorist, but I can imagine that some people don't like too much coloring.......it's always labour intensive.
So I did create one card , stamping plain black and only adding some gold paint. And on another card I did only use 3 colors which you can see in the photo. 

So I will begin with the most simple one....
I did use:
Artistic Expressions(the word Beauty)

I stamped the image using Memento black, the most suitable ink for working with alcohol based markers.
The gold coloring is done with an ultra fine brush and some Gansai Tambi gold paint. It is opaque and you can see the  lovely shine on the photo above and below.
First, I stamped Katya.......than I stamped the flowers and leaves on a separate piece of paper and decoupaged them. I also stamped some leaves directly on the card where they would fit in.


The 2nd one, using the next materials:

Not my usual color combination but I think it creates a lovely contrast. Also used some glitter pens for that sparkly effect.
Stamps:

I stamped alle the parts in the same order as the previous card. 
I searched for an open flower in my CB collection and found the large flower from the Tangled Garden. 
I stamped it with Memento Black and over stamped the first layer of the flower using the big bold Leafy Brocade background. 
Then for the 2nd layer I used the panel background stamp from the Paisley elephant and also for the top layer, the center of the layer.

Ofcourse you can also use just one stamp for the entire flower. But that is the luxury of having a lot of stamps to choose from.....

I choose some matching alcohol markers to color with. And some accenting with the sparkle pens. Although it's hard to catch the shimmer ......it really sparkles...

Then I wanted to give the black/white gold card more colors so I took that one again and changed the whole card using the 'traditional Russian folk art ' colors.
And here she is.......

Here you can see the lovely shine of the gold paint.......


So, you can either color a lot if that is your thing, but you can also give just one color like the gold accents. Or keep a limited color palette with just 3 colors.
No need to use a lot of blending with different shades, just one plain color.

Hope I did give you more ideas with this lovely stamp, I really like her! Next week again.......a complete change of 'Katya' into..........stay tuned......


Thanks for your visit and always love to read your comments! 
Any questions? Feel free to ask,


Tuesday 16 June 2020

bejewelled landscape by rachel

Hello there,
I have another couple of pieces for you today including a step by step for my patchwork landscape card. But first of all my dress form:


I had much fun making this piece - I painted the dress form first then stamped the images onto rice paper and coloured them. I applied them to the dress using decoupage type glue...once finished I made a quick hat out of cardboard and added that to the dress form too!


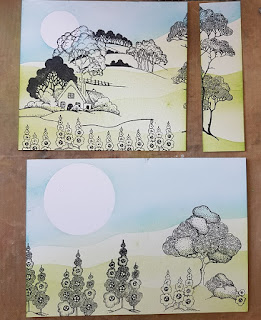
And so to my card ...To begin I created my card blank ... an A3 piece of card was cut in half along the long edge. Once I had done this, instead of just folding the card in half,  I folded one flap to be very narrow and one flap to be very wide ... I then cut three pieces of card ready to mount onto this card blank.


On each measured piece of card I used a landscape stencil and mask to create land and sky using distress oxides and a stencil brush.

Next I added the stamping.... I tried to allow room for the gap on the front of the card - and also did a bit of masking in order to get the images to work together. I also added some pen lines for more landscape...
Next I added colour to the sun and the stamped features using inks and water colour pencils.

I added these to the card blank and added some sequins. 

I do hope this is helpful - if you have any questions please ask away!

Big hugs

Rachel xx


Sunday 14 June 2020

Circles (by Magda) - Patchwork Landscape, Butterfly Flourish

Hello,
This time I have been inspired by the challenge "Circle" that Lesley promoted on "Be a Social Butterfly" in one of her videos on Facebook.

Step by Step :
I covered with white gesso a swiped coloured page and put on top of it  Distress Paint Twisted Citron. 
I draw from a circle stencil different sizes of shapes and colored with Distress Paint Twisted Citron. 
I colored the circles with Distress Ink Pad and dabbed only the largest section of them with a wet baby towel
I stamped with Archival Jet Black the sentiment "Hello" of Butterfly Flourish  stamp in the Circles while on the background as texture I stamped in a darker green Distress Ink Pad  the circle foliage of a tree from Patchwork Landscape.


Thank you for passing by, hugs
Magda