Pin It button on image hover
Showing posts with label Mellow Fruitfulness. Show all posts

Wednesday, 27 May 2020

Autumn Notice Board (by Carole)

Hello everyone, today sees the last project this month from our Guest Design Team member Carole Cann, she has made a brilliant project to inspire you and will be back later in the year.

Carole writes:

Hello everyone.

This is my last project for this GDT session. Hope you like the idea.

I have found this item very useful in my household, for leaving quick messages for my husband and vice versa.
Sttamps used: Mellow Fruitfulness and Autumn Poppy
Distress Inks, Versafine, laminator, Whiteboard pen.


I coloured my backgrounds with different yellows, oranges and red, then spritzed it so the colours bled and left a speckled pattern.

The top section was stamped with black and clear embossed to give it more depth.
Some areas were then coloured with water colour pencils and highlighted with white pen.
I then cut it to the required size and trimmed the other two sheets similarly.

These were then overstamped with various designs on the sheet with Smokey Grey Versafine. If you want it bolder then use black.

Once completed they were laminated too. I used my old Cropodile to put the rings on and joined them all together with wire loops.
You could tie them together with fine ribbon, which would look pretty too.
I didn't have any jump rings big enough, so I wrapped my wire around the handle of a paint brush to make oval jump rings.
The back of the sheets were decorated too.

You can write on this with the whiteboard pen and then rub it off easily when finished with the message.

Hope you have enjoyed my projects as much as I enjoy looking at what you are all making, and happy crafting.

Stay safe,

Carole.

Monday, 24 June 2019

colourful world (by Veronica)

 More samples from the May tv shows to share with you today. A lovely variety of designs in this show, really something for everyone.

My first samples use the mushroom house, a  quirky stamp that will go well with fairy stamps and can also make a different new home card....

the first card was simply stamped in black versafine ink and painted using Koh-i-nor watercolour paints. these are very vibrant colours, so Iwent a bit crazy and created a rather psychedelic house, adding the spots with white pen afterwards.


A more normal version, again stamped using black versafine ink. The mushrooms were masked using masking tissue, and a cirsle for the moon as well. The sky was created using chipped sapphire distress oxide ink and a blending brush plus some yellow for the moon. again painted with the watercolours, but more 'normal' mushrooms this time!


This uses the artichoke stamp, stamped in black and clear embossed  -this time I used masking fluid to cover the image before sprinkling with brusho powders in blue and red and spritzing with water. Once everything was totally dry, i rubbed off the masking fluid. Toning blue and red mats for a change onto a white card blank.


I used the border stamp from the same plate here to create a frame onto a square of wite card using a dark green dye ink pad, and rubbing the ink pad along the edges to create a dark edge.  I used the same ink pad to stamp the apples onto a smaller piece of white card before colouring with watercolour pencils.


My final card was a little different, and I used a stamping platform to create this.  The leaf spray was stamped 4 times using a light green dye ink pad, and then a waterbrush to spread the colout into the leaves.  I used the same ink pad to stamp the rose hips into the gaps left by the leaf stamp. I cololured the leaves with watercolour pencils and then painted the hips orange to make them stand out - the stems came together in the centre to create a squiffy square (purely accidental) so I painted this as well to create a focal point.


Saturday, 22 June 2019

Mushrooms and Apples by Penny

Hello peeps, I hope you are all well and enjoying some sunshine after all the rain we've been having.  I have a couple more samples from last month to share with you today, featuring some of the gorgeous CB stamps.  


Shrooms Galore!

For this first project I have used stamps from the Mushroom House,  The Toadstool Garden, Mellow Fruitfulness and Tagtastic sets; Koh-I-Noor paints, pearlescent paints, black Versafine, silver and clear EP.


I began by stamping a tag onto black card and embossing with silver EP.  I cut it out, then stamped and embossed one of the 'holes' at the top.  I stamped the Mushroom House in black ink and embossed it with clear powder, then painted the image.  On a spare piece of card I stamped and embossed a sentiment with silver EP.  I used a silver pen around the edges before attaching to the tag.   To complete the tag I added the cherry branch, which I had stamped, embossed, painted  and cut out of black card, and some red raffia.


On a piece of white card I stamped the Toadstool Garden image in black ink and painted the toadstools and leaves with watercolour paints.  I added silver pen around the edges then attached it to a black base card.  I then attached the tag to the card beside the focal panel.  


Colourful Orchard.


For this project I used stamps from the Mellow Fruitfulness and Artistic Affirmations sets; grey Versafine ink, red Versafine ink, clear EP and alcohol markers.


I started with a piece of smooth white colouring card and stamped the apple branch image with grey ink.  I masked it with Masking Tissue and stamped the image twice more.  I removed the mask and coloured all the images with alcohol pens, adding light and shading to make the apples appear 3D, and did the same with the leaves.  I added some highlights with a white pen, and a shadow line around the images.  On a spare piece of card I stamped and embossed the apple branch three times and coloured them as before.  I then cut the images out.


I stamped a sentiment in a bottom corner of the focal panel using red Versafine ink and embossed it with clear EP.  I added gold pen around the edges of the panel then matted it onto red card before attaching it to a white base card.  I attached two of the cut out branches to the top corners of the card with 3D foam, and the other to the bottom of the card.


Thank you for popping in today and taking time out to read this post, I hope you've enjoyed it.  I loved creating both cards and I hope these samples give you a little inspiration.

I'll be back next month with more crafty fun, so until then take care,


                               xx  Penny  xx


Thursday, 13 June 2019

Woodland Delights (by Julie)


Hello, today it is my turn to share three cards that I made for Chocolate Baroque's recent  Hochanda TV shows.

 I used the Autumn Poppy set to create my first card which has a bit of a woodland theme. I stamped the mushrooms twice to the bottom right hand side of the card, followed by the leaves spreading from the top of the card. Don't worry if you over lap any leaves as you can hide any "mistakes" by stamping some leaves on spare card, cutting out and layering over the top with 3D foam pads.
I hand drew the tree trunk, before colouring the whole design with Distress inks and Polychromus pencils.


These two cards have been stamped with Mellow Fruit. They make a reasonably quick cards and as you can see are very similar in design.


The cherries and apple designs were stamped with grey Versafine Clair, before being coloured with polychromus pencils. The background is also coloured with the same pencils and white paint pen highlights were added to finish the designs off.

Thanks for stopping by and please call back for more Design Team inspiration.

Julie xx

Sunday, 9 June 2019

Autumn Recipes Book (by Magda)

Hello everybody !
I dedicate this first post of June to all the friends who like writing a recipe book.

Step by step

1. Cut one piece of white heavy cardstock  25,5 x 15,5 cm and a second piece 25,2 x 15,2 cm
2. Colour one side of the first piece with a wash of Brush using autumn colours. This side will be the
    cover of the book.
3. On the front page stencil "Autumn" from Chocolate Baroque stencil Seasonal Journey in a reddish
    colour
4. Blend lightly the inside pages with Distress Inkpad  Brushed Corduroy and Old Paper
5. Add more colour through a stencil leaving some areas to write your recipes, and
    outline scribbling these areas.
6. Stamp on a white  cardstock  several images with Archival Jet Black   You will find the images you
    like in Mellow Fruitfulness  and Autumn Poppy stamp sheets
7. Colour with Faber Castell Art Grip Aquarelle Pencils all the images and cut the edges.
8. Glue every single piece with Inkssentials Glue n Seal on each page.
9. Assemble the book and bind it with a rope.


Autunm Tag 

"Mushroom House " is really a nice funny new stamp with a the right size for a Tag.
I used for it :  Distress Inkpad for the background and on the stencil,  Archival Jet Black , Faber Castell Art Grip Aquarelle Pencils ,  a stencil,  Inkssentials Glue n Seal,  and Stickles. The sentiment is in the new stamp "The Toadstool Garden" stamp 


Thank you for passing by.
Magda


Friday, 7 June 2019

Bountiful Birthday and Magic Mushrooms by Penny

Goodly morning lovely peeps, I hope you are all happy and well.  I'm here with my first post of the month, a couple of lovely projects featuring the beautiful stamps that were showcased in May's shows.  


Bountiful Birthday

I have used stamps from the Mellow Fruitfulness, Autumn Edges  and Birthday Words  sets; Distress Inks, Versamark ink,white EP and CB Kraft Card. 


I began by stamping the large artichoke image, using Versamark ink and embossing it with white EP.  I did the same with  the fruits and a sentiment, then I painted the images with DIs.  I matted the panel onto orange paper. 
I took a cream base card and stamped the collection of fruits and nuts images along the edges of the card in DI, then I attached the focal panel to the base card. 


A beautiful and simple card that you could use for a lot of occasions and recipients.


Magic Mushrooms.

A tag for you now using stamps from the Mushroom House, Tag Tastic and May Fairy sets; black Versafine ink, clear EP, gold EP, Versamark ink, Koh-I-Noor paints, a white pen and a sparkle pen from my stash.  


On a piece of white card I stamped the tag with Versamark ink and embossed it in gold EP.  I then stamped the Mushroom House image inside the tag, using black ink and clear EP.  I took another piece of white card and stamped and embossed the fairy.  I then painted all the images, adding white pen dots to the mushrooms and sparkle pen to the fairy and her wings.  I attached the card tag to a greyboard tag then cut around it.  I fussy cut the fairy and attached her to the tag.  I also stamped, embossed, painted and cut out a small butterfly and attached it to the tag.  


I then added some ribbon from my stash to complete the tag design.


This pretty tag could be a bookmark or a keepsake, and it would suit a recipient of any age.  


Thank you so much for popping in today and spending a few minutes with me, I hope that you've enjoyed my post.  I'll be back later this month with more crafty fun!


                         xx  Penny  xx

Saturday, 1 June 2019

Autumn Glory by Brenda


Good morning, Brenda here and I am delighted to welcome you to our first post of June where this month myself and the team will be sharing our creations using the stamps Lesley showcased on Hochanda TV which included the beautiful new Mushroom House and The Toadstool Garden.

My first share above is a monolith which I treated to a mixture of acrylic paint, distress ink and crackle glaze. I stamped the lovely Chinese Lanterns from Autumn Poppy twice, cut them out and coloured with Kon-I-Noor paint and mounted onto the base, stamped the wording from Acorn House, cut it up and fixed into place.


This is the beautiful new The Toadstool Garden which I stamped with Versafine black ink and coloured in with pencils and added a pale wash of Distress Ink around it, matted and layered and added some ribbons


Here are the lovely Poppies from Autumn Poppy simple stamped in black onto a oxide ink background, I blotted off a good deal of the ink while still wet as I wanted a soft finish. The Poppies are coloured with pencils and the Butterfly stamped again onto vellum, coloured on the back and decoupaged.


My starting point for this one was to use distress inks to create a vintage look and then stamped the fruits from Mellow Fruitfulness using Distress Markers to ink the stamps, spritzing with water before stamping. The sentiment in the middle is from Mushroom House.


Here we have Mushroom House, I machine stitched a pattern around the edges and took my colours from the aqua coloured cotton. The background was created with Pan Pastels, the house stamped with Versafine Clair, stamped again onto coordinating DP's and paper pieced.


My final share for today stamped from Autumn Edges and Autumn Poppy all stamped in black Versafine onto a background of Distress Inks and Gesso and mounted onto coordinating papers which with a die cut edge.
My thanks for your visits today and I hope I have offered some inspiration on using the stamps which you will find over at the web site.


Sunday, 9 October 2016

Merci - Canadian Thanksgiving (by Asha)

Good morning, friends! It's October and that means, autumn, falling leaves, harvest, thanksgiving, fruits, pies and halloween. And that is the theme at Chocolate Baroque this month.

Here's my autumn offering for the Canadian Thanksgiving which falls on October 10 this year. The fruity border is from the Mellow Fruitfulness A5 sheet. I decided on a simple greeting in French from the Pretty Poppies A5 sheet as this card is going to friends from Quebec.

I inked the edges with Distress Inks, coloured the image wth alcohol markers and finished the card with a gingham ribbon.


I have more pictures and details of tools and products over at my blog. Thank you for stopping by today and come back soon for more amazing creations by the rest of the Design Team.

Happy Thanksgiving to all our Canadian friends and fans!


Beijinhos,
Asha


Thursday, 3 March 2016

Balalaikas at the ready as we launch our latest stamps (by Lesley)

Happy March everyone, another month has just bit the dust and it is time for me to throw off some of the winter blues. Bit optimistic I know but hey, Spring must be just around one of the corners. And today is a very happy March day as we are launching our latest stamps.

These are a little more unusual for us, but once again Sue has used her wonderful imagination to draw us these gorgeous images. Babushka is an A5 set that is based on the stacking Russian Dolls and aren't they just fabulous?


You can devise your own stacking doll projects and have loads of fun colouring, decoupaging and creating brilliant artwork. I think the kids would love to join in with the these too, a great set to introduce your young ones to the wonderful art of stamping.

Judith has designed this card by incorporating stamps from our Mellow Fruitfulness set with her Babushka dolls.


And this is just for starters. Wait until you see how creative our Design Team girls have been with these magical new stamps.  There will be lots to inspire you over the next few weeks so please keep coming back to check out their latest samples.

Finally, don't forget all your comments are put into a draw every month so that one lucky person can win a £15 voucher to spend on Chocolate Baroque stamps. Another excellent reason to keep following our DT blog.


Saturday, 3 January 2015

Everyone should have a Heart (by Judith)

Hello everyone, I have some heart-related makes to show you today, suitable for those occasions where a bit of romance might be involved; Anniversaries, Valentine's, etc. I am working with the Punky Hearts and Fluttering Hearts stamp sets, and want to show you how versatile these sets can really be.

My first card is a very quick card for those occasions when you do not have much time to make something. I stamped a large flourish from the Butterfly Dreams stamp set onto a small square card using brown ink. On a piece of scrap paper from my stash, I stamped the apple and half of the butterfly from the Fluttering Hearts stamp sheet. I used waterbased markers to ink the stamps, enabling me to get the multi-toned effect. I also stamped a half butterfly directly onto the card. I cut the images out and attached them to the card, and finally added the sentiment in the bottom corner.
 My next card is again very CAS in style, as I wanted to create a masculine card suitable for an Anniversary or Valentine's card. I masked off a large area of the background, leaving only a horizontal strip showing, and then stamped the area with the floral heart using black ink, covering it with clear embossing powder. I then added some colour using three different tones of Distress Inks, before removing the paper masks. I stamped and embossed the heart once more onto a piece of kraft card, before cutting it out, and adding it to my design with 3D foam pads. Finally, I added a sentiment from the Words of Love stamp set and matted my background onto black card.
 My last project is a mixed media tag, using a real mixture of stamps, which I love to do when creating my projects. Full details of how I made this tag can be found on my blog if you are interested.

 I hope that I have given you some inspiration with my projects. Keep checking back every day to see what my Team mates have come up with, they have some delightful projects to show you. Thanks for stopping by, Judith xx

Sunday, 30 November 2014

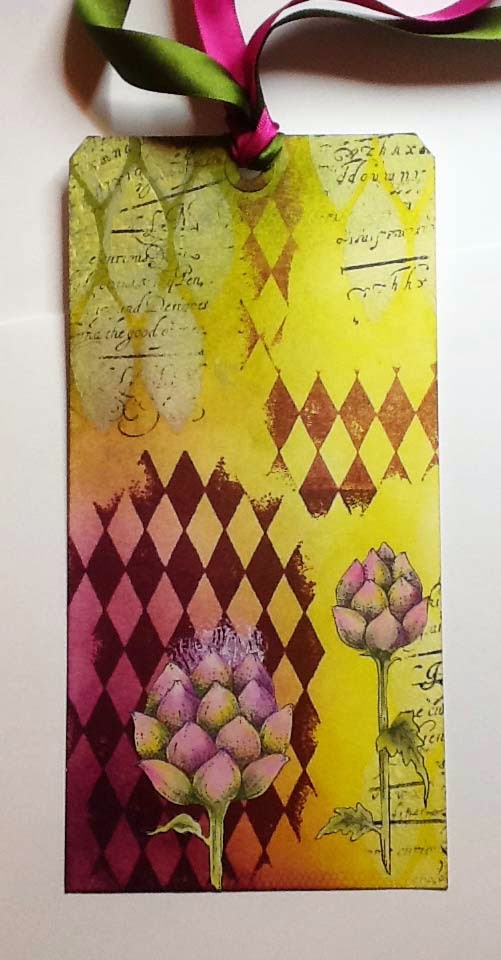
Artichokes and Diamonds (posted by Lesley)

This tag started out as a three colour challenge set for me by Glenda when I was up visiting her in Scotland..She picked three colours of Distress inks for me - Seedless Preserves, Crushed Olive and Peeled Paint and I used these to colour the background on the tag. It was then left lying around for a couple of days because, although I loved the colour combination, I didn't know where I wanted to go next.
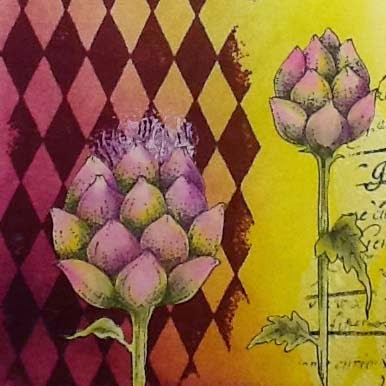
Eventually I decided to use the artichoke image from the Mellow Fruitfulness set. I stamped it onto a self-adhesive label and painted it using the same three Distress ink colours used to colour the tag.. I added some texture with soft relief paste (watch out for this product coming to the website soon) and the Blazonry stencil, then stamped over the top with a script stamp from Eccentric Edwardian. 
Next I randomly stamped the image from Harlequin Fragments, and stamped the stamens of the artichoke using white paint. I cut out the artichoke images and split them up before sticking into place. Just a few scraps of toning ribbon finished it off.
Sometimes it's good to walk away from a project rather than just keep going because you feel you have to finish something.  If you give yourself some space you return to it with fresh eyes and often a sudden influx of inspiration. 

Thanks for joining me today and keep tuning in for some gorgeous creations from the girls with the fabulous new steampunk stamps.


Friday, 28 November 2014

A couple of Autumn projects (posted by Claire)

Good morning, Claire here with a couple of quick projects. This time of year is so hectic there isn't always time for elaborate projects. The first is a card made using Autumn Edges. I'm really trying to come up with some fairly flat designs that can be posted cheaply, hopefully this one will fit the bill.


I'd seen a few images around blogland that had been stamped and embossed with white before being coloured and decided to give this technique a try. I coloured the mushrooms with Graph'It markers and then crated a background with PanPastels. The fairy is from the August Fairy set, again stamped with versamark and embossed with white embossing powder. The sentiment is from Fairyland words, this time I stamped with a Memento inkpad in Teal Zeal.

For my second project I've covered a little notebook to be used for jotting down recipes. I began by cutting a strip of red card slighly wider than the book. Using the book as a guide I scored the card to create a spine and left about an inch of card to overlap the back of the book.


Next I cut white card slightly smaller and stamped the images and 'Recipes' from Mellow Fruitfulness in Memento Tuxedo black ink. I coloured the images with my Graph'It markers and distressed the edges with Tumbled Glass Distress Ink

Hope you like these two quick projects, we're all getting in the mood for some steampunk fun with the gorgeous new stamps! See you soon
Claire xx