Pin It button on image hover
Showing posts with label Essence of Nature. Show all posts

Wednesday, 27 April 2022

Butterflies! (by Christine)

This is my final post on the blog for a little while and you will see there is a bit of a theme running - butterflies!

Chocolate Baroque have many beautiful butterfly designs in their catalogue so I was rather spoilt for choice. For my first project, I used the largest stamp from the Patchwork Butterfly stamp sheet. Using C

Versafine Onyx Black ink, I stamped it straight on to my card. I then used Distress Inks, (Twisted Citron, Abandoned Coral, Salty Ocean), around the edge of the card to give the card a sort of gentle coloured halo, leaving the area closest to the image white, as a highlight. 

I chose watercolour pens to colour the image, finally adding some Glossy Accents along the black body and gold Liquid Pearls on selected areas. I chose not to add a sentiment for the moment - I will add one if I need it for a particular occasion. There are many lovely sentiment stamps on the Chocolate Baroque website.

 My second project comprises two tags. One used the Butterfly Tree from the Essence of Nature set, the second a selection of butterflies from the Honeysuckle Butterfly set.

I used Versafine Onyx Black for both tags.
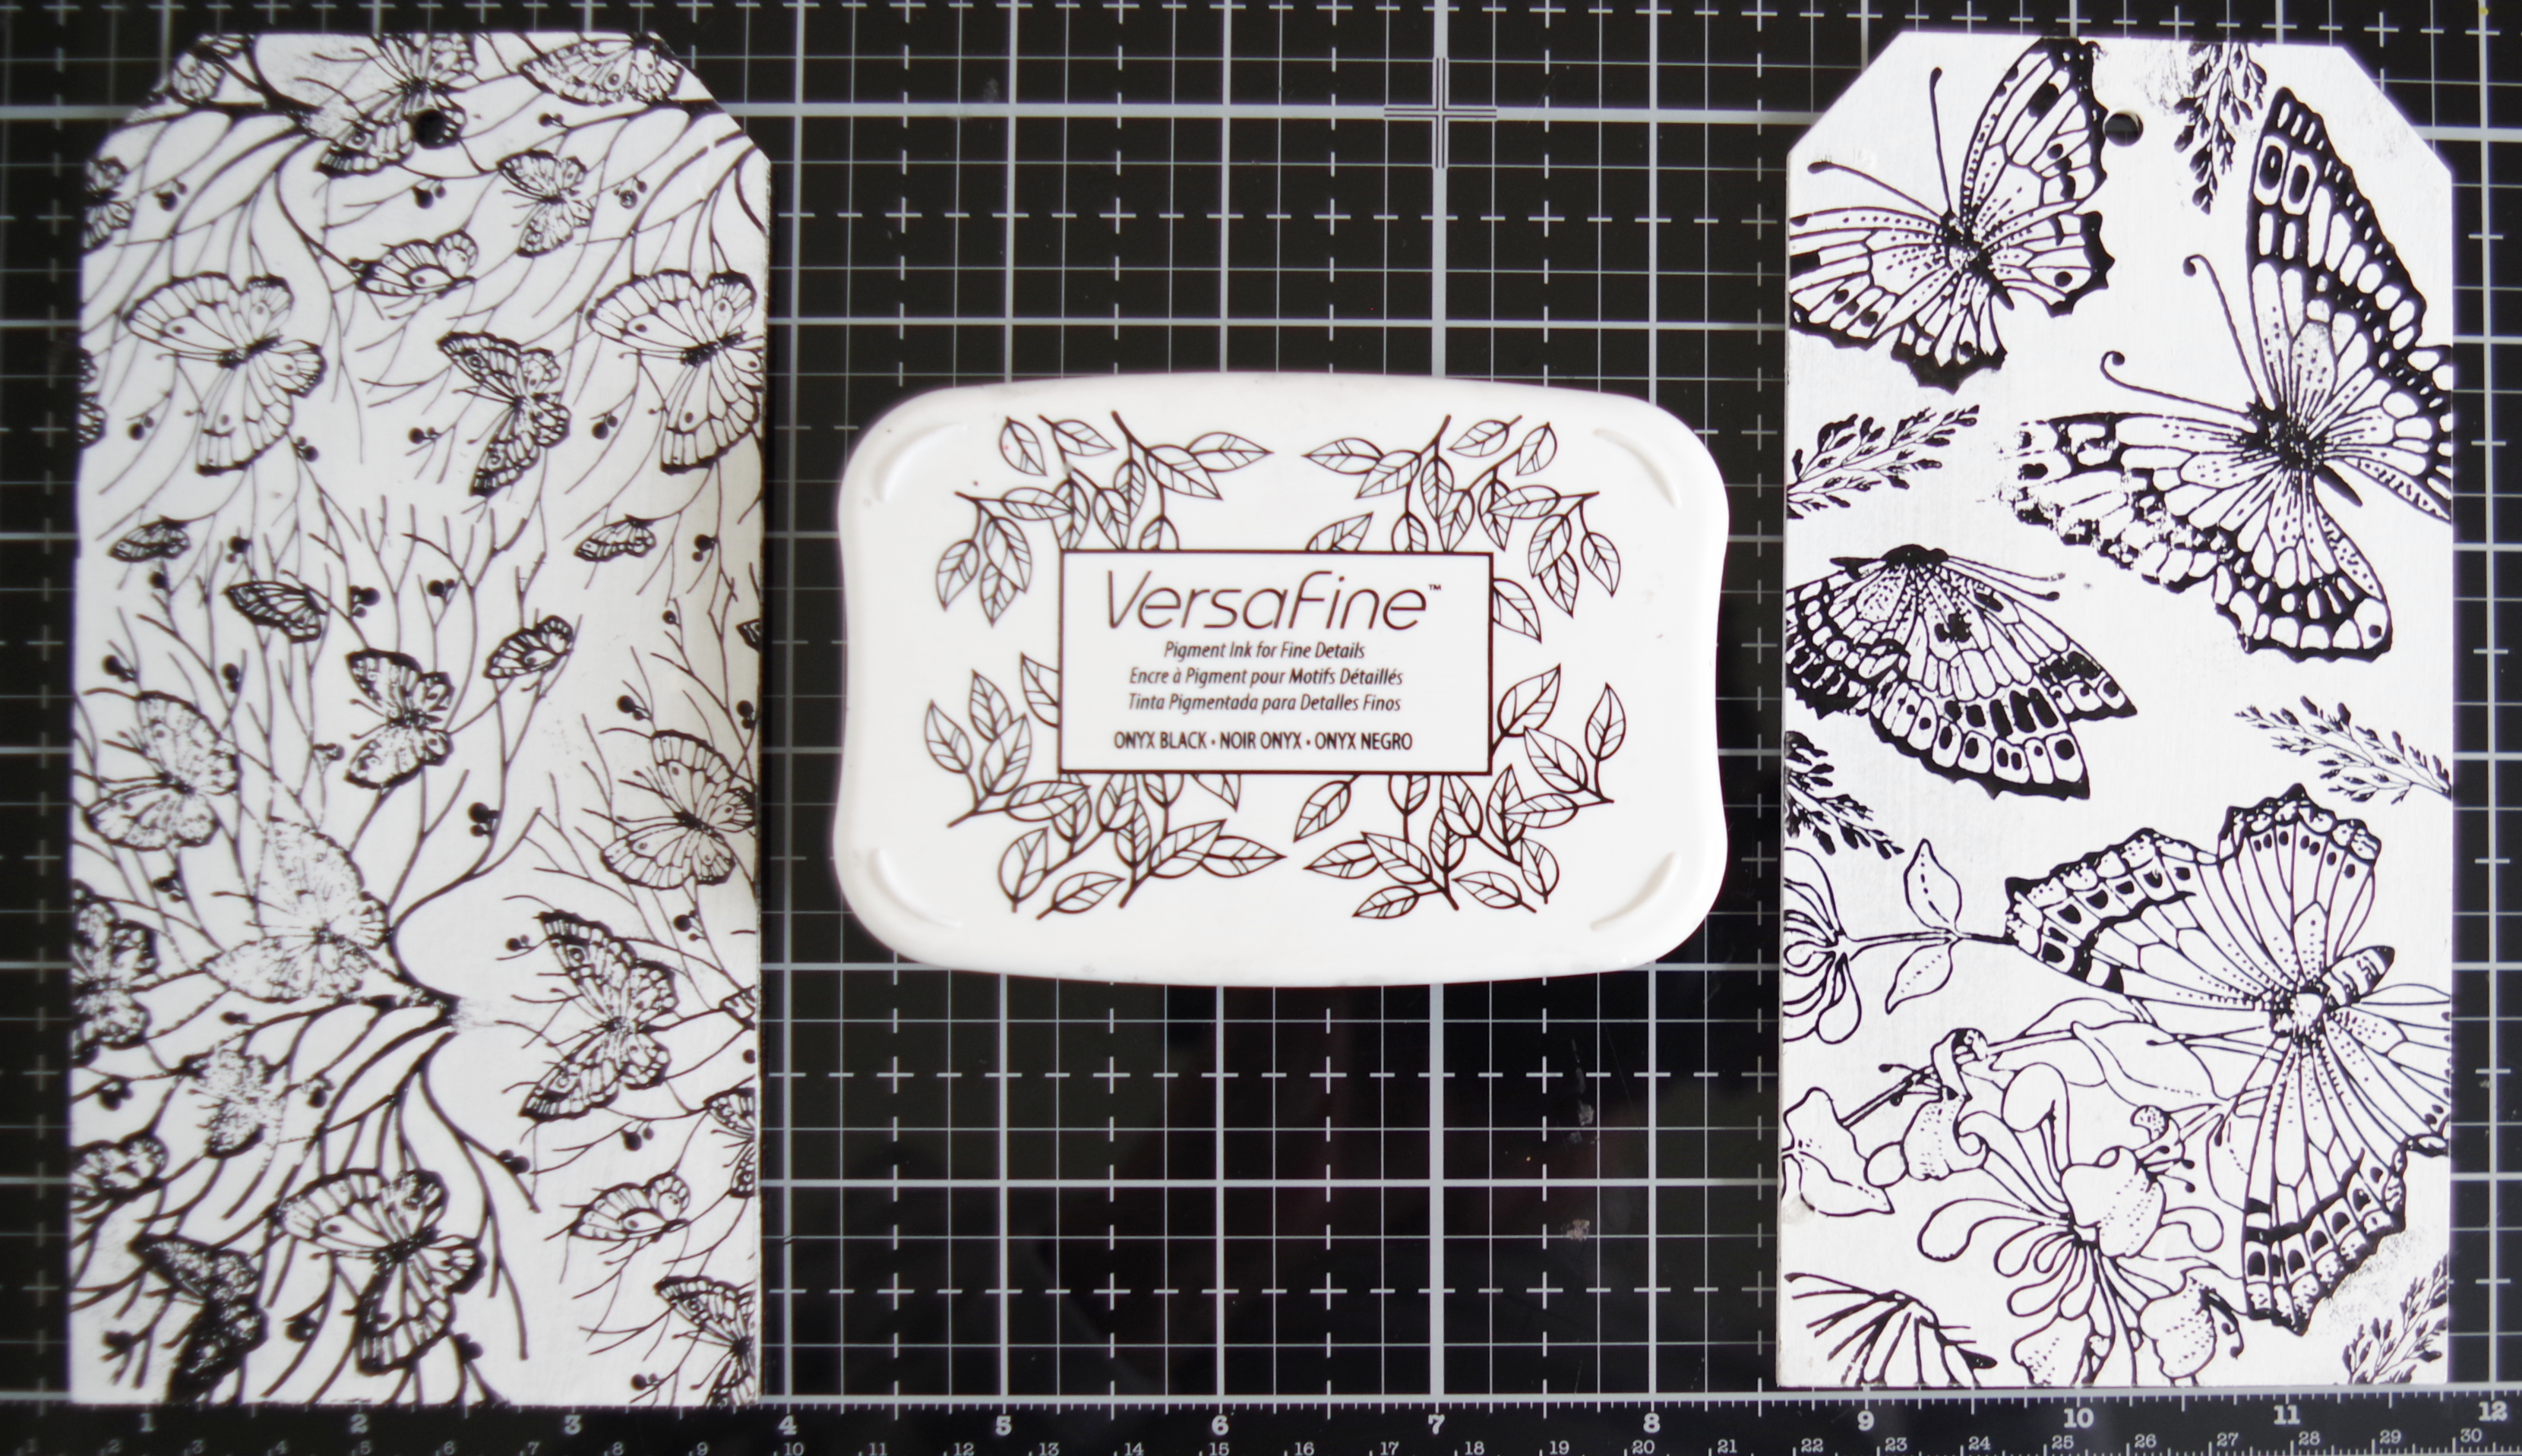

The background for the Honeysuckle stamps was created by spraying purple and yellow inks through a stencil. I used a white gel pen to pick out some areas on the butterflies and then gold paint on others.

The background for the Butterfly Tree was created using acrylic paints and a stencil on my gelli plate and then taking a print straight on to the tag. I used coloured pencils to highlight each of the butterflies and finished them with Glossy Accents.


 I do hope you like the projects.

Happy crafting and take care.

Christine

xx


Wednesday, 13 October 2021

Beautiful Book Cover (by Carole)

Hello everyone, our regular Guest Design Team member Carole is back with us this month, she will be sharing some inspirational projects with us for the next three weeks. The first is a beautiful book cover. 

Carole writes:

Hello everyone.

I am pleased to be back for this GDT spot again.. hope you like what I have to show you.

For my first project I decided to cover my sample book, something I have wanted to do for ages! I keep a visual record of the stamps I receive for Chocolate Baroque samples in an A4 book and then cross reference this to my storage boxes. It has been looking decidedly tatty for ages as it is well used. Most of the initial time was taken up deciding on a plan and colours and what stamps to use. Always a tough one, but got there eventually, and tried to keep out of my comfort zone for colour. 

So here it is.

Once I had cut the paper to size, I clear embossed some leaves then coloured over them with Wild Honey Distress Ink, to emphasise the embossed areas.

This was overstamped with a selection of stamps from various sets.

The flowers were stamped with Versafine Sepia and cut out, as were some of the butterflies. These were coloured with Aged Mahogany Distress Ink, Dried Marigold and watercolour pencils, then stuck down.


I haven't decided on the back yet, but it will probably be a simpler design.

Once everything was stuck down securely I sprayed it with a matt sealant. Hopefully this will protect it as it is well used.

Thank you for looking. I was pleased with the result in the end. At least it's easy to find being bright yellow!😊

Hope you like it and enjoy covering a book yourselves.

Stamps used: Essence of Nature, Floral Perfumery, Honeysuckle Butterfly and various other grasses and sentiments from different sets.

Colours used: Wild Honey, Aged Mahogany, Dried Marigold, Weathered Wood to add to the edges.

Back next week for a different sample.

Happy Crafting

Carole


Wednesday, 14 April 2021

Spring Primroses (by Carole)

Hello everyone, today sees the first of three posts this month by our regular Guest Design Team member Carole. She has created a beautiful Spring themed project for your inspiration.

Carole writes:


Hello everyone.

I'm delighted to be doing a GDT session again.

I have revisited some older stamps as these are often neglected and it's not until I start using them again that I realise how much I enjoyed them the last time I used them.

So many ideas buzz around and no time to do them!!!

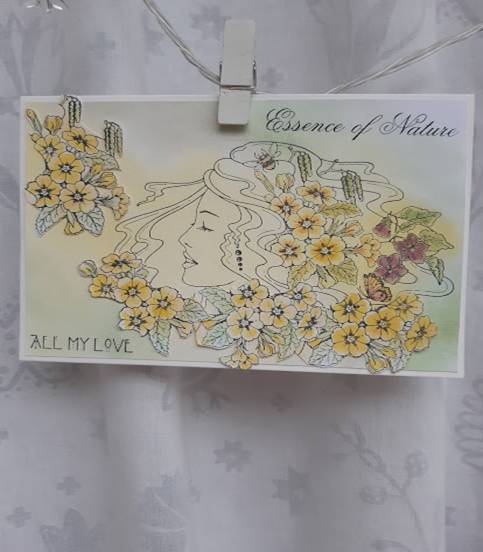
As the weather has been gorgeous here for a little while, and the garden is bursting with life, my first sample is using Spring Awakening. This is a lovely stamp for Spring birthdays and Mother's Day cards. 

The colours look a bit washed out in my photo unfortunately.

Stamps used: Spring Awakening, Amazing Mackintosh Words, Essence of Nature

I stamped the face onto a piece of backing paper that had been coloured with different yellows and sage Distress Inks. This was then spritzed to was the colour out a little.

The primroses were stamped a few more times, cut out and coloured.

The main image was coloured with watercolour pencils, still one of my favourite ways to add colour.

The loose primroses were then added to the areas required.


Hope you are enjoying some lovely Springtime weather where you are too.

See you next time for another of my samples.

Happy Crafting

Carole 😊


Friday, 22 May 2020

Feeling Gratitude (by Magda)

Hello,
my second post of this month is a layered Journaling Page, that brings in evidence two Chocolate Baroque stamps.
You can hardly see the first pink-brown background with the blue flowers and orange dots, the second layer of gesso with green swirls will give a nice light under the craft tag.


I stenciled the tag with light green flowers, scored the tag and blended with Distress Ink pad Walnut Stain , at last I stenciled again with white.


The decoupage "A Heart full of love" is coloured with watercolored pencils.
The sentiment on the project is in the plate Words of Gratitude  is stamped with Archival Black jet on a white cardstock coloured with Distresss Ink Pad Mustard Seed 
Glue all the pieces on the page.


As a quick idea here two ATC changing the colour but using with the same stamp Essence of Nature Words to Dazzle and Sparkle and stencil 


I hope you enjoyed my projects this time too,  hugs
Magda  

Monday, 25 February 2019

The Magic of Nature (by Carole)

Hello everyone, Carole is back with her final post of the month, a beautiful Spring themed card. 

Carole writes:

Hello again, another project for February, it is a little busier than my previous projects.
As Spring is in the air, or so they say, (it's got to come some time), I have used the pretty Spring Awakening stamp. She is one of the Four Seasons stamps, all of which I like.

Products used:

Spring Awakening stamp
Distress inkpads: Squeezed Lemonade, Dusty Concord
Versafine Smokey Gray, black permanent inkpad
Clear embossing powder, parchment paper
The words are made up from a section of one of the sayings from Let's Get Festive and Essence of Nature.

It is useful to be able to use parts of sayings from different sets. It makes them go further. Like the Autumn card I made for a previous Guest Design Team post, the hair can be inked separately to make a good background. This I did with Versafine, onto a background made with Squeezed Lemonade and Dusty Concord Distress inkpads. The Lady is stamped and embossed, then coloured with the same colours as the background. I stamped the primrose clump three times and cut around them to make an added feature.
I wanted to pick up a little of the violet colour so have mounted the background onto a violet coloured card and then the white card base.
The words are stamped with a permanent inkpad onto the parchment and when this had dried thoroughly, I tore around the relevant words.

Thank you for visiting and I look forward to my next session later in the year.
Bye for now and happy crafting,

Carole.


Monday, 18 February 2019

A Walk in the Garden (by Carole)

Hello everyone, our Guest Design Team member Carole is back today, sharing a delightful card which uses a background that she found in her stash. We often make extra backgrounds and 'file' them away for later, why not have a rummage through your left overs, and use Carole's project as inspiration for a project?

Carole writes:

Hello everyone.
Time for my next post. Where does the time go?
When I was tidying my craft stuff, I use this term loosely, I found a beautiful background piece that I had made with my Brushos.
I have teamed it up with an image from one of my other favourite sets, the Mackintosh Beauty.
I have used her in one of my previous Guest Design Team posts, in fact exactly a year ago, but because you can snip away various parts of the design, she can look different each time you use her. I like this versatility in a stamp.

Products used:

Stamps: Exquisite Edges, Mackintosh Beauty, tiny butterflies from Essence of Nature, words from Loving Sentiments.
Brushos, Versamark, clear embossing powder, an Aloe Vera coloured inkpad, Majestic Blue Versafine, black permanent inkpad, parchment paper.

I stamped the background with Versamark and clear embossed it.
I used a paintbrush to wet the inside of all of the flower shapes and then lightly sprinkled a blue Brusho over. The water tends to be contained within the embossed areas so the colour doesn't spread too far and the splatters spread into the sky area.
I left this to dry and then coloured the lower section with the Aloe Vera inkpad.
The lady and the tiny butterflies were stamped with the blue Versafine and clear embossed. Her dress was coloured with the same colours as the background.
The words were stamped with the permanent inkpad onto parchment.
It was a little time consuming to cut the butterflies out but I thought they were cute.

Thank you for visiting today and I hope you enjoyed my card.
It is always a pleasure creating projects with such beautiful stamps as these.
Bye for now and happy crafting,

Carole.


Friday, 21 September 2018

Autumn Medley (by Carole)

Hello everyone, here is the final post this month from Carole, a beautiful Autumnal project, using a mixture of stamp sets.

Carole writes:

Hello again.
My final project for this Guest Design Team session is Autumn based, a beautiful time of the year.
As the foliage is changing colour rapidly where I live and the leaves are falling, I have used a favourite stamp of mine called Autumn Medley and an Autumn Edges stamp.
I think this is a beautiful image and the foliage hair can be used on its own, to create lovely autumnal backgrounds.

Products used:-
Stamps: Autumn Medley, Autumn Edges, Essence of Nature (words)
Versafine inkpads: Onyx Black, Satin Red, Spanish Moss
Gold glitter embossing powder
Distress inkpads- various Autumn colours
Gold gel pen

I created a background using a variety of Distress Inks in Autumn colours.
This was then spritzed with water so the colours bled into each other then I over-stamped with the border while it was still damp, so this bled too.
It was left to dry and then over-stamped again with the green and red Versafine inkpads.
The main image was stamped with black Versafine and covered with embossing powder, but only over the hair foliage. When heated this gives a very pretty effect over the black. Unfortunately my photograph does not show this well. The image was coloured with Distress Inks and the hair highlighted with a gold gel pen.
It was then cut out and the edges inked.
I have a couple of other projects using these stamps on my blog. Hope you'll get a chance to visit.
I have enjoyed showing you my three projects and I look forward to visiting next time.
Bye for now and happy crafting.

Carole 😊


Friday, 17 August 2018

Baroque Butterflies (by Doreen)

Hello everyone, it is time for the second post from our Guest Design Team member Doreen this month. She has created a lovely delicate card, featuring flowers and butterflies. 

Products used:

Chocolate Baroque Smooth White Paper
Baroque Meadow stamp
Chocolate Baroque Mask- Kaleidoscope of Butterflies
A little heavy gesso
Distress inkpads: Mowed Lawn, Chipped Sapphire and Wild Honey, applied using soft blending brushes
Sentiment from Essence of Nature stamp set
Black Archival inkpad

Thank you for looking,

Love Doreen

Sunday, 27 May 2018

Tags Collection - by Magda

Hello dear friends,
I don't know what do you think, but for me a tag is a concentration of ideas, feelings, techniques, colours and layers of products.
For this Tag Collection I used the following items, that you can find at Chocolate Baroque:

- Fragrant Honeysuckle for the images
- Essence of Nature for the sentiments
- Different stencils
- Distress Ink Pad
- Versafine in different colours
- White Gesso
- Modeling Pastes
- Busho
- Tags size 8"


I hope that in each tag you could find something interesting.
Magda

Saturday, 26 May 2018

Surreal Dreamy Tree Landscapes (by Anne)

Good morning. Today I am sharing a couple of projects using the Rose Tree and Essence of Nature stamp sets.

My first is a surreal dreamlike scene using the pretty rose tree as the main focal point.


Materials:
  • Rose Tree and Essence of Nature stamp sets
  • 19.5cm X 14.5cm card blank, black card, white card (for backing), acetate (recycled packaging) and waste copy paper (to create masks)
  • Clear double sided sticky sheet
  • StazOn Inkpad (Jet Black)
  • Alcohol ink pens and opaque white marker
  • Bulb spritzer attachment to spray ink pen (similar to Ranger Distress Marker Spritzer)
  • Nail varnish remover
  • Glitters (green, gold and crystal)
  • Viva Décor Kristall Gel (Holographic)
  • Hexagon dies (Tonic)
How it was done:
  1. The scene was stamped onto the acetate using StazOn ink.
  2. Colouring was added to the reverse using alcohol ink pens. Strips of copy paper were used as a mask and alcohol ink spritzed using a bulb attachment for pens. Basically air is blown across the pen tip by squeezing the bulb, creating a spray. Some colour was dabbed away from the sky area using nail varnish remover.
  3. Double sided sticky sheet was then placed on the back and coloured glitters were dropped onto the scene, burnishing into the sticky sheet using a finger.
  4. A die was then used to cut out a hexagon shape from the centre of the scene. A little Kristall Gel was applied to the background panel for added texture and sparkle.
  5. White card was trimmed and glued to the back to make the images stand out. These were then backed with black card to create a border around the background and hexagon cut shape. White faux stitching was added to frame the images.

My second project uses the lovely butterfly tree as the main focus to create another dreamy scene.


Materials:
  • Essence of Nature stamp set
  • 15cm square card blank, cartridge paper, metallic satin card (blue/silver), pink vellum
  • Versamark Inkpad and pen
  • Embossing powders (aqua sparkle and detail white)
  • Ink spritzers (pink and green) and sparkle brush pens (deep pink and clear)
  • Stickles glitter glue (Diamond) and PVA pearls (pink)
  • Large decorative square die (Tonic)
How it was done:
  1. The background was created using ink spritzers. The image was stamped with Versamark, embossed with sparkly powder and coloured with sparkle pens. The embossing pen was used to draw in extra hills extending the scene and anchoring the tree.
  2. The image was stamped again onto the vellum, embossed with white powder. The butterflies were cut out, shaped and glued onto the tree.
  3. The image was then framed with the decorative die cut and finished with glitter glue and PVA pearls.
Happy stamping, Anne xxx.

Wednesday, 23 May 2018

natural colours? by Veronica


 For my last post this month I am back (mostly) to my favourite brusho powders - I just love the vibrant colours and the randomness of the results!
The large honeysuckle stamp was ideal, I stamped and embossed with white EP before sprinkling the red, yellow and green powders roughly where I would like them to stay, then spritzing fairly heavily with water. The EP resists the water, and also traps some of the colour into the image.
Sentiment from Mackintosh words stamped in black versafine, image trimmed down to fit onto a square white card blank with a deep red mat.


This one is far more muted, just a very light dusting of yellow powder to create a background. Image stamped with black versafine and coloured with watercolour pencils - have to admit I can't remember which set the sentiment came from!


For my final samples this month I have used the lovely big tree stamp from essence of nature.
The first one is very restrained, not a speck of brusho in sight!
I used a square white card blank as the base, and stamped the tree stamp all over  to create the background. I used hickory smoke distress ink and held  the stamp in my hand so that only part of the image stamped at a time.

 The focal image was stamped onto black card with versamark ink and I used a rather ancient bonding powder (which thankfully still worked) before using the gold and coppery mix of gilding flakes. For some reason i never got on with stamping using glue when i had the gilding flakes with everything craze years ago, but the bonding powders worked every time...


My final card was back to brusho for the foacl image. Stamped onto white card using black versafine ink and clear embossed before using yellow, red and blue powders to create the sky.


I started with a square back base card , and added the background card at an angle. This was a square of white card stamped with the trees in hickory smoke distress ink and sponged round the edges.
I trimmed the brusho image down, added a black mat and glued onto the background.

Thanks for looking, and many thanks to Judith for doing my last post for me when i had internet problems - a relief to be back, you don't realise how much you need it until you haven't got it!

Sunday, 20 May 2018

Back to Nature (by Judith)

Hello everyone, I am sharing a few more cards showcasing the beautiful stamps that were featured on last months Hochanda TV shows. You may have caught some of these cards on the shows.

For my first card, I have used one of the very versatile whiteboard shapes made by Tando, exclusively for Chocolate Baroque. These shapes are great, already being white, as they can be inked up straight away without needing any preparation. I added a bit of soft colour in tones of orange and green, and did the same to a piece of drawing cartridge that was going to become the card background. Using a honeycomb stencil, I added some colour using Distress Ink, repeating this on the background. I stamped a bee on the heart, using Versafine Onyx Black Ink, and masked the image, before stamping a foliage image from the Essence of Nature stamp plate. I coloured the bee with pencils, and added a sentiment to the heart.

To complete the background, I stamped the honeycomb image from the Honey Bee stamp set, again colouring the bees with pencils. I added stickles to the bees' wings. To complete the card, I added some green ribbon and green card as a matting layer.

For my next card, I chose an old book page and stamped the pretty foxglove image on to the paper. I added two bees, and coloured the images with pencils. I added some shading around the edge of the page, and then stamped a pretty fern image from the Wild Meadow stamp set around the edge, using two coordinating colours. I used the same foxglove and bee images to stamp over some kraft card to complete a background for the book page focal image. I selected some deep plum card to mat the layers.

My final card was a fairly quick card showcasing the fabulous Textured Art card that is available on the website. I coloured the card very quickly by placing Distress Ink on my craft mat, spritzing it with water, and laying the card on top. I stamped the lovely butterfly tree from the Essence of Nature stamp set, and added the small tree either side, to create the appearance of a little woodland. I added some colour under the trees to 'ground' them, and painted the butterflies.  Adding the main sentiment was all that was needed to complete the card.

Thanks for stopping by, Judith xx

Thursday, 10 May 2018

4 seasons Card (by Magda)

Hello,
are you ready today for a collage and stamp Step by Step ?

1.  Colour randomly a white A4 paper with Distress Inkpad  in brown and grey shades.
2.  Stamp on it sentiments from "Loving Sentiments" stamp plate and flowers from "Fragrant Honeysuckle"


3. Tear the sheet into irregular pieces and glue them on a heavy A4 cardstock
4. Stamp with Versamark four times the same tree from "Essence of Nature"
5. Colour with Pan Pastel each tree with the matching season colour


6. Highlight some butterflies with Stickles Icicle
7. Cut into four equal panels and glue them on a black cardstock

Here is the finished project 


I hope you will go now for a try, thanks for passing by and let me know.
Magda


Wednesday, 9 May 2018

Essence of Nature created (by Anne)


Good morning. I have three makes to share with you today using Essence of Nature and The Rose Tree stamp sets.

I used one of my inky background papers from my stash. This was created by wetting a large sheet of cartridge paper and then painting over the surface with dissolved Brusho powders to make a blended watery background. Dishwasher salt crystals were then dropped onto the surface and the paper left to fully dry before brushing away the salt to reveal the lovely texture effect.
My first is using the lovely tree panel from the Essence of Nature stamp set (and bee from the The Rose Tree set).
The background panel was trimmed to fit the card front (21 X 14.5cm) and images stamped with Versamark Ink and heat embossed with detail white embossing powder. Faux stitching was drawn around the edge with an opaque white pen.
A white card backing panel was trimmed to approx. 9.5 X 15cm. The tree scene and sentiment were stamped onto recycled acetate packaging using black StazOn Ink. Double sided sticky sheet was then applied to the back of the acetate and the image ‘coloured’ using a variety of extra fine and chunky glitters in blue, green and crystal.

I have used the tree panel again on this one but this time to create a textured paper clay embellishment. The clay was rolled out and pressed with the stamp. After drying it was coloured by spritzing water based ink sprays with mica. Pebeo Gilding waxes were then rubbed across the textured surface.
The background was stamped and heat embossed with sparkly gold embossing powder, trimmed and mounted onto a 15cm card blank.

On my third project I went a bit off the wall – tee hee. Again I made some textured paper clay embellishments and thought that they resembled coral – hence a sea themed card was born.
I combined tree and leaf stamps together to make a jelly fish. The images were heat embossed with white powder and extra detail drawn on using pens, plus an embossing pen and white powder. A little white charcoal was used to add some shading to the jellyfish.
I further embellished with lots of sea themed die cuts and added some texture to the foreground with a mix of embossing powders and frontage fragments. Finished with lots of sparkly glitter glue – had to be done.
I hope that you enjoy my makes today. Happy stamping, Anne x.

Sunday, 6 May 2018

Stamping on Dark Card (by Judith)

Hello everyone, I have two cards to share with you today, that I demonstrated on last month's TV shows on Hochanda. I used dark card to create my projects, and stamped the images with white ink, before colouring them with coloured pencils. The finished effect is very dramatic against the dark card, and I have shown how you can use the technique to create both backgrounds and a focal image.

For my first card, I used some dark brown card to create the background, and stamped a leaf image from the Essence of Nature stamp set repeatedly using white ink. I then chose a selection of pencils; yellow, green, orange and red, to colour the leaves. I created a central panel by colouring a scrap piece of drawing cartridge with Brushos. I sprinkled the Brushos onto a large acrylic block, spritzed the block with water, and then pressed the block onto the drawing cartridge. Once the background was dry, I stamped the image, again from the Essence of Nature stamp set. The sentiment was stamped onto a piece of the same background, and I inked around the edge of the panel with the ink that I had used for stamping.

For my second card, I stamped the image from the Fragrant Honeysuckle stamp set onto burgundy card. Again, I used a selection of coloured pencils, this time I chose blue, lilac, pink and green. I added some Stickles for a bit of sparkle to the flower centres, and around the edges of the layers. I chose a toning piece of Crafty Individuals paper as a main background, which worked really well with the image. It just shows how well Chocolate Baroque stamps mix with other brands.

I hope that you will give this technique a try, as the white ink gives you the option of using those dark surfaces to add a bit of drama to your projects if you wish. Combining them with lighter, brighter elements keeps the whole piece balanced.

Thanks for stopping by,

Judith xx