Pin It button on image hover

Saturday 30 April 2022

Reflective scenes by Zoe part 3

Good morning Lovelies and welcome to my final post for April.

Today is my wonderful daughter Ashley wedding day, we are out in Canada for the big event.

So here my final card I made for the shows last month.

This is a large card, I used A3 card stock so I could use the whole scene as a card. Isn’t it a wonderfully unique design? I so enjoyed these stamps.
Unfortunately due to a busy life, I was unable to do them justice, I only produced 5 projects so I had to make them count. The sentiment is a sticker that I had in my stash.


Thank you for visiting today.
Have a wonderful day, I’m pretty sure I’m having one at the wedding xxx Zoe xxx

Friday 29 April 2022

Butterflies are Phenomenal ( by Doreen )

Butterflies are Phenomenal 


For my final post of April I would like to share with you this fabulous stamp.
Phenomenal Butterfly Is most definitely a beautiful stamp which includes the most beautiful Dragonflies as well as the Butterflies, it lends itself to any number of techniques, too many to mention but if you do have this and did not get the Elements that go along with this stamp I would definitely recommend purchasing them , you will not be disappointed they are a different size to those you see stamped here.

I first dusted the card with an anti static bag and then used the Versafine Clair Nocturne to stamp the image, using clear embossing powder and then heat setting the powder I coloured the image with Sakura Glaze Pens.

 Then using a selection of seed beads, sequins and a few small keys from my embellishments stash I added them and finally mounted the piece onto a black offcut of mountboard from my scraps box, surprising what you come across when you are searching for something else isn't it ? A scrap piece of cord and the sample is finished. 

Thanks for looking in today 

Love Doreen 


Wednesday 27 April 2022

Butterflies! (by Christine)

This is my final post on the blog for a little while and you will see there is a bit of a theme running - butterflies!

Chocolate Baroque have many beautiful butterfly designs in their catalogue so I was rather spoilt for choice. For my first project, I used the largest stamp from the Patchwork Butterfly stamp sheet. Using C

Versafine Onyx Black ink, I stamped it straight on to my card. I then used Distress Inks, (Twisted Citron, Abandoned Coral, Salty Ocean), around the edge of the card to give the card a sort of gentle coloured halo, leaving the area closest to the image white, as a highlight. 

I chose watercolour pens to colour the image, finally adding some Glossy Accents along the black body and gold Liquid Pearls on selected areas. I chose not to add a sentiment for the moment - I will add one if I need it for a particular occasion. There are many lovely sentiment stamps on the Chocolate Baroque website.

 My second project comprises two tags. One used the Butterfly Tree from the Essence of Nature set, the second a selection of butterflies from the Honeysuckle Butterfly set.

I used Versafine Onyx Black for both tags.


The background for the Honeysuckle stamps was created by spraying purple and yellow inks through a stencil. I used a white gel pen to pick out some areas on the butterflies and then gold paint on others.

The background for the Butterfly Tree was created using acrylic paints and a stencil on my gelli plate and then taking a print straight on to the tag. I used coloured pencils to highlight each of the butterflies and finished them with Glossy Accents.


 I do hope you like the projects.

Happy crafting and take care.

Christine

xx


Tuesday 26 April 2022

Butterfly Wings: Converting portrait stamps for horizontal cards by Natalie


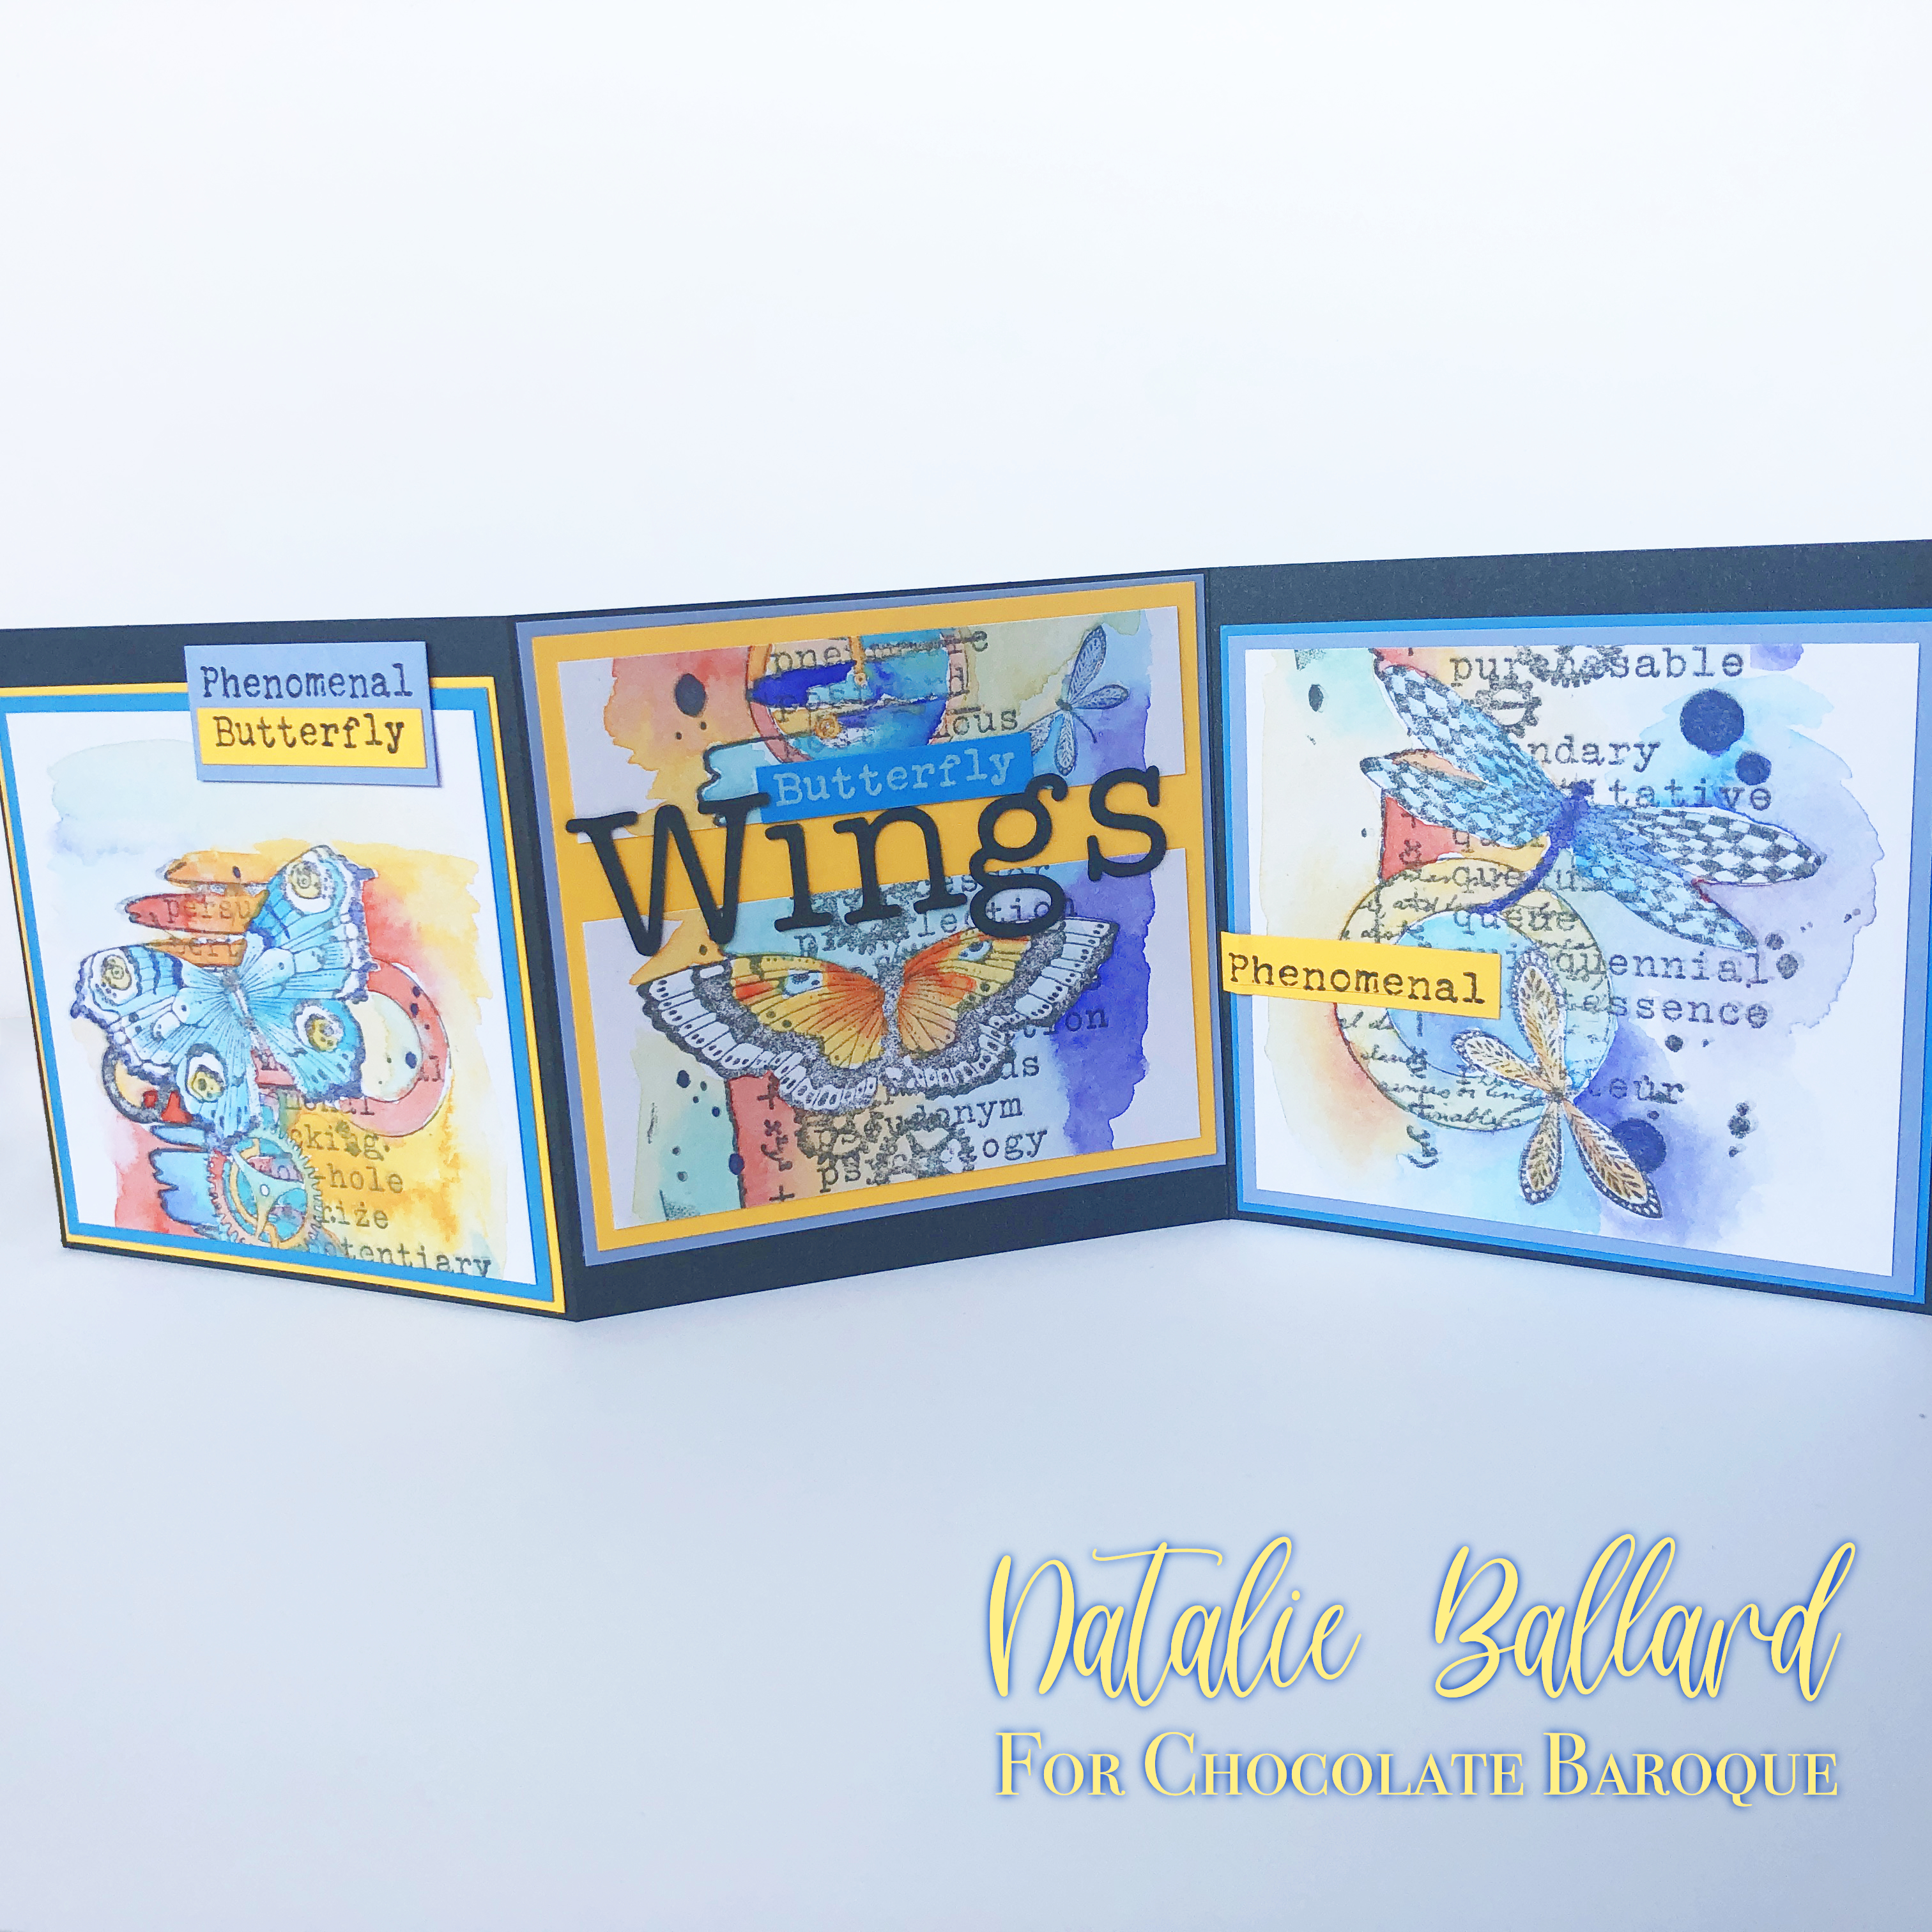
Today's project uses The Phenomenal Butterfly but you could also use Floral Paraphernalia for this approach. These beautiful stamps are stunning in their vertical orientation, but will not always fit your project without a little adaptation. This is where we need to get brave and start cutting into our images. I coloured my stamped image first, which can add to the trepidation. While you are practicing, start by stamping then cutting and finally colouring.


Stamp your image onto stamping card, watercolour card or a smooth mixed media card; it needs to be capable of handling washes. Use a water resistant ink such as Archival by Ranger. A grey ink pad will allow you to layer colour over the top, so the grey becomes more of a shading to your paint.

With this image, I coloured the background first, avoiding all the other details. The two sides of the brushstroke line are handled separately; start with the right hand side first and allow to dry. Working from the top down, wet the background only of the top 7-10cm of the design using clean water, up to the edge of the brushstroke. Drop in a saturated red to the tip of the background brushstroke. The colours look deceptively soft in the progress shot above. This red then blends into a vivid orange on the right. Add a little more red to the right of the butterfly before blending on down to a strong yellow.

The next 7-10cm should then be wet, blending out any lines from the yellow above. This time the brushstroke (beneath the butterfly) will be turquoise blue blending back to the yellow. There is no green paint used in this image at all, it is all in the blending. Add some of this blue into the background of the cog too. Sweep the blend of the yellow and blue down into the next brushstroke section where you will add more blue; this in turn blends into a rich blue-purple.

Under the next butterfly, working from right to left, extend the purple down, blending into the turquoise, then the yellow and finally red along the brushstroke edge. Carry this down into the background behind the dragonfly. Avoid the circle and add the same rainbow order around and beneath it.

Allow the paint to dry: this step cannot be rushed or ignored. This will keep your background lines sharp. Work back up the left of the brushstroke line working to opposites: blue-yellow, red-purple etc; extending the colour beyond the stamped image. Do the same for those elements of the background not yet coloured (circles, cogs etc) but save the butterflies and dragonflies for last. You want to put your strongest contrasts in your focal butterflies. Really make them pop by adding extra saturation by using more pigment.

Score and fold a card base into a zig-zag, a nice simple one is a 4" base which you can create from a 12x12" sheet of card. Trim your stamped panel vertically only so it fits inside the width of 1 panel of your card base allowing for two contrasting mounts. 
Once you have your strip, it is then a case of working out the best cutting points. I let the butterflies dictate this; starting at the top I cut beneath the first butterfly and cog. Then, using your panel as a guide, trim the top edge so you needn't have an even border around this top piece.
The centre panel is made up of two pieces from the strip. The first is a thin section that stops just before the second butterfly; thus showing off the little dragonfly on the right. The next piece finishes just below the second butterfly. The gap between the two is where the sentiment will sit, so don't worry if there's a gap - there should be.
The last panel should be trimmed to match your first in height. Each panel is then mounted onto two contrasting mattes. These mattes should be consistent in size so base all of them on your first design panel. Mount the first and last pieces as normal. The centre two are mounted top and bottom leaving a gap.

The Phenomenal Butterfly sentiment is stamped onto offcuts of the mounting card: the lilac piece is left whole, while the blue and yellow is cut in two. One half is stuck to the lilac piece and the other is left on its own. Mount as shown in the finished card apart from the blue for now.

The "wings" was cut on an electronic cutter using a typewriter style font. Cut this from the same card as your base and use low tack transfer tape to transfer it to your project. Finish with the blue "Butterfly" text piece.

This is my favourite sample from those I have made so far with this collection. However, it is so inspiring I haven't stopped playing yet.


Monday 25 April 2022

Country Reflections (By Tracy Thompson)


 Hello again, I'm here with the last of my samples for March's shows,  above is my Rainbow creation, I love doing this.  So I started with a strip of card and taking ink pads (I used VersafineClair) in six colours I stamped the long image Country Reflections,  then embossed with embossing powder which gave the ink a richer colour,, I stamped a sentiment from Birthday words underneath.  I matted and Layered onto some black card which makes the colours pop.


I love making Notelet sets, because you get to showcase multiple stamps on one project, so I used the sets Country Reflections and Country Reflections Elements.  My front cover and the notelets were done by using a mask and gently inking inside a circle, and still using the mask stamping part of the strip stamp.  I stamped a different part of the stamp each time for different looks.

The pocket inside the folder was stamped using the elements stamps and gentle inking around the edge.  For the envelopes I put part of the circle on the corner and stamped an Elements stamp inside the inking.

Everything was layered onto black card, and the only coloured ink was a Distress Oxide, I kept to just one colour for this project to keep a subtle look.

Thank you for looking and see you next month here on the blog for some more new projects. 

Happy crafting

Tracy x

Sunday 24 April 2022

canvas boards (by Veronica)

My final shares for this month are two canvas boards I decorated using the A4 stamps.

I used decor art paints to cover the canvas boards, using browns and blues, just slapping the paint on randomly to get rid of the white.- - one ended up with stronger colours  than the first

I used brown versaclair ink to randomly stamp parts of the images round the edges of the boards to create the background.

The strip stamps were stamped onto copy paper using black versafine ink, and the white paper was coloured using a soggy teabag. Once dry, the images were coloured using alcohol marker pens and torn round and glued onto the boards using modge podge.


Saturday 23 April 2022

Elemental (by Sandra)

Hello, I am sharing my third post of the month with you to show my cards made for the Create and Craft shows in March.

I have used Floral Paraphernalia Elements and Out of the Trees Elements stamp sets. These really  compliment the main sets, but can also be used as stand alone sets.

For my first card I sprinkled some Turquoise Brusho down the edge of a card blank, lightly spritzed it  and left it to dry overnight. Once it was dry I stamped the Port Hole shapes and solid circles. I then stamped the floral and leaf stamps, masking where needed. I used pencils to colour in. I added some of the number stamps from the sets and a quote from Artistic Expressions.


Next I used the Element stamps to create a small scene. 
Starting from the "front" I stamped the stone wall. I then masked a small area so that I could stamp the deer behind the wall. I then masked the deer and stamped the treeline. I used a stencil to create some hills in the background and coloured with Distress Inks. I finished by adding the script stamp to the lower edge.


For my last card today I used my stamping platform to repeat stamp the flower and leaf stamps. I have then coloured using watercolour pencils and a little bit of Stickles. I die cut a couple of circles and added the word Joy from Artistic Expressions. 


Thanks for looking
Sandra x


Friday 22 April 2022

Playing With The Elements (by Judith)

Hello everyone, I hope that you are keeping well. I have a couple of projects to share with you today showcasing the stamps that we featured on last month's TV shows on Create and Craft.

My first project was a particular favourite demo on the TV shows. I love the colours, purple and turquoise, and the images are really beautiful too. I created a Distress Ink background and stamped several images from The Phenominal Butterfly Elements and I also used the circles from Floral Paraphernalia Elements stamp set with toning ink over the top using Versafine Nocturne ink. I die cut a circle of Drawing Cartridge and blended some Distress Oxide over the top, then spritzed the ink with water. Once the background was dry, I inked up The Phenominal Butterfly Slim Strip stamp and pressed the circle onto a section of the stamp. I coloured the dragonfly and butterfly with shimmer paints for maximum impact.

For my next project, I drew a circle in pencil onto a piece of smooth white stamping card. I added flowers from the Floral Paraphernalia Elements stamp set, and covered them with Masking Tissue. I added leaves, and covered them with Masking Tissue as well. Finally, I stamped the script rings in the gaps that were left. My circle is a bit random, and I could have worked it out to be a little bit more refined, but I wanted it to look quite natural.

I removed the Masking Tissue and coloured all of the images with pencil, adding deeper colours for shading, and grey pencil around the edges for touches of shadow. I added some script on the background from the Out of the Trees Elements stamp set.

A little bit of inking with green ink around the edges takes away the whiteness of the background.

I wanted to show how you could use up some of your tiny offcuts of patterned paper and make a much simpler version of this wreath. In my picture below, I stamped various elements to create the ring, and added the leaves and flowers cut from patterned paper.

I hope that I have given you lots of ideas for these very versatile stamps. Thanks so much for stopping by, take care,

Judith xx


Thursday 21 April 2022

Reflective scenes by Zoe part 2

Good morning Lovelies and welcome to my second post for April.

Using these wonderfully different stamps, I love them, they are so unique and versatile. I felt this one with the train and deer could even be Christmas with the right colours!

So my card I used part of the large, long stamp to create a wintery scene, I decoupaged the deer from the elements set which is slightly larger than the one on the big stamp.


I love doing Envelopes, this one is simply stamped in black and a few sequins added to match the wintry scene of my card.


Thanks again for stopping by.

Have a wonderful day xx Zoe xx 

Wednesday 20 April 2022

Limited Colours (by Christine)

Hello again and welcome to my second blog for April.

You may remember that I decided on a journal page for one of my pieces in the first blog so I needed another to balance the other side of the journal.

I chose the lovely Mother Earth stamp sheet and decided to create a background from scratch. The first thing I reached for was the Draw and Tear Ruler Set and then, with a permanent black fine tip pen, used each side of each ruler to draw lines horizontally and vertically across the page.

Using some grey Archival Ink, I then added some elements from the Modern Textures stamp sheet.

When that was completed, I created a mask for the shroom stamp and then added six shrooms to the piece, again using grey Archival Ink. 

I stamped the shroom image four times and used pencils as my colouring medium; two shades of red for the head of the shrooms and two of brown for the stem. A white gel pen brought the white areas out a little more and then I used a blending stub to finish them, but decided to keep them quite uneven for the effect. Before adding them to the page, I stamped two words from the Mother Earth stamp sheet using a deep pink and brown Versafine ink. Finally, I used Vintage Photo Distress Ink to edge the final A4 page.

I used my fingers to give the shrooms some shape, added some foam tape down the length of the centre and, voila, a finished journal page.

I really enjoyed creating this page - I hope you like it too. 

My second project is an 8" x 8" card, clean and simple. The stamp of choice for this one is the Floral Clock.

I used Versafine Black ink and then clear embossing powder since I intended to use alcohol pens for the colouring. I kept the colour choice to a minimum and was pleased with the final look. I cut a red mat and then mounted them to the front of the card. I had already used a heart edger die from my stash to give the front a little more detail. A simple but effective design I think.


Take care and happy crafting!

Christine

xx

Tuesday 19 April 2022

April ( by Doreen )

April


For this post I would like to share a month from the calendar I made for last months shows.  I have used a partial print from the Floral Paraphernalia stamp set. These stamps make it very straightforward to select an area to stamp without much fuss. Simply ink up the are you want, making sure with a damp cloth to remove any ink from areas you don't want to stamp out. I used a Memento Tuxedo Black Inkpad to stamp the image. 

When it came to colouring the image it was a case of being spoilt for choice but my Grandchildren had bought me some pencils for Christmas so I decided to have a play with them they are new to the market I believe and I love the brightness of them. Derwent Chromaflow pencils are quite soft even waxy to colour with and blend well either with paper stumps or fingers. I sealed the image with a fixative for my own peace of mind. 

I do have to add that with these stamps the possibilities are endless and there are so many areas to take out and stamp that the stamps are definitely excellent value for money and with the elements added well the skies the limit to my mind. As you may have guessed I am more than a fan of this release of new stamps. 

Thanks for looking in today 

Love Doreen 

Monday 18 April 2022

Spring Cards (by Magda) - Lily, Hydrangea Tag, Essence of Nature

 Hi girls,  I have two fresh cards to share with you. I used the following rubber plates:  Lily, Hydrangea Tag and Essence of Nature. On a white cardstock mat I stamped the images with Archival Jet Black, colored all the flowers with Brusho. For the background of both cards, I used wet on wet and wet on dry layer washes. 


I am quite happy with the end result and hope you too. Thanks for passing by, hugs
Magda


Sunday 17 April 2022

Adding motion to stamps by Natalie Ballard


You will need a vehicular stamp or other potentially moving object. The train featured here is from the Out of the Tree Elements stamp set. Ideally, the stamp should have the object in perspective rather than flat on.

Stamp your image onto smooth stamping card or cartridge paper using a permanent ink. With sharpened coloured pencils and a ruler, work along the perspective lines of your stamped image. Harder coloured pencils will work better. Press the colour along the areas where the colour is; as you reach the edge of the colour area, lift slightly and flick the pencil beyond the edge. Do this not only for the colours but also create a similar effect for the highlights; not by using a white pencil, but by shading the trail with a coloured pencil.

Use the same technique to extend the rails across your card front or panel.

You can then stamp and colour a background if you wish. To make the original image "move" more, keep the background static and soft. Here, I used the cogs from The Phenomenal Butterfly Elements stamp set stamped with a lighter grey ink so as to not overpower the main image. On the cogs I used the same technique but going around the cogs like they are spinning.

Saturday 16 April 2022

Reflections And Wings (By Tracy Thompson)


I'm here again to share a couple more samples that were made for the shows in March, all the stamps were so good to use and I loved all the details.  So for my first I wanted to show The Phenomenal Butterfly Elements stamps, so I kept this one simple by using a small stamping block, adding ink then spraying with some water, then press down onto the card.  I did this in three different colours, then stamped an element over the top in black.   I added a sentiment that suited the Butterflies and Dragonfly from the set Birthday words.  Matted and Layered in a matching colour.  I said it was simple!


For my next creation I thought what would show off these fabulous trees from Out Of The Trees stamp, and yes of course a reflection, I love doing reflections.  So I started by creating the background putting in a little sunset/sunrise colour and just building up all the colours to get the right back drop.  You just do half the card as below for the other half you need to go a bit lighter for the water effect.  To do my reflections I use a Gel Plate, so stamp the main image first then stamp onto the gel plate and then place below the main image as a reflection.  Then adding some detail by grounding the stamp and just layer it up on a co-ordinating colour card.

Thank you for looking and see you near the end of the month with a couple more creations.
Happy crafting
Tracy x

Friday 15 April 2022

Chrysanthemum Blueprint (by Miranda)


Hi peeps,

Miranda here with another monthly inspiration. I used the same technique as I did in my previous post. 
Colouring on tinted paper called Canson Mi-Teintes.

This time I have used another blueprint stamp, the Chrysanthemum blueprint stamp sheet. It has a bit of an Autumn feel but hey the weather does too........and I don't mind because I like the weather being more cool than hot.


I stamped the image using Archival Pebble beach and colored with Derwent Lightfast colored pencils.
The circle has been colored with Stabilo Carbothello pastel pencils fading out with a paper stump.
I used white acrylic ink to spatter for some interest.


Thanks for your visit and I like to read your comments or questions if you have them.

Till next month,


Thursday 14 April 2022

floral trio (by Veronica)

Three cards to share today using the floral paraphernalia stamp.

The first two actually started out as one A4 image, with cold tea splodged round as a background  - some colour added with a brush and some with the teabag dragged over. All the images were coloured with alcohol markers before cuuting to make two separate cards.

The second card has a random background stamped onto the card blank using parts of the same stamp.

The third version uses the top part of the image again, stamped onto a  sponged distress oxide background in salvaged patina and twisted citron. I stamped the flower from the companion set floral paraphernalia elements elements  and the letters to create a background. The flowers and leaves were coloured with pencils


Wednesday 13 April 2022

Black and White with Added Colour (by Christine)

Hello everyone, today sees the first of three posts from our Guest Design Team member Christine Patch. Christine has created a couple of pretty floral projects for your inspiration. 


Christine writes:


Hello everyone,

I am very pleased to be back from a bout of ill health to contribute to the Blog and am sharing two projects. 

The first is a set of note cards which I have been planning for a while. I used a die to give me a decorative background for all six, three using black and three white card. For the white version I used a lovely stamp from the Rose and Thistle set, fussy cut it out three times and then used shimmer watercolour paints as my colouring medium.

For the next three, I chose one of the stamps from the Sunny Sunflowers set and then used coloured pencils as my colouring option. I chose a light and dark orange, a light and dark blue, and a light and dark red.


My second project is for my art journal. It is watercolour card, A4 in size, and started life out as a clean-up from a piece started last year! (They do say crafters never throw anything out?)

It was a mix of shades of blue so I added some Worn Lipstick and Spiced Marmalade Distress Inks through two of the Chocolate Baroque Strip Stencils to add a little more colour. The stamps I chose for this project are some of the latest that were shown on Create and Craft recently, the Floral Paraphernalia Slim Strip and the Phenomenal Butterfly Slim Strip.


I stamped them directly on to the page, then twice on to plain card, cut out each stamp in its entirety and placed it over the relevant image, then fussy cut out selected areas from the second card. These I coloured using the shimmer watercolour paints again as a contrast to the rest of the stamped image. Finally, I edged the entire page in Black Soot Distress Ink and then used a black watercolour pencil around the edge of both stamps, followed by a water brush to bring out the black. This acts as a shadow that makes the images stand out a little more from the background. I thought the main areas of the stamps needed a little more colour so added some coloured pencil here and there.

I hope you like the projects and that they inspire you to do some of your own.

Happy Crafting!


Monday 11 April 2022

Beautiful Collage Stamps (by Sandra)

Hello, I am sharing some more of my cards from the March shows on Create and Craft.

All of my cards are made using Out of the Trees Slim Strip Stamp Set

I stamped the A4 stamp strip, which has some fabulous collage, detail onto some drawing cartridge.  I used my heat gun to dry the ink - Black Archival, and then sprinkled Black Brushos over the top. I then spritzed very lightly with water. I left it to dry naturally overnight and then blended Black Soot Distress Ink around the edges. I then mat and layered onto some white cardstock and then onto a black card base.


For my next card I made a Z card base. I cut some smaller pieces for the background layers and used Distress Inks to colour these. I stamped the Out of the Trees stamp onto some white card and coloured with watercolour markers. I added some extra dots from  Numerology  stamp set and the word Nature from Sow the Seeds set.


For my last card today I stamped the Out of the Trees stamp onto white card with black Archival ink and then die cut 3 pieces.  I then used an Accordion Die and cut 3 panels. I glued the stamped images to each panel and then glued the base together..... a bit fiddly, but it does look good on the mantlepiece!

 Thanks for looking

Sandra x

Sunday 10 April 2022

A Pretty Journal Page (by Judith)

Hello everyone, I hope that you are keeping well. I have a few projects to share with you today showcasing stamps from last month's TV shows from Create and Craft.

My first project is an 8" x 8" journal page, using one of the beautiful patterned papers that were available on the show. I stamped the large Floral Paraphernalia Slim Strip rubber stamp down one side using black Archival Ink. I added images from Floral Paraphernalia Elements over the background using Archival Ink in first and second generation stamping. I coloured the main image with Koh-I-Noor pencils, and added a bit of a splatter from the Numerology stamp set.


For my next set of cards, I wanted to create a clean and simple look in three different ways. I die cut three circles from the papers, and inked up the same strip stamp. I pressed the circles onto various areas of the stamp, reinking it each time. For the first card, I used the large and small circle from the corresponding Elements stamp set and made a background on a 6" x 6" card blank, using red, blue and yellow dye based inkpads.

For the second card, I used the splatter stamp from the Numerolgy stamp set as before, and also a mathematical image from Floral Paraphernalia Elements, both of which I stamped using black ink.

For my final card, I simply mounted the circle onto a piece of linen effect black card, and added a little button as an embellishment. All of the images were coloured with pencil.

These die cut circles are a great way of using up your small offcuts of papers that you might have left over from another project. I love getting the most use out my patterned papers and try not to throw any pieces away.

I thoroughly enjoyed creating all of these projects, and hope that I have given you a few ideas. Thanks so much for stopping by,


Judith xx


Saturday 9 April 2022

Reflective scenes by Zoe

Good morning Lovelies and welcome to my first post this month.
Today I’m showcasing two samples I made using these amazing stamps that were on last months shows.

My tag was made up of the elements that were a bit larger than those on the long stamp which is fab, it just gives you so many choices. I felt these stamps are so versatile, they could easily be for those difficult Male or teens cards.

My tag’s are just coloured with Distress Oxides, watered down on a mat and mopped up, I just stamped over, creating layers using different and corresponding colours of inks. I used a Perspex disc from the website which was coloured with Alcohol inks before using Stazon to stamp.


My triptych card, is just Watercolour card which I stamped using Versafine Claire Nocturne ink and heat embossed using clear EP, I then cut it up into equal portions and coloured using Distress inks from a mat that had been spritzed with water.


Thank you so much for visiting. 

Wishing you a wonderful day xx Zoe