Pin It button on image hover
Showing posts with label Teeny Weeny Meadow. Show all posts

Saturday, 29 January 2022

Using small stamps: Spotlights and panels by Natalie Ballard


The Teeny Weeny Meadow rubber stamp set is perfect for playing with panel and spotlight designs. In the sample above, I used an offcut of stamping card as an initial layout idea, and I loved this idea of a bold panel of colour offset to one edge.

Stamp or blend first?

The answer to this is how clear do you want your silhouette to be? If you want it crisp and true black, then stamp last; for a softer look, stamp first. In the sample above, I stamped and then blended over to soften the look. I also stamped secondary impressions to create a scene with trees fading into the distance.

Beginners will find it easier to blend with Distress Oxide inks or another hybrid ink, but you don't want a perfect ombre for this type of card. Allow some of your brushstrokes and movements to show and you will get the impression of clouds.


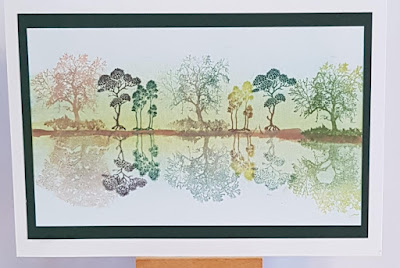
Another option is to skip the blending altogether, and just focus on the stamping. Here, I created a mirror image using a gel plate to reverse the stamp. Once you have stamped the reverse image, use the second impression to stamp the right way. This was the ink colour should match in intensity.

You could also do this as a background image and highlight just a section with colour. This is known as a spotlight and it is useful when you want to guide the eye to a feature point.

Sunday, 16 January 2022

Teeny Weeny Meadow Arrangements (By Tracy Thompson)


Hello again, I'm here with my second post for this month, I would like to share with you some more creations made for the December's shows at The Craft Store.  
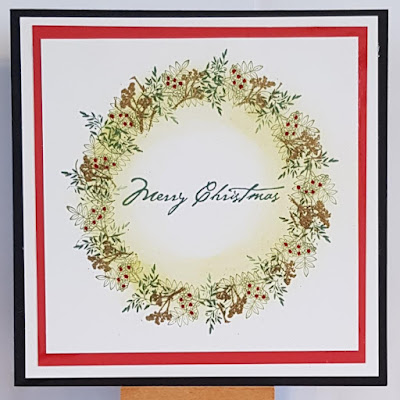
For the first one using Teeny Weeny Meadow stamp set, I created a circle of subtle colour as a base for the stamps.  I stamped different leaves/foliage stamps in different colours creating a Wreath.  I added red berries with a Gelly Glaze pen.  I stamped a sentiment from the Holly Script set, into the centre of the wreath.  Then I matted and layered in contrasting colours.

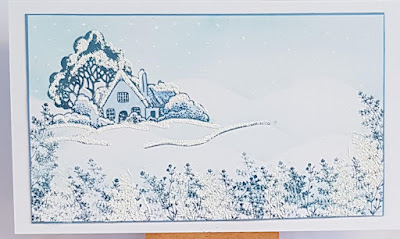
I thought a nice snowy, frosty scene for my second creation to show the stamps versatility and that they can be used foe all seasons.  So I started by stamping the house from Patchwork Landscape, and colouring it in blue tones, I then stamped the Teeny Weeny Meadow stamps in the foreground in blues and white embossing powder for that frosty and snowy effect. Using a hill mask I created some snowy hills, and with embossing powder I created snow on the house and trees.  I added glitter for some frosty sparkle to finish off.

So I have another post coming at the end of the month, so it will be nice if you could pop back then, until then there will be lots of lovely creations posted by the rest of the team for you to see.

Happy crafting
Tracy x
 

Thursday, 13 January 2022

Teeny Mail Art by Sandra

Hello, I am sharing some more of my cards from the December show on The Craft Store.

The stamps I have used are

Curiosities

Mail Art and

Teeny Weeny Meadow 

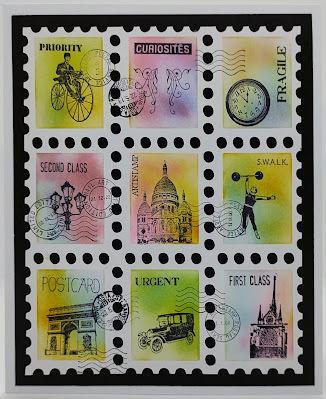
For my first card I cut a piece of smooth white card to look like stamps using my electric cutting machine. I then cut an aperture in a piece of acetate the size of the individual "stamp". I placed the aperture over the card and used Distress Inks to colour each stamp in. Once the ink was dry I used Archival ink and stamps from Curiosities and Mail Art to decorate. I finished by layering onto some black card and then onto a card base.


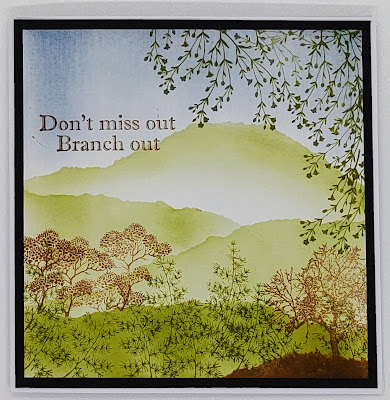
For my next card I used a stencil to create a background with Distress Inks. I then used stamps from Teeny Weeny Meadow to make a country scene  with trees and ferns in the foreground and leaves hanging down. Sentiment is from the Walk Tall stamp set.


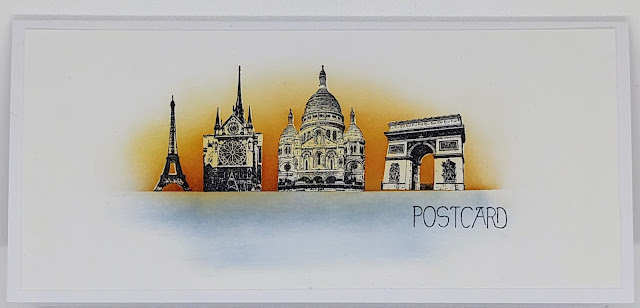
For my last card today I placed a piece of washi tape across my card at horizon level. I then stamped the landmark buildings from Curiosities along the top edge. I also stamped these onto some Masking Tissue, cut them out and covered the stamped images on my card. I blended some inks to create a sunset behind the buildings. Next, I moved the washi tape so that the bottom edge was now on the horizon and used inks to create a watery look. I removed the washi tape and Masking Tissue and stamped the word Postcard from the Mail Art set.  I trimmed my card and adhered to a DL base.


Thanks for looking

Sandra x

Tuesday, 11 January 2022

Teeny Weeny Flowers (by Judith)

Hello everyone, I hope you are keeping well. I have a couple of projects to share with you today featuring stamps that were showcased on The Craft Store last month.

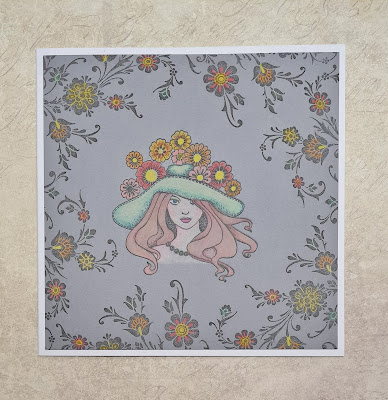
My first project uses the Lady in Hat stamp stamped on grey card, and I stamped a border using an image from Brocade Backgrounds. I coloured these images with pencils.

Using a coloured background like this gives a completely different effect to the images, and the colours really pop.

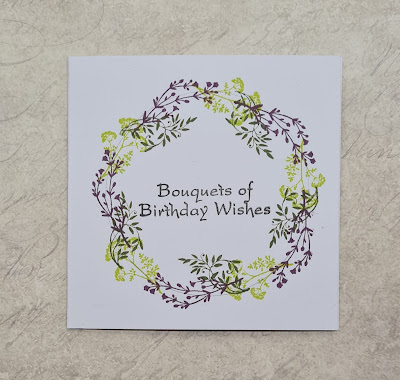
My second card is a really quick project; a little 4" x 4" card. I stamped a sentiment from Birthday Words in the centre of the card, and drew a pencil circle on the card. Using Versafine Clair ink, I stamped some of the images from Teeny Weeny Meadow around the circle to create a wreath.

I will be back later in the month with more projects to share with you, thanks for stopping by,


Judith xx


Wednesday, 5 January 2022

Gardens & Meadows (By Tracy Thompson)


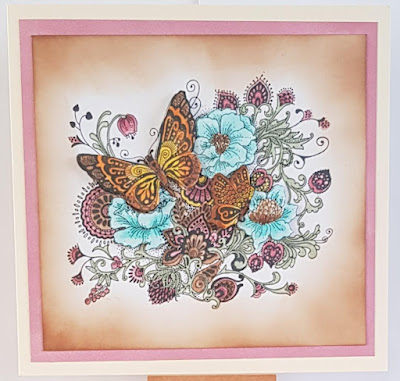
Hello and Happy New Year, this is my first post for this year, and I'm bringing you some creations I did for the December's shows.  We had some fabulous stamps to work with as you can see.  My first is using the stamp The Folk Art Garden, it is a very big and detailed stamp and fantastic to colour.  After I had stamped the image I coloured with Distress Inks, keeping the tones in Vintage shades.  I then stamped the image again, only colouring the butterflies and flowers.  I fussy cut them and decoupaged on to my image, I inked around the edge with Distress ink and then layered onto contrasting card.


For my second creation I used the Teeny Weeny Meadow stamps,  so I started this one by putting some colour down on to my card with Distress inks in blues, greens and browns.  I stamped my trees in Versafine Clair and as I did the main image I did the reflective image using a Gel Plate.  I mixed and blended my colours for the trees to give some dimension.  It just needed to be matted on some dark green card and it was done.

I will be back around the middle of the month to share some more of my creations from the shows.
Thank you for looking
Happy crafting
Tracy x

Monday, 9 September 2019

Stylised Houses

Hello
I am sharing some of the cards I made for the August show on Hochanda with the Bookmark Stylised House Collection.

My first card features the Turret House stamps.
I stamped and embossed with white embossing powder.  I coloured on kraft card with soft pastels in rainbow colours to match the sentiment. I also added some gold to the turrets. The backgroud is sprinkled with Brushos.


My second card is using the Italian House set. 
This time I stamped the house with Archival to the right of the card, masked it and stamped again to the left. I coloured with water-colour pens. I made a background using trees from the Teeny Weeny Meadow set


The next card is the Dutch House.
I stamped with Archival and coloured with water-colour pencils.  I mat and layered onto a U-Fold card which folds flat for posting. Crackle stamp is from Echos of Italy set.


The last card I am sharing today I used all the house stamps from the collection and did a lot of masking! I think these stamps really lend themselves to scene building.


Thanks for looking, I'll be back soon with some more cards to share.
Sandra x

Wednesday, 17 July 2019

Sunset Shadows (by Doreen)

Hello everyone, our Guest Design Team member Doreen is here again today with a beautiful scenic card that she has created. Doreen writes:

This card is a simple blending of inks on an acrylic block which I find very effective as it can conjour many different scenes in the mind.

For this project I have used the following products:

Distress Ink pads: Picked Raspberry, Squeezed Lemonade, Peacock Feathers, and Black Soot to add depth and a feeling of darkness to the finished image.
Teeny Weeny Meadow stamps
A sentiment from Punky Expressions
Black Versafine Inkpad
Drawing Cartridge paper

To begin the project apply the Picked Raspberry, Peacock Feathers and Squeezed Lemonade to a clean acrylic block, spritz with water and drag across the Drawing Catridge and leave to dry. If you do not have time for this or are like myself a bit impatient this process can be sped up a little with a heat gun.

I saw in my image some sloping hills and a lighter area that looked like a pathway, so using the edge of one of the tree stamps made small hedgerows.
Then with some of the other stamps from this set I added some trees and some meadow like grasses around the surrounding areas.

Cut the topper to the size desired then using the black soot and a blending tool add the ink to the outside of your topper, this adds the impression of evening time and depth to the topper. Mat and layer with black and white offcuts from your stash. Mount onto a card.

Using some of the offcuts from your project, stamp a sentiment and mat and layer in the same way as your topper and apply where you wish.


Thank you for looking,

Love Doreen.


Wednesday, 5 June 2019

Teeny Mushroom Houses (by Judith)

Hello everyone, I have two projects to share with you today featuring the fabulous Mushroom House stamp set featured on last month's TV shows on Hochanda.

My first card is a moonlit scene and was a demo on one of the shows. I stamped the image onto a piece of drawing cartridge, and then masked the image with masking tissue, also masking off a moon shape in the sky. I drew the rest of the grass line with a permanent fineliner pen and then added colour with Distress Inks. I added some extra yellow from the moon across the sky, falling where the moolight would shine on the image and the grass.

I removed the masks and added colour to the moon with Distress Ink. I then coloured the Mushroom House with pencils, colouring all down the right hand side with a yellow pencil to represent the moonlight. Finaly, I added some white dots in the sky with a gel pen for some stars.

To create my second project, I again used a piece of drawing cartridge for the background. I inked the bottom part of the image, using masking tape to cover the top part, and then before I stamped the image, I removed the masking tape. I then cleaned the stamp and inked the top part of the image, using masking tape to prevent getting ink on the bottom part of the stamp. I removed the masking tape before I stamped the top part of the image halfway up the card.  I drew hills with a fineliner pen to create a scene, and coloured the sky, hills and houses with Distress Inks and a waterbrush. I added extra stamping using images from the Teeny Weeny Meadow stamp set.

I had a lot of fun working with this particular stamp and hope that my projects have given you a few ideas. Thanks for stopping by,

Judith xx

Saturday, 7 October 2017

trees (by Veronica)

 I loved working with these tree stamps, and these cards are all fairly straightforward, and quicker to create than they look!
The first one uses trees from tall trees, fantasy landscape and teeny weeny meadow to create a scene, with the grass and hills created using torn paper as a mask and distress inks sponged on.
A simple mat of black card and a sentiment from lets get festive to finish.


The image from tall trees was stamped in black versafine ink, and the rocks stamped onto acetate then pressed onto the card below the stamped image to give the reflection. Distress oxide inks sponged over to create the evening sky, and a mixture of distress inks to create the grasses and the reflection. Cut down to a panel to fit an 8" sqaure card, and the words from tall trees stamped at the side.


The last card has the image from fantasy landscape stamped in black , with a background from sponged distress inks. Image was die cut and added to the card blank with a sentiment from amazing Mackintosh words

Apologies for the poor quality of the scans, I seem to have managed to change the settings without noticing at the time! (Needless to say, I couldn't have done it deliberately if I had tried to!)

There are lots of very useful smaller stamps in these sets, and an example is here on my blog.
There are some fab ideas coming up from the girls........


Wednesday, 18 June 2014

Guest Post - A Thank You Bouquet by Jan Thompson

Our guest blog spot this week belongs to Jan Thompson, who has chosen to create this lovely tag. So it's all yours Jan.


I was so thrilled Glenda asked me to Guest DT for Chocolate Baroque so I had a play and this is what I came up with. 

  • I cut the tag out on my Silhouette Portrait die cutting machine using Kraft card.
  • Using Floral Bouquet I stamped the main image with Versamark and then embossed with black embossing powder. 
  • I then coloured the flowers with Picked Raspberry, Seedless Preserves & Crushed Olive distress inks. Tip: Make sure each colour of ink is dry before adding the next one so that they don't bleed together.
  • Next, to create a background, I stamped randomly around the main image with the Teeny Weeny Meadow stamps using Crushed Olive.
  • When everything was completely dry I distressed the edges with the Picked Raspberry to emphasise the colour in the bouquet.
  • Finally I added some twine and the Thank You message.
Hope you like it.
 
We did and our thanks to you Jan for taking the time to design this tag for us. I hope you show your appreciation by leaving a comment and if you would like to see more of Jan's work then please visit her blog Jan Loves to Craft.


Friday, 29 April 2011

Rainbow tree!

I have always been a great fan of the Chocolate Baroque Wild Meadow stamps, so I was excited to be sent the Teeny Weeny Meadow set ahead of release to have a play! The set contains some of the old favourites in miniature and some new images and it is one of these I have used on this card. This is the branches of a tree taken from a photograph. I have given it the Andy Warhol treatment!


I repeat stamped the tree image in black archival ink and cut out the tiles. I used at least 4 colours of ink on each tile in 6 colour families to build a depth of colour with Cut n Dry foam. I always try and leave a pale patch in the centre to get a glowing effect. I added a sentiment from the Artistic Affirmations plate embossed in teal metallic EP onto white card and the shaded with inks.The panels are matted onto hammered black card.

Needless to say I can highly recommend this versatile A6 set, as well as a number of cracking new stamp sets over on the Chocolate Baroque on line shop.

Have a happy and creative long weekend!

Elaine x