Pin It button on image hover
Showing posts with label birthday words. Show all posts

Friday, 5 August 2022

Monochrome With A Red Heart


These are some samples from the July's shows, there were lots of gorgeous stamps to use.  So for my first one I started by stamping out the graph paper as I wasn't quite sure what I was going to do, I stampede it twice and thought what is graph paper used for then I thought the paper for Heart Monitor machines and so I went on to draw the heart beat line and added in a hearts.  I matted and layered them adding a sentiment to it from Birthday Words , would have made a good Valentines card.


For my second creation we are Monochrome again, utilising the corners from the Butterfly Daisy Collage set,   So I stamped one of the corners and embossed it forming a square, out of the same set I stamped out the butterflies twice and fussy cut them.  I added them to two of the corners then added a sentiment from the Birthday Words set in the centre.

I will see you again towards the middle of the month for some more samples.

Happy crafting

Tracy x

Tuesday, 26 July 2022

Just Bugging Around


Hello, I'm here with my last post for this month, showing some more of my samples from the shows in June.  I loved making this first card as I think that Monochrome is so effective.  I stamped the flowers which is from the stamp set The Rose Tree and embossed with clear embossing powder, then did the same with the Bee and the sentiment (which is from Birthday Words). Quick and simple but lovely at the same time.  All that was left to do with it was to matt and layer it.


For the second card I cut my cardstock to size then using three different coloured inks and a small acrylic block, I inked the block in turn with the three different colours, spraying with water then pressing on to my card to create the three coloured blocks.  Using black ink I stamped the three insects that comes with the set The Rose Tree,   I matted that on to grey card, then for the background piece I used grey ink and stamped the Dandelion all over.  

I will see you next month for some new samples for the July's shows
Happy crafting
Tracy x


Saturday, 16 July 2022

Nature's Shares


Hello  and welcome, I'm here to show some samples I created for June's shows.  My first creation is created with a Christmas stamp called Christmas Tweetings.  So I started by stamping out my image on grey card and colouring with Aqua pencils and white charcoal pencils.  These show nice on Grey or Kraft card, I mounted onto black card then again on to some silver mirror card.

This creation was made using the Nature's Paisley stamps and Birthday Words,  I started by masking off a strip and using Oxides I blended three colours.  I then splashed with some water, when dry I peeled off the masking tape and stamped the various paisley and leaf images.  I added a sentiment and matt and layered it all.  Simple but effective.

I will be back towards the end of the month with some more of my samples.

Happy crafting

Tracy x


Saturday, 28 May 2022

Butterflies And Blooms (By Tracy Thompson)


This is my final post for this month showing samples from April's shows, for my first creation I am using stamp sets Dream Petals and Butterfly Mind.   So I started with a background, using Distress Oxides and stencil brushes gently built colour up in green and blue, I kept it soft and subtle.   On some separate card I stamped out the flowers from the Dream Petals and cut them out.  I always cut out first and colour afterwards as if using water colours the card doesn't cut as crisp when damp.  I coloured with distress inks and when dry used a white gel pen to highlight in the centre of the flowers.  I adhered them to the bottom of the card overlapping them.
I then stamped two butterflies and cut them out, I coloured them the same way and put them on as if fluttering above the flowers. Finally added a sentiment.


For this creation I used the stamp set Life Is Wonderful with a sentiment from Birthday Words.  I started with the background, I used Cadence Metallic Acrylic paints found here,  I sponged them in two different colours all over and left to dry.  Meanwhile I stamped my image twice, and coloured the main one with Aqua pencils, I then cut out parts of the image, the butterfly and the biggest flower then coloured them.  I decoupaged the the cut out pieces.   and adde3d some glitter to the centre of the flowers and the butterfly wings.

I will be back with new posts next month, thank you for looking.
Happy crafting
Tracy x

Monday, 25 April 2022

Country Reflections (By Tracy Thompson)


 Hello again, I'm here with the last of my samples for March's shows,  above is my Rainbow creation, I love doing this.  So I started with a strip of card and taking ink pads (I used VersafineClair) in six colours I stamped the long image Country Reflections,  then embossed with embossing powder which gave the ink a richer colour,, I stamped a sentiment from Birthday words underneath.  I matted and Layered onto some black card which makes the colours pop.


I love making Notelet sets, because you get to showcase multiple stamps on one project, so I used the sets Country Reflections and Country Reflections Elements.  My front cover and the notelets were done by using a mask and gently inking inside a circle, and still using the mask stamping part of the strip stamp.  I stamped a different part of the stamp each time for different looks.

The pocket inside the folder was stamped using the elements stamps and gentle inking around the edge.  For the envelopes I put part of the circle on the corner and stamped an Elements stamp inside the inking.

Everything was layered onto black card, and the only coloured ink was a Distress Oxide, I kept to just one colour for this project to keep a subtle look.

Thank you for looking and see you next month here on the blog for some more new projects. 

Happy crafting

Tracy x

Saturday, 16 April 2022

Reflections And Wings (By Tracy Thompson)


I'm here again to share a couple more samples that were made for the shows in March, all the stamps were so good to use and I loved all the details.  So for my first I wanted to show The Phenomenal Butterfly Elements stamps, so I kept this one simple by using a small stamping block, adding ink then spraying with some water, then press down onto the card.  I did this in three different colours, then stamped an element over the top in black.   I added a sentiment that suited the Butterflies and Dragonfly from the set Birthday words.  Matted and Layered in a matching colour.  I said it was simple!


For my next creation I thought what would show off these fabulous trees from Out Of The Trees stamp, and yes of course a reflection, I love doing reflections.  So I started by creating the background putting in a little sunset/sunrise colour and just building up all the colours to get the right back drop.  You just do half the card as below for the other half you need to go a bit lighter for the water effect.  To do my reflections I use a Gel Plate, so stamp the main image first then stamp onto the gel plate and then place below the main image as a reflection.  Then adding some detail by grounding the stamp and just layer it up on a co-ordinating colour card.

Thank you for looking and see you near the end of the month with a couple more creations.
Happy crafting
Tracy x

Tuesday, 5 April 2022

Phenomenal Butterflies (By Tracy Thompson)


 Today I would like to share with you a couple of creations that were made for March's shows on Create & Craft.  The first one above is using the fabulous stamp The Phenomenal Butterfly, which is a very large long stamp and beautiful to work with.  I started by creating a background with Distress oxides and layering on to my base card.  I then cut three squares and stamped a different part of the stamp on each square.  I then stamped the butterflies and dragonflies again, cut them out coloured them in the same colour inks as the background and covered them in clear embossing powder for a glossy finish.  I placed them over the original image on the squares, I stamped a sentiment from the set called Birthday Words on a strip of card and added to my card.


For my second creation I started by stamping the wall from the Out Of The Tees Elements, I stamped another on some masking paper and covered the original, with the masking paper over the wall I stamped the train in place then stamped that onto masking paper too.  Now that both my main elements were in place I started to create my scene.  Using Distress oxides I created a hill, I then used the trees along the hill line, then behind the wall.  for the foreground I stamped foliage from the Walk tall stamp set.  I removed my masking paper and coloured my main elements.

I will look forward to later in the month when I will share with you a couple more makes from these shows

Thank you for looking

Happy crafting

Tracy x

Sunday, 23 January 2022

Natural Shades (by Judith)

Hello everyone, I hope that you are keeping well. I have a couple of projects to share with you today featuring stamps that were showcased on last month's TV shows on The Craft Store.


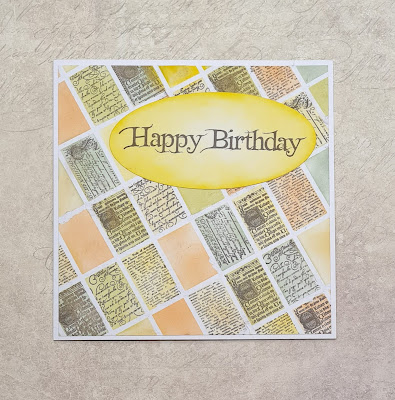
My first card features stamps from the Mini Scripts stamp set. I created a grid using very fine masking tape, and coloured each segment using Distress Ink. I stamped some of the script stamps randomly in the segments using black ink.I chose to leave a few segments plain, as I felt it would be too dark if I stamped in every segment. I carefully peeled the tape away to reveal the tiled effect. I added a large sentiment from Birthday Words stamped onto a die cut which I had also coloured with Distress Ink.

TIP: The masking tape was a little bit too tacky, and I would ensure that I had placed it on something first before using it, so that it had lost a little bit of its stickiness. You can see where a couple of pieces of the design have been pulled if you look carefully. However, I want you to learn from my experiences, which is why I am pointing this out 😉

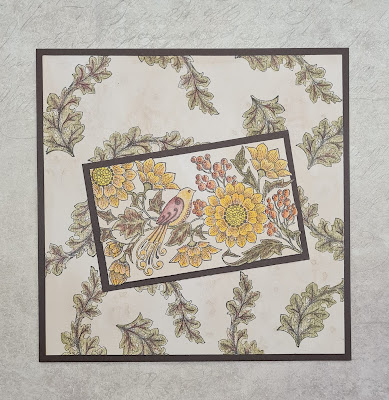
My second project is a remake of another project, using the Song Thrush stamp and a lovely leaf from Brocade Backgrounds. I coloured some Drawing Cartridge with some tea, and left it to dry. I stamped the main image, and then used a larger piece to stamp the leafy image randomly to create a background. I coloured all of the image with pencils, and blended them with a waterbrush.

I matted both pieces with dark brown card before adhering them to the base card. I hope that you have enjoyed seeing my projects this month. I will be back next month with more projects to share with you. Thanks for stopping by,

Judith xx
 

Tuesday, 11 January 2022

Teeny Weeny Flowers (by Judith)

Hello everyone, I hope you are keeping well. I have a couple of projects to share with you today featuring stamps that were showcased on The Craft Store last month.

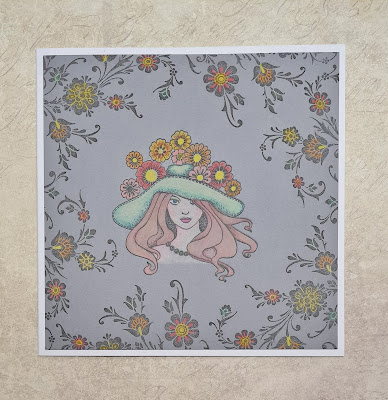
My first project uses the Lady in Hat stamp stamped on grey card, and I stamped a border using an image from Brocade Backgrounds. I coloured these images with pencils.

Using a coloured background like this gives a completely different effect to the images, and the colours really pop.

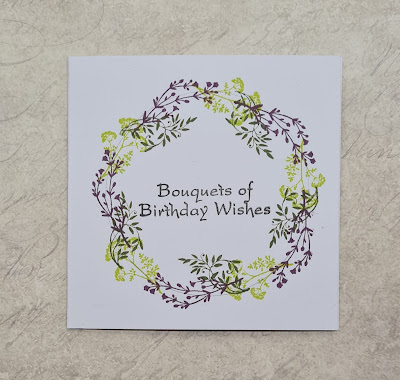
My second card is a really quick project; a little 4" x 4" card. I stamped a sentiment from Birthday Words in the centre of the card, and drew a pencil circle on the card. Using Versafine Clair ink, I stamped some of the images from Teeny Weeny Meadow around the circle to create a wreath.

I will be back later in the month with more projects to share with you, thanks for stopping by,


Judith xx


Thursday, 1 July 2021

From The Deep (by Judith)

Hello everyone, I have a few projects to share using stamps that were featured on last month's TV shows on The Craft Store.

 My first card was created on a piece of glossy card, and I used an inky plate to create the background. I brayered a selection of Distress Inks onto the plate, and then pressed the card onto the plate to get a print. I trimmed the card to size, and then placed a square of Masking Tissue in the centre. I stamped the images from Mermaid Queen and Seashell Collage around the edges using Archival Ink. I added some shading using grey Archival Ink before removing the Masking Tissue. I stamped the bird and sentiment from the Seashell Collage stamp set within the faux frame, amd added a touch of pencil colouring to the image.

To create my second card, I used a piece of Smooth White Stamping Paper and stamped the Ammonite image in the foreground using black ink. I masked the image using Masking Tissue, and proceeded to stamp the image again in grey ink, masking as I went along, until I had filled the page. I only needed three masks in total to achieve this effect, and as they are reusable, I will be able to put them to good use in future projects. I used colouring pencils to complete the project, choosing a rainbow palette, and using three different colours on each shell to give a good variation of shading. I started with the lightest colour each time. I added a sentiment from Birthday Words.

My third card was created using Drawing Cartridge and Distress Inks. I added salt to the background while it was still wet to create an underwater effect, like bubbles in the sea. Once the background was dry I added some foliage along the bottom from Something Fishy, and completed the sea bed by drawing in some lines and dots with a fineliner pen. I added lots of the fish, and stamped a few extra fish and shells onto to some sticker sheets which I coloured separately, all with pencils. I added a few fronds of colour to represent seaweed using my Koh-I-Noor plalette and a waterbrush. 

This last project is a golden oldie which I am sharing again for those readers who have not seen it before. I used Ink and mica powder on the bckground covered up with scrunched up cling film. Once the background was dry, I stamped all of my images from Mermaid Queen with Archival Ink and coloured them with pencils. I have joined the images up with dots to make them appear to be part of one big scene using a fineliner pen, and used toning colours throughout.

Thanks for stopping by, I will be back later in the month with more projects to share with you. Take care, and stay safe,


Judith xx

Saturday, 17 April 2021

flower power (by Veronica)

One of my favourite stamps was in the shows last month, the lovely flora musica and i have two versions to share today. The first is a very CAS card, simply stamped onto a  square of white card. The stamp was inked with distress marker pens and stamped using a stamping platform. I used a damp brush to draw the cololur out into the flowers and leaves and stamped the sentiment from birthday words in the bottom corner. The card was edged with ablack marker pen before mounting onto a white card blank.
The second version was again stamped using marker pens, this time edged with distress ink and mounted onto a dark red car. The background panel was sponged with matching distress inks, and randomly overstamped using just the flowers and a swirly music stamp from the music fanfare set. The same sentiment was stamped onto spare card and cut out using a punch,

the next cards use the harlequin bouquet  stamp, the first stamped in grey versafine onto white card and then again using black versafine onto spare white card, The first piece of card was coloured using wild honey distress ink and water on a craft mat, and the harlequin part of the stamp stamped randomly using the same distress inkpad to create the background. The flowers and leaves on the second image were coloured with marker pens, cut out and glued over the first images.
The base card was sponged with hickory smoke distress ink, then the image stamped randomly using the wild honey distress ink
The second version is more muted, inked first with distress markers then overstamped qwith black versafine. Background card sponged with hickory smoke and a pink distress oxide 
( probably worn lipstick, but not sure!) then randomly stamped with the harlequin part of the stamp using the grey.
Sentiment from say it vertically


My final card uses the floribunda stamp, stamped in versamark onto kraft card and white embossed. I sprinkled truquoise brusho powders over the flowers and spritzed with water. Mounts were white and turquoise card onto a square card blank , and the sentiment stamped in turquoise ink onto a scrap of white card edged with the same inkpad and matted onto a scrap of kraft card


Tuesday, 16 March 2021

Bold and Beautiful Butterflies (by Judith)

Hello everyone, I am sharing more butterfly cards with you, following on from my last post. Butterflies are such a universally popular image, and I hope that you will enjoy what I have to share with you today.

I created my first card using the Just Butterflies and Butterfly Blush stamp sets. I coloured a piece of drawing cartridge using Distress Oxides and then stamped some of the butterflies from Butterfly Blush using Versafine Clair. I added some white dots using charcoal through a stencil, however, you could achieve a very similar look by using white paint and one of the dotty stamps from Make Your Mark.

I added some texture paste to a piece of MDF, and once it was dry added some paint and gilding wax. I stamped and embossed the butterflies, cut them out and layered them up onto the panel. The sentiment from Butterfly Mind was stamped onto a spare piece of background.

The following two cards are older projects, but once again, I hope that you do not mind me sharing them with you. I masked off  the edges of the cards, and added Distress Ink in the centre of the cards. I was aiming for aurora borealis effect, and hopefully achieved that feeling in these cards. I added water splatters, and then stamped the foliage from Briar Rose Butterfly along the bottom using black ink. The butterflies were stamped onto sparkly acetate using Archival Ink and I added coloured vellum to the back, but you could just stamp them onto card, colour them as normal and use a sparkly pen over the top to achieve a similar look. The sentiments come from the Birthday Words stamp set.
 

By changing the colours and foliage, you can create a completely different look, these are really pretty and would make a nice set to give as a gift as well.


Thanks for stopping by, stay safe and take care,


Judith xx


Friday, 5 March 2021

All about the Butterflies (by Judith)

Hello everyone, I have some projects to share with you today created with some beautiful butterfly images that we brought to Hochanda last month. My first card was created fairly quickly using a piece of drawing cartridge, onto which I drew a circle with a pencil. I chose several colours of Versafine Clair in shades of blue and green and stamped an image from the Thistle Butterfly stamp set around the circle. I stamped each colour five times, to ensure an even coverage, varying the direction that I stamped to make the foliage appear more natural. Although these colours are not necessarily true to nature, I love how they turned out.


Once I had finished the wreath shape, I added some splotches with an image from Just Useful, using some of the same colours that I had used in the wreath. I added a touch of shading around the edge of the background with Distress Ink. I added a sentiment in the centre of the wreath from Birthday Words.


I stamped and embossed three butterflies from across the four sets, I just chose whichever butterflies appealed to me most, to be honest. I used some of Lesley's A5 Doubled Sided Designer Papers, they are so useful for this sort of thing, and will last for ages. I used white embossing powder for a delicate touch.

I am sharing two older projects with you today using the Honeysuckle Butterfly stamp set. These two projects were really fun to create, so I hope that you don't mind seeing them again. The first was a canvas that I made using a sheet of old music paper. I painted over the top using a zingy green colour, and decoupaged the image which I had coloured using pencils. I stamped around the edge using Archival Ink. I added lettering to create a collage effect, you could use book paper, die cuts, whatever you have in your stash to create this effect.


This next project is more subtle, but again, I loved creating this one too. I used a Brusho background, and added stamping using an image from the Elegant Edges stamp set around the edge of the background. The butterflies are decoupaged, leaving one wing free for real dimension. This card is just waiting for a sentiment for the right occasion. It would make a lovely Mother's Day card, don't you think?


Thanks for stopping by, take care and stay safe,


Judith xx


Thursday, 3 October 2019

Marvellous Magnolias

Hello
I'm sharing some of the cards I made for the August show on Hochanda which featured the Happy Flower's Day stamp set. This set contains a lovely selection of flowers, butterfly, sentiments and dictionary definitions.

I did a few cards featuring the Magnolia stamp and did different techniques for each of them.

My first card, I stamped and embossed onto Kraft card and used thin bleach to lighten the card, added a sentiment and a pretty punch down the side.


 For my second card I stamped and used water colours and a sentiment from Birthday Words


For my third card I stamped the Magnolia and then masked it off and stamped again.


For the last card I stamped the image onto some card 3 times and used two of the images to decoupage the Magnolia.


Also on the stamp set are the Snake's Head Fritillary and a butterfly. I have used them here with words from Artistic Expressions in the background.


Thank you for looking
Sandra x

Saturday, 13 July 2019

Smell the Roses by Brenda


Good morning, Brenda here with some of my samples using the new Rose and Thistle and Rose stamps that Lesley launched on Hochanda TV last month, such perfect images for making Summer cards........and confetti, I have been dehydrating rose petals on a daily basis to fill little boxes to hand out to guest as they arrive at Church for our eldest Granddaughters wedding.

The panel of the top card was masked before stamping the Rose from Rose Set using Distress Markers direct to stamp and spritzed with water to bleed the colours before stamping. With the masking tape still in place I used DI's to create the frame and a brick stencil to add some background interest, finally stamping a sentiment from Birthday Words.


Next a card with matching envelope, I masked the bottom of the card both front and back and repeat stamped the Rose and Thistle from the set of the same name using Distress Markers direct to stamp along with a spritz of water before stamping. Next I added some shading with DI, then 'splodged'......a very technical term......more of the same DI onto my glass craft mat, a little water and inked up a fan brush and flicked it over the stamping to give the effect of grass.  I masked the envelope with a post it note, stamped the flowers and again some shading with the same DI. The sentiment is from Words to Dazzle and Sparkle.


For this one I stamped the image with Versafine onto black card and embossed with detail gold EP. I ripped the edges, inked and added more gold EP and the same with the sentiment panel.


I love purple and teal together so those two colours of Distress Ink were the inspiration for this one. Using my stamping platform I repeat stamped this pretty bloom by inking the image with Distress Markers and water.........and yes, this is a favourite technique of mine as you might have guessed from this post. It doesn't work with all stamps but where there is a lot of detail and rubber it works brilliantly.

My final share and yes you guessed right, the stamp platform and Distress Markers again and here I have tried to show how east it is to get a totally different look from the stamp as using this method to add ink you can focus on just the focal blooms and leaves and leave out the other areas of the stamp. I then added some stencilling to the background.

My thanks as always for your visit today, myself and the Design Team always appreciate your words of encouragement.

Tuesday, 18 December 2018

Black and White ( By Marga)

Hello everyone here a card from me today


Today I used only black and white. Mostly I'm a colour girl but sometimes you must go out of your comfort zone.
I used black embossing powder for the flowers and stamped the sentiment with Versafine Onyx Black.
The dots I made with a black and white gel pen.

Stamps I used are: Diamante Delights and Birthday words.

Hugs Marga

Thursday, 6 December 2018

Tagtastic book by Brenda


Good morning, Brenda here with some samples made using the gorgeous new stamps and papers Lesley showcased on Hochanda.
                                                

My first share is a little book which I made using my Zutter, something that's not see the light of day for far too long.

I used Distress Oxides to created the pages and pockets to hold the tags which were all made using the new Tagtastic stamp.

I cut each down slightly to enable them to fit into the pockets.


I managed to incorporate all the new stamps into this one: 

Shared beauty,  Movie strip collageFloral grunge and Be Kind 

I used a variety of inks and stencils along with sentiments from Floral Delight.

Also used are some of the stamps from Wild  Meadow which is a really beautiful stamp set and so useful.


The pages also had a liberal helping of structure paste and stencilling to add interest and texture.


This one uses one of the new Designer papers along with a little wooden frame I bought at Stamp Magic from Lesley and David stand there. I felt it lent itself to rustic colours so inked the edges and fixed over the DP, the bloom is from Movie strip collage which I stamped several times onto vellum and heat embossed with detail gold, cut out and layered up, adding a little gold glitter as well. The corn is a die cut also glittered with gold and copper ultrafine glitters. The sentiment is from Birthday words.

I hope I have offered a little inspiration to get out your stamps and get inky.