Pin It button on image hover
Showing posts with label Mail Art. Show all posts

Wednesday, 19 January 2022

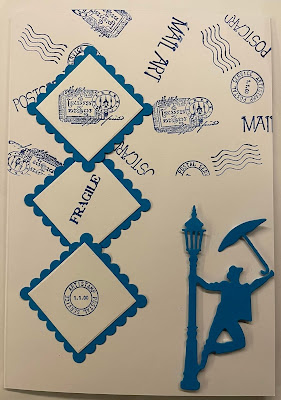
Mail Man (by Andy)


Hello Peeps

This is a straightforward card I did for the December show. A nice masculine card. Naturally you can change the colour to browns and use cream card as the base which will be just as effective.

You will need

A5 card blank

Majectic Blue Versafine ink pad

3 die cut squares and scalloped squares to mat on to

Man and lamp post die cut

Using the Majestic Blue randomly stamp several images from the Mail Art stamp set on the top half of the card blank.

Using the same ink stamp a single image on to each of the white squares. Mount onto the blue scalloped squares. Attach to the left-hand side of the card, slightly overlapping the top and bottom corners.

Die cut the man and lamp post and attach to the front of the card.

Job done

Enjoy

Andy

Thursday, 13 January 2022

Teeny Mail Art by Sandra

Hello, I am sharing some more of my cards from the December show on The Craft Store.

The stamps I have used are

Curiosities

Mail Art and

Teeny Weeny Meadow 

For my first card I cut a piece of smooth white card to look like stamps using my electric cutting machine. I then cut an aperture in a piece of acetate the size of the individual "stamp". I placed the aperture over the card and used Distress Inks to colour each stamp in. Once the ink was dry I used Archival ink and stamps from Curiosities and Mail Art to decorate. I finished by layering onto some black card and then onto a card base.


For my next card I used a stencil to create a background with Distress Inks. I then used stamps from Teeny Weeny Meadow to make a country scene  with trees and ferns in the foreground and leaves hanging down. Sentiment is from the Walk Tall stamp set.


For my last card today I placed a piece of washi tape across my card at horizon level. I then stamped the landmark buildings from Curiosities along the top edge. I also stamped these onto some Masking Tissue, cut them out and covered the stamped images on my card. I blended some inks to create a sunset behind the buildings. Next, I moved the washi tape so that the bottom edge was now on the horizon and used inks to create a watery look. I removed the washi tape and Masking Tissue and stamped the word Postcard from the Mail Art set.  I trimmed my card and adhered to a DL base.


Thanks for looking

Sandra x

Friday, 1 November 2019

Ephemera and Flowers

Hello,
I am sharing my projects from the Hochanda October show with you. This show featured the wonderful Baroque Ephemera stamp sets 1 and 2

With my first card I used a slotted die in which I could keep all my "memories".  I used the tickets, train sticker and receipts stamps. I aged them with Distress Inks.

For my second piece , I stamped the postcard and receipts. Again I aged them with Distress Inks and tied with some lace and added a die cut flower. I added the "Love Post" stamp from the Mail Art stamp set.

For this wall hanging I think I stamped everything! 
I started with an A5 size piece of greyboard and covered with gesso. I then stamped a background with one of the large stamps from Dusky Damask and the crackle stamp from Echoes from Italy .  I then ripped the stamped images of the receipts and edged with Distress Ink, added some tickets and a tag. I stamped the Butterfly from Happy Flower's Day  Added some splashes and drips of ink to finish.


My last two cards are from Floral Grunge and Movie Strip Collage.
Both cards were made by spritzing Distress Inks on a craft mat and then stamping with Archival. I then colourd the images with the same colours I had used for the backgrounds.

Thanks so much for looking
Sandra xx

Thursday, 5 July 2018

Fat Plants - by Magda

Hello,
do you like fat plants? To be honest I didn't until I received the new "Succulent and Cacti" stamps from Chocolate Baroque to work with. During this month I will show you the samples I have made.

Just for you card  :  
Stamp the big Captivating Cacti image with Versafine Onyx Black on 250 grams white cardstock and colour the background and the cacti with Brusho watercolour powder diluted in water. The sentiment is from the Words to Dazzle and Sparkle plate


Grow positive thoughts card:
On  250 grams white cardstock stamp the image using Distress Ink Pad  according to the colour that will be used to colour the flower from the Scrumptious Succulents plate.  Use colouring Pencils for the background and the flower. While the frame behind and the background of the sentiment are made with  Distress Inkpad green and brown blended together.  Stamp the sentiment from the Blossom and Grow stamp set with Versafine Onyx Black


S.w.a.l.k. card :
Stamp the flower from Scrumptious Succulents plate on craft paper with Versafine Sepia.  Colour the flower with white and brown pencils; stencil the bricks with Distress Ink Pad Walnut.  You can find the sentiment S.w.a.l.k. among the stamps of the Mail Art rubber plate


Thank you for passing by and see you on the 17th again.
Magda


Friday, 8 September 2017

A Quartet of Flowers (by Judith)

Hello everyone, I have some floral projects to share with you today, that were featured on last month's TV shows on Hochanda. These cards were made using the individual floral stamps from the shows, and I used a range of techniques to create the cards.

For my first card, I coloured the background with Distress Ink, and then stamped over the top using a stamp from the Harlequin Fragments stamp set, again using Distress Ink. I stamped the Harlequin Bouquet individual stamp onto a die cut oval, using purple ink, and coloured the image using Distress Inks and a water brush. I added a sentiment to the background from the Loving Sentiments stamp set.


For my second card, I created a background using Brushos and kraft card. I stamped the Floribunda Net individual image onto another piece of kraft card, and embossed it using white embossing powder. I coloured the image using Brushos and a water brush. I stamped the setiment from the Loving Sentiments stamp set onto a smaller piece of kraft card, again using white embossing powder. I have inked the edges of each piece of card using red ink.

For my third card, I coloured the background again using Distress Inks, and used the Large Crackle Background for added texture. I cut a postcard sized piece of card, and stamped the Crackling Rose individual stamp, adding images from the Mail Art stamp set, to create a postcard effect. I created a small sentiment strip using words from the Loving Sentiments stamp set once again.


Long term viewers of the blog will have seen a rendition of this final project, which I remade for the TV show. I hope that you will not mind seeing it again, using the Flora Musica stamp set:

My Team mates have made some beautiful projects using these lovely stamps. Do keep checking back this month to see their designs. Thanks for stopping by, Judith xx

Friday, 26 February 2016

Sending Smiles (by Judith)

Hello everyone, I'm back again with another project created using one of this month's featured stamps. I hope that you are enjoying the Design Team inspiration using these lovely stamps, we have been really enjoying creating our artwork for you.

I decided to create a piece of collage in the style of an old postcard as the focal point for my card, and so I cut a piece of scrapbook paper to the correct size, and gathered a selection of stamps that I could use to create my postcard. I chose a couple of butterflies, and two stamps from a great little mini set found within this collection.

I stamped the butterflies first, and covered them with a mask, before adding the large flower stamp. I then added the little postage mark, and the postcard sentiment last. I coloured the images with pencils, and edged the piece with Distress Ink.

I created a little tag from a piece of scrap card to fit a small paper wallet, and stamped a fitting sentiment, taken from the Amazing Birthday stamp set. I added some stamps from the Mail Art mini stamp set as before to complete the tag, along with some dark brown ribbon.
If you would like to know more details about my card, then hop along to my blog. Thanks for stopping by, Judith xx