Pin It button on image hover
Showing posts with label Rose Stem Script. Show all posts

Sunday, 13 February 2022

red roses

Carrying on the Valentine theme, some more samples this time using the main image from the Rose and thistle stamp set as well as the sentiment from words of love

The main image was stamped in black versafine ink and coloured with watercolour pencils, then torn out and edged with versafine ink. The background was sponged wiith distress inks in worn lipstick and peeled paint and parts of the stamp were randomly stamped in worn lipstick.. Sentiment stamped in versamark and gold embossed.

Same stamp stamped in grey versafine and part coloured with watercolour pencils. To make the coloured roses stand out more i added some elderly stickles with a brush and then covered the coloured areas with glossy accents. Once it was really dry i fussycut it out and added on to a distress oxide background. The diecut sentiment is from  rose stem script stamp set


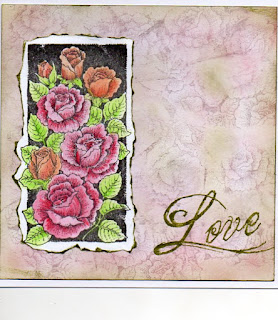
My last card uses the main image from the rose stem script set stamped in versafine again and coloured with watercolour pencils, torn out aned added to torn mat of green card.  
The background was made with the rose stamp coloured with Koh-i-nor brush pens , randomly stamped then spritzed with water to make the colours run.
Sentiment from harlequin rose set stamped in black versafine ink


Friday, 4 February 2022

heartfelt (by Veronica)


For my first post this month I chose the  Harlequin Rose and Words of Love stamp sets - I thought they would be appropriate as Valentine's day is approaching......

The first one  is 7" square, the background is distress oxide inks  squeezed lemonade, peeled paint and salvaged patina sponged randomly and part images from the Rose Stem Script set and  words from Tall Trees set also used to overstamp.The sentiment is from Words of Love, stamped in black versafine and candy apple distress oxide inks. The main images were stamped onto spare card with verxafine ink, coloured with watercolour pencils and fussy cut out. If you snip  the leaves carefully you can weave two images together. I glued just the bottom halves onto the card, so the the centre pieces will stand up slightly


The second card is a very simplified version of the first, with red and black lines drawn with marker pens round the image and no sentiment - this is a 6"square card


Another  6" square version, again coloured with pencils this time trying to get a rainbow effect - in hindsight I think it would have been better to start the rainbow at one side of the image and not do individual leaves....

this was a single image, fussy cut round the edges of the design only and glued onto a distress oxide background. Background was stamped with the rose from Rose Stem Script coloured with marker pens and randomly stamped over the card, thne spritzed with water to blend the images. Distress oxide inks were then sponged over the dried card , sentiment added in black versafine and the wobbly lines drawn with a fineliner.


Wednesday, 25 March 2020

Quick Cards (by Christine)

Hello everyone, today sees the final blog post this month from our Guest Design Team member, Christine. She has made some speedy cards for your inspiration.

Christine writes:

Hello everyone.

My final blog post for March!

The first project comprises four examples of quick cards to have available in your stash! I used four mini gelli plates of different shapes, Distress Inks and stamps from Rustic Fragments set to give detail. I then chose some beautiful floral stamps, colouring in two of them with sparkle pens, but leaving two of them simply stamped, (I thought the colour from the gelli plates was enough). Floral stamps used are:

Rose Set
Rose and Thistle set
Medici Flower
Rose Stem Script


The second card was also quite a fast one to achieve. I had a circles stencil on my desk so chose blue, pink and yellow Distress Oxides and mixed them across the stencil. I cut the resulting image into different widths of strips and glued them across a piece of white card on the diagonal. Once complete, I cut out a 5" square then stamped one of the Geometric Trading Hearts with Versafine Clair Onyx Black in the centre. On a remaining piece of the striped background card, I stamped one of the sentiments from the same set.
Mounting on black card was the final step before adding to the card blank.


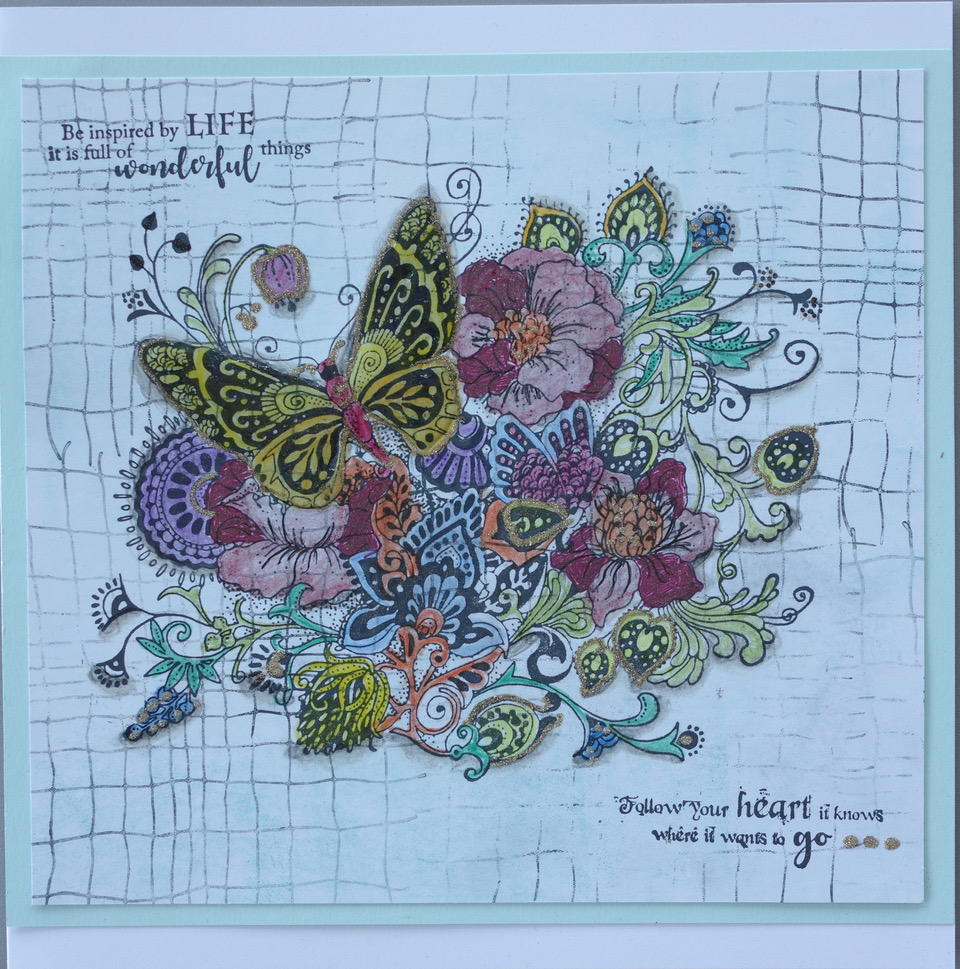
My final card showcases the stunning stamp sheet called The Folk Art Garden.
The first step was to create the background using the Open Weave stamp and Distress Ink. I then stamped the image with Versafine Clair Onyx Black ink and coloured it with pencils. When I was finished I added Glossy Accents to the butterfly and then glitter around some of the elements. The sentiments are from The Folk Art Garden stamp set.

I hope you have enjoyed my blog posts and look forward to catching up with you later.
Happy crafting!

Christine
xx

Wednesday, 12 February 2020

Mackintosh Beauty (by Doreen)

Hello everyone, this month we welcome our Guest Design Team member Doreen Sympson to the blog to inspire you with three posts. She has decided to start with a beautiful Art Nouveau style card.

Doreen writes:

With Valentine's Day just around the corner when I was browsing through my collection of Chocolate Baroque stamps for this post, a beautiful set of stamps just fitted everything I was looking for, it oozes romance. The Mackintosh Beauty set is divine, you can do as little or be as elaborate as you wish, and it stamps perfectly. The sentiment however comes from the Rose Stem Script stamp set and works so well on this card.


Products used in the making of this card:

Ranger Archival Inkpad- Plum
Chocolate Baroque silk card
Black card and 8x8 card from stash
Alcohol ink pens and blender pen

Thanks for looking

Doreen

Friday, 12 July 2019

Introducing Sandra our New Design Team Member

Hello everyone, today we are introducing our second new Design Team member, Sandra South. We asked Sandra to tell us a little bit about herself so that you can get to know her a little better:

Hi, my name is Sandra. Originally from Worcester, I have lived in Abergavenny, South Wales since I married in 1982. I have two sons 26 and 30, who have flown the nest, enabling me to have a lovely craft space!
I like a lot of crafts, but stamping is my favourite. I'll have a go at most styles when it comes to stamping, Clean and simple right through to grungy and Steampunk. Depends on my mood that day! my first set of stamps from Chocolate Baroque was Christmas Flourish and it still features in my Christmas cards each year.


For my first post as a Design Team member I am sharing a vintage themed card made with Rose Stem Script.


I made a background using Distress Inks Antique Linen and Tea Dye. I then stamped the image with an Archival Ink. I used a stamping platform and this enabled me to re-stamp with Versamark, but just in a few areas which I then embossed with copper embossing powder.


Using Distress Inks Tea Dye and Vintage Photo and a water brush I coloured the image in. I used Vintage Photo to add some splahes and blend around the edges. I stamped the sentiment onto a piece of card that had the same background and cut the words out. I mat and layered the card and added the photo corners.
Thanks for looking,

Sandra.

Monday, 1 July 2019

A Bunch of Roses (by Judith)

Hello everyone, I have two projects to share with you today using little worker stamps. These small stamps are often overlooked on a stamp set in favour of the bigger images. You can quickly create a lovely card using the small images by creating a bckground, and adding a sentiment or topper.

My first card uses some images from the Rose Set, with a Rennie Mackintosh feel to them. I love this style, and chose soft colours to create a vintage look for the card. I placed a circle mask onto a piece of drawing cartridge, then added colour to the background by placing some chalk ink onto a large acrylic block, spritzing it with water, and dragging it across the drawing cartridge. Once the background was dry, I stamped the two small rose images with burgundy and green ink, and stamped them in first, second and third generation stamping randomly over the background.


I removed the mask and embossed the sentiment in the middle using gold embossing powder. Using gold embossing powder again, I stamped the larger circle image nine times onto a spare piece of card. I coloured the image using the same colours of ink that I had used on the background, adding the colour with a water brush. I cut the circles out and attached them using 3D foam.


For my next card, I stamped the little rose sprigs from the Rose and Thistle stamp set randomly over the background. I added a topper stamped with an image from the Rose Stem Script stamp set. In my fabric sample, I added a sentiment from the Words to Dazzle and Sparkle stamp set. The images were coloured with Inktense pencils.


In the second sample, I stamped onto Textured Art Card to give a feeling of fabric, and coloured the images with Koh-I-Noor paints. The sentiment comes from the Rose Stem Script stamp set.

Thanks for stopping by,

Judith xx

Monday, 30 January 2017

Romantic Roses (by Julie)

Hello crafty people. I have two romantic cards to share with you today.


My first card is made with the Harlequin Rose set. The centre panel is stamped with the smaller rose design that I inked up by applying brush marker direct to the stamp and then stamping onto the card. I masked off the stamped image before adding more roses. Don't worry about the ink drying before you are ready to stamp the design, a few deep breaths or "huffs" onto the stamp will reactivate the ink and you are good to stamp. The tassel border has been stamped into each corner. To get the distressed look I stamped the excess ink off onto scrap paper, before stamping onto the panel. The white base card was stamped with the small rose stamp as before, using Sepia Versafine ink and the centre panel was finished off with some sepia coloured lace ribbon underneath the stamped sentiment.


For my second card, the base card was coloured with Shaded Lilac Distress ink and stamped with the tassel border from Harlequin Rose. The leafy panel is the new Leafy Panel background stamp that I have coloured with brush markers along with the  rose which you can find on the rather wonderful Rose Stem Script  set and to finish off I added a sentiment from Words of Love.

Thanks for stopping by and please be sure to call back soon to see some more Design Team inspiration.

Julie x


Monday, 23 January 2017

blue roses (by Veronica)


For one of the samples for Lesley's first show on Hochanda I made this small  notebook.

The cover was covered using  tissue paper coloured with brusho powders and crumpled up, glued on to the cover with modge podge. I used purple and turquoise powders.
The plaque used soft form relief paste and mica powders. I brushed the powders over the rose and leaves of the rose script stamp before adding the relief paste and leaving it to dry overnight. Once it was dry and peeled off the stamp, it was glued on using pva glue.
The mica powders are absorbed by the paste, and will not brush off - you will get a stained stamp though, but it will clean off.


close-up of the plaque, and the open notebook


The large 8" square card used the large stamp from the harlequin rose set, coloured with blue and green brusho powders, with grey powder for the background, and gold mica powders for the swirl. The large lacy border was stamped onto the base card using broken china distress ink, whicgh was also sponged round the edges.
Card mats were gold, green and blue.


The last one is red, not blue and shows the lid of a snall hexagonal box also covered with crumpled tissue paper.
I stamped the large image from harlequin rose three times, coloured it with promarkers, cut out the rose and decoupaged it. The 'raindrops' are glossy accents.


Lesley will be back on Hochanda at the end of the month  with a one-day special, featuring some really lovely stamps that are a little bit different, so check the programme listings for times, you won't want to miss this one!

Meanwhile, my team-mates have some lovely samples to show you using the roses.............

Sunday, 22 January 2017

Rose Canvas and Leafy Trails (posted by Claire)

Good morning, I hope you're all having a lovely crafty weekend. This morning I'm sharing a couple of projects made for Lesley's last shows on Hochanda.

Do you ever start a project with one idea and go off on a complete tangent and make something completely different? That's what happened with this canvas as I coloured the gorgeous roses from Rose Stem Script with my pencils planning to make 3 CAS cards but got totally side tracked and ended up making this lol.


I used acrylic paints to create the background, adding some stencilling with texture paste and then created texture around the images to frame them. I used scrunched up tissue paper with matte gel medium and once it was all dry I added silver highlights with gilding wax. I stamped the sentiment on an acrylic tag and embossed with silver embossing powder and added some little roses that I'd made with air dry clay to finish off. I wasn't sure how the tissue would work but it's quite solid once the gel medium is dry.

My second project is a card made with PanPastels and distress inks. I began by creating the background with PanPastels and then overstamped with the beautiful Leafy Trails Big Bold Background stamp. I watercoloured the image with distress inks and then distressed around the edges with Gathered Twigs distress ink. I layered the image on cream and brown card and added the sentiment (from Words of Love) with some garden twine. I used a couple of little berries and some ribbon to finish the card off.


Thanks for visiting, keep checking back as my teamies have lots of beautiful projects to share!
Claire xx

Saturday, 14 January 2017

Leafy Trails card and gift box (by Anne)


Good morning. I am excited to share one of my samples for Lesley’s first TV shows on Hochanda at the start of the month. Lesley demonstrated several sets of stamps from Chocolate Baroque featuring a romantic theme with gorgeous roses and heartfelt sentiments. Great for creating projects for loved ones, Valentines Day, Weddings and Anniversaries too.

I have used the Big Bold Backgrounds Leafy Trails stamp to create this card and to decorate a small gift box to match. I embellished using the Rose Stem Script stamp and a sentiment from the Words of Love set.

Materials:
How to make:

Stamp the leafy background with Versamark and heat emboss with gold powder. Trim stamping card to fit the card blank leaving a small border. Round the corners with a punch or scissors. Edge with the alcohol marker.


Open out the box and lay flat. Mine was cut on the Silhouette Cameo, but you could use a die cut or a ready-made plain box. My box measured approx. 30 X 21 cm when opened out. Stamp and emboss the box sides with the leafy stamp.


Colour the card front and box with sparkle pens. Spray with a coat of sparkle varnish. Glue the background mat to the card front.

Cut a strip of card, stamp the sentiment and small border with teal ink. Trim and edge with alcohol pen. Attach to card front with 3D foam.


Stamp the rose panel in Versamark Ink and emboss with gold powder. Colour with watercolour and sparkle pens (both are water based so can be used together). Cut out the rose and lightly shape. Tie on a ribbon and glue to the card with 3D glue gel.

Wednesday, 11 February 2015

Chalk and Cheese (posted by Judith)

Hello everyone, I have really been enjoying working with the current stamps of the month, Sketchy Doodle Landscape/Flowers Multibuy, and my samples today are no exception. I wanted to show you the versatility of these stamps, and hopefully I have shown that with the following projects.

I chose to make a set of pastel cards for my first project, and began by masking the top and bottom of the cards, leaving a large strip of the card exposed across the centre. I poured a bit of Acrylic Wax onto a craft mat, and using a piece of cut 'n' dry, I applied the wax onto my stamp. I stamped the image randomly across the card, reapplying the wax to the stamp each time. I cleaned the stamp immediately I had finished stamping the images. Once the wax was dry, I covered the area with Memento ink, choosing soft pastel shades on each card. The wax acted as resist, so that the images were visible through the ink. I removed the masks, and stamped a sentiment onto each card from the Amazing Birthday stamp set using black ink. I stamped some of the butterfly and dragonfly images using Versamark and white embossing powder onto vellum and cut these out, before attaching them to the cards.


My next project was created using a piece of MDF as a base, which I painted with gesso. I added a honeycomb diecut and some lace, which I also painted with gesso.

I embossed several of the sketchy flowers using Versamark and white embossing powder onto a textured card, and cut them out. I added some dark brown die cut pieces, the flowers, and some gessoed metal flowers and butterflies to the board. I layered several of the sketchy flowers up, and added jewellery findings to them, which had been gessoed as well. I sprayed the whole piece with a mixture of blue and lime Dylusion sprays, which I had decanted into mini misters. I wanted a finer spray, without the big droplets that you sometimes get from the normal spray bottles. Finally, I added a bit of gilding wax here and there for a bit of metallic sheen.


I had lots of spray left on my craft mat after this project, so I decided to create a 'mop up' project using some of the left over flowers that I had. So, I dipped a tag through the inks, and also some of the white flowers. I stamped a sentiment from the Rose stem script stamp set over the background using Memento ink. I die cut some leaves from the scrap white card, and added some sari material to the top of the tag.
 I hope that I have given you lots of ideas with these stamps, and that you will have as much fun as I have had. Thanks for stopping by, Judith xx

Friday, 8 February 2013

Rose Stem Script - Stamp of the Week


This week we are delving deep into the archives to bring you a stamp set that has been a firm favourite for several years - Rose Stem Script.

It's such a pretty stamp, it's been fun to dig it out and have a play with it again.  The card above is made with the rose stem, combined with one of our newest stamp sets - Rose and Thistle.  I used the little sprig to stamp around the edges of  a piece of A6 sized cardstock with Versamark then used PanPastels to colour over them.  The rose is also stamped with Versamark and again dusted with PanPastels.  The panel was layered onto olive green card and then onto Firefly Prima paper on an 8x8 inch card and finished with an olive ribbon.

I have to show you this card too - made by Lesley.


Now you might think that it's just a pretty card, but hop on over to Lesley's blog and you'll see that it marks a pretty major achievement for her.  She's right handed, but is currently recovering from a nasty break in her upper right arm. She created this card from scratch with just her left hand!  So if you're feeling a little creatively challenged or in a mojo slump, why not set yourself the challenge of seeing what you can create with the 'wrong' hand!  You might just surprise yourself!