Pin It button on image hover
Showing posts with label Gothic Angels. Show all posts

Monday, 15 August 2022

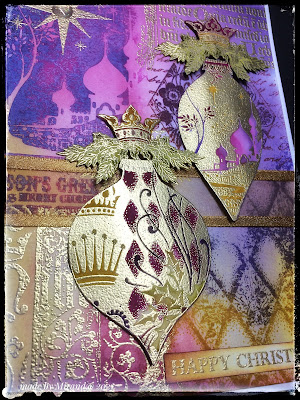
Luscious Christmas card nr. 1 (by Miranda)


Hi there,

Miranda here with some Christmas inspirations during the hottest time of the year.......but hey just think cool......

Always love to make these cards and fortunately I have a studio where there is air conditioning.

I used these beautiful Christmas stamps: Big Bold Background Poinsettia  (for the background)and the Gothic angels sheet and the Big Bold Background Christmas Baubles where I cut out some of the baubles.

This is one of the cards for a coming workshop, Miracle Christmas with Chocolate Baroque.


I worked with Distress Oxydes for the background and colored the decoupaged element using my Tombow markers. lots of gold embossing powder really makes it rich....


                    Hope you like my take on this Christmas card, next time there will be more......

Thanks for visiting and till next time,


Thursday, 16 December 2021

Royal Christmas (by Miranda)


Hi peeps, Miranda here with a festive blogpost. 

I have browsed through my CB collection and came up with these sets.........Harlequin Christmas A4 set

and this one too 'Gothic Angels A4 set'. Two of my favorite Christmas themed stamp sets.

I have used Distress inks and some Oxydes. Lots of gold embossing powder for a rich shine. A bit of decoupaging and coloring. 


Hope to have inspired you a bit...however....I think you all will have finished your Christmas cards.......but maybe for the next year?

Thanks for your visit and like to read your comments as always,

stay safe and have a lovely peaceful Christmas time,


Saturday, 27 February 2021

Ace of Trees

 Hello

I am showing more of my cards from the January show on Hochanda.

I have used the same stamp set, Ace Card,  for my two cards, but coloured to give totally different effects.

For my first card I used a light brown ink for the background and added some splatters from the Just Useful stamp set. I then stamped the main image from the set and coloured with watercolours. I added a sentiment from Gothic Angels . Love this Vintage look....and it's never too early to make a Christmas card!


For my second card I started with a faux batik effect for the background. 
I stamped the wood panel from Fragile Wings in Versamark and embossed with clear powder. I then blended grey distress ink over the top. With a hot iron and some copier paper I removed the embossing powder to leave just the coloured ink. I then stamped and embossed the main image in silver and coloured in tones of blue and green.

Thanks for looking

Sandra x

Tuesday, 15 September 2015

Put A Spell On You - Halloween Card - By Florence

Morning everyone

Today I would like to share with you an easy card made using the new fabulous Halloween Stamps.

For this card I have used
"Put A Spell On You" A5 Set and you can see the mult-buy option HERE.

They are both great sets with lots of images that can be mixed and matched to enable you to let your spookylicious imagination create wonderful projects.

The stamps are a great size which are ideal for stamping onto any surface.  They are perfect for card making, tags, ATC's or decorating gift boxes for trick and treating or for making Halloween decorations.  Lots of scope for these stamps.


Here is my card for today.

Please click on the image to enlarge.


To make this card

Cut a piece of white card stock to size.
Colour the card using Distress Inks and a piece of Cut-n-Dry foam.
For this card I used Wild Honey and Seedless Preserves.
Place a mask/stencil onto the card and apply more Distress Ink, using the same color Distress Inks that are under the mask/stencil.
Stamp the images and text.
Take a damp paint brush and some kitchen paper and remove some of the ink to high light parts of the images.
Optional - Add white highlights to the circles and to the bodies of the bats.
Using a piece of torn copier paper as a mask and some black Distress Ink create a frame.
Stamp the spell book and the sentiment onto white card stock, cut them out and attach them to the card using foam pads.
Make up the card as seen.

Thank you for looking.
Do pop back and see the wonderful projects made by the DT.  
There is a new post every day with lots of inspiring ideas.

Take care
Florence x

Tuesday, 18 August 2015

Christmas Candlelight and Sparkling Trees - Cards by Florence

Morning everyone

Today I would like to share with you two cards made using the beautiful Christmas Candlelight and Sparkling Trees stamp sets.  The multi buy offer on these stamp sets can be seen here.

These are great sets of Christmas stamps.  They have been very cleverly designed so that you have very classic images but they are so versatile you can easily give them a modern twist depending on your style of card making.  Brilliant!

For this card I wanted an aged effect but also a contemporary feel about it.


Please click on the photo to enlarge.

 On thing I would like to share with you about the the candle image is that the image has the most beautiful fine lines and stamps perfectly every time.  A really, really lovely stamp to use.

To make this card

Stamp the candle image using a brown Distress Ink say, Frayed Burlap or Walnut Stain.
Color the image with either diluted Distress Inks or diluted felt pen ink and a small paint brush to create a soft watercolor effect.
Flick some lemon juice onto the card and heat it with a heat gun to create the scorched droplets and background.  This is a very old idea that some of you will remember from back in the day.
Take a mask/stencil and Distress Inks and create the circle pattern.
Stamp the sentiment using Archival Ink.
Make up the card as seen.

My next card is a very quick and easy CAS card.


 To make this card

Stamp the tree image onto coated card stock using Archival Ink and leave to dry.
Again, using Archival Ink, stamp the tree decorations and the sentiment
Make up the card as seen.

Thank you for looking
Happy Stamping

Florence x


Tuesday, 4 August 2015

Christmas Candlelight and Sparkling Trees By Florence

Morning everyone

I hope your week is going well.

Although it seems quite strange thinking about Christmas in August, the silly season will be upon us in a blink of an eye.  I am determined this year to get ahead and make one or two cards each week.

Who is organised and making Christmas cards now or who leaves them until the last minute?
Mmm....  I wonder!
I would love to hear from you.

Today I would like to share with you two cards made using
Christmas Candlelight and Sparkling Trees.


please click on the image to enlarge

To make this card

Using a piece of Cut-n-Dry and Distress Ink color a piece of white card stock.
Stamp the candle images using black ink.
Stamp the lace boarder using blue ink.
Using a paint brush and water remove some of the ink from parts of the candle images ie the glow of the light and the candles.
Color the images.
Take a mask or stencil and using a sponge and Distress Ink create patterns just on areas of the background.
Stamp the Yuletide sentiment.
Attach the stamped piece to a white blank card.


My second card today is a simple CAS card.

The deer stamp is fabulous.
There are so many possibilities with it and it mixes and matches so well with the other stamps.


Please click on the image to enlarge.


To make this card

Trim to size a piece of coated card stock.
Using pieces of paper or post-it notes mask off the top and bottom of the card stock leaving a 4 cm strip across the top part of the card.
Using a piece of Cut-n-Dry apply some light blue Distress Ink to the whole unmasked area.
Using Distress Ink and a mask/stencil, create the pattern on the boarder.
Move the stencil/mask slightly and apply more ink.
Repeat until you are happy with the pattern.
Remove the paper masks from the card stock.
Stamp the snow flakes and the deers using Archival Ink.
Add some gems to the centers of the snowflakes.
On a separate piece of white card stock, stamp the sentiment, trim the piece to size and edge it with a gold pen.
Make up the card as seen.

That's all from me today.
Thank you for looking

Florence x

Monday, 11 November 2013

Icy Fragment (posted by Claire)

Good morning, Claire here with a card made using one of the gorgeous images from Gothic Angels on a background made using one of the fab new stamps, Nature Fragments

I've used glossy card for the background and randomly applied tumbled glass, broken chine and a little shaded lilac distress inks and then overstamped with the icy fragment using the same colours. I've edged the background with tea dye distress ink and matted it on some kraft card. The main image was stamped on kraft card and embossed with sparkly white embossing powder. I stamped the image again on smooth white card and coloured with Graph'It Markers.


 Next I cut the image out and layered it up on the kraft card. I layered the image up over some cheesecloth, coloured with distress inks and added a little bow and some die cut snowflakes topped with little pearls.

Thanks for visiting today, keep popping back as my teamies have got some gorgeous samples to share using these lovely new stamps
Claire xx

Saturday, 2 November 2013

Nature Fragments meets the Gelli Plate (by Debbie)

Hello. The card I have today is made with Adirondack inks, Distress inks, black embossing powder and my Gelli Plate. I'm not good at tidying up painty mess so when I saw the Gelli Plate being demonstrated at Harrogate show using inks rather than paint I just had to give it a go. I have only used the plate with Adirondack and Distress and must say the Adirondack gives a better effect than the Distress. The distress inks bead even when brayered many times. After a play day on Thursday with Glenda and Lesley other dye ink pads can be used, I think it will be a trial and error technique.
I started by applying Peach Bellini to the Gelli Plate with the brayer as a base coat, it looked as if there was hardly any ink on there but it definitely is. Next, I inked the wood grain stamp from the new Nature Fragments stamp plate with Cranberry and stamped on the Gelli Plate. I repeated with my new favourite colour Stream then placed a square of white card over the plate and rubbed with my hand. I love the reveal when lifting the card away to see what's happened underneath.
The beauty of using the ink rather than paint is that you can over stamp with fine detailed stamps. For the stamping I used the Gothic Angels stamps, the Angel has been coloured with pens using similar colours to the background. I have a few more cards using this technique to post and hope that you'll give it a try. Thanks for visiting, Debbie

Sunday, 20 October 2013

Fairy Flourishes (posted by Judith)

Hi Folks, I have a sample to show you today using the new Fancy Flourishes clear stamp set. I created a background by colouring a piece of white card with Mustard Seed Distress Ink, and then stamped the large flourish stamp across the card with black ink. I used the feisty angel from the Gothic Angels stamp set, masking off the areas that I did not want to appear before I inked the stamp, and then peeled the masking tape away before I stamped the image. I was then just left with the head part of the image. I coloured the image with pencils, and added Glossy Accents to the ivy leaves. I added a sentiment from the Fairyland Words clear stamp set.

I made a flower using handmade paper which was sprayed with yellow ink, and cut from Nestability dies. I edged the shapes with black ink for definition. I scrunched each layer, and attached them together with a brad. I glued a cog into the centre, and dropped seed beads into the glue. Finally, I die cut some ivy leaves from green card.

The background reminds me of expensive wallpaper, it would look lovely in a living room or bedroom, wouldn't it? Keep popping back for more samples from my Team mates. Thanks for stopping by, Judith xx

Wednesday, 16 October 2013

Holly Edges with an Angel (by Shirley)

Hello, I hope everyone is doing well.

I have a design today using the beautiful Holly Edge from the new Christmas Edges and an Angel from Gothic Angels stamp sets.


The background is Seedless Preserves and Festive Berries Distress Ink using the Acrylic Block technique.   When dry I flicked a little water over it.   I stamped the Holly edge and sentiment with Seedless Preserves Distress Inks.  I embossed the pretty Angel with silver and coloured her with Inktense pencils.   I cut her out, attached to the background and added glitter to the bottom of her dress, wings & halo along with the pearls on the background.

Thanks for stopping by and have a great day!
Shirley

Tuesday, 27 August 2013

A little Christmas wall hanging (posted by Claire)

Good morning, Claire here with another sample featuring one of the gorgeous angels from the new Gothic Angels themeplate. I've combined her with some of my favourite stamps, the little cottage is from Home Sweet Home, the trees are from Terrific Treescapes  and the sentiment is one of the clear stamps (you can find them here)

I began with a little wooden  plaque coated with white gesso, I inked in the sky with distress inks, masking the moon and then splashed some water and swooshed it around a little before blotting to create the clouds. I stamped in the cottage and added some shadows with weathered wood distress ink, added the trees and then drew in the hills with a fineliner pen. The sentiment is stamped with versamark and embossed with WOW gold embossing powder. I stamped the angel on some smooth white card, coloured her with Graph'It markers and added some glitter. I popped her up on some silicone glue to give the impression of the angel watching over the little cottage.

To finish off I've added some glitter for a frosy sparkle and applied some gilding wax around the edges.
Thanks so much for visiting today
Claire xx

Sunday, 25 August 2013

Gold Snowflakes (by Shirley)

Hello everyone, I hope you are enjoying the weekend !

I'm back with another Christmas design, this time using the beautiful new Big Bold Background - Snowflake Shadow.     This card can easily be duplicated to make a quick batch of cards.  I plan to make more in different colours :)


I stamped and embossed the background with Gold.   Next I blended a little Picked Raspberry and Peacock Feather Distress Inks over the background.   'Merry Christmas' is from Gothic Angels which I also embossed with gold and blended a little Seedless Preserves Distress Ink around it.  The die is Spellbinder S4-322.    I added a couple of snowflake charms hanging out in my embroidery stash and rhinestones in the centres of the flakes.   Easy !

Thanks for stopping by and have a great day,
Shirley

Thursday, 22 August 2013

Christmas in the Air, Yes, Already! (posted by Clare)

Hello, Friends!  I am so excited about the new Chocolate Baroque Christmas Stamps!  They are absolutely gorgeous!  I've combined some of the new stamps with older ones, to create a couple of cards. 

For the background on this card, I used the new Big Bold Background Holly stamp, and when I say big, I mean BIG!  These new backgrounds are a huge 5" by 5", with lots of varying surface details!  I stamped the Holly background with an olive green ink onto white cardstock, then shaded the leaves and berries with green and red 3-D stamp paint.  It's a new product that I found at a craft convention, and it's just amazing what it does!  I used a sponge dauber to apply this creamy, sparkly paint, which dries almost instantly.  I used a new die to cut the red, green and white lattice layers, and the sentiment tag.  "Yuletide Greetings" is from the new Chocolate Baroque Christmas set, Gothic Angels.  I re-stamped a few of the holly leaves, cut them out, then layered them at the bottom of the tag, with three red berries (red pearls).


Big Bold Background Holly Unmounted Single Rubber stampGothic Angels Unmounted Rubber stamp sheet - A4
This next card looks so elegant but was a very easy one to do.  Again, I used shades of teal ink, and gold 3-D stamp paint applied with a sponge dauber to create an old-timey look.  It adds such a sheen!  I used stamps from the Gothic Angels set, some printed paper, and a tree stamp from the Christmas Flourish set, shown below.  I heat embossed the larger script stamp image, and the tree in gold.


Christmas Flourish Unmounted Rubber Stamp Sheet - A4
I hope you will see all of the other "delicious" creations that my talented design team-mates have created!  Thanks for visiting!

Tuesday, 20 August 2013

Christmas cards, batch style (posted by Judith)

Hi folks, I have a couple of quick cards to show you today. I am always in a hurry as Christmas is approaching to get all of my cards made, and these new Big Backgrounds are just perfect for batch making. My first card uses the Poinsettia background stamp. I have created a background using alcohol inks, and then stamped onto the card using a dark green archival inkpad. The background was so pretty that I didn't want to add anything to the flowers themselves, apart from a few beads in the centres. I stamped a sentiment from the Gothic Angels stamp sheet, and placed this onto a piece of red satin ribbon across the card. This card was made very quickly, and could easily be made in batches.


My second card uses the Snowflake Shadow Big Background stamp.I have embossed the background using clear embossing powder, and then blended three different colour blue Distress Inks over the background. I have added a sentiment from the Pears and Baubles stamp sheet. I die cut a Crealie open flower which looks just like a snowflake when you cut it with white card, and matches the stamp very well. Some organza ribbon and a large gem finish the card.


So, I am well on my way with my Christmas cards, several more to go, but these stamps have got me in the mood to make some batches of cards. I hope that I have inspired you to have a go as well. Thanks for stopping by, Judith xx

Monday, 19 August 2013

Gothic Angels in Purple and Blues (by Shirley)

Hello everyone

I have a couple more cards today that feature the Angel in the stain glass window from the beautiful new Gothic Angels set.


I created the background with Victorian Velvet and Seedless Preserves Distress Inks using the Acrylic Block technique.   I stamped the Gothic letters from Gothic Angels and a Fragment from Gothic Fragments with Seedless Preserves, spritzed with a little water on the ink before stamping.

I added the brick using a stencil and molding paste.  When dry I coloured over the bricks again with the Distress Inks and added a little silver Inka Gold.

The Angel and window were coloured with Prisma Pencils.   I added glitter to her dress and wings.   I attached a gothic style key that was hanging out in my stash and sheer silver ribbon to finish off the card.


I used the Acrylic Block Technique as described by Glenda in a recent Monday Mojo tutorial for the background below:

 
The acrylic block that I used has wavy edges and left marks that you can see on the above background.   I used Peacock Feathers Distress Ink on the block.   When dry,  I blended a little Vintage Photo around the edges which I distressed.   I also added the same ink to the lace.    I stamped one of the fragment windows from Gothic Fragments a couple of times after spritzing water onto the inked stamp.   

I coloured the angel and window with Prisma Pencils.  Yuletide Greetings is also from Gothic Angels.    

Thanks for stopping by and have a great day,
Shirley

Sunday, 18 August 2013

Tangled Baubles (posted by Judith)

Hi folks, I have a couple of samples to show you today using the Tangled Baubles stamp sheet. For my first sample, I have created a background using alcohol inks, and then stamped the image using archival ink. I stamped part of the image again onto another spare piece of card, also coloured with the alcohol inks, so that I could decoupage one of the baubles. I added some co-ordinating card to mat and layer the image, and stamped a sentiment from the Gothic Angels stamp sheet.I simply added some ribbon to finish.


My second card uses the Tangled Bauble stamp sheet again as my focal point, and this time, I simply stamped the image with black archival ink. I then watercoloured the background using some red paint, adding shading for depth around the baubles. I stamped a sentiment from the Pears and Baubles stamp sheet onto a piece of card, slightly larger than the sentiment itself. I used a permanent pen to draw a design around the outside, and after making sure that it was completely dry, I used the same watercolour paint to colour the border. I used some co-ordinating card to add some matting and layering again.


This tangled bauble stamp would make perfect Christmas cards for your Zentangle loving friends, and you can personalise it in so many ways.

Thanks for stopping by, Judith xx

Friday, 16 August 2013

Yuletide Angel (posted by Judith)

Hi folks, here is a sample created using the new Gothic Angel stamp sheet.I have made a leafy background with various colours of ink. I stamped the angel on another piece of card, and then created a holly frame around her. I coloured the images with pencils, and then cut around the edge of the holly, leaving a small border for definition. I added some purple ribbon to tie in with the central image, and stamped the sentiment to finish.


These images make a great card for those people who like to celebrate a traditional Chritmas, but are also suitable for people who like a more modern or alternative Christmas as well. look out for more inspiration from my team mates coming soon. Thanks for stopping by, Judith xx

Thursday, 15 August 2013

Pink Angel (posted by Claire)

Good morning , Claire here with a card featuring one of the beautiful stamps from Gothic Angels, one of this months new stamp sets. This angel is so pretty and feminine so I decided to go for a pink and gold theme.


I made the background using distress stains in VIctorian Velvet, Tea Dye, Spun Sugar and Tarnished Brass and overstamped with one of the gorgeous background stamps from Gothic angels, firstly with Tattered Rose and then with versamark, embossed with WOW gold embossing powder. The main image has been coloured with Graph'it markers, die cut and matted on some craft card. I've added a little brass charm, come twine and a bow to finish off.

I hope all the gorgeous projects from my teamies is helping to inspire you to start your Christmas cards, the way this year is whizzing by it will be here before we know it.
Thanks for visiting today
Claire xx

Tuesday, 13 August 2013

Gothic Angel (by Shirley)

Hello everyone, I hope you are doing well.

I have another Christmas design today using the beautiful new Gothic Angels set.   I think this one could also be used for a non-Christmas card.   I added images from Gothic Fragments, they compliment the new set so well.   The corners are from New England Winter, they matched the foliage on her head piece.   I love how so many of Chocolate Baroque stamp sets compliment each other and give endless possibilities for designs.


I stamped the beautiful 'feisty' angel from the Gothic Angel set with black Stazon Ink.   Both Glenda and Judith have nicknamed her 'feisty angel' which I think is a good description.    She looks like a strong woman.  I coloured her with Prisma Pencils and used Spellbinder dies to accent her.
 
I created the background with Evergreen Bough Distress Ink on my craft mat spritzed with water and then sprayed a little Teal Dylusions Ink over top (of the cardstock).  I used two fragments from the Gothic Fragments set and the Gothic letters fragment from Gothic Angels with Evergreen Bough & Salty Ocean Distress Inks that were lightly spritzed with water.  The corner flourishes from New England Winter are stamped with black ink.      .

Thanks for stopping by and I hope you can come back often as my teammates have lots of beautiful designs to show you.

Have a great day,
Shirley

Sunday, 11 August 2013

Blue and Gold Snowflakes by Glenda


Here's a simple and quick card with the Snowflake Shadow background.  I stamped with Majestic Blue Versafine onto a pale blue card and embossed with holographic embossing powder (trust me on that, the photo doesn't show it at all).  The greeting is from Gothic Angels and is stamped in the same ink onto a strip of card that I then used a large corner rounder on.

I added some gold stickles to the snowflakes and a snowflake embellishment to the centre of one.  I found some gold glitter card in my stash so used that behind the background and sentiment, added a piece of ribbon (which I have been hoarding for about 10 years) and layered the whole thing onto an old gold 7 inch card.

If I was doing this again, I don't think I'd bother embossing the background stamp, the colour combination is striking enough and the stickles and glitter card adds enough bling to be eye catching.  Leaving out the embossing would speed up production of a batch of these too.

How are you getting on with your Christmas card making?