Pin It button on image hover
Showing posts with label Teardrop Baroque Ornament. Show all posts

Thursday, 30 June 2016

Baroque Ornament Palm Fan Silhouette and Teardrop cards (by Anne)


Good morning. Today I have 2 cards to share with you using the lovely Baroque Ornament stamps.


Project 1 – Palm Fan Silhouette
Materials:
  • Baroque Ornament Palm Fan Silhouette and Indian Elephant stamp set
  • 7 X 7 inch card blank and approx. 6 inch circle plus a scarp of stamping card
  • Inkpads: dye based (violet), multi-coloured (blue and violet), Versamark
  • Alcohol ink marker (violet)
  • Glitter pens (pink, purple, blue)
  • WOW embossing powder (Blueberry)
  • Glue pen and fine crystal glitter
  • 3D glue gel and foam pads

How to make it:
  1. Stamp the ornament and emboss with blue powder. Colour with glitter pens. Cut out the ornament. Snip into the petals and lift and shape. Using the glue pen ‘colour’ the outer sections and sprinkle with the glitter.
  2. Place the cut out ornament onto the circular mat and mark the outer positions of the image by dotting lightly with a soft pencil. Next draw in lightly cross sections of the circle to create 12 segments in total. This is to help you align for stamping. Stamp the small motif 12 times around the circle using the multi-coloured inkpad. Also stamp in the corners of the card blank.
  3. Edge the circular mat with a little dye based ink. Edge the card blank and circle with the alcohol marker to create a frame.
  4. Mount the ornament onto the circle using 3D glue gel for added dimension. Mount this onto the card blank using 3D foam.
  5. Finish with a little more glitter for extra sparkle.
  
Project 2 - Teardrop
Materials:
The materials used were as above except using the Baroque Ornament Teardrop stamp, and with the addition of turquoise PVA pearls.

How to make it:
This one was made in a similar way to the first card. In this case the ornament was stamped twice and the central section cut, offset and layered onto the base one. Turquoise PVA pearls were used to finish.

Saturday, 18 June 2016

Dreams Rise In The East (by Asha)

Good morning, friends! I'm back with 2 more projects featuring the brand new Teardrop Baroque Ornament.

First up is an Art Journal page. Actually, its my very first attempt at art journalling. The design is inspired by a Dreamcatcher dancing in the wind at sunrise. I heat embossed the Teardrop Baroque Ornament, with black EP, onto a piece of vellum. I also heat embossed the tassels in the same way. These little elements are from Indian Textiles and Indian Elephant. To create the background I used Distress Paints. For texture and interest, I used the Miniscript from the Mini Stamps Multibuy set and randomly stencilled in some texture paste. To put it all together, I fussy cut the Teardrop Baroque Ornament and supporting elements and adhered them to the page. Finally, I added some string to the tassels.

The second project is an easy one. This time I heat embossed the Teardrop Baroque Ornament onto some black cardstock using white EP and coloured it with Faber Castell Polychromos. For a dramatic finish I added little dots a Silver Sharpie.  And there you have it - a super simple all occasion card.


If, like me, you find Art Journals intimidating, I'd like to encourage you to give it a go. It can be a stratifying experience. Unlike a card, an Art Journal isn't going anywhere. It's for your pleasure and, best of all,  you don't have to worry if the recipient is going to like it. Over at my blog I've got more pictures and details of all the materials used on this project.

Have a lovely weekend and don't forget to swing by often for more fabulous ideas from the rest of the team.

Beijinhos,
Asha

Thursday, 16 June 2016

palm fan 2

 Two slightly different takes today using the lovely new baroque ornaments stamps.
For the first card, I wanted to use up some leftover background pieces, using the palm fan embossed in white then coloured with turquoise and leaf green brusho powders.
I cut strips of background, cut streamer edges on the bottom of the strips, then glued them onto white card. The mat was a matching piece of turquoise card, and the base card is 20cm sqaure white card blank.
 I used a darker piece of brushoed card in similar colours to stamp and emboss the palm fan in black, cut it out, added it with foam pads.
The second uses the teardrop stamp as well as the palm fan, but only bits of them!
I had several stamped images that didn't quite work with the brusho backgrounds, and this way I could still use them.
Background was a piece of plain brusho, using leaf green and turquoise again, and a think black mat. Wording is from words of inspiration, stamped in black versafine
( I won't argue if you think it is more of a nightmare, it was one of those 3am ideas!)
I cut out the large fans from the palm fan images and the flowery edges from the teardrop images, and glued them down to represent flowers.
Base card blank is white 15cm square
I hope this has given you some different ideas on how to use these lovely stamps (or even how not!)
Veronica

Tuesday, 7 June 2016

Teardrop Bag (By Magda)

 Teardrop Baroque Ornament Bag

I needed a little shoulder bag for my quick shopping and I decided to do it with the new Teardrop Baroque stamp of Chocolate Baroque.

For this project you can follow the instructions of any pattern or tutorial of a simple fabric shoulder bag or make up bag.

You might have:

1. Chocolate Baroque Teardrop Baroque stamp
2. Distress Paint
3. Brayer
4. Gelli Plate
5. Cotton Fabric
6. Quilt padding
7. Sewing machine
8. Scissors and thread
9. Zip

Step by Step:

1. Distribute the colour with a brayer on the Gelli Plate
2. Put the stamp on the Gelli as if it is an inkpad.
You will so lift colour from the Gelli and could stamp it on a cardstock. On this way you don't waste colour and you can use the cardstock for a later project. Stamp on the Gelli and on the cardstock until you are happy.
Clean immediately the stamp with warm water.
3. Put the piece of cotton fabric on the Gelli, press firmly.
4. Lift the fabric and let dry.
5. Repeat points 1-4 for all of the pieces of fabric you need for doing your project.
6. Stamp Teardrop Baroque Ornament stamp with Versafine or Archival on the front and back piece of your bag.

Assemble, sew all the pieces as explained in your pattern and have fun with the new stamps and all the other products of Chocolate Baroque!  

Magda


Thursday, 26 May 2016

Fabulous Ornaments launch today (by Lesley)

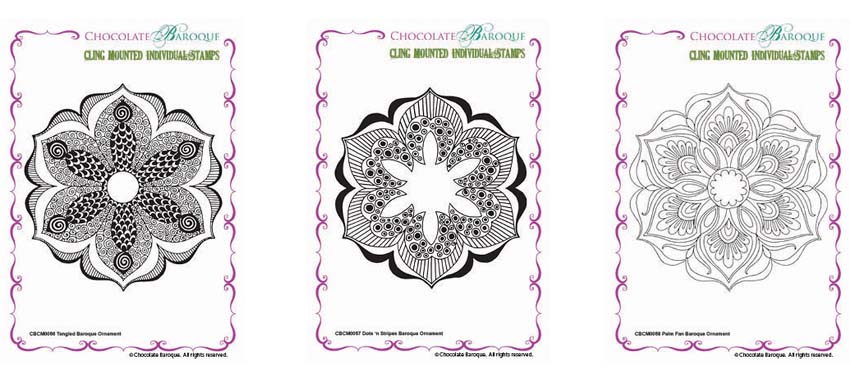
I am so excited to be launching some gorgeous stamps today.  Baroque Ornaments is a collection of six individually cling mounted stamps each with their own unique pattern.  These are loosely based on the traditional mandalas but Sue has used her imagination to bring them right up to date.

I am sure you just want to see them now to here we go with the first three.

From left to right there is Tangled Baroque Ornament, Dots 'n Stripes Baroque Ornament and Palm Fan Baroque Ornament.

The second three look like this


I think Sue has done her usual magic and created some stunning images. Each individual stamp is cling mounted and cut out ready for you to starting playing as soon as you get them out of the packet. And of course we have this full collection available as a money saving multi-buy if you really can't decide.

Here is a sneaky peak at a gorgeous sample from Zoe which shows the Teardrop Silhouette stamp off to perfection.


I hope you have as much fun with these as the Design Team, who have been colouring and inking and creating more exciting samples for you to show off the new stamps.

I think that Zoe has chosen a wonderful sentiment for her card, it eptomises what stamping is all about. It really is an adventure into creating your own art and seeing just how imaginative you can be. So why not join us on a new adventure everyday with our wonderful Design Teams' daily dose of inspiration.