Pin It button on image hover
Showing posts with label Frosty Trees. Show all posts

Friday, 24 December 2021

Happy Christmas Eve (by Sandra)

Hello and Happy Christmas Eve!
I'm sharing the last of my cards from the November show on the Craft Store.

These cards all use stamps from Frosty Trees set.


For my first card I made a background using Distress Inks and a stencil. I blended the inks off the stencil onto the card each time using a darker colour and not quite covering the previous colour ink. I also blended some ink for the sky which I spritzed with water and blotted to make it look snowy. I stamped the swirly tree in Versamark and embossed in silver. I stamped some background trees from Trees a Crowd using my background colours. I stamped a sentiment onto a die cut. I mat and layered my piece onto a 8x8 card base.


For my next card I used Brushos on a piece of  water colour card. When it was dry I stamped the trees with Versamark and embossed in white. I trimmed the image and layered onto a 7x5 card base. I added a sentiment from the stamp set.


For my last card I made an aperture easel card. I stamped "snow" using the splatter stamp from Numerology. I stamped the Swirly tree onto a piece of vellum and embossed in white. I added a sentiment as a stopper. The second picture shows it lit up.


I hope you all have a happy and healthy Christmas and I'll be back next year.

Sandra x

Monday, 20 December 2021

Its all about the trees by Rachel

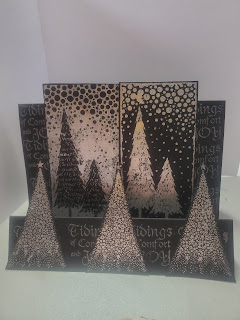
 Hello there! Rachel here today with some more makes from the November shows. This first one uses the Frosty Trees stamp set. I used flitterglu and flake on black card to create the images and added them to the card blank that I had stamped in versamark and added and heat set gold embossing powder. 


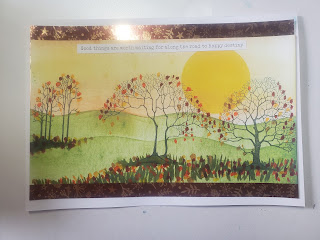
This one uses both the trees a crowd and the remembrance tree stamps. I stamped the trees then built a scene around them using inks. Finally I added some leaves using pens of autumnal colours.


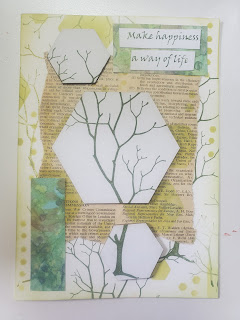
This last one is a mixed media card using the main image from the trees a crowd stamp set. 


I hope this gives you a few ideas! 
Merry Christmas to you. Wishing you a happy healthy 2022 too!
Rachel x


Saturday, 11 December 2021

Festive Trees (by Judith)

Hello everyone, I hope that you are keeping well. I have a couple of Christmas projects to share with you today. These projects feature stamps that aired on our November TV shows on The Craft Store.

My first project was created on kraft card.  I stamped the large heart from Artist Trading Heart, and masked the outside. I added trees from Trees a Crowd, and some scenery lines with a fineliner pen, using torn paper. Keeping the paper in place, I added some shading with white ink and a stencil brush. I used a white gel pen to add some highlights to the trees and dots in the sky for snowflakes.

I added a sentiment from Let's Get Festive to finish.

My second project consists of two little CAS cards stamped straight on 4" x 4" cards. I used two colours of ink and stamped straight onto the card blanks. These were really quick cards to make. I chose images from Frosty Trees for both the sentiments and main images. The teal and purple colour scheme is not traditional, but would suit someone with a modern home decor. You could choose any colour palette; black and gold, red and green, blue and silver, whatever combination you like, and use black card if you opt for metallic colours for even more drama. I added a little bit of glitter glue on the tree, you can click on the photo for a close up look.

I will be back later in the month with some more projects to share with you, thanks for stopping by, Judith xx


Friday, 10 December 2021

For The Love Of Trees

 For The Love Of Trees

Hello everyone well December already and the days to Christmas are flying by. I am nowhere near ready and not quite sure I will be, but I dare say by hook or by crook I will get there somehow.

Today I would like to share some of my samples using the fabulous variety of Tree stamps featured in the November shows. I have to admit tree stamps are a huge weakness of mine, so versatile and useful in all sorts of different ways.

The first card shown below uses 

Frosty Trees

Versafine Clair Acorn and Pine Cone.

 A White Gel pen.

Masking Tissue.

Country Views

After stamping the Cottage and the Trees using Masking Tissue to give added depth the colour added was applies using soft brushes. The White Gel Pen was used to give the illusion of snow on the roof and in the air. The sentiment was stamped and applied to the card using double sided tape.

This is so simple, it uses stamps from the 

                                    Trees a Crowd Rubber Stamp sheet

MDF plaque and stand, Masking Tissue, White Gesso, Grey Inkpad, apart from the stamping all inks were applied with a soft brush gradually building up the colour.


This sample is rescued from the bin, simply stamped using Versafine Inkpads and a gold gel pen to add a little sparkle and mounted onto Kraft Card.


The next sample is fairly easy to achieve it just takes a little thought before stamping. I have used just an Archival Colbalt Blue plus a Promarker and Ruler.


This next sample uses a Plywood Postcard Stamped and enhanced with Pyrography and inks to colour.


This sample is not difficult and again uses the stamps from the Trees a Crowd stamps. I used a light pencil to help with the designing of this. Two different shades of green to stamp and a fine liner to draw the circles around the images. A green pencil has been used to ground the image in the centre of the card.


Thanks for looking in today 

Love Doreen 


Monday, 6 December 2021

Change your point of view by Natalie


This project is all about looking at designs differently. It is easy to be lulled into the security of thinking "Oh its a tree stamp, and that means roots/ground is at the bottom and the tip is at the top". However, we can stretch our stamps further by rotating, cropping and even joining them together. This project focuses on this exact concept.

We are going to use the swirl tree from Frosty Trees as a decorative border rather than as it was originally designed. This piece is ideal for multiple uses; you could join it together with a copy of itself and mask the centre for a monogram; or why not press it into enamelled embossing to form a decorative hinge. It is even ideal for paper moulding.

For this example though, simply use a slimline blank and stamp it twice rotating it 180ยบ. You can do this using a stamp platform or using a stamp block. I drew a pencil guideline to help me align the stamp as they should be placed above the central line.

The central decal is then built up with shaped, stamped holly leaves and decoupaged berries which were topped with red glitter for extra shine and sparkle. 

The sentiment was then stamped with gold ink onto red cardstock, then mounted onto gold glitter cardstock. I used the same red to add a panel onto my card blank and decorated it with a green strip to match the holly and tree images. Finally, add the sentiment strip and add two gems/sequins where the sentiment would join the green strip.

Saturday, 4 December 2021

frosty trees

this stamp set is definitely appropriate at the moment, my part of the country has got away lightly so far with the weather, but it is still very cold. Hopefully those who lost their electricity during the recent storm will all be re-connected by now and gradually thawing out.

My first sample uses one of the snowy stamps to create a sheet of gift wrap. This was just a sheet of copy paper with the stamp repeat stamped using a multicolour ink pad. It is a solid stamp, and quite easy to line up the images - any squiffy ones probably won't be noticeable once you have wrapped something up, especially with any ribbon decoration -I didn't have any ribbon, so used some silver cord.  I also made a matching gift tag, using the sentiment from the same set.

The next samples are very similiar, using the triangular tree and a stamping platform to create a star. The first one I used the same blue inkpad as before, keeping the lighter ink to the top of the tree . The sentiment in the centre was stamped in versamark and gold embossed, The mat is actually silver mirri card
For this version I used a grey ink pad - I didn't have a silver one - and the sentiment was inked with the blue inkpad. The mat was white card sponged in blue using the darker part of the inkpad.
 

Wednesday, 9 December 2020

Christmas is coming (by Anne)


Hi everyone. I am delighted to be a guest designer for you this month. My first offerings are some Christmas makes. It's been a tough year for us all and this Christmas is not really going to be usual. However, lets hope that time goes by quickly and that we can look forward to better times ahead with our friends and family in 2021. Lots of hugs, Anne.

CHRISTMAS LANTERN

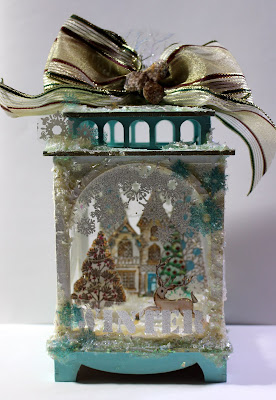
My first project is a pretty Christmas lantern. I mixed & matched lots of stamps on this one but just had to include my absolute fave reindeer stamp.

Woohoo – all lit up.

This one is to be gifted to my 96 year old friend who I help care for. We are having Christmas together as I am in her support bubble. I think that she will love it.

Materials List

Pretty 3D scene with house and trees.

A close up – oh that reindeer!

Adding the acetate baubles helps to blur and disguise the side edges of the card cut outs creating the scene.

How it was made:

  1.  The bare MDF lantern was coated with white Gesso (primer).
  2.   When dry it was painted with acrylics. Gilding wax was added around the ledges.
  3.  Versamark was applied through the stencil onto heat resistant acetate to create the Winter sentiment. It was heat embossed with sparkly white powder, cut out and attached to the lantern with strong tape.
  4. The snowflakes border was stamped and embossed with white glitter powder 4 times, cut out and taped to the top portion of the lantern arches. Two large baubles were also stamped, embossed and cut out.
  5. Extra snowflakes were stamped and embossed with white or blue glitter powders, along with a few twiggy branches, and cut out ready to use as embellishments.
  6. The main images; 2 large background trees, the building scene, smaller foreground tree and reindeer were stamped with Versafine and cut out. In addition pine cones were cut out from the stamped pine branch stamp.
  7.  Images were coloured with watercolour, glitter and gel pens.
  8.  Now for the messy bit – ha ha. The glitter gel was used to coat the base and spread on top of the ledges. Some was also applied behind the acetate to help glue it in place securely. I had this heavy bodied thick glitter gel in my stash for years. It really needed using up as it had started to set in the pot. Some of the half set chunks were stuck down into the wet gel for added dimension. For added sparkle I also dropped in some of the chunky mica flakes. You could substitute heavy bodied acrylic medium and add glitter for similar results.
  9. The stamped images were anchored into the wet gel to create the scene. I just had to add a little bit more sparkle over the images with clear glitter glue too.
  10. Once the glitter gel medium had dried I did a bit of dry brushing with white Gesso in some areas to add more snowy effects.
  11. The light string was then arranged to light up the background house and trees, and to light up the foreground tree. The wires were anchored with strong tape at the back of the images to help hold them in place. The switch was hidden behind the large background scene images.
  12. The acetate bauble images were added to the sides with red tape. This helped blur the view through the sides of the lantern where just side on edges of the card elements were visible. It may have been better to stamp the sides as one complete panel but I found that I needed easy access to the inside in order to arrange the stamps and lights.
The ribbon bow was added to the top. The acetate snowy sprigs and pine cones were added to embellish the bow. The glitter glue gel was used to anchor everything in place. Extra snowflakes used to embellish too.

ROBIN SCENE CARD

Every year I end up leaving my Christmas cards until the last minute so I decided to do a couple of projects that would be fairly quick and easy for batch making. I always use my stamping press for batch making – it makes it so much easier to line everything up and repeat stamp multiple times.

I hope that you like this robin scene card.


I added extra inking around the outer edges of this one but decided that it really didn’t need it so didn’t do it on the rest. I just had to get on with that batch making! Ha ha.

Materials list

How it was done

  1.        Images were stamped with Versafine and cut out.
  2.      The main image was coloured with watercolour pens and mounted onto Kraft card. Glossy Accents was used to add shine to the Rosehips, and glitter glues added for sparkle.
  3.         The snowflake borders were stamped directly onto the card blank with  Distress Ink.
  4.      The ribbon was glued down and the main topper added. The sentiment was also mounted onto Kraft card and glued in place. The branch was lightly shaped before gluing.
  5.           Finished with more dots of glitter glue. Hey – you can never have too much bling – tee hee.

Note: I kept these fairly flat for ease of posting. 3D foam could be used for more depth if desired.

CHRISTMAS TREE SHAKER CARDS

Who doesn’t like a shaker card? Scenic panel stamps make them really quick and easy for batch making. These were quite tricky to photo due to shiny acetate and all that bling. Hopefully you can see enough detail of the lovely glittery snow behind the acetate windows.

Materials list:

  • Frosty Trees stamp set (Chocolate Baroque)
  • 15 X 9cm white linen textured card blanks
  • Heavy weight textured white card (for frames)
  • Heat resistant acetate
  • Versamark Inkpad
  • Embossing powders: Detail white, white with silver glitter, metallic silver
  • Glitter for inside shaker (I used Pinflair Ice Diamond – non static glass glitter)
  • Stickles glitter glue (Icicle)
  • Foam tape and red liner tape (strong double sided tape)
  • Optional: Die to cut decorative aperture approx. 12 X 6cm (or cut a plain frame by hand). I used a die from Tonic (Kaleidoscope Box Panel set)

How it was done:

  1.         Cut a frame to fit the card front and surround the stamped scene.
  2.       Stamped the image onto acetate and heat embossed with choice of powder. Trimmed and attach behind the frame with strong tape.
  3.           Next attached foam tape ensuring that no gaps were left (to contain the glitter).
  4.         Laid card flat and placed glitter in the middle before placing the framed acetate scene.
  5.         Finished with dots of glitter glue.

MORE CHRISTMAS TREE CARDS

Finally I made another batch of quick and easy cards using the reverse scene image and blue ink. I do love monochrome blue & white cards.

Materials list:

How it was done:

  1. Images were stamped with Versafine. Note: images on the textured card blanks will not be sharp. This is fine for the backgrounds.
  2. Scene panels were cut out and stuck down with foam tape for added dimension.
  3.    Finished with glitter glue sparkles. Sorry but had to do it.


Tuesday, 6 November 2018

Christmas Inspirations (by Magda)

It is time to think about Christmas cards and on the Chocolate Baroque site you have a big choice of stamps.  Here below I show you three projects that could inspire you.

From Our House to Yours
1. Score a white cardstock and colour it with Distress Ink Pad
2. Stencil with embossing paste the snowflakes from Seasonal Elements
4. Stamp the birds from Fat Robin and colour with Distress Ink Pad using a brush and cut the shape
5. Stamp the sentiments from Let's get Festive, use Stickles on the snowflakes, and assemble all of the pieces as shown


Joy
1. On a white cardstock use several layers of stencil in blue Distress Ink Pad and the snowflakes from
    Seasonal Elements
2. Stamp Winter Edges in Archival Library Green and apply embossing paste on the trees and on the
    bottom
3. Colour the ground in brown/green shades of Distress Ink Pad
4. Stamp the sentiments from  Let's get Festive, use Stickles here and there  and assemble all of the
    pieces as shown


Frosty Trees
1. On a white cardstock blend  Distress Ink Pad  Barn Door and Festive Berries
2. Stamp with Versamark Onyx Black one tree from Frosty Trees plate
3. Stamp the sentiments from  Let's get Festive at the bottom of the card and cover it with embossing
    paste through a stencil
4. Wipe on the same  stencil a wet cloth in a corner on the top of the background
5. Stamp with water  the same tree of Frosty Trees plate  to create a shadowed wood
6. Apply Stickles gold on the stars of the trees and add a gold wire.


See you soon for my second post in November, happy Christmas crafting 
Magda


Friday, 29 September 2017

Two projects (by Magda)

There is still time for Christmas, but these beautiful stamps from Chocolate Baroque have tempted me to try two very different projects.

Long Card :

1. Blend Distress Ink Pad Antique Linen on 3 white ATC cards
2. Stamp with Versafine Olympia Green  on each ATC a different subject, from Frosty Trees
    and New England Winter set
3. Decorate with red gems and Stickles - Crystal
4. For the background of the card blend Distress Ink Pad Antique Linen, Old Paper, Mustard Seeds
    and Rusty Hinge.
5. Stamp with Versafine Olympia Green  a sentiment from the Frosty Trees set


Journaling Page:

1. Colour your journaling page with green, red  and yellow acrylic paint
2. Cover all the page with Dina Wakley Media white gesso 
3. Stencil spots randomly with Distress Ink Pad Pine Needle 
4. Stamp with Distress Ink Pad Pine Needle and Walnut Stain the tree from the Frosty Trees set  in order to create a scene
5. Use Dina Wakley Media white gesso  on the snowflakes of Seasonal Elements stencil 
6. Stamp with Versafine Vintage Sepia the sentiment Let's get Festive
7. Decorate with some red gems and Stickles - Crystal


Thank you for passing by
Magda


Saturday, 23 September 2017

Christmas selection (posted by Claire)

Good morning, Claire here with a selection of Christmas cards made for Lesley's shows on Hochanda.  

To make this acetate card I cut the front off an 8x8card blank leaving a little border (about 2cm) along the top and used red line tape to attach an acetate panel. I stamped the gorgeous little house from New England Winter on watercolour card and added some colour with watercolour paints, highlighted with glitter and glossy accents. I cut this out and then tore several strips of card, adding glitter to the torn edges. The important thing with this style of card is to add some weight to the front of the card otherwise it doesn't stand up properly so the strips of snowy card give the front some strength. Layer the strips of card, popping the house in between. I added some 'snow' with a white Posca Pen and some icicles with glue and glitter. I stencilled the moon using Seasonal Elements stencil and white gesso with a sprinkle of glitter. The sentiment is from Let's Get Festive. I made the background using watercolour paint, creating a very dilute wash of colour. 


My second card was made using Frosty Trees. I began by stamping the slender trees with a rainbow ink pad, it doesn't show too well in the pic but the trees are actually shades of blue/green and purple. Next, I stamped the ornate tree with gilding glue and applied some silver holographic glitter. I used the same stamp to create a border around the white card. I stamped the sentiment (from the same set) with gilding glue and again applied glitter. 


I love these pretty birds and made two colour variations for the show using the Winter Birds set. This one in shades of pink and brown was fairly quick to make. I watercoloured the image and die cut with a spellbinders die before dusting with distress ink (Picked Raspberry and Tea Dye) and added some frantage embossing powder. The sentiment is from Let's Get Festive, I stamped with versamark and carefully embossed with gold embossing powder, carefully missing the word Hearts which I coloured with pink EP. Again this was die cut and distressed before layering up on a shaped easel card made using the same die. 

My last card for today features the same stamp but in more traditional Christmas shades of Red and Green.


I watercoloured the image, adding some glitter for a snowy sparkle and splattering some paint here and there for the background. I stamped the holly border using the little silhouette stamps from the Winter Birds set. I stamped them in green and added red berries using a fineliner pen. I added some dots of white glue and dusted with some glitter. 

I hope we're giving you lots of inspiration for your Christmas cards, this year is whizzing by and it will be here before we know it. Thanks for visiting today
Claire xx


Friday, 22 September 2017

Christmas Old and New (by Judith)

Hello everyone, I am sharing some Christmas projects with you today that were featured on last month's TV shows on Hochanda. Some of these were old projects that I made a few years ago, but I hope that you do not mind seeing them again.

I will start with a new project, where I created a background, using soft blues and pinks to represent a Winter sky. I added some deeper blue hills using torn paper masks, and stamped the tree from the Frosty Trees stamp set and the sentiment from the Let's Get Festive stamp set, using dark blue ink. Ensuring that the background was completely dry, I added some snowflakes using white embossing powder, and then used some flat-backed gems for added sparkle.

Using another tree from the same stamp set, I created an icy background using metallic paints, and on a smaller scrap of card, I stamped and embossed the tree panel using Versafine Onyx Black Ink and clear embossing powder, for a crisp image. I matted the layers onto black card, and added some small black gems. The sentiment comes from the Let's Get Festive stamp set once again.

 I wanted to create a piece of home decor especially for Christmas using my favourite sentiment from the new stamp set. I painted a chipboard heart in soft blue, adding some crackle medium here and there, and then added a vintage white paint over the top. I then stamped the sentiment in a bold red before adding the fabulous pine cones from the New England Winter stamp set around the edges. I used water based markers to colour the stamps, allowing me to add colour exactly where I wanted. A red ribbon completes the project.

This next card is an adaptation of an old card that I first made several years ago, using the Winter Birds stamp set, but I have made it in a different size. These days, I like to make 8" x 8" cards, and so the card does look slightly different from the original. I have added one of the new sentiments this time around as well.


Finally two golden oldies for you, I remade the first one, which was originally given as a Birthday card to someone. It just goes to show that these beautiful stamps can be used at other times of the year, not just at Christmas, with a change of colour. I have used the large image from the Reindeer Landscape stamp set, embossed with copper embossing powder, and coloured with Distress Inks and a water brush. The background was also created with Distress Inks, and I have then stamped leaves from the Sunny Sunflowers stamp set, and coloured them with pencils. The sentiment comes from the Nature's Peace stamp set.


Finally a luminary, also using the large image from the Reindeer Landscape stamp set. I die cut an aperture from four large printed tags. The images were stamped and embossed onto parchment using white embossing powder, and coloured from behind. I used metal tape to join the tags, which I embossed, and aged with a little bit of black paint.

I hope that my projects have given you some ideas using these fabulous stamps. Thanks for stopping by, Judith xx

Wednesday, 6 September 2017

Flora Musica (by Brenda)


Good morning all you crafty Peeps, I hope you week is going well.

Today I have some creations to share using the stamps that Lesley showcases on Hochanda in August, the first show featured a wonderful collection of Vintage inspired floral stamps and the second show was all about Winter and Christmas. I will share a few of my samples for both shows with you next week.

Starting with the card at the top which features Flora Musica which I stamped onto a Distress Oxide background and the used DI's to colour the image. Using Decorative Edges I stamped some random harlequins using the same Oxide inks, a little Butterfly from Just Butterflies and sentiment from Words of Inspiration which I think is my all time favourite Chocolate Baroque sentiment set.


For this card I again created an Oxide ink background and the overstamped with the holly from Winter Birds using Versafine blue ink. The central panel has a sentiment from the new Christmas Word Plate and again the same holly around the edges.


This one was a bit of an experiment !! Yet another Oxide ink background............yes I am a bit obsessed with them and over stamped with Harlequin Bouquet which I stamped with Versafine black and coloured in with the same DI's. I then covered the whole piece with three layers of  Versamark and heat embossed each layer with detail clear poweder and then the madness set in..........I cut the piece into seven piece and rearranged onto a piece of coordinating cardstock, but do quite like the finished effect.


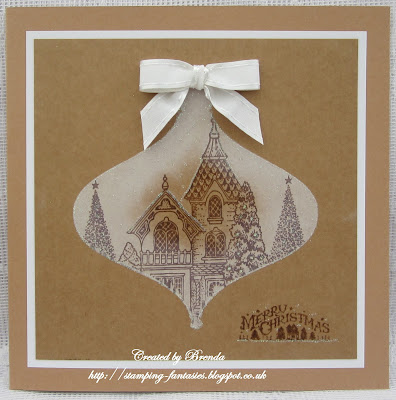
For my final card I used Kraft card, a mask and a white inkpad to create the Christmas bauble shape and with the mask still in place stamped the house from New England Winter using Gathered Twigs DI and finally the little sentiment set from Frosty Trees and a white bow to finish.

As always my thanks for popping in today and I hope I have inspired you to go check out the lovely stamps from the shows.


Monday, 6 April 2015

Awesome Orchids (by Shirley)

Hello everyone, I hope you had a great Easter.

I have a few designs to show today using the beautiful new Awesome Orchids clear stamp set.


I used the new Abandoned Coral along with Picked Raspberry Distress Inks in the background (using an Acrylic Block & water).   Next I added texture with white acrylic paint, a small stencil and a bottle cap.  The little dots were created using the 'snow' stamp from the Frosty Trees set.   I painted the pretty little Orchid with Inktense pencils.

I used the same colour theme below:


I used the same background technique as the first card.  I stamped the Orchid stem & leaf image three times onto the background, and one of the flower heads on separate card stock.   I coloured the leaves and flowers with the same Distress Inks along with Seedless Preserves, cut them out and attached.

And the last design is a quick CAS card:


Using a circle cut from cardstock as a mask, I blended the new Cracked Pistachio and Mustard Seed Distress Inks over top and used a stencil for the texture.  I coloured the image with pencils.

Thanks for stopping by.  I hope you can visit often to see the beautiful designs by my talented teammates.

Shirleyx