Pin It button on image hover
Showing posts with label Birdcage Collage. Show all posts

Wednesday, 8 June 2022

Birdcage Collage (by Carole)

Hello everyone, today sees the first of three posts from our regular Guest Design Team member Carole Cann. Carole has created a beautiful card using one of our lovely collage stamps. 

Carole writes:

Hello everyone.

I am pleased to be doing another GDT slot and will have three projects for you over the next three weeks, using some of the older stamps. Hope you enjoy looking at them.

My first sample uses Birdcage Collage, a lovely stamp which is very versatile and much used.

You will find some other samples on my blog page.

I have stamped onto black card with Versamark Ink and embossed with silver embossing powder, then coloured the image with pearlescent paints. The left hand edge has been cut away around the cages.

The edging uses one of the Floral Edges stamps and again is stamped with Versamark and silver pearlescent powder brushed over. I sealed this with a quick spritz of cheap hairspray.

The words are from the Loving Sentiments stamp set.

I hope you like this stamp as I have had fun using it again.


Thanks for visiting, and hope to see you again next week.

Happy crafting, 

Carole


Monday, 29 October 2018

A stepper and using gold relief paste (by Rachel)

Hello there! Rachel here with a couple of cards from the September shows. The first is made using the auricula script stamp and one from the floral edges set. The card is a ready made stepper that I decorated using distress inks then added the auricula stamp as a topper.


In this second one I used the gold soft form relief paste on the birdcage collage. I love this stuff - you just spread it on, wait around 24 hours then once dry, peel it off! I have used the decorative edges stamp at the base of the card and stamped in flitterglu and added flake. I think the two techniques compliment each other.


I hope you have enjoyed these two makes and I look forward to sharing more with you next month.
Hugs Rachel x

Tuesday, 23 October 2018

A Collage of Colour (by Judith)

Hello everyone, I have a mixture of projects to share with you today, showcasing the stamps featured on last month's TV shows from Hochanda.

My first project uses the lovely Birdcage Collage stamp as my focal point. I created a colourful background using Brushos spritzed with water, and pressed a piece of crumpled cling film over the top, to add a bit of texture to the background. Once the Brushos had dried, I removed the cling film, and stamped some of the words from the Amazing Mackintosh Words stamp plate over the top, using black ink.

I stamped the Birdcage Collage onto a spare piece of Drawing Cartridge, and coloured the image using water based markers and a water brush. Finally, I cut out the image, and attached it to the background.

For my second card, I created a piece of background using Distress Inks, which I had added to my craft mat and spritzed with water. I picked these up on the Drawing Cartridge a couple of times, drying each layer in between. I coloured a piece of Stampbord with the same colour of inks, and the stamped the deco edge from the Decorative Edges stamp set on both the Stampbord and the background, using a plum coloured ink. To finish, I added a piece of ribbon, and some Little Birdie flowers.

My final sample is a reproduction of one I made a long time ago, however I liked the design, so why not? I stamped the Butterfly Dress image onto a piece of smooth card, and masked the image. I stamped the Floral Edges image across the bottom twice. I added clouds using a stencil and blue ink, but you could use torn paper or a frilly die cut to achieve a similar look.

I stamped the Butterfly Dress image twice again onto spare card, and then coloured the flowers and butterflies, plus the main images all with pencils. I added the extra butterflies to the background flying around the lady, and along the floral border.

Thanks for stopping by,

Judith xx

Wednesday, 10 October 2018

Free as a Bird - by Penny

Goodly morning everybody, I'm back again to tempt and inspire you all with the first of my samples from last months Chocolate Baroque shows.  This one features stamps from the Birdcage Collage, Amazing Mackintosh Words, and Decorative Edges sets; I also used Distress Inks, marker pens, and a few bits and pieces from my stash.     


I began with a piece of white card and blended the inks on it.  I then stamped and embossed the Harlequin border on one side of the panel, matted it onto black card and attached it to a white base card. 


On a seperate piece of card I stamped the Birdcage Collage image and coloured it with pens.  I then fussy cut the image and attached it to the card,  I added a couple of die cut feathers and a couple of pearls from my stash.  To complete the design I stamped and embossed a sentiment onto white card, die cut and embossed it, added ink and some pearls then attached it to the card. 

I hope you have enjoyed reading my post today, thank you for dropping in and spending a little time with me. 

I'll be back later in the month with another crafty project,

see you then,

                      
                                      x Penny x


Saturday, 6 October 2018

Butterfly garden by Brenda


Good morning Peeps. Brenda here with some more inspiration using the lovely stamps Lesley showcased on Hochanda last month.

My first creation is one using lolly sticks which I glued together to form a stamping case and then coloured with Acrylic Paint after fixing a masked sun in place. Next I stamped the beautiful Butterfly Dress image and stamped her again a few more times so I could decoupage her dress. Using one of the stamps from Floral Edges I added some leaves across the bottom to ground her. Next I coloured everything including the additional flowers and Butterflies and built up her skirt adding a few more flying around her garden.


The next one below features Auricula Script which I stamped onto cardstock coloured with Distress Oxides and heat embossed with Lapis Lazulite embossing crystals. The sentiment strip across the bottom is from Amazing Mackintosh Words.


Some more inkiness with the next one using Distress Oxides and the harlequins from Decorative Edges to create a background and I was fairly liberal with the water spritzed onto the inked stamp to achieve a rather messy and random finish and then inked the edges and heat embossed with detail copper powder. I used the same inks to create a background for the Lady's Slipper Orchid image, stamped with Versamark and used the same embossing powder and bleached out the colour from the bloom.


The background on the next one was a bit of an experiment using a piece of kitchen tissue and alcohol inks to create a background. I then stamped Birdcage Collage with Versafine black and added a little white highlighting.


Thank you so much for popping in today, myself and my team mates always appreciate your kind comments.

Friday, 22 June 2018

Birdcage Triptych (by Rachel)

Hello everyone, our regular Guest Design Team member Rachel is back with her final blog post this month. She has created a beautiful mixed media project for us this week.

Rachel writes:

Hello all! My third and final piece of inspiration for this month is a small triptych. I have used the following stamp sets in creating this piece: Birdcage Collage, A Little Bird Told Me, Rustic Fragments and Sunny Sunflowers.


I started by gessoing the triptych, then once dry, I stamped the Birdcage Collage and coloured it using a combination of acrylic paints and Distress Inks. Then I painted the gessoed surface with Distress Ink before stamping over it with a Rustic Fragment stamp. Next I prepared some card with Distress Inks and stamped and fussy cut some of the flowers, leaves and also a bird. I added these to the sides of the triptych and finally added the words 'a little bird told me'.


I hope you like this piece. Big hugs, Rachel x

A big thank you to Rachel, who will be back with us soon.


Wednesday, 22 June 2016

A little Birdhouse in your Soul (by Rachel)

Sadly we have reached the final week of Rachel's Guest DT spot and this week she has created a magical piece of home decor. Would love this in my house.


This week I used a Tando Creative birdhouse kit which I covered with acrylic paint. Then I used the Rustic Fragments stamp set to stamp on the birdhouse and then glued it together. 

I added birds from the Fly Away with Me stamp set that I had stamped with Jet Black Archival ink and fussy cut. The greenery was part of the Tando kit and finally I added flowers stamped, coloured and cut from the Birdcage Collage stamp.


I hope you like it! I have really enjoyed designing my projects over the last three weeks and look forward to seeing you all again later in the year.

Rachel x

And we have so enjoyed seeing your beautiful creations Rachel, thank you for your time in the Guest DT seat.

Don't forget we have new projects still to come from the Design Team ladies, so please drop by again.


Friday, 24 April 2015

Beautiful Birdcage Collage (by Shirley)

Hello creative people, I hope you are doing well.

I have a design to show using a gorgeous new cling single stamp - Birdcage Collage.


The background was created with Dylusions inks and Distress Paint (yellow).   I over stamped with a stamp from the beautiful Dusky Damask set.   The main image stamped with Cobalt Archival ink was painted with water colour markers.


Thanks for stopping by and enjoy your day,
Shirleyx

Tuesday, 14 April 2015

Brusho Birdcage Collage (posted by Claire)

Good morning folks, have you seen the gorgeous new individual stamps released this month? Goodness me they are stunning and the perfect price for a crafty treat without breaking the bank too.

This one is called 'Bird Cage Collage' and is a gorgeous image and I really enjoyed colouring it.


I began by having a play with my Brushos and water colour card which I used to create my background. I stamped the image with brown ink and distressed with Tumbled Glass distrss ink. Next I stamped the image with versamark and embossed with gold ep before cutting out and colouring with distress inks. I stamped the focal image with Memento Tuxedo Black ink, coloured with my Graph'It markers and carefully cut out before popping up on 3d foam pads.

I've used purple card for matting and layering and simply adding some gems to the corner to finish off.

Thanks for visiting today
Claire xx

Thursday, 9 April 2015

Birdcage Collage with Stampbord (posted by Judith)

Hello everyone, I have a project to show you using one of this month's individual stamps, Birdcage Collage.

I started my project by inking up the stamp, and then placing an ATC sized piece of Stampbord onto the stamp to take a partial print of the image. I stamped the image again onto a piece of white card. I coloured the Stampbord image with pencils, and also the areas of the image on the card that would not be covered by the Stampbord image.

I covered the piece of Stampbord with Versamark and sprinkled it with extra thick clear embossing powder, melting it with my heat gun. I added embossing powder twice more while the embossing powder on the Stampbord was still molten. You need to be very quick to do this! Once the Stampbord had cooled down completely, I attached it to the card image, lining up the two images so that they matched each other.

I created the card background using the wrinkle free Distress technique: adding Distress Ink to my craft mat, and spritzing it with water, before dragging my card through the ink. I dried this layer, and then patted the card onto the mat again to pick up some of the left over ink droplets, and dried the card again. I added a second colour and repeated the process. I used a template and Distress Ink to add a trellis effect to two of the corners of my background, and stamped a small berry stamp taken from the Woodland Dreams stamp set onto the other two corners.

I attached the background to an 8" x 8" card blank and added a sentiment from the Card Sentiments clear stamp set.

 
Thanks for stopping by, Judith xx

Thursday, 26 March 2015

Stunning new stamps launched today (by Lesley)

It is almost the end of another month so today is the launch of our April stamp sets and are you in for a treat.

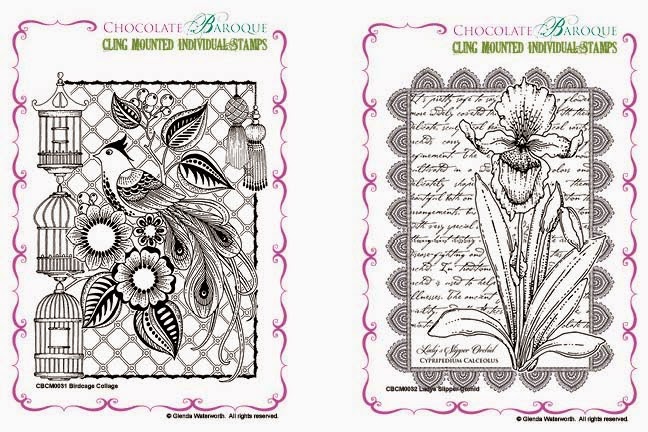
When we launched our first individual cling mounted stamps back in December the response was terrific and now we are adding four more to the collection.

First we have Birdcage Collage and Ladys Slipper Orchid


All four stamps are available individually or as a money saving multi-buy.

Here is a stunning card made by Glenda using the Birdcage Collage


Stamped and then painted you can see this design is ideal for colouring and many of the elements are crying out to be decoupaged. And coming soon on the Shop Blog will be a post from Glenda on how she made this beautiful card, so watch out for that.

Our other stamp launch for April is an A5 clear set entitled Awesome Orchids.

This clever set features two orchid flower images and a sentiment plus a single stem and four individual orchid heads. Now you can design your own flower, how cool is that?
Here I have created three mini cards using the single stem and a selection of the orchid heads, which have then been coloured with watercolour pencils. The backgrounds have been stamped with the crackle and speckled patterns from the Natural Eggs set and the ART letters are from our Newsprint Alphabet clear set.

I just know you are going to have fun with these new stamps and keeping checking back on a daily basis for some truly inspiring projects created especially for you by the Design Team. 

Told you you were in for a treat.