Pin It button on image hover
Showing posts with label Heath Robinson House. Show all posts

Tuesday, 29 December 2020

Quirky and Cute! By Rachel

 Hello there - Rachel here with todays inspiration - using the  fabulous and fun Acorn and Heath Robinson house stamps.

Firstly the Acorn house. I stamped the image directly to the card and then added distress ink around the outside before flicking with water, Next I used watercolour pencils to colour the image.


For the Heath Robinson House my process was identical - love the details in this stamp - there are plenty of friends I know I can make a card for using this stamp!


I trust you have had a good Festive season and I look forward to catching up with you in the New Year!
Big hugs
Rachel x


Saturday, 20 July 2019

Stand out from the Crowd and A Partridge in a Peartree by Penny

Goodly morning everyone, I hope you are all well and enjoying some beautiful weather.  I have a couple of cards to share with you all today, the first is one of my samples from the April shows and the second is a Christmas design from last year.


Stand Out from The Crowd.

I have used stamps from the Heath Robinson House and Tagtastic sets; Koh-I-Noor paints, copper soft relief paste, Distress Inks, alcohol pens, copper EP, Versamark ink, gilding waxes,die cuts and a stencil from my stash.


I began by creating the tag, I stamped it with Versamark onto white card and embossed it with copper EP.  I then stamped the house and embossed it and cut the tag out.   I coloured the house with my pens then painted the background before mounting it onto black card.


I created the background by spritzing paints onto white card through a stencil.  When dry I used some copper paste through a small cogs stencil in each of the corners.  I blended black DI around the edges and mounted it onto black card.  I attached the panel to a white base card, added some die cut cogs that I had coloured with gilding waxes then attached the tag with 3D gel. 


I stamped and embossed a sentiment onto a spare piece of card coloured to match the background and matted it onto black card before attaching it to the card.


 A Partridge in a Peartree.


For this card I have used stamps from the Christmas Song set; alcohol pens, black Versafine ink, clear EP, Distress Ink, an embossing folder and some glitter from my stash.


I stamped the Peartree image in black ink onto smooth white card, and embossed it with clear EP.  I coloured it with pens and added glitter to highlight.  I used a couple of nesting dies from my stash to cut out the focal panel and a piece of black card.  I blended some DI around the edges of the focal panel then matted it onto the black card. 


I took a piece of Kraft card and embossed it in a Christmas folder from my stash.   I then die cut it and added DI to the edges. I added some ribbon to the bottom of the focal panel then  I attached both panels to a white base card overlapping them slightly.  I stamped and embossed a sentiment onto white card and cut it into a banner, added DI around the edges before attaching it to the card. 


This is a slight variation of the design.


Thank you very much for popping in today, I hope that you've enjoyed this post.  I'll be back next month with a few more crafty projects, in the meantime my team mates will be bringing you lots of crafty inspiration!  


Take care peeps until next time,


                             xx  Penny  xx

Saturday, 25 May 2019

Stamping on Patterned Paper (by Judith)

Hello everyone, I have some more projects to share with you today showcasing the beautiful bookmark style houses that we brought to Hochanda last month. These three projects formed part of a TV demo that I did on one of the shows. I wanted to demonstrate how to stamp onto a patterned surface, and when an image is coloured, the image pops out, and the patterned surface recedes to the background.

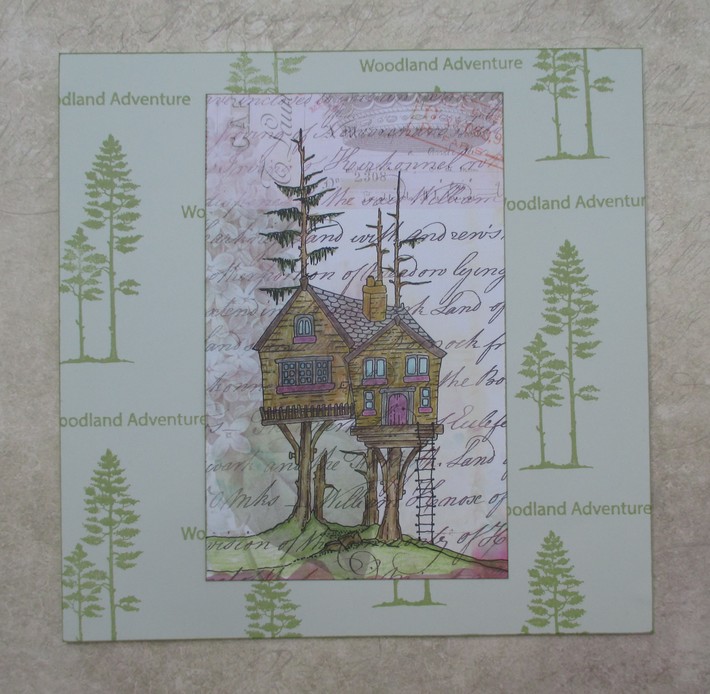
I used a piece of Lesley's Chic Script Designer paper pack, and cut  a piece of the script paper to size. I stamped the Tree House onto the paper. I added a few lines at the bottom using a fineliner pen to finish the landscape, and coloured the image with pencils. I added shading with grey pencil for added depth.

I took a plain piece of green paper from the pach, and using one of the trees from Trees a Crowd and a sentiment, I created a piece of background paper using Memento Ink. This was really quick to create, and you can have your own designer background in minutes! I inked the edges of both pieces of paper with the green ink for definition. As you can see, the script paper looks great as a background, and the house sits really well on the pattern.

For my second card, I used the large Tagtastic stamp and stamped onto a piece of book paper. I stamped the Garden House image inside the tag, and coloured the image with pencils once again. I added a bit of shading on the background using Distress Inks.

For the large background, I used a large acrylic block and added pink, blue and green Distress Oxide which I spritzed with water. I smooshed it across a piece of drawing cartridge in one go. I stamped two bees from the Honey Bee stamp set, and added a sentiment. I coloured the bees with pencils.

For my final card, I created a gelli print background, adding a bubble effect texture, and stamping a sentiment randomly over the background. I used a Crafty Individuals script effect tag and stamped the Heath Robinson House, which I then coloured with pencils. I added bright red highlights which I matched with a bright red ribbon. I added shading to the tag with Distress Inks, matching the colour of the gelli print background.

I hope that you have enjoyed my projects this month, I will be back next month with lots more to share with you, thanks for stopping by,

Judith xx

Tuesday, 21 May 2019

Monochromatic woodland by Brenda


Hello Peeps, Brenda here sharing some more trees and bookmarks. 

For the top card I stamped a selection of the trees from Trees A Crowd, cut around the tops and used a die to create an aperture which is easily done by placing the bottom section of the die behind the tree so the pop up in from the background. The top section can then be mounted with foam pads to give a dimensional look with in this case just a sentiment from the same set.


I created a little box using a score board and dies to give a decorative top, added panels to all four sides using stamps from Acorn House, Garden House, Heath Robinson, Tree House and Trees A Crowd. Next I made four tags and stamped the houses onto these, coloured in with pencils, stamped elements from each a second time and decoupaged. 

                            
Finally, all four were mounted onto corrugated and seam binding tied to the top of each and the four tags fit nicely into the box.
                                 

An inky background using Distress Oxides, some stencilling and a sun added after creating the background by placing the mask and inking around it, I find doing it this way preferable in some instances as it's less stark and blends in with the background. Next I stamped Acorn House twice using Versafine black and then used Silhouette Palace 1 mask and DI to the background and sentiment from the same stamp set.


For my final share today I took a piece of card and stamped the large tree from Trees A Crowd using Versafine Clair, randomly stamped one of the smaller trees using another colour of the same ink and added some leaves to the focal tree using an stamp from Spinney Design a Tree. I then used an oval die to cut the centre which I then lines up and mounted with foam pads Finally some sentiments from the same focal stamp set. 

As always many thanks for your kind visits and words of encouragement.

Tuesday, 14 May 2019

Tag Cards (by Magda)

Hello,  I am back today with two Tag-cards.
I used for the first one the new stamp "Heath Robinson House". This image is really in Heath Robinson's style, the famous illustrator.

Step by Step

1. Stamp the House on a tag with Archival Jet Black 
2. Repeat point 1 on a second tag, cut the shape and cover the image of point 1
3. Colour the background of the tag 1 with several blue shades of Distress Ink pads


4. Colour the house with Faber Castell watercolor pencils 
5. Draw white circles for having more bubbles on the blue backgrounds.
6. Glue the Tag on the left-over Tag of point 2 with PVA
7. Stamp with Archival Jet Black  a chimney and more bubbles on it and colour these images
8. Colour highly the front of the card
9. Use the new Tag as a mat and glue it on the card
10. Colour with a blue Distress Ink pad  a white piece of cardstock and stamp the sentiment in
      Archival Jet Black 
11. Cut the sentiment and glue both pieces as shown.


Be Different :  for this Tag- Card  I used 

1. a brick shaped stencil and colored the Tag with green and brown Distress Ink pad
2. Archival Jet Black for stamping only the upper part of the "Garden House" stamp
3. Faber Castell watercolor pencils 
4. White cardstock that I cut as a Tag Card
5. The sentiment is in the same plate "Garden House"


I hope you liked this idea of Tag-Cards, hugs
Magda


Sunday, 12 May 2019

designer houses (by Veronica)

 Good morning everyone, today I am sharing my samples of the gorgeous quirky houses from Chocolate Baroque - definitely something different for new home cards!
The stamps are book mark sized, but easily make larger cards...
The card on the left is 8" square, just to prove it can be done.  I started out with scraps of bleeding art tissue laid onto white card to create the background and brushed with water. Once dry, the tree house was stamped using black versafine ink and coloured with watercolour pencils. A narrow black mat, then glued to the card at an angle. The sentiment is from punky expressions


The next ones are both on diffent size card blanks, the left is 5"x7", the right DL. The one on the left has a distress oxide background for a night effect, while the one on the right is just stamped onto white card  and then edged with different colured marker pens. tjhey are both coloured with watercolour pencils

 The Heath Robinson house stamp was stamped onto grey card using black versafine ink and coloured with a mix of brusho powders and watercolour pencils. I cut it out into a sort of bubble shape to echo the bubbles, then cut the same shape out in black as a mat and orangy red to match the colours of the house. The sentiment was also cut into a shape and given a black mat, then glued at an angle
 The last one is simply stamped onto grey card  and coloured with brusho powders, mounted onto a DL card blank.

I loved these quirky houses, especially the tree house, and can see them getting quite a bit of use - the tree house would make a great halloween card.......


Sunday, 5 May 2019

Autumn sunset by Brenda


Good morning everyone, Brenda here with some of my creations made for Lesley's Hochanda shows where she showcases some wonderful new stamps.

I've always had a bit of a thing for tree stamps so was really in my element with the new Trees A Crowd set which I used for the above card. I started by creating a background using masks and Distress Inks plus Pan Pastels, I then stamped four of the trees from the set, used second generation stamping to create the shadows in the water and used a fine line pen to continue the ground lines. The sentiment is from the new Acorn House set.


This one features Garden House which I repeat stamped to extend the fence line and flowers which I decided are Hollyhocks, coloured in with pencils, added some clouds with Pan Pastels and matted onto a back panel stamped with the honeycomb pattern from Honey Bee set. The sentiment from the same set as the focal image is stamped onto a torn piece of vellum along with a Bee also from Honey Bee set.


A simple four panel base created on a score board and Acorn House, Garden House, Heath Robinson and Tree House stamped onto tags using Versafine Majestic Blue, some ink splattering around the images and just yellow colouring added.


For this one I used a frame card inking the frame with DI's and using Versafine Clair stamped trees from Trees A Crowd (before assembly) and on the insert I used deeper shades of DI's, a sun mask and stamped the tree using the same Clair ink and added some branches around the top of the piece plus some hand drawn birds.

Thanks so much for visiting today.