Pin It button on image hover

Sunday 30 September 2018

Festival Elephant - by Penny

Goodly morning peeps!  Well here I am again to share another of my Indian inspired samples from last months shows.  I can't believe we're at the end of September already!  This year has flown by - it's ridiculous!
Anyway - back to business, I have a pretty piece of home decor for you today.  I love creating home decor and I wanted to do something different from a canvas. I have used stamps from the Paisley Elephant, Indian Elephant, and Indian Textiles sets; Distress inks, Versafine ink, clear embossing powder, Crackle Medium and some acrylic paints from my stash.


On a piece of white card I stamped and embossed a large elephant.  I then used several small worker images to decorate the elephant's skin.  I've seen pictures of elephants that are decorated and painted for festivals in India, and I wanted to re-create this in my artwork.  I painted the elephant with Distress inks and a gold pen.  It didn't matter about stamping outside  the lines as I would be painting the background.


I painted the background with a dark acrylic paint, when that was dry I added some crackle medium around the edges of the focal panel and left it to develop.   Then when that was dry I used a dry brush to add a neutral colour chalk paint, giving the piece some texture. To complete the vintage, shabby effect I blended some Distress ink and gold pen along the outer edges.


I created a frame for the focal panel using greyboard and cutting it to size, and cut an aperture in the front.  I then stamped and embossed some floral and paisley images onto black card, painted them and cut them out.  I painted the frame, added the focal panel and attached the embellishments.  And there we have it - a lovely piece of home decor that will cheer up any room.

Thanks for joining me today, I hope you have enjoyed reading this post.  I'll be back next month with more crafty fun and ideas to share, meanwhile my lovely teamies will be here each day with more beautiful projects for you.

So until next time,

                                                             x Penny x

Saturday 29 September 2018

Eastern Skies (by Judith)

Hello everyone, I am sharing more cards with a touch of Eastern promise, using stamps featured on last month's TV shows on Hochanda.

My first two cards came about when I made the backgrounds, which were a mixture of Red, Yellow and Orange Brushos sprinkled onto drawing cartridge and spritzed with water. I also added some Gold shimmer for some added bling. I like to create one piece, and use a second piece of the drawing cartridge to blot the excess liquid off the first, creating a second background for later. Both pieces end up a bit less vibrant, but I do not mind this effect.

When I looked at the backgrounds, they looked as if they had a sandy foreground, and a sunset sky, which made me think about creating some sort of scene with the backgrounds. Every background turns out differently when you are using Brushos, and it was just luck, that these two made me think of making this sort of card.

I cut a square of copy paper, and placed it in the middle of the background, then stamped the paisley image from the Paisley Elephant stamp set all around the edge, using purple ink, to create a border. I used the same ink to add the sentiment from the same stamp set. On my first card, I used the Chocolate Baroque Mask- Silhouette Palace 1, with Seedless Preserves Distress Ink.

On the second version, the card that I demoed for the TV shows, I simply stamped an image from the Indian Textiles stamp set, using a deep plum ink.


These one layered cards will be cheap to send through the post, even though they are a bit larger in size. If you vary the colours, they would be great masculine cards. I have kept them fairly monochrome, if you made them in blues or greens, they would look equally effective.

I am sharing a much older card with you as well, which uses this same image. Long time followers will have seen this card, but I thought that some of our newer viewers would like to see the card as well. I stamped and embossed the building using white embossing powder, and then created the background with inks. I used masks for one side of the background and then the other. I stamped a tree image from the Landscape Edges stamp set along the horizon, and a flower stamp from the Floral Edges stamp in the foreground.

The elephants were stamped onto a spare piece of card, coloured with water based markers, and then decoupaged onto the background.


Thanks for stopping by, Judith xx

Friday 28 September 2018

Inspired by India - Zoe


Good morning and welcome to my final post for this month.

I so enjoyed playing with these super India inspired stamps.

I made a tag card using Distress Oxide inkpads, just layering up colours between drying.


I used a shimmery paint on my frame and used one of the coasters that came with set as the centrepiece, I heat embossed in black and gold to create the scene.


I made a tag sampler using Greyboard tags, I layered up colours using Distress Oxides and simply stamped a different stamp on each tag and heat embossed, I finished by edging the tags with gold Gilding wax.


Thank you so much for your comments, I love to read what you think.
Have a great day xx Zoe xx 

Wednesday 26 September 2018

Golden Summer by Brenda


Morning to you all, Brenda here with a few more creations using the Eastern inspired stamps and stencils from Lesley's recent Hochanda shows. 

My starting point for the above card was a background of Distress Oxides, I then placed a large circle mask and built up the backdrop to my scene with DI's and Silhouette Palace 1 and Silhouette Palace 2 masks, taking off most of the ink from the sponge to achieve a softer finish. Next I stamped the Palace from Indian Textiles............I find my Timmy stamp platform so helpful with silhouette stamps as my dexterity is non too good, but with the platform I can over stamp to achieve a really deep impression. No idea why I resisted the idea for so long! Finally I stamped some leaves across the top using a stamp from Natures Paisley.


A fairly simple one here, another Distress Oxide background but much softer using only Squeezed Lemonade and a smidgen of Fossilised Amber, again I added some background stencilling with Silhouette Palace 1 and then stamped both of the Elephants from Indian Elephant and some trailing foliage using a stamp from June Fairy and added some dots with Liquid Pearls.


Some inky fun with this one, yet again Distress Oxides for the background followed by some stencilling using Useful Leaves and the word Summer from Seasonal Journey mask set and some random stamping using leaves from Natures Paisley. The large leaves are also from the same set, stamped and heat embossed with detail gold powder, cut out and fixed onto the base along with a opal embellishment. Finally I rubbed some gilding wax over the leaves and word.

Many thanks for your visits and kind comment which are always appreciated.


Tuesday 25 September 2018

Asian Influences (by Julie)

Hello. Today I have a couple of cards to show you which have been created with Chocolate Baroque's Indian themed stamp sets.


For my first card I started with the card base. I inked the tall floral design from Indian Textiles with a green Versafine ink and stamped in each corner of the card. This was followed by spritzing blue and green spray ink over the entire background and then waiting for it to dry. Once dry I stamped the border around the edge of the card, which also comes from Indian Textiles.
Next you will need a piece of white stamping card and a stamp positioner (I used a Stamping Gear from Inkadinkadoo) to create the circular flower design. Once the circular design is stamped, colour with pencils, cut out with a die and mount onto blue card-stock. Stick the design to the centre of your base card and then ink up the little leaf design with blue dye ink and stamp around the edge of the circle. Both the circle flower and little leaf are from Indian Elephant.
The card was finished off with white, paint pen highlights and a sentiment from Paisley Elephant.


My second card is made entirely from Paisley Elephant and a relatively quick card to make.
For the base card, ink up the decorative square with Onyx Black Versafine and stamp four designs along each side of the base card. To make lining up easier, start with the image that is in the middle of each row and then work your way out. It's much easier than starting from the beginning of a row.
On separate card, stamp out the elephant and colour with pencils. (The soft background around the elephant was created by polishing your pencil colouring with a soft cloth.) Add the sentiment and then cut to size, before mounting onto black card and then sticking to the centre of the base card.
To finish off the card a little flat-backed gem was added to the centre of each little decorative square.

Thank you for taking a peek. Please call again for daily Design Team inspiration.

Julie xx

Sunday 23 September 2018

More Elephant makes

Hello there! Rachel here today with more makes from the August shows - those beautiful Indian elephant stamp sets. I just adored working with these stamp sets - they are all so fabulous and work so well either alone or together.

This first one uses the indian-elephant rubber stamp sheet and the Paisley Elephant stamp set. I stamped and coloured the elephants before masking them and creating the background using distress inks and overstamping with the script stamp from the Paisley elephant sheet. I also used the silhouette Palace 2 mask. For the border I used a couple of 'worker' stamps from the indian elephant sheet.


This one was a quick one - I used the background from the Paisley elephant stamp set and just stamped it onto purple card. Then I stamped and cut out the elephant. A simple card but I hope you agree it is pretty.


This one uses the paisley single stamp from the Paisley elephant set and the silhouette palace from the indian-textiles stamp plate. I stamped the paisley stamp is disfferent colours before overstamping with the silhouette stamp. 


Finally I used elements from the Indian textiles stamp set and did some pattern building. I enjoyed this and think it produces a different kind of card!

I hope you have enjoyed reading how I put these together and if you have any questions please feel free to ask!

Thanks for your time!

Hugs

Rachel x


Saturday 22 September 2018

Paisley Dance (by Magda)

Hello
I have always loved this ancient Persian intricate pattern of curved feathers known as "Kashmir Design".  It is very interesting to read on the internet the history of how and where it has been so appreciated and why it is now known also as "Paisley Design".

The beautiful Nature's Paisleys rubber stamp set inspired me to create the page I show you today
Step by Step :

1. Blend different Distress Ink Pad colours
2. Stamp randomly several times  with Versafine Onyx Black  the script of the set
3. Use Distress Inkpad Fired Brick and Distress Inkpad Black Soot separately and together at the
    same time for stamping the different Paisleys
4. Doodle inside the stamped images with white marker or use acrylic paint with a brush.
5. Stamp the sentiment from  Words to Dazzle & Sparkle


You can find all the stamps of  this Birthday Card  in the new Paisley Elephant set and the colours in the Distress Ink Pad chart. As usual I like to use Stickles to give a shine here and there.


What do you say if we meet again next month ?  Have a happy relaxing crafting.
Magda

Friday 21 September 2018

Autumn Medley (by Carole)

Hello everyone, here is the final post this month from Carole, a beautiful Autumnal project, using a mixture of stamp sets.

Carole writes:

Hello again.
My final project for this Guest Design Team session is Autumn based, a beautiful time of the year.
As the foliage is changing colour rapidly where I live and the leaves are falling, I have used a favourite stamp of mine called Autumn Medley and an Autumn Edges stamp.
I think this is a beautiful image and the foliage hair can be used on its own, to create lovely autumnal backgrounds.

Products used:-
Stamps: Autumn Medley, Autumn Edges, Essence of Nature (words)
Versafine inkpads: Onyx Black, Satin Red, Spanish Moss
Gold glitter embossing powder
Distress inkpads- various Autumn colours
Gold gel pen

I created a background using a variety of Distress Inks in Autumn colours.
This was then spritzed with water so the colours bled into each other then I over-stamped with the border while it was still damp, so this bled too.
It was left to dry and then over-stamped again with the green and red Versafine inkpads.
The main image was stamped with black Versafine and covered with embossing powder, but only over the hair foliage. When heated this gives a very pretty effect over the black. Unfortunately my photograph does not show this well. The image was coloured with Distress Inks and the hair highlighted with a gold gel pen.
It was then cut out and the edges inked.
I have a couple of other projects using these stamps on my blog. Hope you'll get a chance to visit.
I have enjoyed showing you my three projects and I look forward to visiting next time.
Bye for now and happy crafting.

Carole 😊


Thursday 20 September 2018

Indian Delights (by Anne)


Good morning, today I am sharing a couple of projects created with the lovely Indian themed stamps.

My first is a shabby chic style card. Think vintage block printed sari silk and old documents.

Materials:
How it was done:
  1. Soft Form Relief Paste was spread over the stamp and left to dry overnight before peeling away. Extra colour was added with glaze pens and gilding wax.
  2. The card blank was repeat stamped with the paisley background and rainbow ink. Alcohol marker was used to emphasise the edges. Textured ribbon was glued down to create a border.
  3. The cartridge paper was stamped using Versafine and trimmed to fit the card front. The edges were distressed and curled using scissors then coloured with alcohol marker. The paper was then spritzed with inks before gluing to the card front.
  4. The embellishment was glued to the card front with 3D glue gel for added depth. Finished with PVA pearls.

My second project is a bright and cheery elephant scene. You know how I love colour and bling. I had a lot of fun with this one.

Materials:
How it was done:
  1. Soft Form Relief Paste was spread over the stamps and left to dry overnight before peeling away. Extra colour was added using pink and gold metallic plus black paints. Glitter glue and PVA pearls were added for extra bling (you know me!).
  2. Watercolour card was spritzed with water and coloured by dropping on pigment powders. Images were stamped with Versafine (third generation stamping was used to faintly stamp the buildings in the background). The flowers were coloured with metallic pen (taking care not to obliterate the stamp detail – the ink was very opaque).
  3. The card was edged with Versamark and embossed with sparkly powder (Yay, more bling).
  4. The embellishments were glued to the card front with 3D glue gel for added depth. Yellow puff paint was applied to the foreground and heated to puff up and add texture.
Sad News
I hope that you like my latest projects. This will be my last regular post for Chocolate Baroque for a while. I have been working with this wonderful Design Team for over 3 years now and I am very sad to be leaving. Nothing to worry about, I just have to give extra priority to other things at the moment. However, you will still see the odd post from me in the guest blogger spot and in the Facebook Group. I simply cannot tear myself away completely.

Thank you all for your support and lovely feedback over the years. Big huggles, Anne xxxx.

I am sure that you will all join us in wishing Anne all the very best in her future adventures, and we hope to see her back here from time to time as a Guest blogger. We will miss her colourful projects, as a regular feature here on the blog, but as she has said, she will keep in touch on the Facebook Group. Good Luck Anne!


Wednesday 19 September 2018

mini journal (by Veronica)

 My apologies, but this is a long post, and picture heavy, so you may want to get a coffee first!

Usually I just play with new stamps and see what happens, but this time I had a new die to play with that created a mini book that I really wanted to try out - I had a slightly crazy idea of using it with the new Indian themed stamp sets  and trying to use all the stamps ........by the time I tried to take the photos, I was sure that it was crazy, but didn't have time to go with anything else for the tv shows.
Anyhow, here goes , and you can decide!

The first pic is of the slip case I made for the book, using the script stamp in black onto a brusho background. The fastening is a loop of plaited embroidery threads with embossed elephant buttons glued back to back over the ends.
 The cover from black card was simply stamped in versamark and gold embossed with the script stamp , and you can see the embroidery threads holding the inner pages in down the spine.
 the diecut pages were coloured as spreads before decorating, so I had to try to arrange them in colour groups before fastening them into the cover. most of the backgrounds were brusho, but some were distress inks.
Tjhe silhouette was stamped in grey versafine, elephant stamped onto white card and cut out after colouring using the Koh-i-noor paints
 Images gold embossed on both pages, strip of matching card added to create the pocket, and a strip of glitter netting added. Small tag stamped  and embossed in gold, coloured with distress inks
 Images again embossed in gold, coloured with pearlescent paints
 More gold embossing, gold is a colour that i associate with India for some reason, along with jewel colours
 Similar to first page on the left, but more of a lighter sky.
Feather stamp is from the I shall be your wings set, stamp covered with mica powders and then silver soft relief paste,. trimmed once dry and glued in place.
Pocket stamped with border stamp from indian textiles set , flower stamp on tag from same set.


The stamp on the right is an older single stamp that has a definite eastern theme, and I thought it fitted with the other sets. It was coloured with brusho used as watercolours


Tuesday 18 September 2018

Floral Script - by Penny

Hello peeps, Penny here again to share another of my Indian samples from the shows last month.  This one features stamps from the Indian Textiles, Indian Elephant and Paisley Elephant sets; Distress Inks, Little Birdy Paint  and a gold pen from my stash.  


I stamped three floral and paisley images in black and embossed them with clear powder.  I then masked the images and painted the background in Muted Teal.  When dry I stamped the script in gold ink and added a worker and a paisley stamp  randomly.    I removed the masks and coloured the images with pens.  I then added gold pen around the edges of the panel


On a white base card I stamped some worker stamps and a paisley image to form a border around the edges of the card, and blended ink on the outer edges.  I then attached the focal panel to the card.  I stamped a sentement on a spare piece of white card, edged it with gold pen then added dots around the words, before attaching it to the card.

Thanks for dropping in today, I hope you've enjoyed reading this post as much as I enjoyed creating this card.

Until next time,


                            x Penny x  

Monday 17 September 2018

Sunny Flowers (by Monica)

Hello everyone, Monica is back with another card to inspire you with today. She has chosen a bright cheery palette of yellows to brighten up your day.

Stamp your image using Versafine Ink onto Yupo paper and colour using alcohol inks. Once done colouring, adhere to a 6.25" x 4.25" piece of black cardstock.

Products:
Honey Bee stamp set
6" x 4" Acrylic Block
Versafine Ink
Double Sided Tape
Scissors
Yupo Paper

Monica will be back with her final project next week.

Sunday 16 September 2018

Paisley Accordian Book (by Judith)

Hello everyone, I am back to share another project with you featuring the stamps from last month's shows on Hochanda.


This time, I have chosen to share a little concertina book that I made. I make these books quite often, and they are a great size for journalling, or creating smaller pieces of artwork.

I took two whiteboard postcards, and coloured the white surfaces with blue Distress Ink. I then stamped the surfaces with a paisley image from the Paisley Elephant stamp set, using purple ink. To create a cover for the inside, I coloured a piece of drawing cartridge with green Distress Ink, and stamped the same image with orange ink. I trimmed two sections to fit the whiteboard panels.


These sections will be barely visible when the book is finished, but they create a nicely decorated edge inside the book, and it is worth completing this step.

I made my pages by cutting and folding some large pieces of watercolour paper, but you could use drawing cartridge, it would make a great surface for this project. You need to make the pages slightly smaller in height and width than the whiteboard pieces themselves, and just keep folding the pieces, and sticking them together until you have a section as long as you want to put inside the book. As you can see, I have already added some ribbon underneath my back decorated surface, and this will wrap all of the way around the book eventually, to keep it closed. The left side of the ribbon needs to be longer than the right, to go across the spine and the front of the book, (see top picture).

To decorate the front of the book, I used some shimmering purple Soft Form Relief Paste, which I spread over the large background image from the Paisley Elephant stamp set. I left this to set overnight, and then peeled it away from the stamp. I trimmed the edges, and added some blue and gold gilding wax, picking out some of the raised detail. I attached the film to the book, and added some Little Birdie flowers that I had spritzed with orange Brusho, and some gold paisley embellishments from my stash.


Thanks for stopping by, Judith xx

Saturday 15 September 2018

Fifteen Minute Cards

Hello everyone, it's time to share our monthly crop of time-saving and stash-busting projects created by the Design Team. The following cards and projects have been created in fifteen minutes or less, and aim to inspire you to make something that looks eye-catching and unique. Whether you start from scratch with a blank piece of card, or rummage through your left over materials as a starting point, you can rustle up a card with a few basic supplies for that last minute Birthday surprise. If you want some ideas for batch cards; Weddings, Christmas cards, or craft fairs, we can give you lots of ideas. Check out some of our previous posts for more inspiration. So, grab a cuppa, and enjoy what we have to share with you this month.

Most of our cards have an Eastern feel this month, as we are sharing designs from last month's TV shows on Hochanda. The lovely Pat has created two pretty cards for us. She used a flower from the Indian Textiles stamp set, which she stamped and watercoloured using Distress Inks and a waterbrush. She then added the background using more Distress Inks and a waterbrush. An image from the Nature's Paisleys stamp set was added to the corners and heat embossed with gold embossing powder. She completed the card by redefining the outline and detail of the flowers with a permanent black fine nib pen.

To create her second card, she stamped images from the Nature's Paisleys stamp set using brown Distress Ink and heat embossed using clear embossing powder. A further small image from the Indian Textiles was stamped and embossed using silver embossing powder. The script stamp from the Paisley Elephant stamp set was partially stamped using blue Distress Ink. Distress Ink was blended over the background. The sentiment was stamped and embossed with silver embossing powder onto coloured vellum.

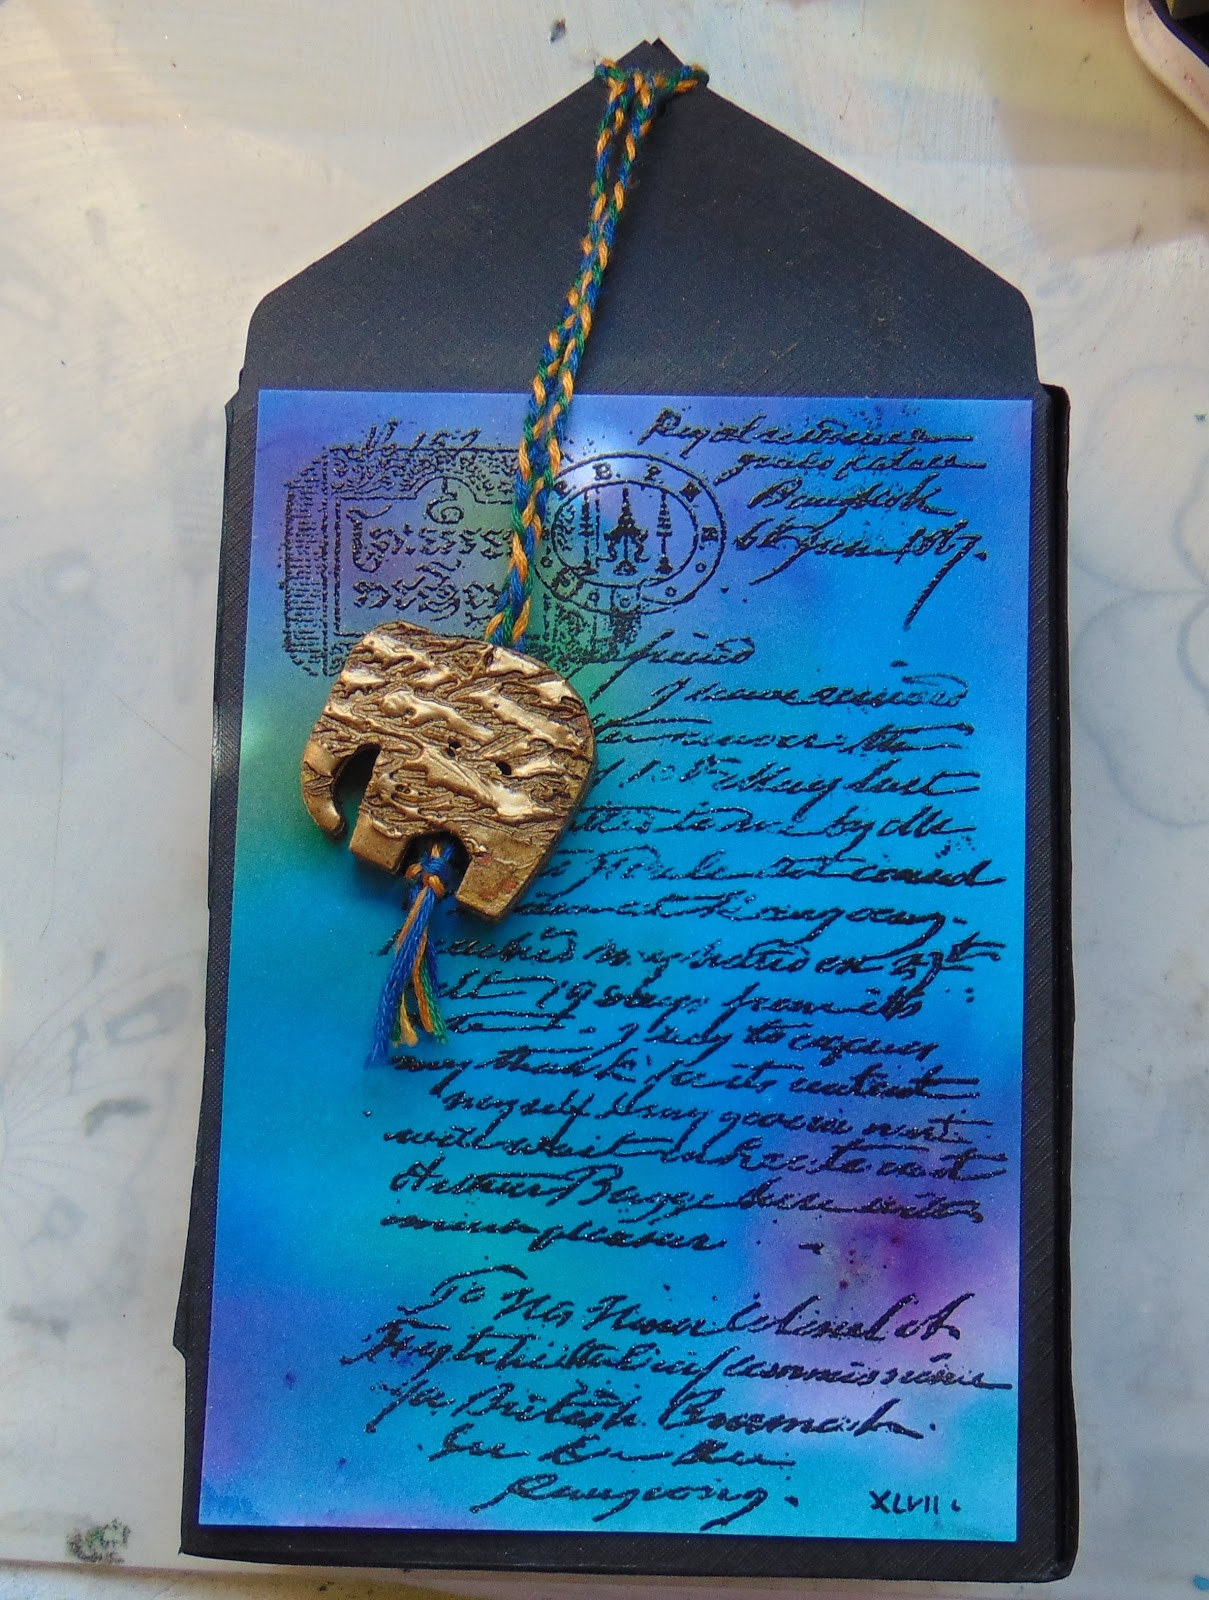
Zoe has created some fabulous mail art for us on the following two envelopes.


Who would not want to receive one of these in the mail? She has simply masked the address panel before adding colour and stamping the images. 

Her final project uses black embossing on black card for a very dramatic finish.

Two bold cards by Anne next, her first uses a shaped coloured card, and she has used Versamark Ink throughout. The border and sentiment were embossed using gold embossing powder, and the smaller motif had mica powder brushed over the top. She picked out some details in the border with a dark pink sparkle pen and purple glitter glue.

For her second card, she stamped the border directly onto the card using StazOn, (she used a glossy card base). She then stamped the images with an ink which when heated became tacky, but you could use a suitable glue instead, and then added gilding flakes. Finally she added black sequins.

A quick card from Julie next. She told us that she very bravely stamped this by eye using a clear acrylic block, and did not do any extra lining up. If you are nervous, you could draw some fine pencil lines to help. (I often put guide lines on the reverse of my acrylic block to show where certain parts of the stamp are, using a marker pen. These can be wiped away when I am finished.)

A dreamy card by Penny next, she has used a mask on drawing cartridge, and added diluted brushfulls of Distress Ink. She spritzed more water over the card, creating a wash. She dried the background with a heat gun, and removed the mask, replacing it with the matching stencil, and blended ink through it.

For her second card, she stamped the elephant onto drawing cartridge, and added a mask over the top. She stamped the paisley image over the top, removed the mask, and then painted the elephant. She added a border using gold pen. A ribbon and bow were added to complete the card.

I stamped and embossed an image from the Nature's Paisleys stamp set several times onto coloured vellum, using Versamark and gold embossing powder. I cut the images out to form 'petals'. I chose one of the other images from the stamp set, and after loosely laying the petals onto a card blank, decided where I wanted to stamp the image, to create leafy sprays. I stamped the image using green ink, and then adhered the petals to the card. I added a blingy centre to complete the flower, and stamped a sentiment from the Paisley Elephant stamp set to complete the card, using the same green ink as before.

Rachel has created three fabulous cards for us, the first using gesso as a resist, and applying Distress Oxides over the top. She has simply stamped the images and added white highlights.

She has stamped the background using black ink, stamped the focal image, which has been painted, cut out and decoupaged. The plain black and white background looks so sharp and crisp, a real tribute to the quality of Sue's designs and the stamps themselves.

Rachel's final card has been stamped in various colours of Distress Ink, and painted with the inks as well. The monochrome colours work really well with this design:

Magda has created a mixture of projects for us this month, and the first one is really delightful. She has stamped and watercoloured a small panel using Distress Inks, which she has attached to a hessian wall hanging.

Her second project was created in exactly the same way, but she has left this one as a card:

Magda's next idea would be sure to win anyone over- little packages of chocolates! She has created a Distress Oxide background, stamping a small flower, which she has coloured with markers.

She has stencilled a background, using Distress Inks, adding a stamped image, and placed the sentiment on 3D foam.


Finally, a set of ATCs, she has created Distress Ink background, adding stencilled embossing paste, and stamped images.


Finally here are a few cards from Brenda, she has placed a mask onto a card blank, adding two colours of Distress Ink, and stamping, before removing the mask.

She blended Distress Inks with glycerine before stamping the images with black ink.

She stamped the main image once, then covered the image with a sticky note and stamped the top part again to extend it, and stamped the tiny flower a few times onto the stems. She stencilled some brick work onto the background using Distress Ink.

She stamped using Versafine black ink, doodled a border, and added orange Liquid Pearls.

Finally, she created a Distress Ink background and added some stecilling. She repeat stamped the paisley image with black Versafine. She added a sentiment panel and an organza bow.


We hope that you have enjoyed this month's selection of cards and projects. We will be back next month with another post full of inspiration.

Thanks for stopping by,