Pin It button on image hover
Showing posts with label Shaded Baubles. Show all posts

Thursday, 24 December 2020

Hello and Happy Christmas Eve. 
I hope you are all keeping well in these strange times. 

I am sharing a couple more of my cards. 

First I took a piece of card and blended Distress Ink over a Holly stencil. I then stamped the plain bauble from the Shaded Baubles stamp set and embossed in gold. I added a sentiment from Christmas Cheer. I then added some die cut leaves and a silk foam flower, and mat and layered in gold and green.


My second card uses the shaded baubles too. This time I stamped the Snowflake Bauble onto some pattern paper and embossed  it. I then masked it and stamped it again, just below the first. With both baubles stamped, embossed and masked I did the third Bauble, this time the plain one as a contrast. I added a sentiment from Christmas Garden stamp set. 


Thank you for looking.

I hope you have a lovely Christmas 

Sandra xx

Saturday, 5 December 2020

tomte bauble (by Veronica)

Good morning everyone, today I have a quick card to share using the tomte and bauble stamps from last months Hochanda shows
The plain shaded bauble was stamped using versarmark ink and silver embossing powder, then sponged round the edges with tumbled glass distress ink. The tomte gnome was stamped in versafine grey ink, and coloured with tumbled glass using a waterbrush. trimmed to a square,  silver and pale blue mats  mounted onto a 6"square card blank and done.
The second is just a variation of the first, but this time coloured using marker pens with red and gold mats - I could have sworn the mats were straight.....fortunately I collect my new glasses today!


Tuesday, 1 December 2020

Bauble Butterfly (by Judith)

Hello everyone, I hope that you are all keeping well. Today I am celebrating a lockdown Birthday, and like many of you this year, it will be a subdued affair. However, I am thankful for my family around me, and will celebrate properly once we can get out and about again.

I have created a card using stamps from last month's TV shows on Hochanda. There was a fabulous selection, and I was really spolit for choice when I came to creating something for my blog post. I decided to use the plain circle from Shaded Baubles, and added a butterfly from Butterfly Perfumery as a focal point.


I found a spritzed background in my stash, which I cut down to fit a 6" x 6" card, and drew a wiggly frame using a fineliner pen. I added a sentiment, from Butterfly Perfumery once again. The splatters are from the Timeless stamp set, such a useful little stamp. 

 I stamped the bauble image onto a paler version of the spritzed background so that it toned in with the main background, and then stamped the butterfly on top. I stamped the butterfly again on a piece of spare card, and coloured it with Inktense pencils, blending them with a water brush. I added shading around the edge with Distress Ink. I fussy cut the image, and decoupaged it onto the circle. 

Thanks for stopping by, take care, and stay safe,


Judith xx


Monday, 20 July 2020

Words, Trees and Katya (by Zoe)

Good morning Lovelies and welcome to my second post this month.
Here are the rest of my samples from last month.

My first card is Yupo paper which I used Alcohol inks and blending solution, then used Archival ink pads to stamp Tangled Birch on.

I used Distress Oxides ink pads to create the background and Inktense pencils to colour in the beautiful Katya.

I used a whiteboard tag from the website, I coloured and stamped the background with Distress Oxides, a little splatter with a marker pen to finish it off. I used:
Words of Inspiration, Shaded Baubles, I Shall Be Your Wings.

Thank you so much for spending your time visiting.
Have a wonderful day, stay safe and keep well.
Big hugs
Zoe xx

Tuesday, 27 August 2019

Christmas Baubles

Hello everyone
This is my second post this month showing the wonderful Christmas stamps that were on Hochanda recently.
My first card is from the Shaded Baubles set.


I stamped the snowflake bauble with Versamark Ink and embossed in silver embossing powder. I then stamped the image again with a clear glue.I was able to to do this exactly over the first image as I was using a stamping platform, and this time I used glitter. This gave it a lovely sparkle!  I masked a strip across my base card and stamped the small snowflake from The Christmas Garden set in different shades of blue and grey Distress Inks. I stamped the sentiment, Happy Christmas Birthday in this  case.  I then mat and layered  my bauble and added some gems.
If you saw my last post you will see that the snowy bauble stamp is perfect for the little gnomes in the A Tomte Christmas stamp set.
My next cards are from Christmas Circles set.


I stamped the robin and candles onto card stock in black archival ink and coloured with the Koh I Noor Brilliant Water Colour Palette. I then mat and layered onto some circular cards.

Thank you for looking,
Sandra

Sunday, 25 August 2019

More Christmas makes by Rachel

Hello there! Rachel here with you today and I have some more makes from the July Christmas show to share with you today. This time I used the other stamp sets from the show - Christmas Garden, Christmas Curcles and shaded baubles.


In this one I used the candles from the christmas circle set and coloured the image in using water colour pencils. I used one of the sentiments too and added the corner from the Christmas garden sheet. I also overlayed a shaded baubles stamped onto acetate.


In this one I used versa mark and the Christmas Garden stamp and heat set the image using white detail embossing pwder. I then used metallic pencils to colour the image.


The Christmas garden image here was coloured with water colour pencils.


In this sample I used packing paper from a well known company and made some environmentally friendly gift wrap...


In this one I used the robin stamp from the Christmas Circles stamp and colouredin water colour pencils. Finally I added the shaded bauble on acetate again. Finally I used part of the Christmas Garden Stamp to surround the central portion.


Lastly a tag made using part of the Christmas Garden stamp again - its such a fabulous large stamp but its ok to just use a section of it!

I do hope this has given you a little inspiration!

Hugs

Rachel xx

Friday, 23 August 2019

Three Xmas Cards (by Magda)

Hello,
Here I am with three cards and hope to inspire you

Christmas Garden Card
1. Use a white cardstock  and color it with a wash of Brusho
2. Stamp The Christmas Garden stamp with Versamark
3. Emboss hot with gold Embossing Powder
4. Use a watercolour brush to take color off in the stamped image to highlight the bird and some
    lights.


The new Shaded Baubles stamp with the snowflakes is perfect for a simple monochromatic card, adding more single snowflakes from the The Christmas Garden stamp.  The images are stamped with


This colourful card is as contrast to the other two projects.
I used Archival Jet Black for stamping on a Distress Ink Pad blended background. I coloured
the bird and the leaves of Christmas Circles stamp with Faber Castel Art Grip Aquarelle Pencils and stencil rays with yellow Distress Ink Pad.


Our next appointment is in September, happy crafting 
Magda

Saturday, 17 August 2019

Quick Batch cards (by Judith)

Hello everyone, it is still a while before we get to the busy Christmas season, but this month, we are sharing some of our projects created using stamps designed by the lovely Sue Page, featured on last month's Christmas shows on Hochanda. Batch card designs are always useful at Christmas time, because we need to make lots of cards for friends and family. I have used several of the stamp sets to russle up a few quick cards to share with you today.

For my first card, I stamped and embossed the dotty circle from the Shaded Baubles stamp set onto a piece of card using white embossing powder. I also added some snowflakes from The Christmas Garden stamp set, also embossed in white. I covered the circle with a piece of Masking Tissue, and coloured the background with Distress Ink. I removed the mask, and blended the ink slightly into the circle to show the fine dots of the embossing more clearly. By masking the area first, you have more control with the coverage, and can colour the background a lot quicker. I added the sentiment with a darker ink which complemented the background colour. This card was very quick and could be made in a range of colours and different sentiments.


Using the same circle and snowflake, I created a very Scandinavian style card next, by stamping and embossing the snowflakes onto a piece of grey card. I added some red card behind and used a piece of red ribbon as an embellishment. The circle and sentiment were stamped using silver embossing powder on this occasion.


I stuck with the grey card for my third card, adding dots of Stickles over the card and allowed them to dry. I added a large glittery snowflake, some stripey ribbon, and stamped the sentiment using grey ink onto a die cut. I edged the die cut with the same grey ink.


For my final card, I took the mistletoes sprig and created a wreath by stamping around a pencil drawn circle. I added Stickles on the berries, and then stamped a sentiment using red ink.I rubbed out the pencil lines once everything was dry.


I hope that my simple cards will have given you some inspiration for some quick cards to try out for Christmas. Try looking at the smaller stamps on the stamp sets and see how quickly you can make backgrounds, add a sentiment within the dotty bauble, and you will have a lovely card to send. Try unusual colours, bold and bright, or go for a vintage theme, whatever you prefer.

Thanks for stopping by,

Judith xx

Tuesday, 13 August 2019

Candle glow by Brenda


Good morning Peeps, Brenda here with some Christmas shares from Lesley's July Hochanda shows.

For my first card I used the candle image from the new Christmas Circles stamp set, stamped onto linen cardstock and coloured in with Koh-i-Noor paints and some watered down Distress Ink washed around the edges and a little glitter added to the glow of the flames. A die cut frame placed over the image using foam pads to raise it before matting and layering onto red and white cardstock.


As I had some inchies on my desk from another project I thought I would use them for this card. I started by using two of the worker stamps from Christmas Garden and stamping with Versafine Clair. I inked the inchies with the same inks and then stamped the image from the new Tomte stamp set using Nocturne Versafine Clair and when dry added three layers of UTEE heat embossing each layer to build up a glazes finish. The sentiment is from Christmas Circles.


And this is the beautiful Christmas Garden, a new stamp with so much detail. The background is Brushos and the image stamped with Versafine Black and heat embossed with detail clear EP and the colour bleached out of some elements and a little white gel pen added to bring out detail.

Thanks as always for your visit and I hope I have inspired you to pop over the the website and take a closer look at the new stamps.

Monday, 12 August 2019

Is it Christmas yet?...... (by Sandra)

Hello everyone, I'm sharing some of the cards I have made with the new Christmas stamps.

The first one is from The Christmas Garden stamp set. What a gorgeous stamp this is, you can use all of it or just parts.
For this card I stamped in Archival ink and coloured with pencils.


My next card I stamped and embossed in gold and filled in selected areas with red glitter glue.

The next card is using the small Mistletoe sprig and sentiment from the the same set. I used a stamping platform and two shades of Distress Inks, Forest Moss and Bundled Sage, to make a pretty frame for the sentiment. Finished with some 3D liquid pearls.


My next pieces are from the fabulous A Tomte Christmas set. Who could resist these quirky gnomes?

This one is on a piece of grey board.  I made a background with gesso and dark blue acrylic paint. I added branches from Howling Moon stamps and embossed in white. Using Kraft card, I stamped and cut out the large gnome, coloured him with water colour pens and added the sentiment.
My next cards are little 4x4 cards.  These are so cute! I stamped with Archival and coloured with water colour pens and used the Shaded Baubles stamp to frame them.


This is the last card I am sharing with you today.  I cut 3 different sized circle apertures into a piece of card and popped the Tomte gnomes behind. These were coloured with alcohol markers.

Thank you so much for looking at my first DT cards and I'll be back soon with some more,
Sandra

Saturday, 10 August 2019

Have Yourself A Merry Little Gnome (by Julie)

Hello, today I have a selection of  fun, Winter/Christmas themed cards for you all. Chocolate Baroque recently released some brand new Christmas stamps which include Tomte Christmas, which has lots of fun Scandinavian style gnomes.


My first project is a DL card where I have teamed the large gnome from Tomte Christmas with the Mushroom House. I started by stamping the gnome in the bottom left corner of the card and coloured with polychromus pencils. I also stamped the image onto some copy paper and cut it out to make a mask.
Place the mask over the gnome and then stamp the Mushroom House so that it just overlaps the masked gnome. Remove the mask and draw in some free hand lines to join up the path and to create texture in the snow. Colour with polychromus pencils and add white paint pen to the tops of the mushrooms for a snow effect along with touches of Chrystal Stickles to finish off the snow effect.


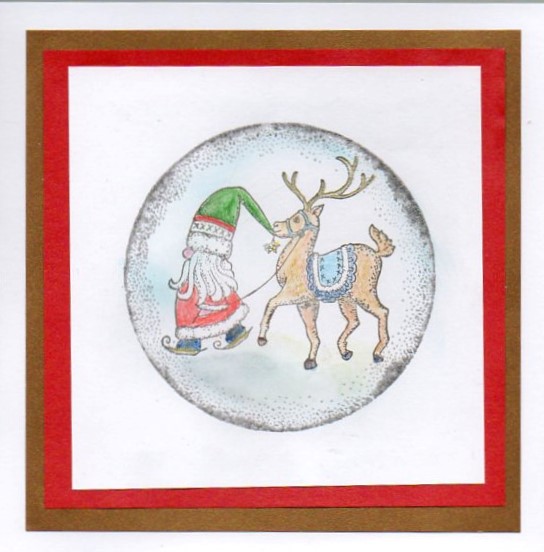
My second card sees the the little Tomte Gnome pulling a reindeer placed inside a bauble. I inked up the blank bauble from Shaded Baubles with a blue dye ink and stamped onto some white stamping card. I then inked up the little gnome and deer image with the same ink and stamped it within the bauble. I coloured the image with polychromus pencils and then cut to size to fit the centre of my card blank. I finished off the panel with a sentiment from Tomte Christmas and a stamped snowflake from Christmas Garden.


For my third card I inked up the blank bauble from Shaded Baubles with a light blue dye ink and stamped it directly onto my card blank. I also made a mask from some copy paper. Next I placed the mask over the blank bauble and stamped the snowflake bauble to the right so that it overlaps the first one. Remove the mask and stamp the little trio of Tomte gnomes using the same ink as before. Colour with Polychromus pencils and then add the little snowflake from Christmas Garden for the background before finishing off with a sentiment from Tomte Chrismas and dabs of Crystal Stickles.


My last card uses the same light blue, dye ink as before, which I used to ink up the snowflake bauble from Shaded Baubles and stamped onto spare stamping card. I also made a mask from copy paper. Once you have stamped the sentiment into the bauble, cover with the mask then spritz with a royal blue, spray ink. Cut to size and then stamp the snowflake from Christmas Garden using the dye ink as before, around the edge.
On a separate piece of card, stamp the snowflake and spritz with the spray ink as before. When dry, cut to size and attach both panels to the front of your card blank with 3d foam pads.

Thanks for stopping by and please call back soon for more Design Team inspiration.

Julie xx

Friday, 9 August 2019

Tomte tomte tomte tom (By Rachel)

Hello there! Rachel here today with some more gorgeous Tomte makes - these wee guys really are sooooo much fun - I love them to pieces!!! Here's some of my makes with them from the July shows:

When I first got the A Tomte Christmas stamps - they screamed 'scene' to me - so this was my first make - I stamped the wee tomte then coloured them with water colour pencils before masking them and the moon. Then I used torn paper and inks and brushes to create the landscape.


Next I stamped the triple Tomte trouble stamp...they are so very cheeky! J just coloured them with water colour pencils then masked them plus the circle underneath them and finally used distress inks to create the background and then finally used water to spritz and flick and get the splatter effect. 


In this third card I used a gelli background that I created using some of the other stamps from the show (a christmas garden set) and inks and added a circle of card stamped with the snowflake bauble stamp (from shaded bauble set). Finally I added the small Tomte in the foreground. 


.....and finally for today the largest Tomte, stamped onto a mat and coloured using water colour pencils. I added a pen line around this and added the mat to a card I had stamped with the small leafy stamp from the show (from a Christmas Garden).


I do hope I have given you some inspiration of ways to use your Tomte stamps.... big hugs!
Rachel xx

Sunday, 4 August 2019

Baubles Galore by Penny

Hello peeps, I'm here again with my first post of the month.  What better subject for the middle of summer than....Christmas!  I have three cards to share with you today, all were samples for the Christmas shows in June and all of them focus on Christmas Baubles.  


The first card features stamps from the Shaded Baubles and Christmas Circles sets; Koh-I-Noor paints, Distress Ink, gold EP and white EP.  I stamped both baubles onto Drawing Cartridge and embossed one with white EP and the other with gold.  I then painted them and cut them out. 


I stamped and embossed the Robin and foliage in gold and painted it as before, then fussy cut the image and attached it to the plain bauble with 3D foam.  I stamped some Pine branches from the Robin the Spruce set using DI onto a white base card.  I attached the snowy bauble flat on the card and attached the other bauble in 3D.  I added some ribbon and a couple of bows to give the impression of baubles hanging on a tree, and stamped a sentiment.


The second card features stamps from the same sets as the first; grey Versafine ink, alcohol pens, Distress Ink, Luxury Smooth White Paper, a couple of dies and some coloured paper from my stash.  I stamped the empty bauble image in grey ink onto a piece of smooth white colouring paper and coloured it in with pens then added some glitter.   I stamped Pine branches around the edges of the panel and added silver pen around the edges before matting it onto coloured card. 


I used a die to cut some Pine branches from coloured card and another one to cut a lantern.  I attached all the die cuts to the card and added glossy accents to the lantern to look like glass.  I used silver peel-offs to add a chain to the bauble, stamped and embossed a sentiment onto coloured card then matted it and attached it to the card. 


I used the same stamps as in the first two cards; a piece of smooth, Kraft paper, alcohol pens, Versamark ink and white EP, brown DI and a circle die from my stash.  I stamped and embossed all the images in white then coloured them with pens before die cutting them.  I attached both circles to a cream base card then stamped a sentiment.


Thank you for dropping by today, I hope that you have enjoyed this post.  I shall be back later in the month with some more Christmas craftiness! 

Take care all,


                              xx  Penny  xx