Pin It button on image hover

Sunday 31 January 2016

Dreamy Steampunk travel (by Miranda)


Hi there lovely people,

For now my last blogpost....again with one of the images of the Steampunk travel sheet. This time I have used the mobile phone.......the lovely ornament from the Steampunk Butterfly sheet and some gears from the Steampunk Christmas and the Punky flowers sheet. All gorgeous sheets which combine with each other perfectly. And of course there are more Steampunk sheets at CB.....just type steampunk into the search area and you will see them all!

Here is the card..... 
I have made an inky background using fluid inks and stamped the ornament twice in each corner. I have coloured the mobile phone using color pencils and embossed the gears using copper embossing powder. 


a close-up......I have coloured the gear on the telephone using a copper gelli-pen.


Hope to have set your' gears' in motion with this steampunk inspiration and I will just say we will ' see' each other again in blogland or somewhere in digital space! I just can't leave the Chocolate Baroque scene.........
Thanks for all your lovely comments and encouragement through the years!
We sure will meet again on our creative path!


Saturday 30 January 2016

in the night garden

 Sometimes I do have to wonder if I am a total idiot - why, when the stamp so obviously shows a hot summer day scene, do I want to try a night version, and even worse, a snowy one?
Anyhow, here are the results, so you can judge for yourselves!


Another brick in the wall garden stamped onto grey card using black Memento ink, coloured with a mix of promarkers and pencils. I was trying to get the impression of light seeping out through the shutters.
Black matt onto a white15x15cm base card
Same stamp, this time stamped in brown ink onto kraft card, coloured with pencils.
Mostly I just used white pencil , with brown and green for the foliage and the shutters. I also used a white chalk marker pen to add the snow highlights.
Again a black matt and a 15x15 white card base

Thanks for looking, (even if you do agree that I am mad!) and keep checking for the more normal posts from the rest of the girls.....and there are some beauties coming up......

Veronica

Friday 29 January 2016

Spring Garden (posted by Claire)

Good morning, Claire here with a Spring themed card using the beautiful new release stamp 'Walled Garden' and one of my old favourite sets  called Glorious Spring.The winter seems to have been very grey and wet so I thought it was time for a reminder that Spring isn't too far away (hopefully)


I began by stamping and masking the primroses from Glorious Spring on watercolour card. Next I stamped the Walled Garden and then the two rabbit stamps, I didn't bother to mask the Walled Garden stamp. Next I inked the sky using Tumbled Glass and Broken China distress inks applied with an ink blending tool. To create the clouds, I used a very wet paintbrush to create some cloud shapes in the sky. I left the water for a minute and then blotted with kitchen roll. I coloured the images with distress inks and inked around the edges with brown ink. The sky looked a little blank so I stamped the sentiment (again from Glorious Spring) in the cloudy sky.

I matted the image on kraft card and added a bow, paper flower and a filigree corner from my stash.

Thanks for visiting today
Claire xx

Thursday 28 January 2016

Colourful Punk (by Lesley)

One of the sets featured on the last TV show was Steampunk Butterfly, a set that can be used in so many different ways.  Today I want to share a DL tag with you which I made some time ago. It shows two of the images from this set which rarely get a look in, the rose stem and rose bud. And as you know I love colour so get out the sunglasses!


  • The background was created on a DL piece of stamping card using the acrylic block technique and Dylusions Spray inks
  • The music image from Music Fanfare was stamped around the edges with Versafine Onyx Black.
  • The two rose images were stamped on another background, which was made on a self adhesive label with spray inks using the acrylic block technique. Only the heads of the flowers were cut out.
  • Finally the roses were stamped on the main background and the rose heads stuck over the top.

Once again a self adhesive label allowed me to introduce more colour to the original background without the need to mask. I really do enjoy using these techniques and hope you will give them a try.

More super designs are still to come from the girls so please visit us again tomorrow.

Wednesday 27 January 2016

Guest Post - Masking with Sketchy Doodle Flowers by Corine van Kuilenburg

Today is the third and final post from Corine for the time being and this week she is entralling us with two beautful designs which feature the Sketchy Doodle Flower and Sketchy Doodle Landscape sets. 


This is my third and last post as a guest designer. In my first post you saw a card with the masking technique. It has been a long time sice I use this technique and I had forgotten how much fun it is. 


For this third post I made two cards with this technique and used two of my favorite sheets Sketchy Doodle Flowers and SketchyDoodle Landscape.

On both cards you can also see stamps from Rustic Fragments in the background. I really like the combination of Distress ink with Memento Luxe ink.

Chocolate Baroque stamps are my favorite. It is always a joy to go to work with these stamps. I hope I have been able to inspire with my cards. Thank you for looking at my creations and 'til next time.

Kind Regards

Corine

Thank you for sharing such beautiful projects with us over the last three weeks Corine, we have loved seeing your colourful take on our stamps. Corine will be back in the summer with more wonderful ideas and don't forget to drop in daily to see what other goodies the rest of the Design girls have for you.

Tuesday 26 January 2016

Steampunk Butterfly by Zoe

Good morning Lovelies, I can't believe we are near enough the end of January already.

So here is my final post this month, I thought I'd share with you 2 samples this time, both were featured on The Craft Channel and are from the "Steampunk Butterfly" set

My tag I used my Gelli plate to create the background and distress stain around the edges to make it more shabby.

My card was again created using my Gelli plate and the new background stamp, I stamped and cut out the butterfly and rose heads and leaves and decoupaged to create some depth and dimension, I coloured the roses with pencils, I was trying to get a metal look, I'm not a huge Steampunk fan, but I must say I really like this set, the butterflies are gorgeous and there such a fab range of worker stamps for building layers and textures, a very useful set.

Thank you again for visiting, have a great day xx Zoe xx


Monday 25 January 2016

Steampunk Travel (by Debbie)

Good morning.
 
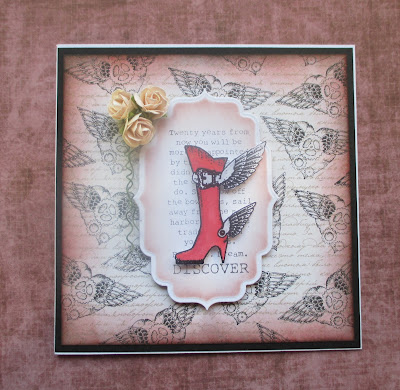
A couple of Steampunk Travel cards from me today, they were made for Lesley's visit to The Craft Channel. The first was made with a masculine theme and the second more feminine with the fantastic winged boot.


For the card above I started with a piece of grey board and painted it dark blue and when dry applied a thin layer Crackle Paste with a palette knife. It was set aside to dry over night and do it's magic.
The next day I applied a light wash of thinned blue paint then stamped the bird house and sentiment onto card and coloured. The words were stamped onto the kraft card to add interest. I found the compass disc/frame at a flee market and had wanted to use it for a while.
 
This card is for my daughter who loves all footwear and pink.
 
 
Many thanks for stopping by
Debbie


Sunday 24 January 2016

The Walled Garden (by Julie)


Hello there, thanks for popping in. Today I have two cards to show you that I have made with the new single, cling stamps.


My first card is made with the Walled Garden, cling stamp. This is going to be one of my favourite stamps as I just love this scene as it makes me imagine what could be through the beautiful, brick archway.
I decided to keep it simple to really showcase the stamp design so I have just stamped with Onyx Black Versafine and  water-coloured, before mounting onto green card.


For my second card I decided to echo the brick design from the stamped image into the background, so I sponged some Barn Door and Hickory Smoke Distress ink through a brick wall stencil. I over-stamped the stencil with the little bonus foliage stamp using Onyx Black Versafine.
The main image is the Another Brick In the Walled Garden, cling stamp, which I have water-coloured. I have again used the bonus stamp to add interest to the wall by sponging red acrylic paint onto the stamp before applying it to the stamped wall.
To finish off I have added Crystal Stickles to highlight the design.

Many thanks for stopping by.

Julie x

Saturday 23 January 2016

Some light in the dark

Hello

It is yet time to say Happy New Year. I'm back and here is a little gift for brillant days coming.
It is a textile pocket to hide what you want.
I made it in an old sheet with acrylic paint on Gelli plate. I stamp Open weave with black acrylic.
Then the Steampunk travel are stamp on another piece of fabric and sewn. I wrote on the back.


Bonjour
Il est encore temps de vous souhaiter une Bonne Année. Voici un petit cadeau pour les jours ensoleillés à venir.
C'est une pochette textile pour cacher ce que vous voulez, réalisée dans un morceau de vieux drap. Je l'ai faite avec des peintures acryliques sur Gelli plate. Le tampon Open weave a été appliqué avec de la peinture noire et les tampons Steampunk imprimés sur un autre morceau de tissu, ont été détourés et cousus.
Au dos quelques écritures terminent l'ouvrage.

Do you appreciate ? I'm coming soon. Have a good time.
Est-ce que vous aimez ? Je reviens vite. Passez un bon moment.

Dominike

Friday 22 January 2016

Walled Garden Extended Scene (by Anne)

I created this sample for the recent TV shows from Chocolate Baroque on The Craft Channel. I love scene building stamps and this one is a beauty with the lovely rose draped arch and textured wall.
 
The Walled Garden stamp makes a great scene all on its own but is also great to use alongside the bonus silhouette stamp which fits perfectly into the arch creating added depth to the scene.


  I have used a bit of partial stamping and masking to extend the scene, and the bonus foliage stamp from Another Brick in the Walled Garden set. I hope that you like my offering. Happy crafting, Anne xxx. Materials:
  • Walled Garden, and Another Brick In The Walled Garden stamp sets
  • A5 card blank, watercolour card
  • Ranger Archival Inkpad (Coffee)
  • Wax crayons (pale browns), watercolour paints and white gel pen
  • Alcohol marker (black) and fine liner pen (brown)
  • Adhesive

How it was made:
  1. Stamped the scene onto watercolour card.
  2. Extended the scene using masking and partial stamping of different elements from the stamp. The left hand side of the scene was extended with the trees and more wall. More trees were placed in the foreground on the right, with more of the wall and pillar behind (while masking the foreground elements).
  3. The silhouette tree was repeat stamped into the archway to add more depth, and silhouette foliage added to the foreground. The scene was completed by drawing with the fine liner pen.
  4. Coloured with watercolours using wax crayons to add resist highlights to the brickwork and pathway. Used the white gel pen for additional highlights.
  5. Edged the card with the black marker to frame and glued to the card front.

Thursday 21 January 2016

The view from the garden wall (by Lesley)

Hi everyone, today I am actually posting one of my own pieces of artwork. Seems ages since I was let loose on here! Anyway, this one was designed for the TV show when the stamp launched last month and I made it to demonstrate a couple of new techniques. Bit of a long one, so maybe you need to pull up the chair.

  • To create the sky take a piece of 300gsm white cardstock, cut to 5" square. Tap three colours of distress inkpad on to an acrylic block, I used Barn Door, Fossilized Amber and Spiced Marmalade. Spritz with water and then drag the block along the top half of the card.
  • For the grass clean the block and repeat the same exercise using Crushed Olive, Bundled Sage and Mustard Seed.  If you want a less 'yellow green' grass then leave out the Mustard Seed. Again spritz with water and drag along the bottom half of the card, allowing the colours to slight overlap the sky.  Set aside to dry thoughly.
  • Stamp the Walled Garden on to a self adhesive label with Jet Black Archival ink and colour with Distress inks and a water brush. When dry, cut out. TIP: Don't worry about the trailing rose stems on the top of the wall, you can draw these back in later.
  • Peel the backing off the label and position on the background, then trim around the edges.
  • To create the walled effect take another piece of 300gsm white card, approx 5" square, an old credit card and Vintage Sepia Versafine ink. Run the long edge of the card through the inkpad and then 'stamp' random lines horizontally across the white card. Keeping reinking the credit card and continue until you have covered in one direction (side to side).
  • Now repeat, this time stamping vertically between the horizontal lines. You want this criss-cross stamping to resemble bricks. It doesn't matter if it is uneven. Sponge Old Paper Distress ink around the edges of the card to give an aged appearance.
  • To distress around the edge of the card use either a distress tool or run a pair of scissor blades backwards and forwards over each edge to rough up the cardstock.
  • To assemble, glue the background to the faux wall and then attach to a 5.5" square blank Kraft card.
  • Finally draw back in the trailing rose branches using a black fineliner pen.
I love 'painting' with an acrylic block and of course if you change the colour combinations you can have a winter or a pale summer sky, brilliant green fields or something a little more subdued. Best of all you will always 'paint' a unique background since the inks on the block will spread out on the card differently each time you do it. I hope you will try these techniques and create your own view from the garden wall.

Thanks for dropping by and please call again soon for more beautiful creations from our fabulous team.


Wednesday 20 January 2016

Guest Post - Mixed Media Butterfly by Corine van Kuilenburg

We are already at the second post from Guest Team member Corine and this week she has chosen to combine Chocolate Baroque stamps with Brushos. Enjoy.


Today is my second post as guest designer. I hope you liked my first post. This time I created a mixed media card. 


  • First paste on a piece of card stock book paper. Paint this with gesso. Emboss an image from Dusky Damask with clear embossing powder. Use 2 or 3 colours of Brusho and spritz with water. Make sure your whole card  is covered with Brusho. Let everything dry completely.
  • Use stencils and inks to add more detail to your background. Stamp with black ink one or two images from Rustic Fragments.
  • Emboss the butterfly from Tangled Garden on watercolor paper and color it in with markers and a water brush. Cut out and glue to your background.
I hope I have inpired you.

Corine


You have certainly inspired me to get out a selection of papers, stamps and colour Corine, thank you. And if you enjoy being inspired by our Design Team then please visit us again, there is sure to be something to whet your appetite.