Pin It button on image hover
Showing posts with label A Tomte Christmas. Show all posts

Saturday, 24 September 2022

Tomte Christmas (by Veronica)

For my last post I am sharing two quick cards using stamps from the August shows on Create and Craft.
Both cards use the slim word strip 2 and the Tomte gnomes and the same method


I cut a square of white card to fit a 6" square card blank and fastened it down on my stamping platform - mine will take an A4 sheet, so i could get the christmas word where I wanted it.
I coloured the word using a distress marker pen, stamped it and repeated to get a stronger colour.
The card square was edged with the same marker pen and added to the card blank.


The gnomes were stamped onto spare card, coloured with distress marker pens, cut out and glued in place. 


As you will have seen in Judith's post earlier, 
 the DT blog will sadly be ending at the end of the month. I will still be adding projects to my own blog and to facebook - one of these days I will get how to use  instagram properly, just don't hold your breath!

Thank you for following us, and I hope you will still be able to keep up with Chocolate Baroque

Saturday, 3 September 2022

Beautiful Words (by Sandra)


Hello, I am sharing some of the cards I made for the August shows on Create and Craft.

The stamps I have used on these cards come from Slim Word Strip 2. A great set of stamps for focal points and backgrounds.

For my first card I used the Christmas words and the spotty strip.
I started with a 7.5" piece of card and stamped the words in Versafine Clare ink, I then stamped the spotty border below and repeated until I had covered my card. I moved the stamps to show  different parts each time. I wanted a Christmas focal point so decided on this little guy from A Tomte Christmas. I stamped him in Memento ink and coloured with alcohol markers. I then adhered these to a 8x8" card base.


For my second card I used the Birthday words, again with the spotty strip. I started with a 5.5" piece of card. I then stamped the spotty strips at the top and bottom of the card and filled each hole will glitter glue. On a separate piece of card I stamped the words using multi colours of Versafine Clare and cut out the section I needed and layered onto some gold card. I glued the spotty card onto a 6x6" card base and added the word panel using foam pads. A great fun birthday card!


The afternoon shows featured the Floral Paraphernalia stamps. You can see my previous post with these stamps here

  Thanks for looking

Sandra x

Wednesday, 17 August 2022

Ivy Christmas Tree (by Julie)

Hi Crafty friends, today I'm sharing a card I made with you. 

Step 1. Take an 8" x 8" white card blank

Step 2. Add a layer of deep red card 7 1/2" x 7 1/2"

Step 3. Take a 7 1/4" x 7 1/4" white card square, ink up the Christmas word strip from Slim Word Strip 2. Ink it up in shades of Red Distress inks: Barn Door, Crackling Campfire, Aged Mahogany

Step 4. Taking the slim dotty stamp from the same stamp set, ink it up in Blueprint Sketch Distress Ink, do this twice so that you have done two strips of blue. 

Step 5. Ink up the Positivity word strip in the same shades of red as the top stamping 

Step 6. Ink onto white paper all three sizes of Ivy leaf from the From Nature 2 stamp set in a mixture of colours. Gold Dewdrop Ink, Crushed Olive and Forest Moss Distress Ink, Green Oasis Versafine Clair Ink.

Step 7. Cut out the ivy leaves, curl tips upwards, them glue one by one using the largest at the base and working upwards to form a fir tree shape. Tuck a spare ivy leaf behind top word strip.

Step 8. Glue mini baubles from stash onto the tree.

Step 9. Take single Tomte Gnome from A Tomte Christmas stamp set using Twighlight Versafine Clair Ink. Cut out and colour with alcohol pens.Use White Puffy Stuff for hem, hat and beard.


May I thank you for dropping by,

Regards, Jules x


Saturday, 19 December 2020

You light up my World by Brenda


Hello all, today's first card uses the lovely Floral Perfumery and Butterfly Perfumery stamped onto an Oxide background and lightly coloured in with the same colour Distress Markers. I added some random stamping in the background using worker stamps from various sets, a sentiment from Lupin Blueprint and the word Love built up with several die cut layers.


Here is another one, this time using Floral Grung and there's a YouTube video of how I made it, a really quick one with a Gelli Plate background.


And a very simple shaker card, a die cut base, one of the circles from Shaded Baubles stamped with Versafine Clair and the Tomte Gnomes stamped in the same colours on the inside, sequins and glass beads for the shaker element.


This is my last post before Christmas so I would like to wish everyone a peaceful and joyous festive season, stay safe and well and let's hope 2021 is a better year for us all.

Tuesday, 15 December 2020

Tomte bauble 2 (by Veronica)


 A very quick version of the baubles to share today, still using the tomte gnomes.

I needed to make quick cards to send to all the members of my WI, (we have not been able to meet since February), and the gnomes added a cheerful note.

I used small kraft card blanks, and a bauble stencil from my stash that would fit the card.

I sponged white pigment ink round the stencil working from the edges inwards to create the bauble, and stamped the gnomes in versafine black once the white was dry -  as I needed 20 of these, by the time I had finished inking the shapes the first ones were dry enough to stamp on. 

I coloured the gnomes with distress marker pens and added some glitter to the stocking one.

Sunday, 13 December 2020

A Compilation of Favourites (by Judith)

Hello everyone, I hope that you are all keeping well. I am going to share a few golden oldie projects with you today that feature stamps from last month's TV shows on Hochanda. These projects are favourites of mine using these stamps, and I thought that you would not mind seeing them again.

The first three projects feature stamps from the perfumery range of stamps:

Butterfly Perfumery

Floral Perfumery

Rose Perfumery

The final projects are from A Tomte Christmas stamp set:


These little gnomes are so versatile for cards and tags, and I know that you have been busy making cards and tags yourselves this year with them.


I will be back later in the month with some new projects to share with you, thanks so much for stopping by. Take care, and stay safe,


Judith xx


Saturday, 5 December 2020

tomte bauble (by Veronica)

Good morning everyone, today I have a quick card to share using the tomte and bauble stamps from last months Hochanda shows
The plain shaded bauble was stamped using versarmark ink and silver embossing powder, then sponged round the edges with tumbled glass distress ink. The tomte gnome was stamped in versafine grey ink, and coloured with tumbled glass using a waterbrush. trimmed to a square,  silver and pale blue mats  mounted onto a 6"square card blank and done.
The second is just a variation of the first, but this time coloured using marker pens with red and gold mats - I could have sworn the mats were straight.....fortunately I collect my new glasses today!


Friday, 4 December 2020

Tomte Tree

 Hello

I am sharing one of the cards I made for the Hochanda show in November. Unfortunately it didn't get shown on the TV show, but Lesley did show it on one of her Facebook lives.

First, I cut 2 pieces of A4 Kraft card to 148mm x 297mm and made a simple Cascade Card. 

I then used my stamping platform and stamped the tree image from Be at Peace stamp set onto a piece of polyester. 

With the Cascade Card open, I positioned the card under the polyester and when it was in the right position I stamped onto the card and embossed with white. I repeated this for the other side of the card. I coloured the tree with a white paint pen and added some red glitter.

I stamped the large tree from Trees a Crowd for the next layer of the card, again I embossed in white.


Inside the card  I stamped the trio of tomte from A Tomte Christmas set , I also stamped the larger ones twice and cut them out. I added some foam pads for dimension. I used some gesso at the base of the card for snow.


I added the sentiment and a little red belt to close the card.

I hope you like this card, it took a little bit of working out to get the tree in the right position, but was worth it in the end!

Thanks for looking

Sandra x

Wednesday, 27 November 2019

Quick Christmas Card (by Jodie)


Hello everyone, our Guest Design Team member Jodie is making her final appearance here this month, and she has created another fabulous Christmas card for your inspiration.

Jodie writes:

Good morning everyone, this is my final project as Chocolate Baroque's latest Guest Designer. November has gone by so quickly and I've thoroughly enjoyed every minute of it.
Even though this card looks quite complicated, using these wonderful stamps and a few dies and a few dies I have in my stash, the card came together rather quickly.

Supplies:
Stamps- A Tomte Christmas
Ink- Versafine Vintage Sepia
Paper- A4 Luxury Smooth White Paper
Cosmic Shimmer PVA Glue
Alcohol Ink Markers
Die Cuts
Scissors

First cut out a mat for the front of the card, measuring 4" x 5 1/4" (10.16cm x 13.36cm).
Next I cut the trees out from the ivory cardstock using a tree die that I had on hand. I lightly inked them up using Versafine Vintage Sepia.
Attach these with PVA glue to the card mat.
Next I cut the deer and the bird, using dies I had on hand. I drew a slope on the ivory cardstock and glued that onto the card base, then I attached the deer and the bird.
Next, ink up the gnome with the sled using Versafine and stamp onto ivory cardstock.
Next colour in the image. I used alcohol ink markers, but you can certainly use any colouring medium you have on hand.
Once done colouring, cut out the image, and attach to the card mat.

I then stamped a saying from the stamp set onto the same paper that I cut the deer out with and attached it to the mat.
Finally I cut a piece of cardstock for my card base, measuring 5 1/2" x 8 1/2" (13.97cm x 21.59cm). I folded it in half, then attached my card front.
I have enjoyed my time here these past weeks and hope that I've inspired some of you to start your Christmas cards early, or for those of you who have already started, maybe I've given you some ideas to help add to your collection.
Thank you for checking out my latest project and don't hesitate to hop on over to my blog at https://confessionsofacaffeinatedcrafter.blogspot.com/

Take care - Jodie


Wednesday, 20 November 2019

Vintage White Christmas (by Jodie)

Hello everyone, today sees the second post from our Guest Design Team member Jodie. She has created another delightful card for your inspiration.

Jodie writes:

Good morning everyone, for my second project, I'm showing how to create another wonderful sample from the same stamp set. There is so much you can do with Chocolate Baroque stamps.
I am simply in love with these stamps. The gnomes remind me of a vintage white Christmas, which is unfortunately hard to come by here in Florida, USA, lol.

Supplies:
Stamps- A Tomte Christmas 
Ink- Versafine Vintage Sepia
Paper- A4 Luxury Smooth White Paper
Cosmic Shimmer PVA Glue
Alcohol ink markers
Embossing Powder- Seth Apter Vintage Beeswax
Glitter
Ultra clear double sided Red Line Tape
Heat gun
Scissors 

First cut out a circle from the ivory cardstock measuring 3 1/4" (8.3cm) in diameter.
Next I inked up the gnome trio with Vintage Sepia, stamping them onto the circle.
Next colour in the image. I used alcohol ink markers, but you can certainly use any colouring medium you have on hand.
I then lightly inked the edge of the circle with Vintage Sepia. 

For the front of the card, I cut out a base mat measuring 4" x 5 1/4" (10.16cm x 13.36cm).
I then cut a piece of printed paper, measuring 2 5/8" x 5 1/4" (6.5cm x 13.3cm).
I matted this piece with the ivory cardstock measuring (7cm x 13.3cm).
I then put a strip of the Red Line tape in the middle of the printed strip, and sprinkled glitter onto it.
Next you will attach this piece to your mat, adding the image onto the centre. 

I then sprinkled the Seth Apter embossing powder in different areas, adding a little bit of glitter for sparkle. Your are going to heat the powder from underneath, since I didn't use anything to stick the powder to the card, if it gets heated from above, it would simply blow away.

 
I then stamped a saying onto the ivory cardstock, cutting it into a banner and attached it to the card.

Finally I cut a piece of cardstock for my card base, measuring 5 1/2" x 8 1/2" (13.97cm x 21.59cm). I folded it in half, then attached my card front.

Thank you for checking out my latest project and don't hesitate to hop on over to my blog at https://confessionsofacaffeinatedcrafter.blogspot.com/
Take care - Jodie

Tuesday, 24 September 2019

Let's play hide and seek- (by Magda)

Hello girls,
The second post of this month is a selection of 3 cards and three ATCs and I hope you will like them.

For this Simple Card I used :
Dutch House and its sentiment, Punky Hearts stamp,  Archival Black Jet, Archival Red, Faber Castel Art Grip Aquarelle


For Rainbow card :


Let's play hide and seek card:


ATCs :
Italian House stamp, Turret House, Dutch House,  and their sentiments. stencil, Faber Castel Art Grip Aquarelle


Thank you for passing by
Magda

Tuesday, 27 August 2019

Christmas Baubles

Hello everyone
This is my second post this month showing the wonderful Christmas stamps that were on Hochanda recently.
My first card is from the Shaded Baubles set.


I stamped the snowflake bauble with Versamark Ink and embossed in silver embossing powder. I then stamped the image again with a clear glue.I was able to to do this exactly over the first image as I was using a stamping platform, and this time I used glitter. This gave it a lovely sparkle!  I masked a strip across my base card and stamped the small snowflake from The Christmas Garden set in different shades of blue and grey Distress Inks. I stamped the sentiment, Happy Christmas Birthday in this  case.  I then mat and layered  my bauble and added some gems.
If you saw my last post you will see that the snowy bauble stamp is perfect for the little gnomes in the A Tomte Christmas stamp set.
My next cards are from Christmas Circles set.


I stamped the robin and candles onto card stock in black archival ink and coloured with the Koh I Noor Brilliant Water Colour Palette. I then mat and layered onto some circular cards.

Thank you for looking,
Sandra

Monday, 19 August 2019

Tomte Christmas Carols by Penny

Goodly morning peeps, I hope you are all well and not too wet lol!  It's my turn to share some craftiness with you today, another of my June CB samples.  Like my teamies I absolutely loved the set of Gnomes stamps and this was the first card I made with them.


Tomte Christmas Carols.


  I used stamps from the A Tomte Christmas and A Christmas Flourish sets; CB Masking Tissue, CB Luxury Smooth White paper, alcohol pens, Distress Ink, fluffy fake snow, a die, a stencil and an embossing folder from my stash and some silver gilding wax.     


I stamped a large gnome onto the smooth paper in grey Versafine ink, masked the image and stamped it twice more to create a group.  I removed the masking tissue then coloured the images in.
I took a die from my stash and cut a vintage style lamp post out of black card.  I also cut a single lantern and added silver gilding wax to the lamps.  I stamped some candles from the Christmas Garden set onto another piece of card.  I coloured the images and cut around them, then attached them to the back of the lamps.


I took a stencil from my stash and added rays of light with yellow DI.  I used the embossing folder with a piece of black card to create a border for the focal panel which I highlighted with silver wax.  I then attached the panel.  On spare card I stamped and embossed two sentiments then cut around them.  I attached them to the card and added some music notes, a single lantern hanging from a shepherds crook made from black card and some fluffy snow.


Santa Gnome's Bauble


I took a papier mache bauble from my stash and painted it both sides with dark blue and white acrylic paints to creat a snowy nightime scene.  I then took a piece of smooth white paper and stamped and embossed two images of gnomes, one with a reindeer and one with a sleigh.  I coloured them with alcohol pens then fussy cut them.   


I added some falling snow by dipping the end of a paint brush into white paint and dotting it randomly over the sky.  I added some glitter to the snow and attached the stamped images, one on each side.


Thank you for dropping in today, I hope that I've given you a few ideas for your Christmas makes!
I shall be back next month with some more crafty fun, in the meantime check out the projects of my teamies on this blog.

Take care,


                             x x Penny x x

Monday, 12 August 2019

Is it Christmas yet?...... (by Sandra)

Hello everyone, I'm sharing some of the cards I have made with the new Christmas stamps.

The first one is from The Christmas Garden stamp set. What a gorgeous stamp this is, you can use all of it or just parts.
For this card I stamped in Archival ink and coloured with pencils.


My next card I stamped and embossed in gold and filled in selected areas with red glitter glue.

The next card is using the small Mistletoe sprig and sentiment from the the same set. I used a stamping platform and two shades of Distress Inks, Forest Moss and Bundled Sage, to make a pretty frame for the sentiment. Finished with some 3D liquid pearls.


My next pieces are from the fabulous A Tomte Christmas set. Who could resist these quirky gnomes?

This one is on a piece of grey board.  I made a background with gesso and dark blue acrylic paint. I added branches from Howling Moon stamps and embossed in white. Using Kraft card, I stamped and cut out the large gnome, coloured him with water colour pens and added the sentiment.
My next cards are little 4x4 cards.  These are so cute! I stamped with Archival and coloured with water colour pens and used the Shaded Baubles stamp to frame them.


This is the last card I am sharing with you today.  I cut 3 different sized circle apertures into a piece of card and popped the Tomte gnomes behind. These were coloured with alcohol markers.

Thank you so much for looking at my first DT cards and I'll be back soon with some more,
Sandra

Saturday, 10 August 2019

Have Yourself A Merry Little Gnome (by Julie)

Hello, today I have a selection of  fun, Winter/Christmas themed cards for you all. Chocolate Baroque recently released some brand new Christmas stamps which include Tomte Christmas, which has lots of fun Scandinavian style gnomes.


My first project is a DL card where I have teamed the large gnome from Tomte Christmas with the Mushroom House. I started by stamping the gnome in the bottom left corner of the card and coloured with polychromus pencils. I also stamped the image onto some copy paper and cut it out to make a mask.
Place the mask over the gnome and then stamp the Mushroom House so that it just overlaps the masked gnome. Remove the mask and draw in some free hand lines to join up the path and to create texture in the snow. Colour with polychromus pencils and add white paint pen to the tops of the mushrooms for a snow effect along with touches of Chrystal Stickles to finish off the snow effect.


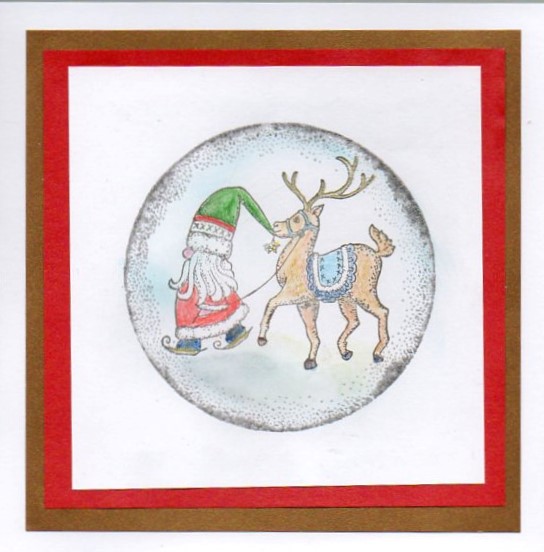
My second card sees the the little Tomte Gnome pulling a reindeer placed inside a bauble. I inked up the blank bauble from Shaded Baubles with a blue dye ink and stamped onto some white stamping card. I then inked up the little gnome and deer image with the same ink and stamped it within the bauble. I coloured the image with polychromus pencils and then cut to size to fit the centre of my card blank. I finished off the panel with a sentiment from Tomte Christmas and a stamped snowflake from Christmas Garden.


For my third card I inked up the blank bauble from Shaded Baubles with a light blue dye ink and stamped it directly onto my card blank. I also made a mask from some copy paper. Next I placed the mask over the blank bauble and stamped the snowflake bauble to the right so that it overlaps the first one. Remove the mask and stamp the little trio of Tomte gnomes using the same ink as before. Colour with Polychromus pencils and then add the little snowflake from Christmas Garden for the background before finishing off with a sentiment from Tomte Chrismas and dabs of Crystal Stickles.


My last card uses the same light blue, dye ink as before, which I used to ink up the snowflake bauble from Shaded Baubles and stamped onto spare stamping card. I also made a mask from copy paper. Once you have stamped the sentiment into the bauble, cover with the mask then spritz with a royal blue, spray ink. Cut to size and then stamp the snowflake from Christmas Garden using the dye ink as before, around the edge.
On a separate piece of card, stamp the snowflake and spritz with the spray ink as before. When dry, cut to size and attach both panels to the front of your card blank with 3d foam pads.

Thanks for stopping by and please call back soon for more Design Team inspiration.

Julie xx