Pin It button on image hover
Showing posts with label June Fairy. Show all posts

Wednesday, 26 September 2018

Golden Summer by Brenda


Morning to you all, Brenda here with a few more creations using the Eastern inspired stamps and stencils from Lesley's recent Hochanda shows. 

My starting point for the above card was a background of Distress Oxides, I then placed a large circle mask and built up the backdrop to my scene with DI's and Silhouette Palace 1 and Silhouette Palace 2 masks, taking off most of the ink from the sponge to achieve a softer finish. Next I stamped the Palace from Indian Textiles............I find my Timmy stamp platform so helpful with silhouette stamps as my dexterity is non too good, but with the platform I can over stamp to achieve a really deep impression. No idea why I resisted the idea for so long! Finally I stamped some leaves across the top using a stamp from Natures Paisley.


A fairly simple one here, another Distress Oxide background but much softer using only Squeezed Lemonade and a smidgen of Fossilised Amber, again I added some background stencilling with Silhouette Palace 1 and then stamped both of the Elephants from Indian Elephant and some trailing foliage using a stamp from June Fairy and added some dots with Liquid Pearls.


Some inky fun with this one, yet again Distress Oxides for the background followed by some stencilling using Useful Leaves and the word Summer from Seasonal Journey mask set and some random stamping using leaves from Natures Paisley. The large leaves are also from the same set, stamped and heat embossed with detail gold powder, cut out and fixed onto the base along with a opal embellishment. Finally I rubbed some gilding wax over the leaves and word.

Many thanks for your visits and kind comment which are always appreciated.


Friday, 24 August 2018

June Fairy (by Doreen)

Hello everyone, today sees the last post this month from our Guet Design Team member Doreen. She has created a dreamy monochrome card, using some stamps from our fairy collection.

Products Used:

Chocolate Baroque June Fairy stamps
Watercolour card
Distress Oxide inkpads: Chipped Sapphire, Mermaid Lagoon, Salty Ocean
Distress Inkpad: Chipped Sapphire
White gel pen
Gold gel pen
Circular mask

Thank you for looking,

Love Doreen.


Thursday, 7 December 2017

Imagine by Brenda


A very good morning, Brenda here with today's share of more samples from Lesley's recent Hochanda shows which featured he most beautiful floral and Butterfly stamps that were a joy to work with.

My starting place for the above card was a background of Oxide Distress Inks which like so many of us I am totally addicted to. Onto the background I stenciled an arch window using Distress Ink, stamped what is probably my favourite Chocolate Baroque sentiment from the Words of Inspiration stamp sheet using Versafine Toffe and using the same ink stamped a selection of leaves around the edge from the Tangled Garden stamp sheet. The beautiful Butterfly is from the same set stamped onto Bristol cardstock and coloured with distress inks, the same colours as the background but not Oxides as I find the chalky finish can detract from the detail of the image.


For this card I used the blooms from Bold Blooms and leaves from the same set and Tangled Garden, stamping all onto a piece of card coloured with Distress Inks and Pearl Mica Spray, I like to add that to inky backgrounds sometimes as it helps to bleed the colours and also leaves a nice sheen. I used a piece of torn paper to create a sunray effect when I wanted to place the flower which I layered up after cutting our three different sized blooms . I cut he leaves out and arranged onto a hand drawn stem with a little bit of doodling to ass interest. The lovely Wordsworth quote is also from Bold Blooms.


I had an idea to create a shadow box surrounded by Butterfly, so started out with the base made using a die set. I coloured a large sheet of card with Distress Oxides concentrating on keeping within a tonal colour palette of oranges and yellows. Onto that I stamped several Butterflies from Tangled Garden and cut out ready to assemble around the frame. The fairy within the aperture is from June Fairy set and grasses from Silhouette Grasses stamped with Versafine Toffee and a masked and inked background plus a few small stamped Butterflies. Finally I layered the Butterflies around and within the layers of the shadow box.


This one to coin Charlie of Hochanda's words is "heavy on the grunge", I started with acrylic paints and brushed them randomly over a piece of 600gsm Fabriano cardstock, it's so sturdy that it takes water and wet mediums without warping. Next added some texture paste through a stencil to the top corner and applied some gilding polish to lift the pattern. I also added some gold gilding flakes here and there. The Lily is from the Lily Fuchsia and Hyacinth multibuy stamped with versamark and heat embossed with copper detail powder and then colour added using the same acrylic paint as the background, the sentiment is from Birthday Words and finally some lace tied across the bottom.


On the rare occasion I find myself with time on my hands I make up a batch of inky backgrounds as I find it really handy to have some in reserve when I am up against the clock to get sample made. This is one of those using acrylic paints and crackle glaze onto which I randomly stamped a sentiment from Birthday Words and then the focal bloom from Breath of Spring  using Versafine Black and then colourd in with sparkle pens and stickles. The base has been stamped with several of the foliage stamps from the Lily Fuchsia and Hyacinth multibuy.

As always my thanks for taking the time to visit today.


Monday, 1 May 2017

May Day Magic (by Asha)

Hello and welcome to the start of a brand new month of creative inspiration here at Chocolate Baroque. Let's get this party going with a little May Day Magic! Here's an Art Journal Page depicting just what that looks like in my head. :)

This project features the fairy from the May Fairy DL sheet, which is part of the Spring Fairy Collection. You would have seen our Lesley showcase these stamps on Hochanda.

The extra foliage and flowers are from the June Fairy and July Fairy DL sheets, respectively. These stamps are also available as the 3-stamp set called Summer Fairy Collection.


As always, on my blog, you'll find more pics as well as details of paints and inks I've used to create this page.

Please swing by often for more project ideas from the rest of the team.

Have a Magical May, everyone!

Beijinhos,
Asha

Friday, 8 January 2016

An Old Postcard (by Asha)

Good morning, fellow Chocoholics. My turn today to share a project and I'm playing with one of the new cling singles called Walled Garden. Here's a simple project that you could easily make without getting too inky. I was inspired by my grandmother's very old holiday snaps. 


To recreate this old postcard look, start by stamping the image on cream cardstock. I coloured it with alcohol markers, but pencils will work well too. Lastly, ink the edges with Distress Ink. To soften the wall I added stamped the falling ivy from the June Fairy DL sheet.

I've made a simple card but with this stamp you can do so much more. Come back soon and be prepared to be wowed by the rest of the team. As always you'll find more detail about this card on my blog.

Thanks for stopping by and have a beautiful day!

Beijinhos,
Asha

Wednesday, 21 October 2015

Guest Post - An Indian Summer by Brenda Weatherill


I just love seeing how everyone interprets our stamps in such different and interesting ways and this week our Guest Designer Brenda has created a zingy garden by combining a stamp from the East with one of the stamps from our Fairy Collection. Over to you Brenda.

Hello to you all, Brenda here again, this time with a card using the gorgeous Chocolate Baroque Indian Textiles and June Fairy stamp sets.


  • I started by dabbing Distress Inkpads Mustard Seed and Broken China on to a craft sheet and spritzing liberally with water then dragging the reverse side of a piece of single sided cardstock through the wet inks.
  • When dry, I use a heat gun to speed the process. I took the lids from two different sized pots of embossing powder and ‘inked’ the edges with the same two distress inks and randomly ‘stamped’ circles onto the inked cardstock. It’s a good idea to give another quick blast of the heat gun before moving on as distress ink can tae a little time to dry.
  • Using a Versafine Black Inkpad I stamped the large flower from the stamp set, added Detail Clear Embossing Powder and heat set. Next I bleached out the colour from the flowers using household bleach and a fine paint brush.
  • I coloured the bleached out flowers with Dylusions Lemon Zest, Pure Sunshine and Vibrant Turquoise. I then stamped the trailing Ivy from the June Fairy stamp set an also added a hint of Dylusions Vibrant Turquoise to the berries.
  • After matting and layering on to co-ordinating cardstock I added a matching organza bow.

Many thanks for visiting us today and you can find more of my work on my blog Floral Fantasies.
B x

Such a beautiful and bright card to put a smile on all our faces, thank you Brenda.  Can't wait to see your third and final post next week.

Saturday, 14 June 2014

A Magical Scene by Doreen

Hello to you all, I am sharing a card made with one of the beautiful Summer Fairies I have used the June Fairy which is a gorgeous silhouette. 
I have made the background by masking off the moon and mountains and sponging with distress inks Shaded Lilac and Spun Sugar.....I have then stamped my images with black Versafine  onto the background.The flowers have been coloured with Shaded Lilac,Dusty Concord and Mowed Lawn distress inks...I finished off with some glitter and the sentiment which is from the "Birthday Words" stamp sheet.xxx 
Enjoy you weekend whatever you are up to.

Thursday, 22 May 2014

Introducing the Summer Fairies (by Glenda)

I'm delighted to present our final set of seasonal fairies - the Summer Fairy Collection.

http://www.chocolatebaroque.com/Summer-Fairy-Collection-Unmounted-Rubber-Stamps-Multi-buy--DL-_p_5557.html

We began our seasonal fairy stamps last Autumn, and have since released Winter and Spring, so this makes the set complete with all 12 months of the year now available individually or as four seasonal collections.  The months of June, July and August are available individually or as a money saving multi-buy.

http://www.chocolatebaroque.com/Summer-Fairy-Collection-Unmounted-Rubber-Stamps-Multi-buy--DL-_p_5557.html


The Summer Fairy collection, like the others, comes with an inspiration leaflet (a download, not a printed one) and this one is a bumper issue with contributions from all our design team members.  Both the individual DL sized stamp sets and the multi-buy are at introductory prices at the moment and if you go for the full collection, you get the leaflet free.

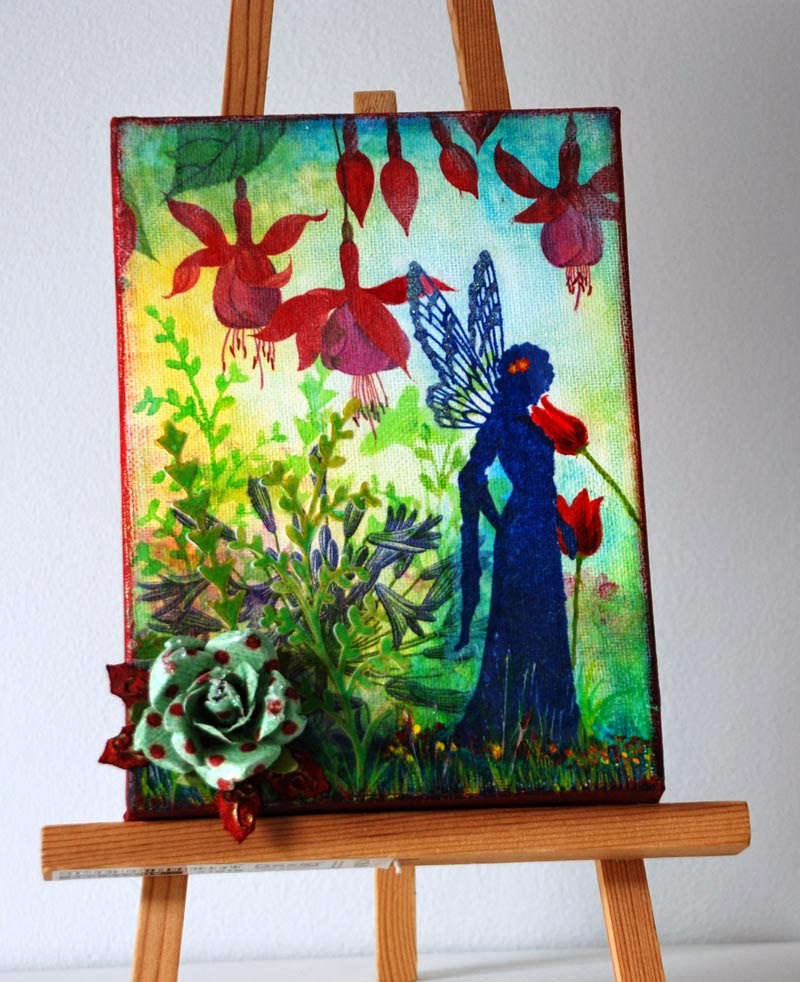
I'll be sharing the details of this little canvas next week on my own blog as it ties in nicely with the Monday Mojo email for next week.  (If you haven't already signed up for my Monday Mojo Magic email series, then please visit my blog where you will see the sign up box in the sidebar.)


(In case you're wondering why the image on the canvas is the other way round to the stamps, it's because it is stamped on tissue paper and glued to the canvas ink side down.)

Stand by for a range of glorious artwork coming up from the girls and don't forget about our monthly prize draw for commenters - you could win a £20 Chocolate Baroque stamp voucher for leaving us a comment - the more times you comment, the more chances you have of winning.