Pin It button on image hover
Showing posts with label Seasonal Elements Stencil. Show all posts

Tuesday, 17 December 2019

Wood Paneling and Beautiful Grunge by Penny

Goodly morning peeps, I hope you are all keeping well.  Are you all ready for the big day?  Or are you like me - chasing your tail to try and get everything finished in time lol!  Ah well, no change from every year then ha ha.  I'm here to bring you my last post of 2019, featuring the beautiful CB stamps that were launched on last month's tv shows.


Wood Paneling.


For this project I have used a stamp from the new Chocolate Blocks stamps - O is for... , and letters from the Classic Alphabet Upper Case set, Versafine sepia ink, Distress Inks, clear EP, CB Seasonal Elements  stencil and a stencil from my stash.
I began with a piece of white card and stamped and embossed the 'O', using sepia ink and clear EP.  I did the same with the other letters to spell the word 'Wood'.  I painted the tree and hill with DIs and added another hill in the distance.


I used both stencils to add leaves  and a woodgrain pattern to the focal panel.  I then attached the panel to a dark brown base card.  


Beautiful Grunge.


This is another card but with a grungy, pretty, mixed media theme to it.  I have used stamps from the Butterfly Mind and Freedom Flower sets, black Versafine ink, clear EP, Koh-I-Noor paints and metalic copper acrylic paint from my stash.
I started with a piece of corrugated cardboard and peeled away the top paper layer in various places to add texture.


I used  DIs to stamp the grid strip  randomly over the cardboard then added the dots.  When the inks were dry I dabbed copper paint all along one edge and held the panel up to allow the paint to run and drip down the panel. 


I took some white card and stamped and embossed the film strip images using black ink and clear EP.  I used the paints to colour the images before cutting them out and attaching them to the background panel.  I repeated the last step with the sentiments then attached the whole completed panel to a white base card.


Thank you very much for dropping in today, and for all your support and lovely comments throughout the year, I really appreciate it, and so do my team mates!  

I'll be back with more craftiness in 2020, in the meantime I wish you all a wonderful Christmas a very Happy New Year!


                           x x  Penny  x x

Friday, 25 October 2019

Heart of the Garden and Butterfly Bouquet by Penny


Good morning peeps, I hope you are all keeping well and dry!  What's with all this rain?  My garden has gone from parched to swamp in such a short time!  
It's my last post of the month today and I've got a piece of home decor and a card to share with you.

Heart of the Garden.

For this Home Decor piece I have used stamps from the Filigree Trading hearts and Celebration Bouquet sets; Distress Inks, texture paint, chalk paint, black Versafine ink, clear EP, CB stencils  Seasonal Elements and Useful Leaves, a gold pen and Koh-I-Noor paints.  


I stamped and embossed the filigree heart image in black Versafine and clear EP three times onto white card then cut them out.  I painted them and added dots with a gold pen.  I did the same with the bouquet.


I took a canvas board and painted a background with chalk paint, then used stencils with DIs and texture paint to add some foliage and flowers.   I attached the hearts to the board then attached the bouquet on top.


Butterfly Bouquet.

This is a quick and pretty piece of artwork that would suit many occasions.  I have used stamps from the Celebration Bouquet and Happy Flowers Day sets; grey Versafine ink, alcohol pens and DIs.  


I took a piece of CB Luxury Smooth White Paper and stamped the bouquet in grey ink.  I coloured the image with pens and added a shadow line.  I then took a spare piece of the paper and stamped a butterfly in grey ink.  I coloured it with the pens then cut it out.  I matted and layered the focal panel onto a white base card, then I stamped a sentiment along the bottom of the card and added a couple of foliage stamps.


I really like this quick card, it is ideal for when you need a hand made card in a hurry!  


Thank you for dropping by today, I hope to see you next month when I'll be back with some more crafty fun.  

In the meantime take care everyone,


                            xx  Penny  xx 


Tuesday, 24 September 2019

Let's play hide and seek- (by Magda)

Hello girls,
The second post of this month is a selection of 3 cards and three ATCs and I hope you will like them.

For this Simple Card I used :
Dutch House and its sentiment, Punky Hearts stamp,  Archival Black Jet, Archival Red, Faber Castel Art Grip Aquarelle


For Rainbow card :


Let's play hide and seek card:


ATCs :
Italian House stamp, Turret House, Dutch House,  and their sentiments. stencil, Faber Castel Art Grip Aquarelle


Thank you for passing by
Magda

Thursday, 7 March 2019

Spring Day (by Magda)

Hello,
I love the new stamp "The Folk Art Garden" and I used that stamp for my step by step projects of today.

Difficult roads card
1. Colour a white cardstock with Brusho watercolour wash
2. Stencil the drops of Chocolate Baroque Stencil Seasonal Elements using Distress Ink Pad
    Victorian Velvet
3. Stamp the flower of The Folk Art Garden with Archival Jet Black
4. Colour only the flower stem with green Faber-Castell Art Grip Aquarelle Pencils
5. Stamp the sentiment from the same plate The Folk Art Garden and fix it with adhesive dots on
    the card


Spring Day
1. Colour a book front page with a light Yellow colour and stamp randomly with Mowed Lawn 
    Distress Ink Pad in second generation part of the stamp The Folk Art Garden
2. Stencil with Mowed Lawn  Spring Day of  Chocolate Baroque Stencil Seasonal Journey
3. Prepare the label with the sentiment, stamping it in green on a yellow colored cardstock 
4. Cover all the stamp The Folk Art Garden at first with green patina mica and then with a bronze soft
    paste and let dry for some days.
5. Peel the dried film from the stamp, cut the excess all around and glue it on the cover of the book


Thank you for passing by
Magda

Tuesday, 20 November 2018

Pocket Money cards (by Magda)

Hello, my second post for this month wants to inspire you to do some Pocket Money Cards.

I realized two projects that you can use for any opportunity changing the stamps. Chocolate Baroque has a lots of suitable stamps for you. and here below you will find what I used for my cards.

The sentiments of the plates  Let's get Festive and Words to Dazzle & Sparkle
Stamp  Fat Robin
The stencil   Seasonal Elements
White Cardstock    4 pieces:   17,5x14,5 - 15,5 x 10,5 - 11,0 x 6,5 - 7,0 x4,5 cm
Distress Ink Pad to blend and stenciled the background and mat
Versamark and Embossing Powder gold
Stickles glue
Peel off
White Embossing Paste


Thank you for passing by and don't miss the appointments of the Design Team
Magda

Saturday, 25 August 2018

Christmas Candle Box and Card (by Anne)


Good morning. Today I am sharing a couple of Christmas project ideas with you.
The first is a festive card with a bit of a grunge feel. I was experimenting a bit with this one – just had to add a bit of glitter bling though (no stopping me – ha ha). Stamp sets used: Winter Edges, Pears and Baubles plus Let’s Get Festive.
How it was done:
The card blank was stamped with the snowflake border and black dye based ink (12cm square texture Kraft card).
A die cut tag was spritzed with green and gold ink sprays. When dry the background was stamped with snowflakes and the sentiment using black ink and opaque metallic gold acrylic paint. A little black ink was blended around the edges. Black and white Bakers Twine was tied onto the tag and around the card front.
The tree was stamped with gold paint onto black card. A little opaque red gouache paint was added to the branches. This was cut out and mounted onto white card to create a border around the tree. It was lightly shaped before gluing to the card.
Next for the bling: I added Stickles (Gold and Sprinkled Sugar). Glossy Accents was also added over some of the elements to add shine and depth.
My second project is a festive candle box using the lovely Robin The Spruce stamp set – lots of bling on this one! The decorative background stamp from the Pears and Baubles set was also used to decorate the inner box panels, plus the Seasonal Elements Stencil  to add sparkly snowflakes to the inner acetate box lid.
How it was done:

I first created a little plain box with acetate lid to go inside and hold 4 small T-light candles (approx. 8cm square and 2cm deep). Viva Décor glitter paste was applied through the stencil to decorate the acetate lid.
An A4 sheet of silver decorative metallic card was used to create the outer box. This was a little deeper than 2cm (to accommodate the inner box) and approx. 9.5cm X 13cm (large enough to fit the stamped panel and sentiment on the front). The candle box was glued inside and Pinflair Snow Dust used to create a snowy effect.
Instead of a fitted lid I created fold over flaps for the top (approx. 13 X 8cm each). Inner panels were stamped in green ink onto smooth white card and coloured with watercolour and sparkle pens. Red glaze pen was added to the berries. The panels were glued to the inside flaps. Thin magnets were added between the card layers to give a magnetic closure, plus a little ribbon tab added for opening. A little obligatory bling was also added with silver glitter glue.
The sentiment was stamped with black ink onto a die cut panel. Foliage was stamped in green around the edges, and yes …. more silver glitter glue.
The front panel was stamped onto acetate with black StazOn ink. The back was coloured with alcohol ink pens. A piece of plain white card was trimmed and glued to the back creating an opaque background layer.
Glaze pen was used to colour the berries and rosehips, and glitter glue added to the snowy hills.

Sunday, 11 March 2018

Tags ( by Magda)

Continuing with the series of houses from Chocolate Baroque, I propose you today three Tags made with the beautiful English Cottages Rubber Stamp


Heartfelt Thanks tag :

Background coloured with acrylic colours
Gesso applied randomly on it
Stenciled the leaves of Useful Leaves, using Distress Inkpad
Stamped on White Cardstock the images with Versafine Onyx Black
Coloured the stamps with Aquarelle Pencils,  cut the images and glued
The sentiment is from the "Words to Dazzle & Sparkle" rubber plate


Sending Hugs tag:

Stamped on a kraft tag the images with Versafine Onyx Black
Coloured with white pencil the image
Stenciled with the white pencil the snowflakes of Seasonal Elements
Stickles  Stardust for some highlights
Sending Hugs sentiment as last touch.


On your Birthday tag :

On a black Tag I stamped at first the trees with Versamark
Blended on the tree Pan Pastel pink
Stamped on White Cardstock the images with Versafine Onyx Black
Coloured the stamps with Aquarelle Pencils,  cut the images and glued
Stickles  Stardust for some highlights on the windows and on imaginary clouds
The sentiment is from the "Words to Dazzle & Sparkle" rubber plate


See you in few days again with another "houses" project.  Thank you.
Magda


Thursday, 2 November 2017

Steampunk fun (posted by Claire)

Good morning, Claire here with a couple of mixed media steampunk projects made for the recent shows on Hochanda. I've used stamps from Steampunkery to make this wall hanging and a card.


I began by making the beetle - this stamp is one of my all time favourites! I gave the stamp a liberal coating of Black Soft Form Relief Paste with a spatula and left it to dry - it does take a while so it's important to be patient as if you try to remove it before it's dry it could spoil it. I always leave them for at least 24 hours before trying to lift up a corner to peek and check it's dry. 

Meanwhile I made the other elements. I removed the outer layer from some corrugated card and gave it a coat of black gesso before applying acrylic paint in metallic shades. Once that was dry I used hot glue to attach a scrap of metallic tulle and a lacey border made with the lacy stamp from Steampunkery and kraft glassine. The next layer was made from watercolour card, it was actually a background that had gone wrong so I stencilled some circles on it with gilding glue and added gilding flakes. I used straws for the faux pipework, painted them with black gesso and then metallic acrylic paint. 

Once the beetle was dry I added some colour with silver and gold gilding wax. I painted his shell with blue and green metallic acrylic paint and once it was dry I gave it a thick coat of glossy accents. 


I made this card using acrylic paints for the background - sloshing them on with lots of water and then adding rock salt. Once it was dry I splashed with diluted white gesso before stencilling in the moon using the Seasonal Elements Stencil. I applied gilding glue through the stencil and added lots of sparkly glitter. I also applied a layer of glue and glitter around the edge of the card.


Once the background was dry I stamped the gorgeous airship with versamark ink and embossed with gold embossing powder. I painted the bottom of the image with acrylic paint. To make the balloon, sails and flag I stamped the image with Gold Stazon onto some fantasy film layered with angelina fibres and cut the elements out. It's hard to get a good photo as it's very sparkly but it looks really pretty in real lift.

I hope you're enjoying this months inspiration from the DT. If you've got your stamps yet make sure you share your makes with us on the facebook group!
Claire xx


Monday, 9 October 2017

Spooky Dream Journey (by Anne)

This was one of my samples for the recent shows on Hochanda featuring the lovely Fantasy Woodland stamps. I couldn’t help seeing the pattern for half an eye in one of the tree tops, and so couldn’t resist making something a little dark and spooky. I had a bit of fun with this one.


Materials:
  • Fantasy Woodland and Birthday Words stamp sets
  • Seasonal Elements and Seasonal Journey stencils, plus a texture stencil for ‘scales’
  • 14cm card blank, black card, white stamping card
  • Ink sprays with mica (teal, copper)
  • Texture pastes: Viva Décor Kristall Gel (Hologram glitter and clear gel) and opaque acrylic texture paste (Pebeo Concrete)
  • Gilding wax (copper gold)
  • Acrylic paint (metallic gold and light metallic teal)
  • Alcohol marker (black)
  • Water based inks (red, yellow, teal green)
  • Inkpads: Versafine (Onyx Black), Distress Ink (Scattered Straw), Versamark
  • WOW heat embossing powder (Clear Gloss)
How it was made:
  1. I spritzed the black card with mica sprays.
  2. Background texture was created by applying clear and glitter gel, plus acrylic paint, through the stencil. When dry I applied gilding wax over the scaly texture.
  3. Lettering was created by applying opaque paste through the stencil. I made a bit of a mess as I got some paste seeping under the stencil. When dry I tidied and sharpened up the letter edging by using a black alcohol marker (mess saved).
  4. The edges were stamped and rubbed over with gold acrylic paint.
  5. The text was stamped with Versafine and trimmed away from the full stamp sentiment. Edged with Distress Ink and applied with 3D glue gel.
  6. The eye was created by stamping the tree top twice (turning the stamp 180 degrees) with Versafine. Note the centre needs to be overlapped slightly to create a circle shape. I then cut out using a circle die and used a black marker to colour around the edge and to draw the pointed pupil shape.
  7. The eye was coloured with water based inks and then heat embossed with clear gloss powder. I added several repeat layers of embossing until I got a smooth shiny glass eye effect. Glue to the card with 3D gel.

Tuesday, 3 October 2017

Autumn Day by Brenda


Good morning Peeps, today it's my turn to share some inspiration using stamps which Lesley showcased on Hochanda recently. The shows were all about Autumn, Trees and Poppies so ticked all the right boxes for me as I love working with Autumnal colours and as those who know me can confirm Poppies are my favourite flower plus I am a self confessed 'Treeaholic'.

For the card at the top I used three panels of cardstock and stamped two with images from the Autumn Edges set colouring with DI's and on the the third panel used the same inks to add the words using the Seasonal Journey stencil.


The lovely Poppy from Pretty Poppies is the focal image on this card, stamped with Versafine Black onto a watery Burosho background, I mopped quite a lot of the colour away as I wanted a subtle finish and then coloured the flowers with sparkly pens, stamping the Butterfly a second time to decoupage. The corners are from Baroque Corners stamped in the same black and then I added a few leaves using Useful Leaves stencil and ties some red ribbon and added a Poppy button.


The same stencil as the top card has been used along with DI's to create the background for this card and the for the focal panel I created a Brusho background and stamped one of the tree from Fantasy Woodland adding a few stenciled leaves using the Seasonal Elements stencil.......I can't begin to tell you how useful these stencils are for building up interest and colour on your artwork.


This is another sample from last weeks shows on Hochanda, this time using one of the images from Butterfly Poppy Collage stamp set, it's an A4 stamp sheet and you get absolutely loads of beautiful images. The background is Distress Oxides, stamped with Versafine black and the colour added to the Poppy heads using the same Wilted Violet ink and Glossy Accents added, plus a little stamping down the left edge, again using the same ink and stamps from Nature's Peace and the same set as the main image.


I am tentatively adding this one as Lesley asked if she could use it as the basis of one of her demos, however I will be away on holiday when the shows are aired and this post goes live so it may or may not have featured. Using a circle as a mask I stamped a selection of flora and fauna from Nature's Table, Nature's Peace and Poppy Meadow, inking with Distress Markers direct to stamp and a spritz of water before each stamping. The horse chestnuts in the corners were stamped with DI and are also from Natures Table. After stamping I removed the mask and used the negative to stamp the focal sentiment, again from Poppy Meadow and added some shading around the circle.

And as I seem to have quite a number of pieces in my gallery which have not been blogged as yet I thought I would share a few of them in this and my following few posts.


A triptych design which was for the August shows featuring the beautiful Harlequin Bouquet stamped with Versamark and heat embossed with detail copper powder on to a Oxide ink background and some stenciling to carry the harlequin design.


This one features the lovely Summer Fayre stamped onto black cardstock using Versamark and detail white embossing powder, then coloured into metallic pencils, the colour is quite subtle but I rather like the soft finish.

Have a lovely day, I am hoping mine will be warm and sunny as today we sail into Rhodes in the Greek Isles.

Friday, 29 September 2017

Two projects (by Magda)

There is still time for Christmas, but these beautiful stamps from Chocolate Baroque have tempted me to try two very different projects.

Long Card :

1. Blend Distress Ink Pad Antique Linen on 3 white ATC cards
2. Stamp with Versafine Olympia Green  on each ATC a different subject, from Frosty Trees
    and New England Winter set
3. Decorate with red gems and Stickles - Crystal
4. For the background of the card blend Distress Ink Pad Antique Linen, Old Paper, Mustard Seeds
    and Rusty Hinge.
5. Stamp with Versafine Olympia Green  a sentiment from the Frosty Trees set


Journaling Page:

1. Colour your journaling page with green, red  and yellow acrylic paint
2. Cover all the page with Dina Wakley Media white gesso 
3. Stencil spots randomly with Distress Ink Pad Pine Needle 
4. Stamp with Distress Ink Pad Pine Needle and Walnut Stain the tree from the Frosty Trees set  in order to create a scene
5. Use Dina Wakley Media white gesso  on the snowflakes of Seasonal Elements stencil 
6. Stamp with Versafine Vintage Sepia the sentiment Let's get Festive
7. Decorate with some red gems and Stickles - Crystal


Thank you for passing by
Magda


Tuesday, 5 September 2017

Flowers with backgrounds (by Marga)

Hello all, today it's my turn to show you something. 

This time I have two cards to share with you.


The first card is made with Distress Inks and some colouring with pencils.
I also used the stencil Seasonal Elements in the corners.

The stamp I used is Harlequin Bouquet


The second card is stamped with Versafine Ink and I have coloured the flowers with pencils.

The stamp I used is Flora Musica.

Hugs

Marga

Wednesday, 30 August 2017

Pretty In Pink (by Asha)

Hello again! Here's another card from me featuring one of the gorgeous new singles released in August: Hanging Flowers Single A6 stamp. What can I say? I just love ... absolutely adore this stamp. It stamps beautifully with clean crisp detailed image and a true joy to colour. It's the kind of image that will work well for all occasions.

I decided to keep it simple by stamping the image with VersaFine Vintage Sepia for a softer more natural look. Then I coloured it with Polychromos and did a little off the edge framing. The background was too white, so I knocked it back with shades of grey and matted with the teeniest show of lavender card.

The background is fake bokeh and I used the  Seasonal Elements Stencil and Distress Inks, applied directly onto a deep pink card base. And lastly, I added some twine to wrap up this project.


I've mentioned this before, but these new floral singles truly are versatile. They work so well for all sorts of projects from a simple card above to a more elaborate Art Journal project I posted a few days ago.

As always, I have details of the tools and products used on my blog. Thank you for stopping by and drop in soon for more designs by the team.

Beijinhos,
Asha

Friday, 25 August 2017

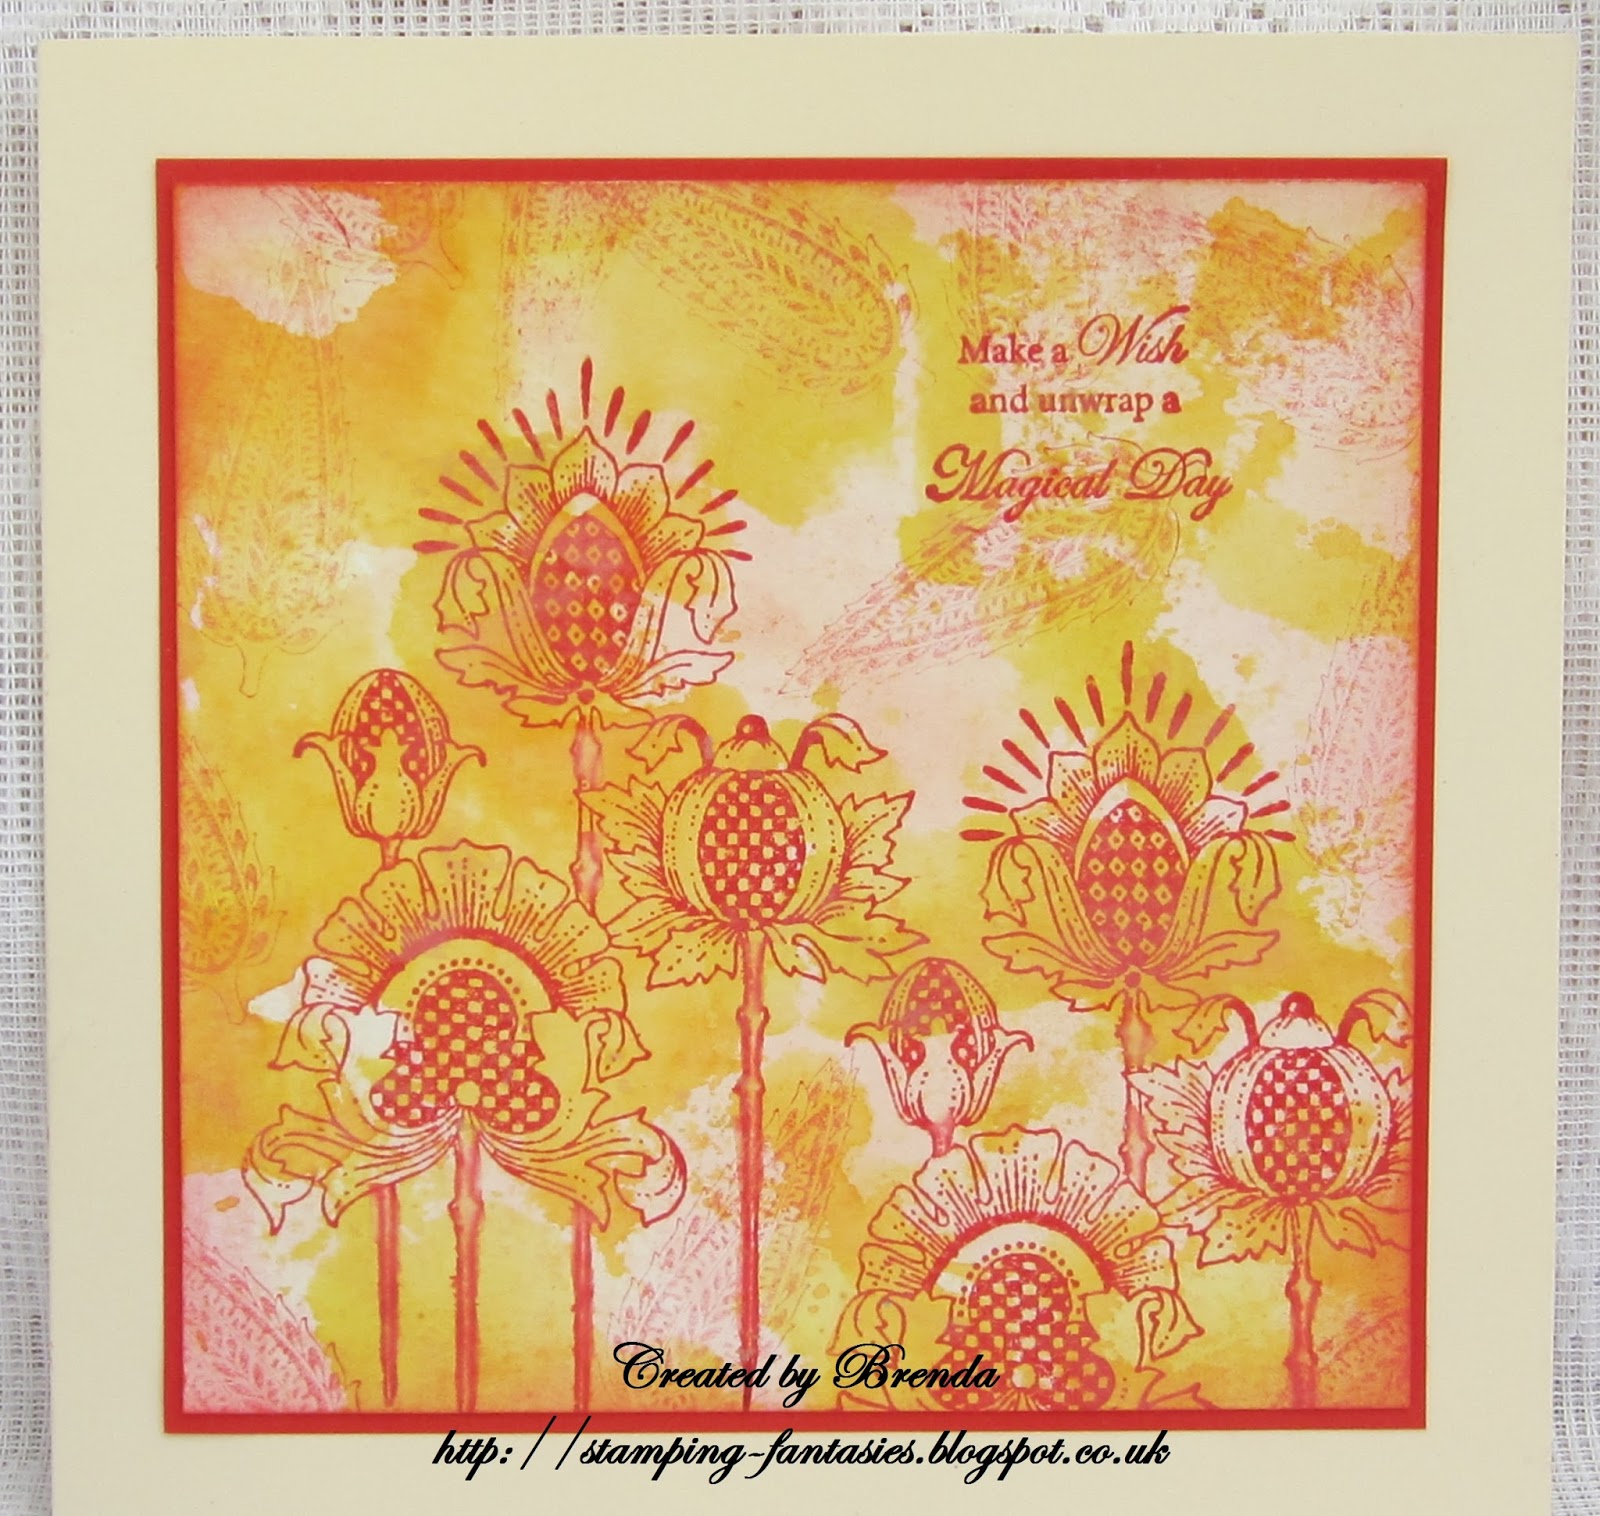
Make a Wish (by Brenda)


Morning Peeps, I am back again with a few more shares using the lovely new stamps Lesley launched on Hochanda a few weeks ago.

The background of the above card is actually the leftover from another one which I mopped up from my craft mat and rather likes the the muted colours. Using the small leaf from the Take It Or Leaf It set I randomly stamped the background with second generation stamping and a red Distress Ink, I then used the first generation ink to stamp the Chequered Flowers which I have to say I just love, they remind me of Thistles but with so much more interest going on. Finally I added a sentiment from Words to Dazzle and Sparkle.


A canvas now which I primed with Gesso, then acrylic paint and crackle glaze before adding leaves and 'spots' using Useful Leaves and Seasonal Elements stencils and texture paste. When dry I placed the stencils back in place and coloured with acrylic pain, then using the same paint coloured some elements from one of the colouring pages from the Colouring Collection which I then cut out and added to the canvas. I added three chipboard Butterflies painted with the same colour and stenciled some leaves onto the largest. Finally some gold Gilding Wax here are there and a sentiment from Amazing Mackintosh Words.

My thanks for popping in today and I hope you have a lovely weekend.


Friday, 28 July 2017

From Summer To Winter (by Julie)

Hello, lovely to see you. I can't believe that we are nearly at the end of July so I thought I had better get my Summer Solstice card in quick as before we know it the Winter Dawn Lady in my second card will be the order of the day...


For my first card I stamped and then masked the Summer Fayre lady. Next I took the Seasonal Journey stencil and applied teal and orange dye ink through the Summer Solstice words and added white, paint pen, highlights. 
The shimmering sun has been stencilled with the Seasonal Elements using a sponge and yellow acrylic paint. Once dry I went over the entire background with Old Paper Distress ink and added more white, paint pen, highlights.
Once I removed the mask from the lady I coloured with pencils and then edged the card with Evergreen Bough Distress paint.


This beautiful Winter Dawn lady was stamped onto Kraft card with a blue Versafine ink and then coloured with Polychromos pencils. I cut the card to size and edged with Picket Fence Distress paint and Crystal Stickles. The base card was stamped with the snow flake stamp from Sparkling Trees, before applying the blue card-stock and the stamped Winter lady. The card was finished off with dabs of Crystal Stickles and die cut snowflakes.

Many thanks for taking a peek. Please call back very soon for more Design Team inspiration.

Julie xx