Pin It button on image hover

Saturday 29 February 2020

Technically Speaking..................by Sandra

Hello

I am sharing some more of my samples from the January shows on Hochanda.

These stamps all work so well together so these cards have elements from  Cala Lily Blueprint, Freesia Blueprint,  Sweetpeas Blueprint  and Wild Cornflower stamp sets.

My first card uses the single leaf image from the Cala Lily Blueprint set which I used with my stamping platform to enable me to create a simple circular design. I used two different coloured Distress Inks.


My next card, again I have used my stamping platform. I have stamped in a soft grey ink and splashed a few drops of Brushos over the top. I have used the spray of flowers from the Freesia Blueprint set and the leaf sprig from the Sweetpeas Blueprint set. The corners are architect drawings from the Freesia set.


Finally, I have used some of the architect drawings from Freesia Blueprint, Sweetpeas Blueprint and Wild Cornflower Blueprint sets. I used a blue card and embossed the images in white to look like old  blueprints. The detail in these stamps are amazing and they are not lost at all when you emboss.


Thanks for looking, I hope you enjoy using these stamps as much as I do.
Sandra x

Friday 28 February 2020

Cala Lily From Grungy to Clean and Simple (by Julie)

Hello, today I have three Cala Lily themed cards with two distinct styles.


My first project has a grungy style and most of the images come from Cala lily Blueprint. I started this card by stamping the main Cala Lily design and then covered it with masking fluid. You can also just stamp onto copy paper and then cut out and use the copy paper image as a mask as well. With the main image covered I coloured the background with Distress and spray inks, also adding in a dotty stencil for interest. Once everything was dry I removed the mask and coloured the Cala Lily with polychromos pencils and stamped the background images. You can find an extra stamp I used in the background on Wild Cornflower Blueprint.


My second card is a simple DL design. I inked up the single leaf from Cala lily Blueprint and stamped in a zig zag pattern along the left hand edge of the DL card. I then added in the single stem Cala Lily at the bottome and top right. This was then coloured with Distress ink and polycromos pencils. The single stem Cala Lily was then stamped onto spare card and the single leaf was stamped twice either side of the stem before being coloured with polychromos pencils. I then cut out the image with an oval die and added a black card-stock matt, before attaching to the front of the card.


My second card is very clean and simple and again uses the stamps from Cala lily Blueprint.
I stamped the three separate designs along with the sentiment using Onyx Black Versafine ink, before colouring with polychromos pencils. I then applied a teal coloured dye ink through a dotty stencil, across the plain white card-stock background.

So you see, the same stamps can be used in a variety of ways...what have you done with yours?

Please call back soon for more Design Team inspiration.

Julie xx

Wednesday 26 February 2020

Delightful Dragons (by Doreen)

Hello everyone, today sees the final post this month from our Guest Design Team member Doreen. She has created a project using a stamp set that is a personal favourite of mine, Here Be Dragons

Doreen writes:

This card is a bit of self indulgence on my part, I have always held a love for dragons, but I think it stems from a song that was popular when I was young, 'Puff the Magic Dragon'. I remember it well, though many of you I dare say, will be too young to have even heard of it.

I have had this set of stamps for quite some time but never quite got round to using it, but now that I have, I dare say it will be out again soon.


Products used in the making of this card:

Here Be Dragons stamp set
Round Gelli plate image made using inkpads and liquid Brushos
Stamped using Versafine Clair Nocturne
Coloured using watercolour brush pens
Base layer cut from card stash

Thanks for looking,

Doreen

Tuesday 25 February 2020

Imagination rules by Rachel

Hello there! Rachel here with my second set of samples from the January shows. 

For this first one I used a gelli print and stamped onto that using stamps from the Cala Lily Blueprint set. I stamped the image twice - once on the gelli background then again on card that I coloured and fussy cut and added to the gelli print. I also used the single leaf stamp to form a border.


These AT coins were made by painting on the MDF blanks and then adding stamped imgaes from the Freesia Blueprint set which I coloured in using sparkly pens.


For this smple I used stamps from the Wild Cornflower Blueprint to create both the background and the centre piece. I chose to colour the central image but left the background black and white.


Another sample using the Freesia Blue print set, fussycut on a painty background.


Finally this is a little treat bag. I created this using a die. I painted then assembled the bag then finally added the Lily stamps.

I hope you have got some more ideas from this post!

Hugs
Rachel xx

Monday 24 February 2020

My Reading of the Year (by Magda)

Hello,
Do you think bookmarks are still popular and useful ? I was wondering if you were still reading paper books or you prefer only e-books.
Bookmarks are really funny to do and it is also a way to use left over of paper pieces . I show you the here the traditional shape and a different one, where you can write on it notes, sentences, words, whatever you liked in reading the book and save all in a folder.


For my projects I used :
- White cardstock
- Distress Ink Pad
- stencil
- Archival Jet Black
- Spring Foliage
- Spring Bird Daffodils
- Fabulous Flappers
- Mackintosh Beauty
- Aquarelle Pencils


Thanks for passing by,  hugs
Magda


Sunday 23 February 2020

techno florals

 My first card uses the main stamp from the sweetpeas set stamped over a distress oxide background - I used a red and a yellow onto a mat and lots of water to create the background, then coloured the image with distress marker pens.  I stamped the colours separately, using a stamping platform to make sure the images matched up.
I then used a waterbrush to add more colour


Same background technique for this one, using the wild cornflower set - have to admit that I thought this was a thistle, as it didn't look anything like a garden cornflower! - and purple and green inks.
Stamped just in black, with some extra colour added using a waterbrush and ink picked up from the mat.


Same stamp again, this time on a brusho background, stamped in black and clear embossed.
Base card uses a couple of the smaller images stamped in blue with green brushed round the edges to take the white down and tone in with the brusho


I seem to have missed scanning some of the lily samples I did, but this one I did find.
Grey brusho powder on watercolour card,  main image stamped in black and clear embossed before adding colour using watercolour paints.
background images added using grey ink, and the sentiment stamped in versafine and white embossed

Friday 21 February 2020

Above and Below by Penny

Hello everyone, I hope you're all warm, well and safe today.  With all the horrible weather we're having, the strong winds,the terrible flooding and all the damage to peoples homes I thought I'd share some bright and sunny projects with you.  These are some pages from a couple of calenders I made in 2018 as Christmas presents, having bought them from Chocolate Baroque.


Under The Sea.


The stamps I have used are Mermaid Queen and Underwater Kingdom sets, Distress Ink, Versafine ink, clear EP, pearlescent acrylics, alcohol pens and a stencil from my stash.

I stamped and embossed three images to create an underwater scene then coloured them all in using the paints and pens.  I masked the images then took a stencil from my stash and used blue DI to recreate the currents in the sea.


Sea Palace.

I have used stamps from the Seadragon and Underwater Kingdom sets, and the same products and tools as above.

I stamped and embossed some focal images then coloured them as before.  I then used the same stencil to create the background.  


Sunny Cove.


For this page I used stamps from the Seashore Scenes and Seaside Dreams sets, Versafine sepia ink, Clear EP, and Colouring pencils.

I stamped and embossed a scene  then added a border of shells either side.  I coloured everything with pencils.


Beachside Holiday.


This time I have just used stamps from the Seaside Dreams set,colouring pencils

I stamped and embossed the Beach Huts, and the borders, as before.  I then coloured the images with pencils.


Thank you for stopping by today, I hope my post has cheered up your day .  I shall be back next month with some more crafty fun, in the meantime stay safe.

Take care,


                             x x  Penny  xx

Thursday 20 February 2020

Pretty Blueprints (by Judith)

Hello everyone, I have some more projects to share with you showcasing the fabulous new stamps that we aired on last month's TV shows on Hochanda. The possibilities with these stamps are endless, and I hope that you will try out lots of the ideas that myself and the rest of the Design Team are bringing to the blog this month. We have had a lot of fun working with the stamps, and we are sure that you will too!

For my first project, I took a piece of kraft card, and embossed an image and sentiment from the Calla Lily Blueprint stamp set, using white embossing powder. I coloured the image using Koh-I-Noor paints. The white paint in the set is particularly effective on kraft for creating delicate effects on flowers.


For my second project, I coloured a piece of drawing cartridge with tea, and then stamped a small worker image from the Freesia Blueprint stamp set randomly over the background. I coloured the image with watercolour pencils. I stamped the main image from the same stamp set onto a piece of fabric, (these detailed stamps still work perfectly even on a surface such as fabric), using Archival Ink. I then coloured the image with Inktense pencils.


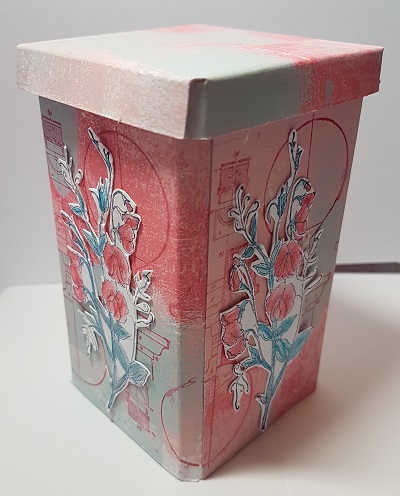
For my next project, I coloured a canvas with acrylic paints. I blended the paints using a baby wipe to get a smooth effect. Once the paint was dry, I stamped an image from the Sweetpeas Blueprint stamp set onto a piece of tissue paper and coloured it with pencils. I tore around the edge of the tissue paper, and stuck the paper to the canvas background using matte medium. I stamped a sentiment onto a piece of scrap card which I edged with black ink, and stuck that to the background to finish.

As we become ever more conscious of the effect of our actions on the environment, I did not simply want to throw the baby wipes away. I dried them off, and look how cool they are!


They would make fabulous backgrounds in their own right, you could tear them into strips and layer them with other papers to make layered background, or simply stamp onto strips to make a decorative type of washi tape. I chose to use some for a mini card as follows....

I stamped a sentiment from one of the stamp sets and a flower from the Wild Cornflower Blueprint stamp set onto one of my baby wipes and cut them out. I adhered them to a coordinating piece of drawing cartridge using matte medium and added a layer of black card to mat the background.

  Thanks for stopping by,

Judith xx

Wednesday 19 February 2020

The Joy of Creating (by Doreen)

Hello everyone, Doreen is back with her second post this month; a colourful card, combining stamps, background papers, and papers from her own crafty stash.

Doreen writes:

This card is a fairly quick make using the latest of Chocolate Baroque's fabulous background splash designer papers, stamped. I then used a background of my own making, stamped, cut out, coloured and using 3D glue gel, mounted onto the background and left the glue to dry. It only needs one hour before it can be safely popped into an envelope but I do err on the side of caution and leave for longer. Of course, if you are in a rush, then you can use foam pads instead.

Products used in the making of this card:

Chalk Ink pads and clear sparkle pen to paint
Nocturne Versafine Clair inkpad
5" x 5" card blank
Base layer of variegated blue paper from stash 


Thanks for looking

love Doreen


Monday 17 February 2020

Revisiting the past part 2 by Zoe

Good morning Lovely’s and welcome to my final post of the month.

As I explained on my first post of the month, I was unable to make samples last month so I’m showing some older favourites.

I’m so proud and feel so privileged to be part of such an amazing Design Team and to be able to showcase such amazing products.


Thank you so much for visiting today.
Have wonderful day xx Zoe 

Sunday 16 February 2020

Believe in Yourself by Brenda


Hello Peeps, Brenda here with some more inspiration using the new Blueprint stamps recently launched on Hochanda TV, the proved to be extremely popular which is no surprise as they offer something different yet still combining beautiful flowers CB is so well known for. All of the sets work so well together and are so easy to extend a pattern of design.

The Calla Lily Blueprint features on my card above, I stamped the bloom three times, cut out and coloured with pencils. The background is a mixture of Distress Oxides and Acrylic Paint, stencilling and several elements from all four sets stamped with Versafine Clair  to create a 'frame' onto which I fixed the Lilies and twine to form a circle. The sentiment from the Sweet Peas set is stamped onto an inked chipboard circle.


A brayerd Oxide background on this one and the Freesia Blueprint stamped with Versafine black and the 'fraome' extended with a stamp from the Sweet Peas set, the flowers stamped again, the flowers cut out coloured and decoupaged. Some texture paste added through a stencil. Elements from the Lily set stamped randomly and the sentiment is from the Cornflower set.


A Gelli Plate background, random stamping using the rule from the Lily set, then the circle masked and Wild Cornflower Blueprint stamped with Versafine Clair. I used a fine line pend to add an outline to the focal circle and some torn rice paper added here and there.


Sweet Peas take me back to childhood so the Sweet Peas Blueprin might be my favourite set! I used a piece of deeply etched linen card to brayer on Distress Oxides to achieve subtle colour, then stamped the Sweet Peas twice, cutting out the flower heads to decoupage after coloring with pencils. I inked just the circle element of the image and stamped randomly in the background, then used a mask to add a circle to reflect that of the image and used sentiments from the Lily and Sweet Peas sets.


This one is just some indulgent pattern building using elements from the Calla Lily BlueprintFreesia Blueprint and Wild Cornflower Blueprint sets, stamped onto an oxide and stencilled background. The little circle is chipboard and was a perfect fit for the circle element on the Cornflower set.

Many thanks for your visit today.

Saturday 15 February 2020

On a scale of 1 to 10.....................

Hello

Today I am showing some of my samples from the January show on Hochanda.
This was Chocolate Baroque's 3rd Anniversary with Hochanda and there were so many sell outs!

These Blueprint stamps are so lovely to work with.

My first card uses the Sweetpeas Blueprint set
I have used the main stamp, which as Lesley explained was a drawing of the top of a flag pole, and I've coloured with alcohol pens. I have also used the little sprig stamp as a background and one of the sentiments

My next card uses the Calla Lily Blueprint set. This is a lovely image and I have used watercolour pencils.  I have used the Set Square stamp for the background layer.


 Next, I have a card using the Freesia Blueprint set.  I coloured with alcohol pens again and added a little bit of glitter.


My last card today is from the Wild Cornflower set. For this card I used a brayer with some chalk paints onto some card and stamped the main image from the set.  I then added some watercolours just to the flower heads.
Thanks for looking
Sandra x

Thursday 13 February 2020

Grungy Blueprint (by Julie)

Hello, today I have two cards to show you starting with a grungy style card that has been stamped using Wild Cornflower Blue Print

I spritzed some water colour card with water and dabbed on blue and cerise liquid inks. I dabbed it with some kitchen towel and once dry I inked up the stamp designs with grey and black Versafine inks to stamp across the background. I finished the design off by dabbing the edges with Antique Bronze Distress stain and then mounted onto black card-stock.


My second project uses Freesia Blueprint and the card was started by inking up the small freesia flower heads with Onyx Black Versafine which were then stamped around the edges of the base card. I stamped the main Freesia image onto spare stamping card and coloured with polychromos pencils and Distress inks. I cut my card to size and then stamped the set square ruler from Cala Lily Blueprint in opposite corners, before mounting onto black card and then adding to the base card.

Thanks for stopping by and please call back soon for more Design Team inspiration.

Julie xx

Wednesday 12 February 2020

Mackintosh Beauty (by Doreen)

Hello everyone, this month we welcome our Guest Design Team member Doreen Sympson to the blog to inspire you with three posts. She has decided to start with a beautiful Art Nouveau style card.

Doreen writes:

With Valentine's Day just around the corner when I was browsing through my collection of Chocolate Baroque stamps for this post, a beautiful set of stamps just fitted everything I was looking for, it oozes romance. The Mackintosh Beauty set is divine, you can do as little or be as elaborate as you wish, and it stamps perfectly. The sentiment however comes from the Rose Stem Script stamp set and works so well on this card.


Products used in the making of this card:

Ranger Archival Inkpad- Plum
Chocolate Baroque silk card
Black card and 8x8 card from stash
Alcohol ink pens and blender pen

Thanks for looking

Doreen

Tuesday 11 February 2020

Colourful blueprints by Rachel

Hello there. Rachel here today to share my inspiration using the blueprint stamps shown in the January shows. They really are fabulous stamps and I am so glad they were so well received.

This first card used stamps mainly from the Freesia Blueprint stamp set. I teamed the images up with inks and stencilled circles and turned them into a butterfly.


More colour in this sample - I used images from the wild cornflower blueprint and the vegetation came from the sweetpeas set. 


A very simple card here using a brusho background and the image from the sweetpea set. Colouring was using water colour pencils.


This was created using dies. Once cut I used paint to colour the card then stamped onto the paint images from the Sweetpea Blueprint set. Finally, after assembling the caddy I added fussy cut images from the SweetPea set. 

I hope I have given you some ideas of ways to use some of your stamps if you have already bought them, or encouragement to get them if you haven't yet!
See you later in the month!
Hugs
Rachel xx