Pin It button on image hover
Showing posts with label Sticks and Stones. Show all posts

Monday, 1 November 2021

Beautiful Autumn (by Judith)

Hello everyone, I hope that you are keeping well. We are really into the Autumnal weather now, the leaves are falling and the windy days are here. I love this time of year, we still get the odd sunny day, and it is not too cold for a good walk. I hope that you caught last month's TV shows, and saw the fabulous new stamp sets that Lesley brought to The Craft Store. The Design Team have had so much fun playing with these stamp sets, and you will be truly inspired by what they have to share with you this month.

I have three projects to share with you today. My first card was created on a left over background from another project. I had painted over a piece of scrapbook paper with a wash of white acrylic paint and added some stencilling with blue and orange Distress Oxide Ink. Some subtle stamping had been added with the same colour ink; butterflies, clocks, and splatters, etc. These colours dictacted the colours that I then chose for the rest of my project. 

I stamped Beauty is in the Eyes using Versafine Onyx Black and extended the bottom frame using a fineliner pen. I used the same pen and a circle stencil to draw extra bubbles on the right hand side. I coloured the image with pencils, and added white highlights with a gel pen. I had another scrap background for the larger background, created using acrylic sprays. Always keep your left over backgrounds, you never know when you might need them! I matted both backgrounds with black card for extra drama. The little word 'Focus' comes from the same stamp set.

My second project is a small chipboard panel. I used a piece of decorative paper and stamped one of the leaves from From Nature 1 across the background using green ink. I stamped and embossed the large leaf spray from the same stamp set onto kraft card using white embossing powder. I also stamped and embossed just the face from Beauty is in the Eyes, and the flower from Floral Grunge, also onto kraft card using white embossing powder.

I added a sentiment to the background paper, before attaching it to the chipboard panel with matte medium. Once the adhesive was dry, I sanded the edges to get a white edge. I coloured the face and flower with pencils, and inked the leaves with Distress Ink. I attached all of the images to the panel for a collaged effect.

My final project mixes and matches stamp sets, something that I really enjoy doing. I have used Distress Inks to create a blended background, and then taken a branch from the Sticks and Stones stamp set which I have stamped in first and second generation stamping, using a brown Versafine Clair ink. I have coloured in the first generation branches using brown pencil, and the second generation using a mixture of grey and brown pencils, to make them appear to be in the background. I have then used a mixture of Autumn colours to stamp the lovely leaf from From Nature 1 in first, second and third generation stamping across the branches. Finally I have added my absolute favourite Chocolate Baroque sentiment to the card. This comes from the Nature's Peace stamp set. As Design Team Leader, I should probably not have favourites, but I am still human, and I adore this stamp! I knew as soon as saw the stamp set From Nature 1 that I wanted to create this card, sometimes a card design just pops into your head.

Thanks so much for stopping by, take care,

Judith xx


Sunday, 28 June 2020

Birthday Mail and Peaceful Dreams

Hello everyone, I hope you are all safe and well.  For my last post of this month I have a couple of quick cards featuring the lovely stamps from last month's shows on tv.

Birthday Mail.


I have used stamps from the Kingfisher Song, Sticks and Stones and Birthday Words sets, Versamark ink, gold EP, pearlescent paints, gold glitter paste, CB Strip Stencil, blue Versaclaire ink and clear EP.  


I used a Gelli plate plate background that I had in my stash of backgrounds and added some gold glitter paste through a stencil.  When it was dry I trimmed the background card , added a border with a gold pen and blended some gold gilding wax along the edges of the card.  


I stamped and embossed the large Kingfisher image on a piece of black card, using Versamark ink and gold EP.  I then painted the image and cut it out. 


I took a white base card and stamped a sentiment and a small image in blue Versaclaire ink.  I used a blue Distress ink to colour the small image.  


I attached the focal panel to the base card to complete the project.  This is a nice quick card that would be suitable for both male and female recipients.

Peaceful Dreams.

I have used stamps from the Kingfisher Song and Trees a Crowd sets, black Versaclaire ink, alcohol pens and a few die cuts from my stash.


I wanted to create my own twist on a black and white card with a splash of added colour, so I opted for a selection of grey tones with bright spots of green.  I took a piece of white card and stamped the stone bridge image in black ink, then added the tall tree scene to one side.  I positioned the images to create scene and perspective and I used a black fineliner pen to add and extend the lines of the scenery.  I then coloured the whole focal panel with my pens.  


When that was done I stamped a sentiment in black then I matted the panel onto black card.  I took a white base card and stamped one of the tree images repeatedly along the top and bottom edges of the card front.  I attached the focal panel and added a few die cuts. 


Thank you for dropping in today, I hope that you have enjoyed this post.  I shall be back next month with some more crafty fun to share with you. 

Until then stay safe and well,


                                     x x Penny x x


Tuesday, 16 June 2020

bejewelled landscape by rachel

Hello there,
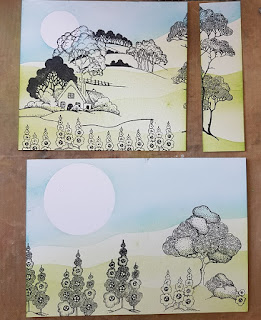
I have another couple of pieces for you today including a step by step for my patchwork landscape card. But first of all my dress form:


I had much fun making this piece - I painted the dress form first then stamped the images onto rice paper and coloured them. I applied them to the dress using decoupage type glue...once finished I made a quick hat out of cardboard and added that to the dress form too!


And so to my card ...To begin I created my card blank ... an A3 piece of card was cut in half along the long edge. Once I had done this, instead of just folding the card in half,  I folded one flap to be very narrow and one flap to be very wide ... I then cut three pieces of card ready to mount onto this card blank.


On each measured piece of card I used a landscape stencil and mask to create land and sky using distress oxides and a stencil brush.

Next I added the stamping.... I tried to allow room for the gap on the front of the card - and also did a bit of masking in order to get the images to work together. I also added some pen lines for more landscape...
Next I added colour to the sun and the stamped features using inks and water colour pencils.

I added these to the card blank and added some sequins. 

I do hope this is helpful - if you have any questions please ask away!

Big hugs

Rachel xx


Saturday, 13 June 2020

Kingfishers (by Veronica)


 Today I have a card to share using the kingfisher song and sticks and stones stamp sets -at least I hope so. Brenda passed on the information that there is a new version of blogger, that we will all have to use from the end of the month. Now i am not the best computer person at anything new , so thought I ought to try the new version while there was still the option to use the one that works! It took me 5 minutes to work out how to start a new post ( a big red + button at the bottom of the screen, so obvious after you've tried everything at the top) 

Back to the easy bit, stamping!
I used a piece of the drawing cartridge to stamp the reeds using grey versafine ink, then masked them off with masking fluid before stamping the smaller kingfisher. The large branch was stamped on the left using black versafine. Used watercolour paints to colour the image, with light washes for the sky , grass and water. The large kingfisher was stamped onto another piece of cartridge using black versafine again, painted, cut out and glued in place on his branch.
Added a mat of black. The white base card was stamped using the bridge image at the top left and the reeds at the bottom right, this time coloured with distress markers so I got  multicololur images


Thursday, 11 June 2020

River King and Solitary Tree.

Good morning everyone, I hope you are all well today.  I have another couple of samples from last months shows to share with you featuring more beautiful stamps from Chocolate Baroque.


River King.

I have used stamps from the Kingfisher Song and Sticks and Stones sets; Distress Inks, sepia Versafine ink, clear EP, Koh-I-Nor watercolour paints.


On a piece of Drawing Cartridge I stamped and embossed the Kingfisher, branch and bridge scene images, then masked them off.  I used water colour paints to create a dawn (or dusk) sky and a calm river scene for the background.  I then removed the masks and painted the stamped images.  I took a spare piece of card and stamped and embossed the Flag Iris image twice.  I then painted them and cut them out.  I matted the focal panel onto dark card, then attached the Iris images in 3D.


On a white base card I stamped several worker images around the edges of the card using Distress Inks then attached the focal panel.


Solitary Tree.

For this quick card I have used stamps from the Trees A Crowd set; Distress Inks, acrylic paints, black Versafine ink, clear EP.


I began this project with a background that I had made previously with acrylic paints and a Gelli plate.  I stamped a large bare tree image in black ink and embossed it in clear EP.  I trimmed the panel and blended ink around the edges.  I then drew a border around the edges of the painted background with a fine liner pen.


I took a Kraft base card and stamped along two sides creating a border to go either side of the focal panel.  I then attached the FP to the card.


Thank you for dropping in today, I hope that you have enjoyed my post and been a little bit inspired.  I shall be back later this month with some more CB samples so until then take care and stay safe,


                                   x x Penny x x

Monday, 8 June 2020

Tree of Hope (by Judith)

Hello everyone, I hope that you are all keeping well in these uprecedented times. Life is still very uncertain for lots of us, and I wanted to create a card with a message of optimism.

I started my project with a piece of kraft card, and stamped a large image from Trees a Crowd, using brown Archival ink. I added a little image from Sticks and Stones as foliage, using first and second generation stamping. I coloured the image using Koh-I-Noor watercolour pencils, and ran a waterbrush only over the first generation stamped images, as I wanted the colours in the other images to remain very soft. I added some colour under the tree to ground the image. A sentiment from Patchwork Landscape was perfect for this card.

To create a border, I ran the edge of an old credit card through the inkpad, and drew it along the card at various angles around the edge of the background. I added some shading with Rusty Hinge Distress Ink.

Thanks for stopping by, and take care,

Judith xx

Thursday, 4 June 2020

Kingfisher Blue

Hello

I'm sharing some of my cards made for the May show on Hochanda.
The stamps I used are from the Kingfisher Song, Sticks and Stones and Trees a Crowd stamp sets.

I love Kingfishers. I live close to a canal and have been lucky enough to spot one, but not for a long time.

My first card uses the lovely medium sized Kingfisher from Kingfisher Song, I've stamped in Memento onto smooth cards and coloured with alcohol markers.I've die cut a simple frame and layered onto some design paper.


My next card I have used the same stamp along with some elements from Sticks and Stones and the main tree from Trees a Crowd. I stamped them all with VersaMark and embossed in silver. I made a moon by sponging VersaMark through Triple Circle stencil and embossing. I mat and layered onto some silver Mirror card and then put onto a black 8x8 card blank.


My last one is on a canvas board. I stamped the large Kingfisher using my stamping platform. I left the stamp in place on the platform whilst I coloured the image in with acrylic paints. I then re-stamped to get all the detail back. I masked the Kingfisher and repeated the technique with the other stamps.

Thanks for looking
Sandra x

Tuesday, 28 February 2017

Gelli Plate Kingfisher (posted by Claire)

Good morning folks, Claire here with a fun card made using the very handsome Kingfisher from Kingfisher Song. I love these stamps and had lots of fun making scenic cards but I couldn't resist giving him a crown for this card lol.


I took a pile of gelli plate backgrounds and chose one for Mr Kingfisher, I also stamped him on another background and added some colour with sparkle pens. I stamped the branch on the gelli plate background and doodles a border with a black gel pen. I cut the kingfisher out and layered him up on 3d foam pads and then matted and layered with white and black card. I took an 8x8 card black and some sequin waste and added some stencilling to the base card using coordinating distress inks. 

I added the sentiment and a few black sequins and as a finishing touch I give him a chipboard crown that was embossed with black embossing powder.

Thanks for visiting today, hope to see you again soon
Claire xx

Friday, 17 February 2017

monchrome bridge (by Veronica)

 I thought I wouold try something different using the lovely bridge stamp from kingfisher song, too nice an image to just use in the background.
i stamped the stones from sticks and stones in the foreground, and then the bridge, with the clouds from the seashore scenes stamp set.
The sky was sponged roughly with distress inks, with white pencil highlights to the moon and clouds.
I used grey brusho powder for the bridge and river, with black and grey watercolour pencils for the trees and stones, with more white pencil highlights.
The second version used a mask for the moon, and the iris leaf stamp repeated across the front to give depth. I added some turquoise brusho powder to the grey this time for the river, and stamped the leaves several times across the base card.
I had great frun doing these, and was pleased with how they turned out, so hope that you like them too.

Saturday, 4 February 2017

Kingfisher (by Veronica)

 Hope you managed to see Lesley's fab shows on Hochanda this week, I had a lovely evening watching the 3 shows I had missed on catch-up - the cat was very happy as it meant she could snooze on my lap without interruptions!
It was great fun spotting my cards on the shows, and I thought that the set looked great with such a variety of samples.


These stamps are all exclusive to Hochanda for 10 days, so if you missed them or only wanted individual sets then you are going to have to be patient, sorry.
The first card uses stamps from both the kingfisher and sticks and stones, coloured with a mix of alcohol markers and brusho powders -actually I used this combination of colours for all 3 cards.


This one uses two stamps from  the kingfisher set and the greeting from the words plate.


main picture uses the same two stamps from the kingfisher plate, with one from sticks and stones stamped in grey on the base card.

There were some really fabulous samples on the show from my teamies, including some that I would have given almost anything to have done!
Do keep checking the blog, as they will turn up at some point this month......

Thursday, 2 February 2017

Kingfisher Compilation (by Judith)

Hello everyone, I hope that you managed to catch Lesley's fabulous One Day Special Shows on Hochanda on 31st January/1st February.  She shared some wonderful techniques with the new stamps, and this month, the Design Team girls will be sharing their fabulous artwork with you on the Design Team blog, as well as on their own blogs and on social media, like the Chocolate Baroque Facebook Group.

I have a couple of cards to show you today that were featured on the TV shows, which utilise several of the new stamp sets. I love to mix and match stamp sets, and so having lots of new stamp sets to work with all at once was just perfect for me.

For my first card, I created a gelli plate background, using blue and green Distress Ink, and used the bubbles stamp to stamp directly onto the gelli plate before I took a print from the plate. I then stamped a couple of the kingfishers onto the card, and masked them. I added branches and foliage, using coloured ink, and then used the bubbles stamp once again to create foliage for the branches. I coloured the birds with watercolour pens and a water brush. I edged the panel with teal coloured ink.

I stamped a greeting onto some sage green seam binding ribbon, using Archival Ink, and then adhered the ribbon across the bottom of the scene, before attaching the panel to my card.

To create my second card, I stamped the large Kingfisher onto a piece of smooth watercolour paper, and masked the image, before stamping the large branch a couple of times. I added several colours of Brusho powder, and spritzed them with water, blotting off the excess liquid with a spare piece of card. (I saved this piece of card for another project). Once the background was completely dry, I stamped the small leafy sprig using three different colour greens, and I used first and second generation stamping to give a feeling of depth to the foliage.

I removed the mask from the Kingfisher, and coloured the image with watercolour pencils. I added a sentiment, and edged the panel with teal coloured ink, before matting the panel onto a deep green card.

Please do keep visiting the blog each day for more beautiful designs from my team mates. Thanks for stopping by, Judith xx