

Friday, 30 September 2011
Krafty Robins by Judith Smith
When I received these fabulous new Christmas stamps, the lovely robin images appealed to me the most. I decided to create a very simple colour scheme for this particular sample, choosing Kraft and green as my base. I stamped the large image onto a piece of Kraft card with Adirondack Snow Cap ink, and coloured the image with Polychromos pencils, before blending them with a blending solution. I then stamped the smaller image onto the corner of an 8" x 8" piece of Kraft card, colouring it as before. I cut a frame in the centre of this piece of card, cutting around the outside of the robin. I made a mount of green card to fit inside the Kraft frame, which I then placed over the larger image.
 Some gems in the centre of the snowflakes add a little bit of Christmas bling to an otherwise simple card. Keep popping back to see what the other Design Team members have created this week. Thanks for stopping by, Judith xx
Thursday, 29 September 2011
Ring Out Those Christmas Greetings .................(posted by Lesley E)
Hi Everyone,
Today I'm sharing a card made using one of the beautiful new stamp sets which is called Christmas Cheer. I love the greeting on this set as it looks like a pretty hanging sign and I also love the bell surrounded by mistletoe (as well as all the others, lol!).
 I started by making an A5 tentfold card from pale green pearlescent card, and the rest was just matting and layering having first stamped the mid green pearlescent layer with the bell and mistletoe using Onyx Black Versafine ink. I heat embossed with clear embossing powder and then coloured the bells with metallic gold paint and the mistletoe with Lumiere paints in green and red before matting onto the darker green pearlescent and mounting that onto the card base.

I stamped the Christmas Greetings onto white card, again with the Versafine and clear embossing powder and then softly blended a little Pine Needles Distress Ink. I matted this onto gold mirri card and mounted this onto the card with 3D foam pads.
This was quite a simple card but the greeting stamp is so beautiful it really doesn't need much.
Keep your eye on the blog because there is lots more inspiration to follow from the team this week.
Hugs
Lesley Xx
Today I'm sharing a card made using one of the beautiful new stamp sets which is called Christmas Cheer. I love the greeting on this set as it looks like a pretty hanging sign and I also love the bell surrounded by mistletoe (as well as all the others, lol!).


I stamped the Christmas Greetings onto white card, again with the Versafine and clear embossing powder and then softly blended a little Pine Needles Distress Ink. I matted this onto gold mirri card and mounted this onto the card with 3D foam pads.
This was quite a simple card but the greeting stamp is so beautiful it really doesn't need much.
Keep your eye on the blog because there is lots more inspiration to follow from the team this week.
Hugs
Lesley Xx
Wednesday, 28 September 2011
New Christmas sheets.......my first creation
Hello there,
Today I would like to show you my first creation with those new gorgeous Christmas stamps! I have worked with the 'Fat Robin sheet'. They are so great to work with and I would make a compliment to that talented designer of these stamps! I have chosen for those pretty little birds sitting on that table and eating the berries. I have stamped them with several colours of Brilliance ink. So here and there I've added some extra colours with my Derwent pencils. The background paper is from Christmas greetings and I used also the Crealies flowers. I have coloured the seam binding with Copics....works really great! Also added some lace ribbon and a holly embellishment. I have used Petals no.6 and shapes no.17.
Well hope to have inspired you and see you next time,
have a nice creative day,


Shine a light at Christmas (posted by Elaine)
I have been working with the lovely new Peace on Earth and Stained Glass Christmas plates to make this 8 x 8 card. You can find the new Christmas stamps here. I wanted a luxurious feel so worked in black velvet and gold.

I stamped the images and embossed in the fabulous Ranger Queens Gold embossing powder. I added red, gold, block and white opaque glitter to the stained glass panel using a fine glue pen. I added a sentiment from an older plate Light of Christmas embossed in gold.
I added some of my favourite tiny gems to the lamp for a flame and as detailing.

I finished off the card with a gold star, more tiny gems, gold ribbon and large black gems and matted the panel onto gold mirri.
Christmas will be here before we know it so it's time to get cracking on those special cards.
Elaine
Tuesday, 27 September 2011
Faux Snow Globe by Judith Smith
Hi folks, I just wanted to share this card that I made using one of the lovely images from The 'Fat Robin' set of Christmas stamps just being released at Chocolate Baroque I really like this little scene with the robins on the bird table, with the Christmas pud and the mince pie! I decided to create a faux snow globe effect, by using triple embossing, but adding thick white glitter in the second layer of the embossing.

I placed the image onto some of the lovely Spirit of Christmas papers, now available as a download from Chocolate Baroque. I then created a flower from polymer clay, using the Steampunk flower from the 'Steampunk Christmas' stamp set, painting it with acrylic paint once it had been cooked. The leaves are simply the larger flower stamped onto green card.

Some gingham ribbon, mesh and curly wire complete the card. Don't forget to keep checking back to see what the other Design Team members have created with these new stamps this week. Thanks for stopping by, Judith xx
Monday, 26 September 2011
Little Robin Red Breast by ikki
Hi, today I would like to show you my card using stamps from the Fat Robin set...

Materials used:
Cardstock – A4 dark turq, white
Stamps : Chocolate Baroque – Trees, robin, snowflakes
Perfect Medium
Adironack : oregano
Embossing powder : gold, clear
Glitter pens: red, green
Glossy accents, gems, glue stick foam pads
Method:
Make a 6" x 6" tent card. Randomly apply a glue stick round the edges, cover with gold embossing powder and heat emboss. With a green inkpad, stamp the snowflakes, and just the leaves from the robin stamp round the edges – cover with clear embossing powder and heat emboss.
From remaining cardstock, cut a strip approx 2.l/2" x 5". Stamps trees with Perfect Medium, cover with gold embossing powder and heat emboss. Stamp snowflakes and round edge of strip with green inkpad, cover with clear embossing powder and heat emboss. Colour the trees. Add gems.
Cut another strip of card 2.3/4" x 5.1/4". Apply glue stick to edges, cover with gold embossing powder and heat emboss. Add topper, and mount on base card using foam pads.
Using Perfect Medium, stamp the robin on spare card and cover with gold embossing powder and heat emboss. Cut out and add a touch of colour to the robin. Add to the card using foam pads.
Robins, holly and Christmas trees - favourites of mine for Chrissie cards and I'm not going to mention how many days.... to go, but it's defo getting time to start thinking!!!!!
Enjoy your day,
ikki
Enjoy your day,
ikki
Sunday, 25 September 2011
Introducing Claire
 I am delighted to introduce a new face to the Design Team, Claire Chapman who has been a fan of our stamps for quite a while. Claire has been good enough to answer a few questions that I put to her on what it is that inspires her and why she loves our stamps so much.
Click on any of the images below for a larger view.


 How did you first hear about Chocolate Baroque?
 I'd been a huge fan of Elusive Images and Graphicus for a long time since seeing Glenda demonstrate on Create and Craft. I was immediately hooked on the style and elegance of the designs and began my collection of stamps. Soon afterwards I joined the Graphicus Guild and learnt so many techniques from the monthly newsletter. I was lucky enough to find out about Chocolate Baroque as soon as it was launched through the newletter emails and placed my first order that very day.
 What is it you like about our stamps?
Chocolate Baroque stamps have their own style and elegance and of course the quality is always superb. The stamps are really well thought out, they work together so well and I love the fact that I can often mix and match stamps from new themeplates with some of the stamps I have had for years. Chocolate Baroque stamps seem to bring out the best in my crafting,
What was the first set you bought?
The first set of stamps I bought was a set of 3 DL sheets, Unicorns, Gossamer Wings and Dragonfly Faeries. I fell in love with the delicate images and I still use them all the time. They are perfect for brayered scenes which I love to make but they combine beautifully with lots of other stamps. I've made so many projects with these stamps and they have all been different, everything from cards to canvases and even jewellery.
Do you have a favourite stamp set?
Its really difficult to choose a favourite stamp set, rather like asking a mother to choose a favourite child lol. Usually its the set I'm currently working and at the minute I'm really enjoying Steampunk Christmas but if I was on a desert island and could only have one set it would have to be Peacock Ladies. This is another set I've used again and again and the stamps lend themselves to so many different techniques they would keep me amused for a long time. I think the set I use the most though is Autumn Hedgerow, this set is always on my workdesk as I use it all the time. The stamps are perfect for creating backgrounds and adding depth to any scene.
Where do you get your inspiration?
I get inspiration from so many places sometimes from crafting magazines or blog hopping. I often find ideas pop up when I'm out and about and see a colour palette in a shop, a beautiful sunset or leaves blowing from the trees. I've had a huge amount of inspiration from the Chocolate Baroque Guild and also browsing all the beautiful artwork on the Chocolate Baroque Group too. Most of my ideas come from the stamps themselves though, as soon as I get new stamps I think about how I'm going to use them, what techniques and materials I want to use and make some notes so I don't forget
Do you have a favourite technique?
My favourite technique is probably trying new techniques. I love making my own background and just messing around with paint and ink. I think my absolute favourite technique is masking as its so useful and can be used in projects. It always seemed very complicated but once I'd got the hang of it I find it gives my stamps a whole new lease of life as I can combine several stamps in one project and get a seamless result . I didn't have a lot of luck with post it notes but now I use Eclipse masking tape and get a much better result. My other current favourite is colouring with pencils and promarkers, I recently took one of Glenda's online courses through My Creative Classroom and I've learnt so much. I find it so relaxing to sit and colour after a long day at work
Do you have any tips for beginners?
Tips for beginners..... I think my top tip would be to have a go if you see a technique or project that you really like. A new technique often takes a bit of practice so don't worry about making a mess of things. If it goes wrong you're only throwing some paper or card and often you'll be surprised at what you can do.
My other tips are to use tack'n'peel on your acrylic blocks instead of EZmount if you need to save some pennies and to dust your fingers with an antistatic bag before you handle glossy card for brayering so you don't get fingermarks on the card.
What’s on your Chocolate Baroque wishlist right now?
As a Chocolate Baroque addict, my wish list is always very long but at the top right now is the gorgeous Nature Swirls A4 themeplate which I haven't got around to getting yet. I love the combination of elegant swirls and the whimsical owls and birds in the tree. I've also got my eye on Family Christmas too, I don't know how I resisted that one last year but it will be perfect for traditional Christmas cards especially with the new Spirit of Christmas downloads.
You can see more of Claire's artwork on her blog, Claire's Crafty Creations or on our community site and Claire will be sharing some of her first DT projects both here and on her own blog very soon.

Friday, 23 September 2011
Yummy Scrummy Christmas Stamps
OK, I know you have all been waiting to see these, so here are the latest Chocolate Baroque Christmas stamp sets.
Firstly we have Fat Robin - a full A4 sheet of gorgeousness.

Then we have three A5 sets which are all so incredibly versatile and usable.


The girls have all come up with some stunning artwork to illustrate the possibilities of this set and we have a series of blog posts scheduled over the next few days, so do check back or subscribe to our blog feed so you don't miss out.
I am doing a blog candy giveaway, but I've decided to do it over on my own blog for a change - it's been a while since I did that, so pop over to glendawaterworth.com and check out some of my Christmas makes with these delicious new stamps.
And please check back on Sunday - I have a new Design Team member to introduce to you all!
And please check back on Sunday - I have a new Design Team member to introduce to you all!
Monday, 19 September 2011
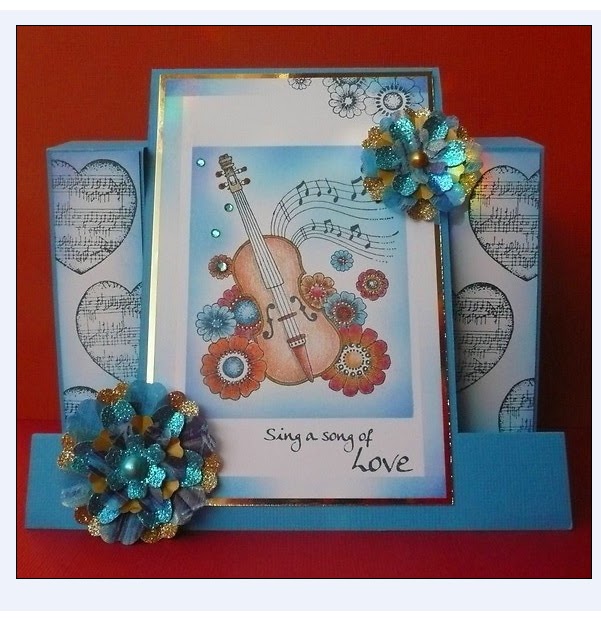
another musical note.........
Hello there,
The 2nd one made with the 'Music Fanfare' sheet. I have used the center step card model. You can find the video tutorial from Glenda here. I have used my Derwent pencils for colouring and sponged the rectangle with Colorbox pigment inks. Also the panels with the hearts are sponged. Beneath I have put some mirri paper. The flowers are from Crealies.(no.6) Just added some gemstones and if you take a closer look you can see a bit of rainbow colours in the top of the card. I have a rainbow crystal hanging in front of my window and when the sun is shining it adds those colours on my photo's.

Hope you have a lot of inspiration by now made by all the girls of the DT team! So enjoy your stamping,
 creative greetz,
The 2nd one made with the 'Music Fanfare' sheet. I have used the center step card model. You can find the video tutorial from Glenda here. I have used my Derwent pencils for colouring and sponged the rectangle with Colorbox pigment inks. Also the panels with the hearts are sponged. Beneath I have put some mirri paper. The flowers are from Crealies.(no.6) Just added some gemstones and if you take a closer look you can see a bit of rainbow colours in the top of the card. I have a rainbow crystal hanging in front of my window and when the sun is shining it adds those colours on my photo's.
Hope you have a lot of inspiration by now made by all the girls of the DT team! So enjoy your stamping,
Saturday, 17 September 2011
Ideal for a Chess fan

When we recieved our stamps for making samples I recieved the Music Fanfare which I love but with my Hubbys birthday around the corner thought the Art of Chess would be ideal for him.
This is an 8x8 card backed with paper. I cut out a square from acetate and used as a mask along the sides as a suggestion of a board. The chess pieces are stamped in black and brown and the edges are distressed. The centre image is stamped with Brilliance Tiramisu and clear embossed. I turned the ink pad as it isn't as big as the stamp. The shading around the sun is Antique Linen Distress Ink so the white of the palace stands out. I mounted onto brown and black then finished with a sentiment.
Keep popping back as there will be more inspiration coming from the Design Team.
Debbie
Friday, 16 September 2011
A Random Blog Winner
I mentioned a while ago that I might do a random giveaway and I have gone through all the comments since we launched Music Fanfare and The Art of Chess, put the names into the random number cruncher and come up with a winner.
And that winner is ...
Marja's Stamp Addiction
Marja - I can't understand Dutch, but the pics on your blog are just gorgeous. Can you get in touch with me please and send me your address so I can send a little something to you.
Next week we are launching our main Christmas collection - be prepared to have your stamping tastebuds tickled pink!
Tuesday, 13 September 2011
Music is my first love and it will be my..............

Music is my first love and it will be my last.....a great song from John Miles. And indeed music is a very important part of my life, so this sheet is fantastic to play with.
I want to show you my creation with that beautiful music sheet. I kept the stamping very simple, so it will be great for a beginner.This time a diamond folded card. I have used an embossing folder for the musical notes and sponged it with Distress Ink. Also used the Crealies flowers/leaves and clef. As you can see I stamped the flowers with the music notes stamp. I stamped the instrument with black and gave some accents with a white pencil. I stamped the clef onto the other areas which you can see in between. Hope to have inspired you and see you next time,


Friday, 9 September 2011
Show Stockists wanted

I am getting so many enquiries about whether our stamps will be at Ally Pally, Harrogate, the NEC, etc, that we would really like to have our stamps out there at shows. Adrian and I have no intention of doing any of the shows ourselves so this is a fantastic opportunity.
We would be happy to grant exclusivity on a show by show basis, so if you are looking for a brand with exciting and popular designs, service second to none, show special pricing, and marketing support, then please get in touch. Please email trade@chocolatebaroque.com and let us know which shows you are going to be attending.
For all of you who are off to the shows to shop 'til you drop - if you have a favourite stand, why not let them know what we are looking for and ask them to get in touch. Hopefully we will be able to have Chocolate Baroque well represented for you at shows in the future.
Tuesday, 6 September 2011
Red, Gold, Cream and Brown (posted by Judith)
Hi Folks, well here is another submission from me, using the lovely 'Music Fanfare' set of stamps just launched this week. The title of my post sounds a bit like a colour challenge, doesn't it? I set out to use this colour combination when making my project and the title just stuck.
 I embossed a path of treble clefs streaming across the card in gold, and then sprayed a mixture of red mists across them. I then stamped some of the flowers from the 'Filigree Fusion' stamp set onto cream card and cut them out, adding brown buttons to their centres. I cut brown Crealie leaves to put behind the flowers. The music fragment and floral instrument were stamped onto cream card and 'aged' with Distress Inks.
The mixture of stamps on this music plate is really lovely, and so versatile. It is such a useful set for male and female cards. Keep checking back for more samples from the Design Team this week. Thanks for stopping by today, Judith xx

The mixture of stamps on this music plate is really lovely, and so versatile. It is such a useful set for male and female cards. Keep checking back for more samples from the Design Team this week. Thanks for stopping by today, Judith xx
Monday, 5 September 2011
Mini Tag Pocket Folder (ala Tim Holtz and posted by Lesley E)
Hello Everyone,
I have another project for you today using the Art of Chess stamps together with a few more from the Chocolate Baroque catalogue. I made the little pocket folder using a method demonstrated by Tim Holtz on his DVD An Altered Journey.

I used watch stamps and a mesh background stamp to build up a background on the lightweight card I used for my little folder and I tore relevant definitions from an old dictionary to stick in strategic places once the folding was complete.

I blended inks onto my tags and used some sequin waste as a mask. I also did some background stamping. I stamped and embossed the chess pieces onto white card, cut them out and shaped them slightly and adhered with silicone glue to the tags.

On the inside of the folder I stamped some of the smaller chess pieces into melted UTEE (clear UTEE with some ordinary Burgundy Embossing Powder added) using a Brilliance inkpad and again used silicone glue to attach them.
 For these two tags I pressed my Distress Inkpads onto my craft mat and spritzed lightly with water. I scrunched up my tags and opened them out again before pressing them into the ink and then ironed them dry between copy paper. I followed this with background stamping on the tags and then this time I stamped the chess pieces onto Glassine using Versamark ink and Sticky Stuff before adding the metal leaf, cutting out and adhering to the tags.
I'm sure there's more to come from the rest of the team so keep watching.
Hugs
Lesley Xx
I have another project for you today using the Art of Chess stamps together with a few more from the Chocolate Baroque catalogue. I made the little pocket folder using a method demonstrated by Tim Holtz on his DVD An Altered Journey.

I used watch stamps and a mesh background stamp to build up a background on the lightweight card I used for my little folder and I tore relevant definitions from an old dictionary to stick in strategic places once the folding was complete.

I blended inks onto my tags and used some sequin waste as a mask. I also did some background stamping. I stamped and embossed the chess pieces onto white card, cut them out and shaped them slightly and adhered with silicone glue to the tags.

On the inside of the folder I stamped some of the smaller chess pieces into melted UTEE (clear UTEE with some ordinary Burgundy Embossing Powder added) using a Brilliance inkpad and again used silicone glue to attach them.

I'm sure there's more to come from the rest of the team so keep watching.
Hugs
Lesley Xx
Sunday, 4 September 2011
A bit of paper weaving (posted by Judith)
I was very pleased to be able to work with the new set of stamps 'The Art of Chess' when Glenda sent these to us, as I thought that they would be perfect for men's cards. (I also have a fabulous idea for a girly card too, using these stamps!) I decided to keep my colour scheme very simple, and just use black and white.
I marked 11/2 cms sections at one side of my card, and wove white card strips through my top black piece of card, to create the illusion of the chessboard fragment. For balance, I used a fabulous large swirl from the 'Butterfly Dreams' stamp set, which I embossed in white in the opposite corner. I stamped the sentiment, and mounted it onto a Nestability frame, fixing it to my card with two white brads. Finally, I stamped two large chess pieces onto glossy card, one black, and one white.

These are great stamps, look out for more Design Team samples coming your way this week. Thanks for stopping by, Judith xx
Saturday, 3 September 2011
Colour my life with music by ikki
When I first saw this new stamp from the Music theme set, I knew I wanted colour and a dramatic look to set of the beautiful image! Black, White and Orange gave me this look.......

Materials used:
White textured 6 x 6 card
Cardstock: black, white
Nestabilies: Large square #7/ Grand square #1
Stamps: Music
Ink: Black Memento
DI's: rusty hinge, dried marigold, spiced marmelade, mustard seed
Scoreboard
PC generated sentiment
Thanks for dropping by,


I really enjoyed creating this card with my distress inks and a masking technique using post-it notes. I stamped the image on the slant to correspond with the PC generated sentiment, then placed 3 post-its round the image and applied ink. With the completed section covered with another mask you can continue to colour the other sections with different but toning inks by just moving the masks about. This is a simple way to give drama and highlight an image if you don't mind getting inky fingers!
Materials used:
White textured 6 x 6 card
Cardstock: black, white
Nestabilies: Large square #7/ Grand square #1
Stamps: Music
Ink: Black Memento
DI's: rusty hinge, dried marigold, spiced marmelade, mustard seed
Scoreboard
PC generated sentiment
Thanks for dropping by,
Friday, 2 September 2011
If Music be the Food of Love! (posted by Elaine)

When I saw the music and hearts on this lovely stamp plate this quote popped into my head!
I strated off with a cream background and added treble clefs and the curvy music staves part of the violin stamp to make up a background using Hazel Adirondack dye ink and colouring with Peach Bellini Addirondack and Frayed Burlap and Vintage Photo DI.I then heat embossed various elements from the stamps onto gold and copper pearl card using contrasting gold and copper EP and cut them out using tiny scissors. Using the curled leaf from the Brocade Background plate, I stamped in Russet Archival ink and coloured in Wild Honey, Frayed Burlap and Vintage Photo Distress Inks. I mixed these with some brown paper leaves to make a trail across the card. I finished the card with a computer generated sentiment coloured with the same inks and cut out with a nestie, added gold ribbon and ric rac and some amber gems.
Keep popping over this week to see what the other girls have been up to with these new stamps. We hope you feel inspired by our ideas.
Elaine
Ebony and Ivory? (posted by Lesley E)
Hello Everyone,
When Glenda first sent us these lovely chess stamps I immediately thought of cards for men but once I got to work with them I thought they would also make lovely feminine cards too especially with the scenic image which is rather romantic. I don't play chess myself but when I see chess sets I always think of Steve McQueen and Faye Dunnaway in The Thomas Crowne Affair, lol!
Anyway, here is my first project using this lovely set of stamps.

I started with an ivory 8" x 8" base card and punched a border across the top and bottom front edges. I punched the same border along the edges of a piece of black perlescent card and trimmed them off the main piece adhering them behind the borders on the front of the card. The piece of black card which was left I embossed down the right half using the Tim Holtz Texture Fades Checkerboard embossing folder and then sanded off the black surface before adhering to my card front.
I stamped the main image onto ivory card using black Versafine ink, trimmed to the size I wanted and then added touches of colour with Coloursoft pencils. I masked the image and dusted Stormy Sky Distress Ink round the top half of the border and Bundled Sage round the bottom border and I then matted it first onto black perlescent card and then ivory card before mounting onto the card front. Finally, I stamped the King onto white card with black ink and the Queen in white onto black card before cutting them out and positioning them together with the stamped sentiment onto the right side of the card.

I think the chess pieces on this stamp set are excellent for making tags or ATCs too and they also combine well with several other sets. Keep an eye on my own blog for a card I made recently combining them with the lovely music set and I know there are more projects coming up from my Design Team buddies so lots of inspiration to come.
Hugs
Lesley Xx
Thursday, 1 September 2011
Beeswax and Butterflies (posted by Judith)
Hi Folks, when I received these lovely stamps from Glenda, I had also just bought some lovely chalk inkpads too. I decided that I would like to combine the two elements in a projects, and this card came about. I created a lovely soft background using three different coloured chalk inkpads, blending them together, and then stamping some swirls from the 'Nature Swirls' set around the edges.
I then stamped the music fragment and several hearts onto some cream card and cut them out. I covered all of these with melted beeswax, and then placed the hearts into a flower shape with a brass flower embellishment. I stamped the gramophone from the 'Music Fanfare' stamp set and two butterflies from the 'Butterfly Flourish' stamp set which I cut out and coloured with pencils. I added Glossy accents to the bubbles on the gramophone image, and used a Tim Holtz swirl behind my flower to complete the card.

Keep checking back for more lovely samples from the Design Team this week, using the new stamp sets. Thanks for stopping by today, Judith xx
Music and Chess
We have a couple of new stamp sets just released this week - Music Fanfare and The Art of Chess.


People sometimes ask me about the sizes, so these are both A5 (half sheets) which makes them approximately 14cm x 20cm (8.5 inches x 6 inches).

I created a center step card with the chess stamps and liked the format so much I created a template with instructions. Click here for the template. I know people learn in different ways and templates work for some people, but others prefer to measure everything, so I put all the measurements on my template, then filmed a short video showing how easy it is to make. You can find the video on YouTube - click here to visit my YouTube channel.
The DT have once again created some beautiful artwork with these stamps and we have quite a line up of blog posts waiting to be published, so please check back often over the next few days as there will be lots to inspire you.

The two sets are available as a multi-buy deal too and you never know when I might just take it into my head to do a random giveaway!
Happy stamping!
People sometimes ask me about the sizes, so these are both A5 (half sheets) which makes them approximately 14cm x 20cm (8.5 inches x 6 inches).
I created a center step card with the chess stamps and liked the format so much I created a template with instructions. Click here for the template. I know people learn in different ways and templates work for some people, but others prefer to measure everything, so I put all the measurements on my template, then filmed a short video showing how easy it is to make. You can find the video on YouTube - click here to visit my YouTube channel.
The DT have once again created some beautiful artwork with these stamps and we have quite a line up of blog posts waiting to be published, so please check back often over the next few days as there will be lots to inspire you.
The two sets are available as a multi-buy deal too and you never know when I might just take it into my head to do a random giveaway!
Happy stamping!
Subscribe to:
Posts (Atom)