Pin It button on image hover

Monday 31 January 2022

Mini Works of Art Part 3 (by Zoe)

Good morning Lovelies and welcome to my final post of the month featuring these gorgeous little Mini Stamps

I made this cute little Journal page and used it as a topper for a little card.

I used a combination of the mini mail-art and mini meadow stamps. I stamped some of the meadow stamps in just ink and some I added glittery embossing powder to, just to add some extra texture, tiny little butterfly die-cuts from my stash.

A bookmark which I used a gel press print from my scrap box for the background.


Thank you for visiting today. Have a wonderful day xx Zoe xx

Sunday 30 January 2022

Small But Perfectly Formed by Doreen

 Small But Perfectly Formed 

I really can not believe that it is almost the end of January already, but for today I would like to share my third and final post of the month.

These samples use four sets of mini stamps that are just delightful, they are perfect for ATC projects, making frames, bookmarks, art for keyrings and the list goes on. 

This photo contains 3 Bookmarks simply made using just Versafine Clair Shady Lane and Distress Inkpad Vintage Photo.


This next card uses The Teeny Weeny Meadow  Versafine Clair Nocturne, Distress Oxide Abandoned Coral and Old Paper Inkpads.


Saturday 29 January 2022

Using small stamps: Spotlights and panels by Natalie Ballard


The Teeny Weeny Meadow rubber stamp set is perfect for playing with panel and spotlight designs. In the sample above, I used an offcut of stamping card as an initial layout idea, and I loved this idea of a bold panel of colour offset to one edge.

Stamp or blend first?

The answer to this is how clear do you want your silhouette to be? If you want it crisp and true black, then stamp last; for a softer look, stamp first. In the sample above, I stamped and then blended over to soften the look. I also stamped secondary impressions to create a scene with trees fading into the distance.

Beginners will find it easier to blend with Distress Oxide inks or another hybrid ink, but you don't want a perfect ombre for this type of card. Allow some of your brushstrokes and movements to show and you will get the impression of clouds.


Another option is to skip the blending altogether, and just focus on the stamping. Here, I created a mirror image using a gel plate to reverse the stamp. Once you have stamped the reverse image, use the second impression to stamp the right way. This was the ink colour should match in intensity.

You could also do this as a background image and highlight just a section with colour. This is known as a spotlight and it is useful when you want to guide the eye to a feature point.

Friday 28 January 2022

From Gold To Bold (By Tracy Thompson)


I'm back with some more of my creations that I made for the shows on The Craft Store in December, we had so many stamps to work with and they were all very inspirational.  My first card I created using Ophelia, I did the background first with rich bold colours in Distress Oxides, which I carried over into the collar and the flowers in Ophelia's hair, the flowers were decoupaged and a pearl added to the centre of each one.  The sentiment I got from the stamp set also on the shows The Folk Art Garden..


Now to create this next one I kept it simple to get an elegant effect.  I stamped my image Song thrush and coloured it with just a gold gel pen, which just left the matting and layering to do in gold and black card.  That's it, it really was an easy creation but I love the finished look.

Thank you for popping by

Happy crafting

Tracy x

Thursday 27 January 2022

mini stamp ideas by Rachel

 Hello there! Rachel here for my final post as a regular DT member - its been a pleasure working on this team but I find myself moving in a different direction and heading off on a different road!

These small stamps can be used in so many ways - as the other DT member have already shown this month - here's a couple of ideas from me..... simple stamping to create a wreath....


masking off the card to produce a stamped border ...


And using stamping and stencilling together to create a tag.


Have a great day!
Thanks for your time!
Rachel x


Wednesday 26 January 2022

Song Thrush (by Andy)


Hi All

Thank you for stopping by.

Another card for you this week featuring the Song Thrush and Damask Panel, which I think go quite nicely together. A card which can be used for a multiple of occasions. Enjoy.

You will need:

6" x 6" (15 x 15 cm) white card blank

White stamping card

Versafine Majestic Blue ink pad

Archival Watering Can ink pad

Water based markers

Gems

Pearlescent paint


Begin by taking the Damask Panel and inking up the Majestic Blue ink pad and stamp the image to the left of the card blank.

Stamp the Song Thrush with the Archival Watering Can on to the white stamping card.

Colour the image with your water based markers.

Paint some of the flowers with the pearlescent paint, but don't overdo it.

Once you are happy, cut out (be careful with the parts that go outside the shape).

Mount over the Damask Panel using foam pads if you so desire.

Add blue gems to top and bottom right corners of the card.

Job Done


Andy xx 

Tuesday 25 January 2022

toadstools (by Veronica)

For my last post this month I am sharing two versions using the Toadstool Garden stamp set from the December shows.                               
The first version of the main image was stamped in black versafine and mostly coloured with grey pencils, apart from the actual toadstools which wwere coloured with marker pens. A very simple edging created by rubbing the card over the ink pad before mounting onto a card blank
The second version of the stamp, also stamped in black but this time coloured with marker pens before mounting first onto a balck mat and then onto a card blank
I used a variation of the first card to make the small card using the songthrush stamp , but here I coloured some of the bckground as well before colouring the bird in blue.. The image was fussy cut out round the edge before mounting onto a blue card blank


Monday 24 January 2022

Give Me Five! (by Sandra)

Hello everyone, I am sharing the last of my cards made for the December show on The Craft Show.
This was a set of 5 stamps on an A4 sheet, but they are available individually on the Chocolate Baroque website as well.


This card uses the Damask Panel.
I stamped the panel onto red card and green card in VersaMark and gold embossing powder. I then cut each piece to make them square. I cut a square of gold card and glued on the green squares, before the glue dried I tucked in the red pieces in a pinwheel style. I added a gem to the centre and a couple of gold leaves.


My next card uses the Fountain Scene set. 
I stamped onto grey card with Archival ink and coloured in the scene with pencils. I cut two strips in design paper and mat and layered all pieces in black and adhered to a 7x5 card base.


My next card uses the Lady in Hat stamp.
I stamped the image in Memento ink and coloured with alcohol markers. I die cut the image with a circle die and then layered it onto a toning decorative doily die. I finished by adding some corner pieces.


My next card uses the beautiful Ophelia stamp.
I stamped Ophelia in Memento and coloured with alcohol markers. I found a 6x6 backing paper to which I added one of the tags from a previous show. I also added some stamping from Mini Scripts to the tag.


My last card today is Song Thrush.
I stamped in Memento and coloured with alcohol markers. I added some gloss to the berries.
I picked out the pinks and greens for my layers and adhered to a 7x5 card base.


 Thanks for looking

Sandra x

Sunday 23 January 2022

Natural Shades (by Judith)

Hello everyone, I hope that you are keeping well. I have a couple of projects to share with you today featuring stamps that were showcased on last month's TV shows on The Craft Store.


My first card features stamps from the Mini Scripts stamp set. I created a grid using very fine masking tape, and coloured each segment using Distress Ink. I stamped some of the script stamps randomly in the segments using black ink.I chose to leave a few segments plain, as I felt it would be too dark if I stamped in every segment. I carefully peeled the tape away to reveal the tiled effect. I added a large sentiment from Birthday Words stamped onto a die cut which I had also coloured with Distress Ink.

TIP: The masking tape was a little bit too tacky, and I would ensure that I had placed it on something first before using it, so that it had lost a little bit of its stickiness. You can see where a couple of pieces of the design have been pulled if you look carefully. However, I want you to learn from my experiences, which is why I am pointing this out 😉

My second project is a remake of another project, using the Song Thrush stamp and a lovely leaf from Brocade Backgrounds. I coloured some Drawing Cartridge with some tea, and left it to dry. I stamped the main image, and then used a larger piece to stamp the leafy image randomly to create a background. I coloured all of the image with pencils, and blended them with a waterbrush.

I matted both pieces with dark brown card before adhering them to the base card. I hope that you have enjoyed seeing my projects this month. I will be back next month with more projects to share with you. Thanks for stopping by,

Judith xx
 

Saturday 22 January 2022

Be Strong by Rachel

 Hello there,

Rachel here today with my makes from the morning show later in December. I love all the stamps featured here - they are so very beautiful! In this first one I did a little repeat stamping then enjoyed colouring the Ophelias using water colour pens.


I used water colour pens again to colour this image and added it to a black background. I also added some repeat stamping to the card blank.


More water colour pens - you can just tell I was enjoying colouring these images in can't you?


And yes - you've guessed it - more water colour pen colouring - this time with more pastel shades.


Finally I was a little more inventive and used this stamp to create a porcelain piece. I stamped in ink then overpainted in glaze before firing in the kiln at PottyRoos in Morecambe.

My penultimate post for Chocolate Baroque. I hope i have brought you a little inspiration!
Big hugs
Rachel x


Friday 21 January 2022

Mini Works of Art Part 2 (by Zoe)

Good morning Lovelies and welcome to my second post this month.

Today I'm posting my samples from last month's The Craft Store TV show featuring these fabulous Mini Stamp sets.  

I made a couple of ATC framed envelopes from my stash using the Mini Meadow stamps.


And a masculine style craft card using a spray ink and mostly the mini Curiosities, also a little die cut from my stash which I stamped from the mini crackle.

Thank you so much for spending your time visiting today, I hope you liked my creations. 

Have a wonderful day xx Zoe xx

Thursday 20 January 2022

Lady in Hat by Doreen

Lady In Hat


Hello everyone, I hope by now we are all settled in nicely to our New Year and that you are all keeping well.

Today I have two cards using the Lady in Hat stamp which to me has a very sixties feel about it, as I am more than old enough to remember this era.

The first is more subdued with its colours but reminds me of the colours used then they were either bright and bold or a more subdued but colourful alternative. I have to say I like either. 

For the first card I have used  a piece of the Chocolate Baroque papers to stamp on which lend themselves to the colour palette I wanted to achieve, I used a clear sparkle brush pen to apply colour using Koh-i-Noor Watercolour Pencils, plus some embellishments from my small stash of gems using a gold colour to lift the background a little.


The second is a little brighter using only shades of blue and pink, I have used  Gloss Card and Stazon inkpad plus Koh-i-Noor Pencils to colour, plus some small donut metallic gems from my stash of little things that sparkle.  


Thank you for looking in Today

Love Doreen


Wednesday 19 January 2022

Mail Man (by Andy)


Hello Peeps

This is a straightforward card I did for the December show. A nice masculine card. Naturally you can change the colour to browns and use cream card as the base which will be just as effective.

You will need

A5 card blank

Majectic Blue Versafine ink pad

3 die cut squares and scalloped squares to mat on to

Man and lamp post die cut

Using the Majestic Blue randomly stamp several images from the Mail Art stamp set on the top half of the card blank.

Using the same ink stamp a single image on to each of the white squares. Mount onto the blue scalloped squares. Attach to the left-hand side of the card, slightly overlapping the top and bottom corners.

Die cut the man and lamp post and attach to the front of the card.

Job done

Enjoy

Andy

Tuesday 18 January 2022

Haberdashery (by Magda) - Floral Mannequins, Haberdashery, The Sewing Room

 Hi,

I think it is time to have something new in the wardrobe, but before going for shopping  a browse in a haberdashery brought me to have this result.   As you can see here below stencils, Distress Ink Pads, "Haberdashery", "Floral Mannequins" and "The Sewing Room" rubber stamps gave life to3 ATCs and a card.


Who of you would like to join me for shopping ?   

Thanks for passing by, hugs


Monday 17 January 2022

Using worker stamps in card designs by Natalie Ballard


Today's sample features The Christmas Garden Rubber Stamps by Chocolate Baroque; this project is perfect for beginners. While Christmas may seem oh so far away, I like to do a few backup projects before putting away my Christmas stash.

This time, rather than using the main image, we are going to focus on the smaller worker images to create our design.

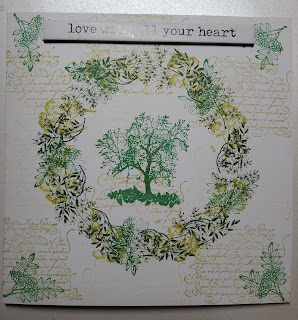
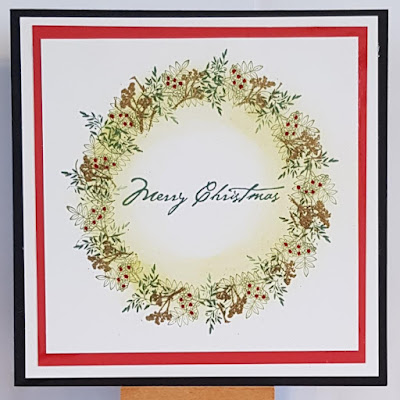
Start with a card panel a little smaller than your chosen card base. Use a large circle or semi-circle die/stencil/template to mark a guide line that features a half circle curve just shorter than the height of your panel. Mark this in an erasable pen or lightly in pencil as you will need to remove this guide later in the process.

Starting with the garland stamp, use a pigment or hybrid ink pad to get a good solid stamped image. You are going to stamp in black ink if you want to replicate the sample, but you could use green as an alternative. Rotate each impression so the design flows around the guide line.

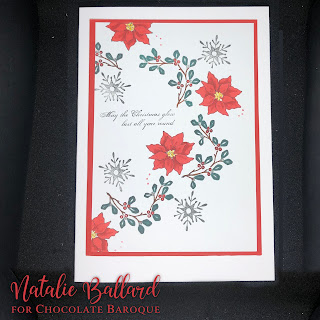
Next, you want to stamp your sentiment onto your card panel. By stamping this next focal element first, you can clearly see the space that needs to be "filled". 

Use the snowflake and poinsettia stamps to infill the wreath design, positioning your images to emphasise the flow of the wreath.

Then, I added colour to the garland and poinsettia images using alcohol markers. Trim the panel slightly and adhere it to a red card layer to add a fine border around the panel. Adhere this to the card and then add sequins, gems or even dots of gel pen to add a touch of Christmas shimmer.


Sunday 16 January 2022

Teeny Weeny Meadow Arrangements (By Tracy Thompson)


Hello again, I'm here with my second post for this month, I would like to share with you some more creations made for the December's shows at The Craft Store.  
For the first one using Teeny Weeny Meadow stamp set, I created a circle of subtle colour as a base for the stamps.  I stamped different leaves/foliage stamps in different colours creating a Wreath.  I added red berries with a Gelly Glaze pen.  I stamped a sentiment from the Holly Script set, into the centre of the wreath.  Then I matted and layered in contrasting colours.

I thought a nice snowy, frosty scene for my second creation to show the stamps versatility and that they can be used foe all seasons.  So I started by stamping the house from Patchwork Landscape, and colouring it in blue tones, I then stamped the Teeny Weeny Meadow stamps in the foreground in blues and white embossing powder for that frosty and snowy effect. Using a hill mask I created some snowy hills, and with embossing powder I created snow on the house and trees.  I added glitter for some frosty sparkle to finish off.

So I have another post coming at the end of the month, so it will be nice if you could pop back then, until then there will be lots of lovely creations posted by the rest of the team for you to see.

Happy crafting
Tracy x
 

Friday 14 January 2022

Easter bonnet (by Veronica)


 Good morning, today I have a card to share using the Lady in a hat stamp featured on the tv shows in December - a very simple card, although it did involve a lot of fussy cutting!

i stamped the image twice onto white card using black versafine ink. The whole of one image was coloured with alcohol marker pens, and just some of the hair, the hat brim and some of the the flowers on the second image.

The first image was diecut, and a matching black mat also then mounted onto a piece of white card randomly stamped in grey with the flowers from the hat. The second image was fussy cut out and mounted with foam pads over the first image - then the whole panel was stuck onto a narrow black mat and then onto a square white card blank

Thursday 13 January 2022

Teeny Mail Art by Sandra

Hello, I am sharing some more of my cards from the December show on The Craft Store.

The stamps I have used are

Curiosities

Mail Art and

Teeny Weeny Meadow 

For my first card I cut a piece of smooth white card to look like stamps using my electric cutting machine. I then cut an aperture in a piece of acetate the size of the individual "stamp". I placed the aperture over the card and used Distress Inks to colour each stamp in. Once the ink was dry I used Archival ink and stamps from Curiosities and Mail Art to decorate. I finished by layering onto some black card and then onto a card base.


For my next card I used a stencil to create a background with Distress Inks. I then used stamps from Teeny Weeny Meadow to make a country scene  with trees and ferns in the foreground and leaves hanging down. Sentiment is from the Walk Tall stamp set.


For my last card today I placed a piece of washi tape across my card at horizon level. I then stamped the landmark buildings from Curiosities along the top edge. I also stamped these onto some Masking Tissue, cut them out and covered the stamped images on my card. I blended some inks to create a sunset behind the buildings. Next, I moved the washi tape so that the bottom edge was now on the horizon and used inks to create a watery look. I removed the washi tape and Masking Tissue and stamped the word Postcard from the Mail Art set.  I trimmed my card and adhered to a DL base.


Thanks for looking

Sandra x

Wednesday 12 January 2022

Flower Hat Lady (by Andy)

Hello everyone, today sees the first of three posts this month by our Guest Design Team member Andrew Bennett. Andy has used the very stylish Lady in Hat stamp to create a lovely card for your inspiration. 


Andy writes:


Flower Hat Lady

Hello peeps thank you for dropping by. This is a card I did for the December TV shows, hope you like it.  

You will need

6" x 6" (15 x 15 cm) white card blank

4" x 4" (10 x 10 cm) white stamping card

5" x 5" (12.5 x 12.5 cm) white stamping card

4.25" x 4.25" (10.7 x 10.7 cm) pink card

5.25" x 5.25" (13.2 x 13.2 cm) pink card

Black dye-based ink pad

Alcohol markers

Begin by stamping the lady on the 4" x 4" card using the dye-based ink pad.

Colour her in using alcohol markers.

Take the 5" x 5" piece of card and using the top of the hat i.e., just the flowers go around the edge of the card. Once all mounted, it will give the illusion of a complete background. You are only using a portion of the stamp but ties in with the main image.

Mount the lady on to the 4.25" x 4.25" (10.7 x 10.7 cm) pink card, mount this on to the patterned card, then mount on to the 5.25" x 5.25" (13.2 x 13.2 cm) pink card. Attach to the card front.

Enjoy

Andy.