Pin It button on image hover
Showing posts with label color pencils. Show all posts

Friday, 15 April 2022

Chrysanthemum Blueprint (by Miranda)


Hi peeps,

Miranda here with another monthly inspiration. I used the same technique as I did in my previous post. 
Colouring on tinted paper called Canson Mi-Teintes.

This time I have used another blueprint stamp, the Chrysanthemum blueprint stamp sheet. It has a bit of an Autumn feel but hey the weather does too........and I don't mind because I like the weather being more cool than hot.


I stamped the image using Archival Pebble beach and colored with Derwent Lightfast colored pencils.
The circle has been colored with Stabilo Carbothello pastel pencils fading out with a paper stump.
I used white acrylic ink to spatter for some interest.


Thanks for your visit and I like to read your comments or questions if you have them.

Till next month,


Tuesday, 15 March 2022

Allium blueprint (by Miranda)


Hi there crafty people,

Miranda here with a new blog post using the beautiful 'Allium blueprint stamp set'. I really love these blueprint stamps and all of the geometrical patterns. The combination of the elegant flowers and the architectural elements are beautiful, I think.

This time I have worked on colored paper which is great for pastels and colored pencils. I have combined the design with a circular shape using a die cut circle stencil.  Just added some white and violet pastel pencil, spattered some white acrylic ink  and a subtle coloring of the flowers. No nee for very labour intensive coloring. 


Thanks for your visit and always enjoy reading your comments or questions,

Till next time, stay crafty


Saturday, 19 September 2020

More Autumn inspirations (by Miranda)


Hello there,

It's me again with more Autumn inpirations........
a similar technique and also using the toadstools.....

This is my favorite technique and style although I als enjoy too play with other mediums and styles....

Watercolor backgrounds, using watercolor paints or Ecoline inks, acrylic inks....anything that can flow with water on the paper. And then adding color with color and pastel pencils......

these are the stamp sheets I have used:


and a little fun using some photo editing....


And some oldies but maybe not seen by everyone of you.....still love these ones......
Also nice to combine with some die cutting too! I will just add them for more inspiration but if you want to know more about these cards, just ask in the comments below......


On these two cards I have use the 


On this card I have used the 
(A cling mounted stamp in a choice of two sizes (or multibuy) 


her I have used the 'Autumn Poppy' (see link above)
Here the 'Autumn Edges' (see link above)

Well, that was a whole lot of Autumn inspirations!
And you can see that I am a real lover......

Thanks for your visit and see you next time,


Tuesday, 11 August 2020

More feathers and flowers(by Miranda)


Hello there,

I am back again with more feathers and flowers.......almost the same stamps as in my previous post but a totally different use of colors and a white,YES....... white background.......did not do much with that.....it was difficult, I admit it LOL....

I used another stamp from the Artist Baubles and I have a lot more of them to play with, really love that set! There are 6 beautiful baubles on the sheet and some design elements.

Used stamps:


I have embossed the feathers with silver embossing powder and used a lovely cabochon to ' hold' them together. 
 I stamped the bauble using Archival Shadow grey. Than I colored the image with Derwent Colorsoft. 
The feathers were colored using Tombo markers. I used the lovely sentiment from the pretty poppies sheet. 

Only added a thin black line and some dots using a black fineliner.


Next time I will be back with something totally different with lots of butterflies........
Thanks for your visit and always like to read your comments.


Sunday, 19 July 2020

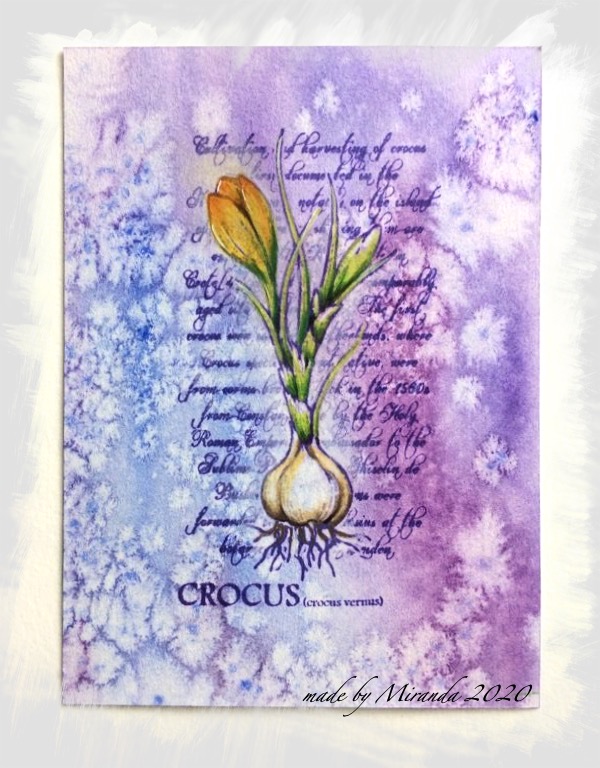
Elegant Crocus (by Miranda)


Hi there,

Today my 2nd guest post using an oldie.......but still a beautiful one......
Okay, I agree it is not Spring but Summer but hey who cares........at the moment the weather is more like Spring and I love it!


I had this background for quit a while in my stash......I did create it on heavy watercolor paper using the Derwent Art bars on an acrylic bloc. I always pre wet my paper with these watercolor techniques.
I did sprinkle some coarse and fine salt onto the damp paper and let it dry for some hours. When you sprinkle salt when the paper is too wet it won't create these white areas but you will get dark spots under the salt. And it will take a very long time to dry.
When the paper is totally dry you can wipe of the salt. And it create such beautiful structures.....


Then I stamped the whole image using a violet ink. And colored it using color pencils.
I am still a fan of the Derwent coloursoft pencils. I have many other brands too but still pick these when I am coloring on inky backgrounds.....they have such a great grip on the paper and beautiful pigment.


Hope you did like my take on this stamp,
thanks for your visit and till next week, have a lovely Sunday!


Monday, 13 July 2020

Follow your heart, it knows where it wants to go (by Miranda


Hi crafty people,

Happy to be back again to share some of my crafty moments with you.

A very true quote ' Follow your heart, it knows where it wants to go. How often I do not listen to that? Do you recognize that?

Well, now on to the less serious part.......

I had a play with the The Folk Art Garden Rubber Stamp sheet - A5. This is such a beautiful and large stamp with lots of beautiful designs in it. So you can imagine that it took me a while to colour every element.......
I did stamp using black Versafine ink on a colorful distress background.

Then I started coloring using my color pencils and using Acrylic markers for accents. I also used some gold accents using glitter pens.


On the photos below you can see the shine of the gold much better.....


Thanks for your visit and always enjoy reading your comments. 
Till next week....

Stay safe and stay creative!


Wednesday, 24 June 2020

Katya, goddess of the sea(by Miranda)


Hello there,


Today is my 3rd and last guest post  for this batch. I did enjoy working with these lovely stamps.

A while ago when I just got the Katya stamp I was thinking to make her more versatile......leaving out her headdress, then she could be every lady you would like her to be.

And then I saw recently Judiths' lovely take on that too.......Oooh, I was thinking I can't do the same......In the days/years I was a member of the DT team it happened often that we had the same thoughts about a stamp then we used to say to each other ' great minds think alike' so with that in mind I started changing her.......trying to do something else......

I used the stamping tool for this, it will be easy using that. I only removed a part of her headdress. So it could also be a crown or decoration .....I wanted to do something with a sea theme so I changed her into a goddess of the sea.......IMAGINE........

I had an inky background in my stash and it was perfect for the colors I wanted to use...


First I did stamp Katya using Memento Londog Fog, it's a very neutral color and you can easily color over it with pencils. I left out the upper part of her headdress. I draw some wavy lines that could be her hair......Then I stamped and masked several of the large scalloped shell. And one tiny shell.......and at the right side the beautiful seahorse......

Then the fun coloring started using pencils.......I used Derwent color soft. And some highlights using a white acrylic marker.

I missed some structure so I added the square bubbles here and there using Memento summer sky. Than in the lower parts of the card I stamped the bubbles using Versamark and brushed some mica powders over it.....it creates a lovely shine(see photo's below)


I did use:
Underwater rubber stamp set-A5(seahorse and large scalloped shell)


Well, these were my ' adventures' with Katya, hope you did like them.
Of course I will be here again somewhere in the future.....(if life is not playing ball)
Thanks for your comments,

Stay safe and be creative,


Friday, 8 February 2019

Serenity and Tranquility by Miranda


Hello there,

Today I have made something using two gorgeous sheets; Serenity and Tranquility.
In time when these sheets were launched I was so happy.....finally some beautiful female Buddha stamps! Still find them so beautiful.......

I've made an inky background using Distress inks and stamped (using same colors) fragments of the background stamp; Studded Lattice.

And then some plain black stamping for the focal image......and some cherry blossom branches....
I did colour her using color pencils.


I made a separate border stamping the beautiful Indian designs from the Indian Elephant sheet which matches perfect with the Buddha designs. I am sure you all understand that I have a lot of favorites at CB!
I have blended with Distress inks and colored on the pattern using gorgeous sparkle pens....you can see the effect on the close-ups......isn't it gorgeous? 
I also gave some sparkles to the Buddha........using a transparant sparkle pen.


and the stunning effect of the Signo Ball glitter pens.........


Well, for now this is my last blogpost but I hope to see you again here on the DT blog......
Thanks for all your kind comments and stay creative, 
let's make the world more beautiful with our ART!


Monday, 28 January 2019

Lots of white.......by Miranda


Hi there,

Today my 3rd guest designers post and this time I used a lot of white.....or better to say....I did not fill a lot of the white paper........and that is hard for me LOL.......
But I always like the effect and I wonder why I don't make that kind of cards more often. 

I have used several sheets: Pretty Poppies, Fresh Blooms and Bold Blooms, Lace Fragments and the sentiment from the Floral Notes.


I have stamped the poppies using white ink onto smooth black cardstock and colored them with color pencils. I have embossed the elements of the Fresh and Bold blooms with black and colored them with water based markers. 
Some white acrylic marker accents as usual and than decoupaged them. I always colour the edges of the decoupaged elements with a marker so you can't see the white of the paper.

The lovely lace border and text is stamped using black Versaclair.


I had a tiny colored piece left over so I made an xtra small card........using another beautiful lace border( from the Lace fragments) and the words are from the ' Words of Gratitude' sheet. The small flower is from the ' Dusky Damask' sheet. Only adding some pearls and this card was finished.......


Hope you did like my ' white space' cards and thanks for your visit and comments!
If you have any questions, feel free to ask,

I will have another post coming in the first week of February, so
see you then!