Pin It button on image hover
Showing posts with label Floral Delight. Show all posts

Friday, 25 March 2022

Flowers, Birds and Butterflies by Sandra

 Hello everyone

I am sharing some more of my cards from the February shows on Create and Craft

 My first cards use stamps from Words of Comfort and Cheer.  

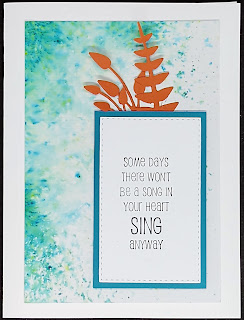
I started with an A4 sheet of watercolour card and sprinkled Brushos down the centre length ways and width ways. I then spritzed with water and let the magic happen! I left it to dry naturally as I think the colour stays more vibrant. Once it was dry I cut the sheet down into 4 pieces and added one of the sentiments from the set to each piece. I added some orange die cuts as a contrast to the Turquoise Brusho. 


My next card uses the Butterfly Mind stamp set.....one of my favourites. For this card I used some of the element stamps. First I stamped the film strip, butterflies and splatters. I then stamped, coloured and fussy cut some of the butterflies and layered over the stamped ones. I finished by adding a sentiment from the set..


On my next card I stamped some splatters  and the large butterfly from Butterfly Mind. I added some fibres over the butterfly with tacky glue. I then stamped the butterfly again, fussy cut it out and layered over the stamped butterfly.  Adding a cut out butterfly over a stamped image means I don't have to worry about cutting out those fiddly antennae!  I finished by adding a sentiment and some gems and mat and layered onto a 6x6 card base.


I stamped the  Wish Flower in Memento Ink and coloured with alcohol markers. A beautiful stamp that can be coloured in many ways.

I have stamped Bird of Joy with archival ink onto Kraft card. I then used pencils to colour and added some gems. I layered onto some mirror card and then onto an 8x8 card base.


 I stamped Floral Delight onto some black card and embossed with gold powder. I have coloured the flowers with shimmer paints, beautiful to use - difficult to photograph! I then mat and layered onto some gold card and onto a 7x5 card base.


Thanks for looking

Sandra x

Monday, 14 March 2022

floral delight (by Veronica)

Apologies to Lesley and anyone who checked this morning - no idea what happened, only way i could fix it was to start again!

Two samples using the floral delight stamp from last month's tv show, both pretty simpple.

The first one was simply stamped onto black card in versamark ink and gold embossed, then the flowers painted with some very ancient iridescent paint. A gold mat and mounted onto a 7" square white card blank, with space for a sentiment on the right.

The second has a distress oxide background , sponged in salvaged patina and twisted citron then the image stamped using black versafine ink and clear embossing powder. The flowers were coloured with pencils. The words from wish flower were stamped randomly round the flowers using a clean versamark ink pad - more to add interest rather than to be readable! I rubbed over the background with a tissue to remove some of the background ink, then dragged the edges over the black inkpad. This one was on a 6" square white card blank

Tuesday, 8 March 2022

Double Delight by Doreen

Double Delight

Today I would like to share with you this card, I do like long slim cards. 


This card uses the Floral Delight  stamp set which is a single floral image. If you like one half of the photo above.
The background was coloured first using Distress Inkpads and blending brushes.
I then stamped onto Masking Tissue but not stamping the sentiments.
I splashed the background with water and then blotted with a tissue, quickly check this is dry by a brief heat gun dry.
Take a Black Inkpad to stamp one side of the card ( I have used Momento Tuxedo Black) then apply your cut out mask to the image and re-ink your stamp and line up as well as is possible with the image on the card slightly overlapping the stems this will not matter if it doesn't line up as well as you would like if you use an embellishment or stamped butterfly, maybe a a bow if you wish.
I used coloured pencils to colour the images.
With some of the card cut from the initial coloured card stamp your sentiments and cut them out, using a Black chisel ended permanent marker edge the card and sentiments. Apply to card separately on foam tape.

Thanks for looking in today 

Love Doreen


Saturday, 5 March 2022

Glorious Floral Delights (By Tracy Thompson)


This is my first post for this month using the fantastic stamps that were shown on one of the February's shows.  So first I would like to show a book I created using the following stamps - Mosaic Flower, Bird Of Joy, Floral Delight, Wish Flower and Glorious.
So all my images were layered onto black card and added to the book, for the front cover I stamped the Mosaic Flower but upside down so it looked like the Chinese lantern plant, I stencilled in the background and coloured the image with pencils.  I added the words and did some highlights with a white gel pen.


The above pages and the ones below were done very much the same as the cover, only when I did my stencilling I masked down each side and only stencilled in the centre.  I wanted to stamp my images to the side for a different look and to get the benefit of the stencilling.  Each image was coloured with pencils in co=ordinating colours to the stencilling.  

For my next creation I made a large tag, using a die I cut the tag set which is a base, top layer and the eyelet covers.  


I coloured the base tag in Distress Oxide in a matching colour to the the colours in the top layer.  The top layer I smooched several colours for the background, then using the Butterfly Mind stamp set I stamped the main image, then stamped again on spare card, coloured the butterflies then cut them out.  On the background I added words from the set and splatters too.  I added the Butterflies, decoupaging onto the main image.  And finally some glitter was added to the Butterflies.

I will be back later in the month with some more creations from the Chocolate Baroque show, thank you for taking a look.

Happy crafting
Tracy x

Thursday, 12 September 2019

Joy flower by Brenda


Good morning, Brenda here with a few shares but sadly not of the work I made for Lesley's recent shows which featured lots of lovely quirky house stamps..........in my rush to get my samples posted off to Chocolate Baroque HQ before we left for our holiday I totally forgot to take photos! So instead I am sharing a few older creations which had not been blogged.

The card above featured the lovely bloom from Floral Delight, stamping the entire image onto a die cut circle and colouring in the blooms with some watery ink flicked onto the background. I then masked the flower and repeat stamped the words to create a side panel, again flicking watery ink onto the piece to carry the colours.


The image I used for this one is a favourite from the Thistle/Honeysuckle Butterfly stamp multi-buy, stamped with Versafine black and coloured in, DI's used around the image and then placed behind a die cut frame with foam used to raise the top panel. The sentiment is from my all time favourite CB sentiment set Words of Inspiration.


Update: This original post was scheduled but feeling rather guilty about my oversight I found time the other day to create another couple of cards using some of the quirky house stamps which this post should have been all about! The background on the above one has been created with Distress Inks and masks, then stamping the Dutch, Italian and Turret Houses in Versafine Clair and colouring in with pens.


And I had to do one using Kim Moody's Poppy Cottage which is Judith's house, I have kept it pretty simple, a Poppy background to compliment the name of the cottage, stamped the cottage with Versafine black and added just a little cottage to draw the eye. This was a limited edition stamp run, but when last I looked there were still a few available on the web site.

Many thanks for your visit today and kind words, myself and the team always appreciate your encouragement.

Sunday, 22 July 2018

In the secret garden by Brenda


Hello everyone, Brenda here with some more floral inspiration using the lovely new stamps which featured on Hochanda recently, all of which are now available on the Chocolate Baroque website as well.

The top card was inspired by our own Secret Garden within our grounds, we created it many years ago and although it has seen changes over the years still hosts an abundance of Cottage Garden flowers and shrubs and recently moved into the twenty first century with the addition of a hot tub. The beautiful flowers on the new Blossom and Grow stamp set are to my mind Hollyhocks which I stamped onto a soft Distress Ink background after first stamping a window from Echoes of Italy Using a stencil I added some brickwork with texture paste which I coloured with acylic paint to soften the whiteness and added a sentiment from the same stamp set.


For this one I used black gloss cardstock for the base panels and stamped the images from Captivating Cacti and Scrumptious Succulents using Versamark and brushing over with gold mic powders, leaving to settle for a few moments before brushing off, the assembling the panels along with a bow.


And one from a few months ago that I found lurking unused in my folder. The stamped sets used are Medici Flower in the centre and to the sides Floral Delight and Wish Flower, all were stamped onto Distress Oxide backgrounds, the images bleached out and the glittered.......unfortunately this doesn't show up very well at all in the photo.

I always appreciate you visits and comment and thank you for taking the time to pop in.


Friday, 8 June 2018

Pottery Candle Holder (by Rachel)

Today sees the first of three posts this month from our regular Guest Team Design member Rachel Fisher. We have all been loving Rachel's beautiful pottery creations on the TV shows recently. She has very kindly created one especially for the Design Team blog this month.

Rachel writes:

Good morning all! It's Rachel here today with my first post this month. I have chosen to share a project with you that I made using the Floral Delight single stamp.


I created this piece using an unfired pot at my local pottery painting centre. To begin, I brayered onto a craft mat a thin puddle of black glaze and dipped the stamp into this, (it's just like stamping with paint). I then stamped the image onto each flat side of the piece. The glaze is so thin it dries almost immediately. At this stage, if you get a bad print you can wash the pot to remove the image. After washing the stamp carefully I then painted the image using a different coloured glaze or two. Once complete, the pot is glazed by the shop to achieve the shiny finish and then fired in the kiln. I usually get the pot back a round a week later.

I hope you have enjoyed reading about this process and I will see you soon with more inspiration.

Hugs, Rachel.

Thanks so much Rachel, a fascinating post about your project, and we look forward to seeing your next project soon,


Saturday, 24 February 2018

Words and Pictures (by Judith)

Hello everyone, I have a couple of projects to share featuring the beautiful individual flower stamps that we brought to you on the TV shows last month on Hochanda.

Both projects were demos from the show, but the first project was designed to be finished in two ways, depending on how the sales of the items on the shows were going. Little did Lesley and I know that everything would sell out like crazy on that first show!

I decided to separate the word clouds from the flower images on my stamps, making it easier for me to create a lot of my projects, and I just cut them apart very carefully with some sharp scissors. I then slot them back together whenever I want to, jigsaw fashion, to create something with the design as a whole.

I stamped the words over a piece of tissue paper, and glued this to a small canvas with matte medium. Once the canvas was dry, I added some watered down acrylic paint. I stamped the Floral Delight image onto a whiteboard heart, masking it and adding some paint in the same colours as I had used on the canvas. I coloured the flower image with pencils, and added a single word to the heart to finish. This was the version that was seen on the show.

For the alternate version, I stamped the flower image onto a spare piece of card and coloured it with pencils as before. I stamped the word onto a die cut rectangle and added these to a canvas.

My second project was all about colour matching. I chose a pretty piece of patterned paper by Crafty Individuals, and stuck it to a postcard sized whiteboard piece. I stamped the Wish Flower, and coloured it with woodless pencils, toning the colours to match the background paper.

I painted a larger piece of greyboard with lilac and blue acrylic paint to match the paper, adding hints of green and orange around the edges, again picking up the colours from the paper, before stamping the words from the main image across the background using first and second generation stamping.

I hope that you have enjoyed the projects that I have shared with you today, and will give them a try for yourselves. Thanks for stopping by, Judith xx

Saturday, 10 February 2018

Book of Flowers (by Judith)

Hello everyone, I have a project to share with you today showcasing all of the beautiful stamps featured in the Anniversary shows in January on Hochanda. I hope you managed to catch the shows, they seemed to go in a flash, and Lesley and I were overwhelmed by your enthusiasm for all of the products that we brought to share with you!


My project is a concertina book, made with two pieces of whiteboard for the covers, which I have covered with some lovely patterned paper by Crafty Individuals. I stamped one of the images, minus the words onto the cover, and coloured it with the woodless pencils that we also featured on the show.

I created some pages for the book using smooth watercolour paper, but the cartridge paper that is available on the website would work equally as well. Each page measures 10.5 cms x 14 cms, and I allowed an extra panel to join the sections together each time. I decorated the back of the pages using Distress Ink, and stamped the words from several of the images on top, creating a tone on tone effect.

On each page front, I stamped a different flower image, and coloured these with Distress Inks, keeping to a common colour theme throughout.

As I assembled the book, I added some ribbon, which allowed the book to be tied shut with a bow. This was such a fun project to make, and would be a lovely keepsake for someone special.

Thanks for stopping by,

Judith xx


Thursday, 8 February 2018

Friendship by Brenda


Good morning, today I would like to share a few of my samples from Lesley's Hochanda shows which celebrated Chocolate Baroque's first Birthday with the channel when viewers were treated to some wonderful new floral stamps and colouring pages.

This release was right up my street and I have to say I thoroughly enjoyed making these samples and it was only time that prevented me making more.

So to my first card at the top uses the beautiful Medici Flower. On this occasion I only wanted to use the focal flower so I used sticky notes to cover the areas around the flower, inked it with Versafine Black, removed the masks and followed the same process three times. I then masked the  individual stamped flowers and stamped the Poppy heads from Poppy Meadow along with a inspirational quote from Pretty Poppies. Next I flicked some watery distress ink onto the white space and finally coloured the blooms with sparkle pens.


I really love this image, it's called Mosaic Flower but to me it yells out Chinese Lanterns. I stamped the image with Versamark and heat embossed with detail gold powder, coloured the flower hears with pencils and rubbed some gilding wax around the edges. Some twine and a button tied around before matting onto a pieced of corrugated and then the base card.


I painted this little box with acrylic and shimmer paints, then used a stencil and texture paste to add some flourishes. When dry I used a slightly darker pain to highlight the stenciled patterns and added gilding flakes here are there and along the opening edges. The flowers on the top were cut from one of the colouring pages, coloured in with pencils and fixed to the top along with some die cut leaves.


My final share today used the new Floral Delight stamp which I stamped once, masked and then stamped part of the stamp a second time and coloured in with pencils.  Using a mask I added some sun rays and stamped three of the words from Wish Flower, cut out and added individually to the finished piece.  

Thank you so much for popping in today.


Tuesday, 6 February 2018

Floral Joy (by Julie)

Hello, hope you are well. Today I have a couple of cards created with the new and rather fabulous individual stamps that come from a collection of six individual A6 size designs.


My first card is stamped with Bird of Joy. I simply stamped the design onto water-colour card, using Onyx Black Versafine ink, before colouring with water-colour paints. Once the main image was dry I then went around the design with a light brown water-colour and then splatted with blue and red water-colour paint. I  cut the water-colour card to fit my card blank, before edging with blue Distress ink and mounting onto my card that had been dabbed with matching blue Distress ink.


My second card has been created with Floral Delights
I started by applying masking tape around the edge of my card blank, before stamping the main image. The background has been coloured with Distress ink and the smaller flowers were coloured with pencils. 
I then inked up the stamp again, but making sure permanent ink such as Staz-on was used and stamped onto acetate. Cut out the three large flower heads and colour the reverse side with blue and purple glitter glue.
Remove the masking tape and when the glittered flowers are dry, mount onto the front of the card with 3d foam pads.

Thanks for stopping by. Please call back for daily Design Team inspiration.

Julie xx