Pin It button on image hover
Showing posts with label See Beauty. Show all posts

Friday, 15 June 2018

Fountain Scene (by Rachel)

Hello everyone, Guest Design Team member Rachel is back today with her second blog post this month, sharing more inspiration with you.

Rachel writes:

Hello all! It's Rachel here again with another inspirational piece. I've chosen to make a card this time using the A6 stamp Fountain Scene. I've teamed it up with one from the Rustic Fragments set and also a sentiment from the See Beauty clear stamp set.

I started by stamping the fountain scene stamp using black ink, then roughly masked it before stamping over the edges with the burlap style stamp. Next I added some colour to the outside using some mica paint powders and spritzing them with water. Finally I coloured the image in using water based pens. The final step was to mount the picture and then add the stamped sentiment.


I hope I've given you a few ideas. Hugs, Rachel x

Rachel will be back next week with her final post of the month,


Thursday, 22 March 2018

landscape edges by Veronica

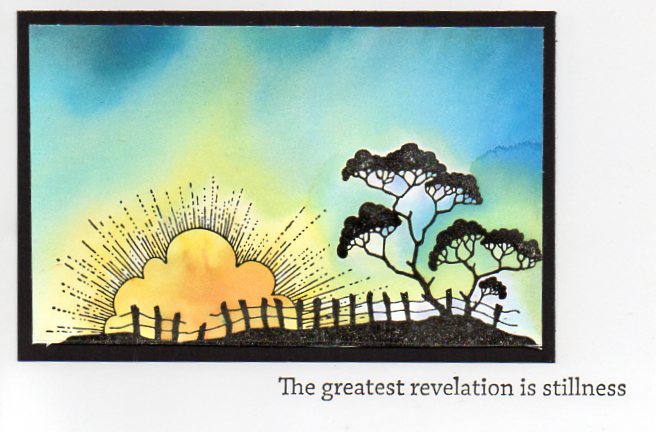
 Landscape edges is my favourite of all the edges series of stamps, and this particular stamp is top of the list! It works beautifully with my favourite brusho powders too.

For my first card I wanted to get a darker sky than usual, but not a night sky.  I was very happy with the rather stormy appearance here - using my favourite brusho powders (mostly the grey) to create the sky after stamping and embossing the trees.
Trimmed down and matted on black card, then glued to the top of a 7"square white card blank, with the sentiment from the see beauty clear stamp set stamped at the bottom right.
 My second card has the more usual sunrise/sunset sky, again created with brusho powders, this time turquoise, yellow and orange.
Again a black matt, this time a 5"x7" card blank, with the sentiment from words of inspiration

Monday, 8 May 2017

dreaming (by Veronica)


Despite fairies not being my favourite themes, I had fun with the stamps featured in the last show on Hochanda - I hope you saw some of the shows and Lesley's super demos.
My inspiration for these came from being allowed to play with my friend Janet's set of the new distress oxide ink pads and black card - I tried to recreate the effect by using white pigment ink and ordinary distress inks, not quite the same but near enough.
I usd the larger silhouette palace stencil for the buildings, and sponged the white pigment ink in streaks to create the base of the sky. Once it was dry, I sponged streaks of purple and green distress inks to create a sort of northern lights sky.
The winged horse and fairy silhouettes were stamped with versamark ink and embossed using a sparkly black powder. A glitter black card matt and a white base card to finish.

The second version has the stencil lower down the card, and a rather heavier application of the white ink first. I added an outline to the stencil using white marker pen, and the sentiment from the clear see beauty set embossed with white.

Monday, 2 January 2017

new dawn (by Veronica)

2017 sees a new start for Chocolate Baroque, when Lesley has her first show on Hochanda on Wednesday - I shall be firmly glued to the tv at 1100 and 1700 to see what new techniques she comes up with!
When sorting out my craft space post-Christmas, I found loads of stash, including some little (if at all, to be honest) used stamps, that were must-haves at the time that got sidelined....I am sure we all have them somewhere! I decided to use a couple of them and have a quick play among the chaos, and this is one of the results.
The main stamp is from owl edges, and the sentiment from see beauty - I usually give sentiment stamps a miss as I can almost guarantee I won't stamp them straight, but clear stamps are a help, and I manage to get them a lot straighter than otherwise, so risked adding this one to the card blank......
Background using distress inks, narrow black mat on a 5"x7" white card blank.

The main focus of the DT this month is romance, and here is my first 'official' sample, using the lovely harlequin rose stamps.It has been around for a while, but is such a useful set for general cards, not only for Valentine cards.
I stamped the main stamp with black versafine, clear embossed it before adding colour with brusho powders, and mica powder for the swirl in the corner. Background stamp from the same set, stamped with wild honey distress ink, which was also brushed round the edges.

I hope you all have a very happy, healthy and crafty new year.
Veronica

Wednesday, 21 December 2016

The Elephants went in two by two (by Rachel)

This is Rachel's second week as our Guest designer and today she has chosen our fabulous Indian Elephant stamp set as her focus.  Here's another one for you to enjoy.


  • I stamped the elephants first onto a piece of white stamping card and then masked them to created the background. The background was coloured with yellow distress ink and then overstamped in various archival inks using other stamps from the set to create the arc. 
  • Next the masks were removed and I coloured the elephants in co-ordinating colours to the background.
  • The sentiment comes from the See Beauty clear stamp set which I stamped with Jet Black Archival ink.
  • Finally the finished piece was mounted onto black card.
I really enjoyed creating something a little less festive this week but with the big day only four days away now may I wish you a very Merry Christmas and thank you for joining me.

Rachel

Another great design, thank you Rachel and we look forward to seeing your next project. 

Meanwhile our design team girls are still working hard to bring you some brilliant artwork so please come back again tomorrow to see a new and inspiring project.
 

Sunday, 19 July 2015

Take three crafters...(by Lesley)

Today's post is another collaboration, this time from Judith, Debbie and I.

A few weeks ago we managed to all get together and decided it would be fun for us to start a project and then swap over.

This first canvas was started by Debbie who stuck small pieces of Melange Tissue and flowers from a serviette to a canvas panel with Glue 'n' Seal. Next she mixed some gesso with Peacock Feathers Distress Paint to make a tint and brushed it randomly around the canvas. After leaving it to dry Judith took it home to add her flair to it. 

Using the cherry blossom image from the Tranquility set she stamped it several times and then coloured the images with a combination of pencils and watercolours. The bird, from A Little Bird Told Me was stamped on 160gsm white cardstock and then coloured with pencils. Finally she added 'perchance to dream' from the See Beauty clear stamp set.


The second canvas was started by Judith who used Postale tissue and flowers from a different serviette. She used the same tint combination of gesso and Peacock Feathers Distress Paint and then handed it over to Debbie. To harmonise with the flower images from the serviette Debbie coloured a piece of 160gsm cardstock with Squeezed Lemonade Distress ink and then punched out a whole bunch of petals. She stamped the leaves from the Sunny Sunflowers set and the bird from A Little Bird Told Me onto cardstock and coloured with pencils.

Using 3d gel she then attached the leaves and petals, arranging them to simulate the serviette flowers and finally added the bird.
So what hand did I have in all of this? Well I was going to add a stamped quote or phrase to Debbie's canvas, but I felt that it would detract from her beautiful flower head. So my contribution is to write up this post , the title of which post should be 'take two crafters and a writer'.  What I can do is to say a huge thank you to both ladies for designing such stunning pieces of artwork, I think anyone would be proud to hang these on their wall. And if ever a collaboration project is suggested again  I don't think I will get off so lightly next time do you?

Thanks for joining us today, please visit again tomorrow to see another wonderful creation from one of our talented design team.

Tuesday, 30 June 2015

Tag Fragments (By Judith & Lesley)

Hi there, today is a joint contribution between Judith and myself.  A couple of weeks ago we were lucky enough to have a play day together and in between the catching up chat you have with a friend you haven't seen for a little while we managed to get a little inky! Strangely enough we both started to use the same colours on a tag and so decided that we would do a tag swap. And here are the results.

So first we have Judith's tag. I coloured the background with Distress inks in Shabby Shutters, Squeezed Lemonade and Dried Marigold, splashed water over the top and patted dry with kitchen towel to give a partially faded look. Then Judith took over.

  • To make the tag stamp the raindrops from Seasonal Fragments with Potting Shed Archival ink. 
  • Next stamp the Snake's Head Fritillary and Honey Bees on to a self adhesive label with Versafine Black Onyx. Colour with pencils of your choice (Judith used Polychromos) and fussy cut. 
  • To finish add die cut corners, tinted with the same Distress inks as the background or stencil a similar image with the inks. Remove the backing from the images and stick into place. 
  • Finally stamp the phrase from the See Beauty clear stamp set with Black Onyx. 
For my tag Judith dabbed some Acrylic Wax randomly over the tag and then sponged the same Distress inks over the top. She then used kitchen roll to polish the tag, thereby removing the ink from the wax to leave her faded background. Here is what I did next.

  • To make the tag stamp one of the floral style images from Seasonal Fragments three times on to 160gsm cardstock with Dried Marigold.  
  • Use a water brush to paint over the images with Squeezed Lemonade.and when dry cut around all three images, cutting one of them slightly smaller than the others. 
  • For the flower centres die cut three circles, two x 30mm and one x 15mm, stamp them with the image from Rustic Fragments using Versafine Olympia Green and colour with watercolour pencils in several shades of yellow and orange (I used Aquarelles). 
  • To give the effect of meadow grass stamp the image from Rustic Fragments along the bottom edge of the tag using Olympic Green. 
  • Stamp the images again on smooth white paper and choose three parts of the image to make stems for the flowers. Colour with Shabby Shutters and when dry cut out and stick to the tag with wet glue. 
  • To complete, attach the centres to the flowers with glue gel and then the flowers to the stems with wet glue. Stamp the phrase from Amazing Birthday with Olympia Green.
It is so interesting to see that, although Judith and I completed our tags over 200 miles apart, we have both focused on a flower theme. I hope you like our joint designs, it is really good fun to start a project and then had it over to a crafty friend to finish.

Thank you for joining us today and I hope you come back soon to see some gorgeous projects created by the Design Team using the new Birds of Paradise stamps.


Thursday, 28 May 2015

New Fragment Stamps launched today

Well here we are almost the end of another month and it's time to launch some fabulous new stamps.  We are continually being told by you that you love our range of Fragment related stamps so this month we're adding to the series with two more stunning examples.


First there is Rustic Fragments


closely followed by Seasonal Fragments.

Both these A4 sets are available individually or as one of our ever popular multi-buys.

There are loads of brilliant images on these stamps ranging from fabric to basket weave and snowflakes to leaves. All of these stamps can be used with many other crafty products; I stamped through a stencil for the card featured here today but you can use them with paints, inks, clay, UTEE, there are so many possibilities.

Also available today are a selection of clear word stamps. These are being released in two sizes, first we have

Awesome Diva
and Positive Beauty
Each of these sets will arrive packed in one of our A5 storage wallets and are excellent for card making etc 

However, for those of you who love journalling and mixed media projects we have decided to also offer these in a larger format, which will really make a statement on your artwork. Once again they are packaged in an A5 wallet for easy storage.

So we have the same words, only much larger, and they are released in the following four sets:

Awesome Today
Rockstar Diva
Positive Pants
and finally See Beauty
Now you can have your own sets of journalling words to complement your creativity. Just please bear in mind that we only have a limited stock of all the clear word set so you may have to wait a little while for more stocks to arrive, but they are definitely worth the wait. If you are concerned on which size may be suitable for your projects the description on the website of each stamp set contains the measurements of both the smallest and largest stamps.

I am really excited about all our new releases as I can see so many ways in which they can be used and I know you are going to just love them.

As usual the Design Team girls have been creating magic with the new Fragment sets so there will be lots of inspirational artwork for you to see over the next month. Hope you can join us and have a thoroughy wonderful stamping time.