Pin It button on image hover
Showing posts with label Dots 'n Stripes Baroque Ornament. Show all posts

Tuesday, 21 June 2016

Dots 'n' Stripes Baroque Ornament (by Julie)

Hello, it's Julie here and I am so pleased it's my turn again, so that I can show you what I have made with these lovely new Ornament stamps. Both of my projects are created with the Dots 'n' Stripes Baroque Ornament


This first card is quite quite easy. I started by covering my base card with silver mirri and then cut a matt layer slightly smaller from plain white stamping card. Next I added a circle die cut to the centre and then stamped the Ornament twice onto spare card and coloured with pink and blue Pan Pastels. I cut them out and layered them up with 3d glue gel before adding a flat back gem to the centre, surrounded by clear sparkly glitter. I inked up the Ornament stamp with Versamark and stamped all around the white card that was cut earlier, which was then followed by applying pink and blue Pan Pastel all over the card, making sure it adheres to the wet Versamark ink. Carefully spray your card with a chalk fixative and when dry attach the wired ribbon and bow. 
Assemble the card with foam pads or 3d glue gel. 


My second project is a papier mache plaque that I coated with a light brown chalk paint, before applying Distress ink through a wood grain stencil. The three flowers were stamped onto thick acetate using black Staz-on. When the Staz-on is dry, cut out the flowers and then carefully shape the leaves by rolling them gently over a pencil, then paint the reverse with acrylic paint. If you shape them after painting you will crack the paint. 
You might notice one of the flowers is quite glittery. This was achieved by applying Turquoise and Yellow Stickles glue to the reverse and again like before shape the leaves before applying the glitter glue.
When everything is dry apply a flat back gem to the centre of your flowers and then adhere to the plaque with 3d glue gel.

Many thanks for stopping by and hope to see you again soon for more Design Team inspiration.

Julie xx

Sunday, 19 June 2016

Dots n' Stripes- Baroque Ornament (by Magda)

This is another beautiful stamp of the Baroque Ornament series, and here is my "Feeling Gratitude" card as my second post for this month.

Step by Step

Background:
1. Blend several colours of Distress Ink Pad on the cardstock
2. Stamp with water Dots 'n Stripes for the background
3. Stamp with Versafine or Archival the main image
4. Apply randomly white Gesso through the stencil

Sentiment:

5. Blend several colours of Distress Ink pad on the cardstock for the sentiment.
6. Stamp the sentiment from the Words of Gratitude stamp set with water first.
7. Stamp the same sentiment again not in exactly the same place with Versafine or Archival.
8. Stamp Dots 'n Stripes on a blank cardstock and cut out the shape.
9. Position the background on the blank cardstock and draw around the sentiment in order to cut it out later, using the arched edge of the Dots 'n Stripes stamp, where it is possible.
10. Cut and glue on the card background.
11. Add some Stickles dots to give light.

I enjoyed creating this project and hope you will try stamping with water. If you have any questions, please contact me.

Thank you for stopping by,

Magda.

Friday, 17 June 2016

Rainbow Garden (by Judith)

Hello everyone, I have a colourful project for you today, using two of this month's Baroque Ornament stamps.

I created a background spritzing water based sprays onto a damp piece of watercolour paper, and added some more water to blend them. I blotted the paper with a spare piece of card, to help smooth out the colour, and also to create another piece of coloured card for my project. I edged the background with Picked Raspberry Distress Ink, and added some stencilling with Mermaid Lagoon Distress Ink.

I spritzed some blue, pink and yellow spray onto a craft mat, and picking the spray up with some water, created a wash of each colour onto some more watercolour paper. I dried each piece of paper thoroughly with a heat gun. I stamped several of the Dots 'n Stripes Baroque Ornament the Tangled Baroque Ornament, plus the centre of one of the flowers from the Tangled Garden stamp set, and the clear Tangled Butterfly stamp onto the coloured backgrounds using Versafine Onyx Black ink and clear embossing powder. I cut all of the shapes out, and layered them up onto the background. I added a small amount of colour to the butterfly using water based markers.

I drew some stems for the flowers using a fine-tipped pen and added some colour, before adding some doodles to complement the flower designs.

Thanks for stopping by, Judith xx

Thursday, 26 May 2016

Fabulous Ornaments launch today (by Lesley)

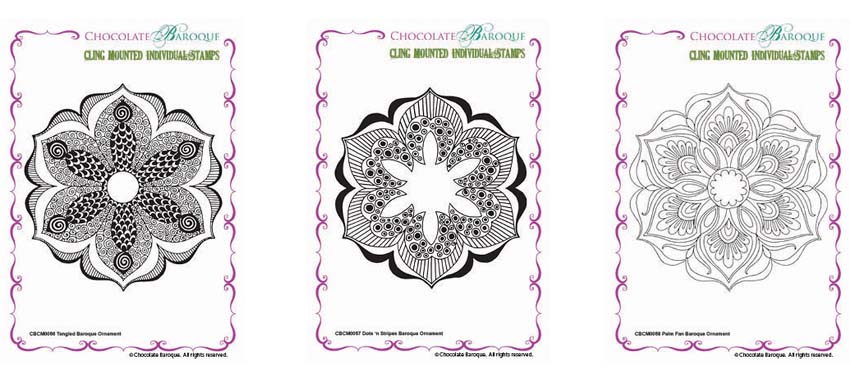
I am so excited to be launching some gorgeous stamps today.  Baroque Ornaments is a collection of six individually cling mounted stamps each with their own unique pattern.  These are loosely based on the traditional mandalas but Sue has used her imagination to bring them right up to date.

I am sure you just want to see them now to here we go with the first three.

From left to right there is Tangled Baroque Ornament, Dots 'n Stripes Baroque Ornament and Palm Fan Baroque Ornament.

The second three look like this


I think Sue has done her usual magic and created some stunning images. Each individual stamp is cling mounted and cut out ready for you to starting playing as soon as you get them out of the packet. And of course we have this full collection available as a money saving multi-buy if you really can't decide.

Here is a sneaky peak at a gorgeous sample from Zoe which shows the Teardrop Silhouette stamp off to perfection.


I hope you have as much fun with these as the Design Team, who have been colouring and inking and creating more exciting samples for you to show off the new stamps.

I think that Zoe has chosen a wonderful sentiment for her card, it eptomises what stamping is all about. It really is an adventure into creating your own art and seeing just how imaginative you can be. So why not join us on a new adventure everyday with our wonderful Design Teams' daily dose of inspiration.