Pin It button on image hover
Showing posts with label underwater. Show all posts

Saturday, 1 January 2022

Happy New Year (by Judith)

Hello everyone, I hope that you are all keeping well and that you have had a good break over the festive period. I want to wish you all a very Happy New Year and all the very best for 2022. 

I am sharing a couple of projects with you today showcasing stamps that were featured on last month's shows on The Craft Store. The first is a little book made from a huge tag and I have used the Damask Panel stamped three times onto a Brusho background, using a metallic embossing powder.

I adhered the pieces onto the tag, and then cut away the excess from the third piece to get the tag shaped end. I added some pretty scrapbook paper on the inside of the tag, and punched the hole again at the top of the tag.


I scored inbetween the pieces, to create the book. I cut a few pages, and sewed them into the book using bookbinding thread. 


I added a piece of teal ribbon through the hole at the top of the tag to allow the book to be closed. This simply wraps around the book, and ties in a bow. These little books make great gifts, and are really quick to make. You could add any kind of pages; old book pages, kraft paper, watercolour paper, whatever you like, to create a mixed media book, but I used drawing cartridge for my sample.

My second project is an old project, which I thought I would share again. I stamped Ophelia onto a piece of Drawing Cartridge and masked the image with Masking Tissue. I coloured the background with Distress Inks and splattered the background with water, which I blotted with tissue. I added some stamping over the top using a stamp from the Texture Fragments stamp set. I stamped and embossed the fronds from the Underwater stamp set before removing the mask. I coloured Ophelia with pencils. I added some foliage from the Song Thrush Silhouette stamp, which coloured this way tie in with the flowers in her hair quite well. I added a bit of Glossy Accents to the centres of the flowers.

I will be back later in the month with more projects to share with you, take care and thanks for stopping by,


Judith xx


Wednesday, 24 June 2020

Katya, goddess of the sea(by Miranda)


Hello there,


Today is my 3rd and last guest post  for this batch. I did enjoy working with these lovely stamps.

A while ago when I just got the Katya stamp I was thinking to make her more versatile......leaving out her headdress, then she could be every lady you would like her to be.

And then I saw recently Judiths' lovely take on that too.......Oooh, I was thinking I can't do the same......In the days/years I was a member of the DT team it happened often that we had the same thoughts about a stamp then we used to say to each other ' great minds think alike' so with that in mind I started changing her.......trying to do something else......

I used the stamping tool for this, it will be easy using that. I only removed a part of her headdress. So it could also be a crown or decoration .....I wanted to do something with a sea theme so I changed her into a goddess of the sea.......IMAGINE........

I had an inky background in my stash and it was perfect for the colors I wanted to use...


First I did stamp Katya using Memento Londog Fog, it's a very neutral color and you can easily color over it with pencils. I left out the upper part of her headdress. I draw some wavy lines that could be her hair......Then I stamped and masked several of the large scalloped shell. And one tiny shell.......and at the right side the beautiful seahorse......

Then the fun coloring started using pencils.......I used Derwent color soft. And some highlights using a white acrylic marker.

I missed some structure so I added the square bubbles here and there using Memento summer sky. Than in the lower parts of the card I stamped the bubbles using Versamark and brushed some mica powders over it.....it creates a lovely shine(see photo's below)


I did use:
Underwater rubber stamp set-A5(seahorse and large scalloped shell)


Well, these were my ' adventures' with Katya, hope you did like them.
Of course I will be here again somewhere in the future.....(if life is not playing ball)
Thanks for your comments,

Stay safe and be creative,


Wednesday, 31 January 2018

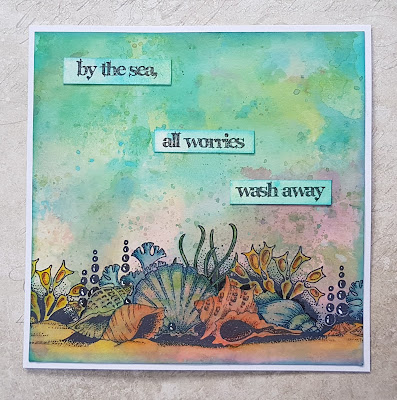
All Worries Wash Away (by Judith)

Hello everyone, I am closing out the month with a couple more watery creations for you, using the sea themed stamp sets that we have been showcasing all month.

My first card was created by making a background using Distress Inks in shades of blue, yellow, pink and green. I stamped the shells from the Seaside Dreams stamp set, and masked the image before adding the second image behind. I painted both images and then added some pencil detail and white highlights. Finally, I stamped the sentiment onto three pieces of scrap card, and attached these to the background.

For my second card, I used a background from my stash that had been made by painting Brushos over the background with lots of water to make a colour wash. Sea salt had been sprinkled over the top and left to dry, which had created small bubbles randomly over the background.

I added some stencilling using coordinating Distress Ink, and stamped the small seahorse using first and second generation stamping. I added some stamping along the bottom using stamps from the Mermaid Queen and Underwater stamp sets. The bubbles were created by dipping a pen lid into white acrylic paint, and pressing it onto the background.

I stamped the large seahorse onto a scrap of card, another background left over from a previous project, and cut the image out, leaving a small border around the edge. I attached the image to the background, and added a sentiment from the Seaside Dreams stamp set. Finally, I edged the background with teal ink, before adhering it to a white card blank.

We hope that you have enjoyed our nautical creations this month, and hope that they have inspired you to try some of our ideas yourselves. Look out for some floral inspiration next month, based on the sell out shows at the beginning of January on Hochanda.

Don't forget that there is a callout for new members for our Guest Design Team. Do check out the post on the Shop Blog for details of how to apply. The deadline is 23rd February, so there is plenty of time to apply. We are a really friendly Team to work with, and you could get to see some of your designs on the TV!

Thanks for stopping by,

Judith xx

Sunday, 28 January 2018

Happy Birthday (by Marga)

Here I am again to show you something that I made for the shows Lesley presented in December.


I made this card by stamping the shells on white paper and colouring them with my pencils. I cut them out and placed them on a piece of kraft paper.

All you need now is a sentiment and the card is ready.


Big hugs

Marga

Saturday, 27 January 2018

Seaside Delights (by Julie)


Hello, thanks for popping in. 
I have three seaside themed cards to show you so I will get straight on and show my first card:


The background is Distress inks and then over-stamped with the shell and star fish from Underwater
The main image is a selection of shells stamped and masked from Underwater as before and then whilst all the masks are still in place, stamp the large single cling Ammonite shell over the top. When the masks are removed the large shell will appear to have been stamped behind the other smaller shells. The little star fish was stamped onto separate card, coloured with water-colour and then cut out and mounted onto the main image with 3d pads.
The sentiment is from Birthday Words.


My second card is a very simple stamp and colour card. 
The Ammonite shell was repeatedly stamped over the background and shaded with pencil. The lighthouse and seagull are from Seashore Scenes and were stamped onto separate stamping card with Onyx Black Versafine, before being coloured with pencils, cut out and mounted onto black card-stock.
The card was finished off with a sentiment from Seashore Scenes.


My third and final card is stamped using Seashore Scenes as before along with Mermaid Queen.
I started by creating the underwater background with shades of blue and green Distress inks. I applied the ink with cut n dry foam and used the straight edge of some scrap paper as a guide. Apply Picket Fence Distress Stain to add the highlights.
Next I stamped the mermaid silhouette with Onyx Black Versafine. I also reverse stamped this image by stamping the mermaid onto some plain rubber and then pressing the image down onto the design.
The little seahorse is from Mermaid Queen which was stamped with Versafine and then coloured with coloured pencils. The lighthouse scene is from Seashore Scenes , which I stamped onto spare stamping card, before colouring with pencils and then cutting out with a circle die. Before mounting onto the card with 3d pads I edged the circle with Hickory Smoke Distress ink.

Thanks for looking and please call back for daily Design Team inspiration

Julie xx

Monday, 22 January 2018

Seaside Mini Hangers (by Anne)

Good morning. I made these mini hangers for the recent sea themed shows. I had so much fun making these, although one of them almost ended up in the bin – tee hee.

On my first project I used stamps from Mermaid Queen, Seaside Dreams, Underwater and the large Ammonite stamp.
  1. I started with one of the white board panels (approx. 10.5 X 14.5cm) from a mixed media white board pack (Chocolate Baroque). I used a swirly stencil from my stash and spritzed through the stencil with blue ink containing mica. I then applied blue acrylic paint mixed with sand texture paste through the stencil with a palette knife for texture. When dry I added some sparkle with gold glitter glue and applied silver gilding wax to the edges.
  2. I trimmed a piece of greyboard to make the top panel, stamped the sentiment with Versamark and heat embossed with WOW embossing powder (Detail White). Shells were stamped onto the background using blue pigment ink. The edges were finished with silver gilding wax and gold glitter glue. Holes were punched into the header and main panel and they were joined with string for hanging.
  3. I applied Hollographic Crystal Gel over the Ammonite stamp surface and left it to dry for several hours before carefully peeling away. I rubbed over the surface lightly with gold and silver gilding wax to emphasise the detail. I then painted the surface with DecoArt Antiquing Cream (Titanium White). After drying I rubbed away the colour from the surface with a damp cloth (this medium remains water soluble when dry – so can be used to add detail to crevices).
  4. I applied StazOn Ink onto the Ammonite and seahorse stamps, then I applied Soft Form Relief Paste (Silver) over the top and left to dry overnight. The embellishments were peeled away from the stamp and rubbed over lightly with gold and silver gilding waxes. The seahorse was glued to the background. I used a fine tipped pen to add in a little more detail (the ink didn’t transfer too well).
  5. I stamped the shells onto cartridge paper using Versafine Ink (Onyx Black) and spritzed with orange/yellow and gold inks with mica to colour. The images were cut out and shaped lightly using a ball tool and sponge mat. I die cut a decorative star shape from black card and coated with gilding wax. The embellishments were glued in place with 3D glue gel.
  6. White pen was used to add highlights to the pearls and seahorse eye, then Glossy Accents added for shine. I finished with some small embellishments created with air dry clay and silicone moulds from my stash.
On my second project I used stamps from Mermaid Queen, Seaside Dreams, and Underwater sets.
  1. I started with one of the white board hearts from a mixed media white board shapes pack (Chocolate Baroque). The background was spritzed with blue ink containing mica. The background weeds were stamped with blue pigment ink and the foreground weeds with Distress Ink (Peeled Paint) and embossed with WOW Embossing Powder (Clear Gloss).
  2. I stamped the seahorse and sentiment with Versamark and embossed with WOW Embossing Powder (Silver) and coloured with dark blue sparkle pen then added a layer of Glossy Accents over the seahorse. At this stage it all looked a complete mess and nearly went in the bin – tee hee. I stamped over the top using StazOn Ink (White) and decided to continue with ‘the mess’. Maybe it would be ok when other bits & bobs were added?
  3. A fine tipped marker was used to add a drop shadow around the sentiment lettering which made it stand out better.
  4. I spread some Viva Décor Crackle Paste (Teal) around the base of the heart and dropped in some blue seed beads for texture. When dry I rubbed over the surface and edges with a little silver gilding wax. I punched a couple of holes in the top to attach a hanging ribbon, and holes in the sides and base for attaching hangers.
  5. The seahorses and weeds were stamped onto blue card with White StazOn Ink, cut out and glued with 3D glue gel.
  6. The shells were stamped onto cartridge paper and spritzed with blue and gold inks with mica. The shells were cut out, shaped and acrylic modelling paste applied to the backs to make them a little more robust. I applied clear glaze onto the fronts for shine. When dry I created attachment holes and added them to the base of the heart using recycled jewellery chain loops.
  7. Finally finished by adding some glitter glue sparkle – just had to be done – tee hee.


Friday, 19 January 2018

Through the Depths (by Judith)

Hello everyone, I have a card to share today using the stamps featured on last month's TV shows on Hochanda. The images I have used were from the Mermaid Queen and Underwater stamp sets.

I had a pretty background lurking in my stash created using inks and mica powder with cling film onto a piece of plain card, and I felt that this would be a perfect backdrop for a watery scene. I wanted a feeling of looking through the water at the images, and so I stamped straight onto the background, and coloured the images using pencils. The mica on the background gives a floaty effect of water both in front of and behind the images.

Where there were gaps between the three individual images, I used a fine marker pen to join the images up using small dots, as Sue has drawn on the images themselves. This way, it looks as if the three images all form part of one larger piece. I have also used common colours across the three sections to tie everything together.

Finally, I edged the background with Distress Ink before attaching it to a large white card blank.

I hope that my card will inspire you to create something using these lovely stamps yourselves. Thanks for stopping by, Judith xx

Saturday, 13 January 2018

Sea Horse (by Julie)

Hello, today I have two cards using similar stamps but looking completely different.


For my first card I stamped and embossed the large sea horse from Underwater onto some water-colour card. I then went over the background with a light blue wash of water-colour before stamping the smaller seahorses using a dye based ink and stamping the images on the seabed. The little sea weed stamp to the left is from Mermaid Queen and I coloured the seabed images with water-colours.


For my second card I stamped and embossed the large seahorse onto water-colour card and then went over the entire card with a water-colour wash of blues and greens. Once dry I sponged blue and silver acrylic paint through a stencil and finished off with a sentiment from Birthday Words

Thank you for stopping by. Please call back for daily Design Team inspiration.

Julie xx

Thursday, 11 January 2018

Winter Sea (By Magda)

Even in winter the sea has its beauty and I love the sea during any season.  Therefore I want to share with you this journaling page spread with a frozen seahorse and a seashore in a foggy and rainy day.


I used  the following items 

For the left page :
Distress Ink Pad  Iced Spruce, Stormy Sky for the background
Forest Moss for the plants
Fired Brick  for the seahorse
Underwater stamp set
White Embossing Powder for the frozen seahorse
Stencil Seasonal Journey "Winter"
Translucent Paste
Stencil  Well rounded for the frozen crystals dots and stripes

For the right page : 
Seashore Scenes stamp set
Distress Ink Pad  Iced SpruceStormy SkyForest Moss, Brushed Corduroy for the background
Forest Moss for the plants
Fired Brick  for the lighthouse
Iced Spruce for the clouds, boats
Stencil  Well rounded for the rain 
Translucent Paste
White Gesso, a diluted wash on the page for the fog

What do you think to have a winter week end at the seaside ?
I wish you all a very healthy and crafty 2018,  hugs
Magda

Tuesday, 9 January 2018

Lighthouse Scenes (by Anne)

Good morning. Today I am sharing a couple of my recent samples using the Seashore Scenes stamp set (plus Mermaid Queen and Underwater for embellishments). The first is a sunset scene mounted onto a patterned background paper from Crafty Individuals, the second a mini wall hanging.


Sunset Scene Card:
  1. The patterned paper was trimmed and edged with black pen to frame before sticking to the card blank.
  2. The background was painted with water based inks (orange and yellow) and the image stamped with Versafine (Onyx Black). Some areas of colour were lifted out using water and blotting. The image was coloured with watercolour pens and pencil. White pencil was used to emphasise highlights.
  3. The foreground was created using Expand IT tinted with watercolour pen, heated to puff and create the texture. Mounted onto black card to frame and glued to the card with foam pads for dimension.
  4. The shells were stamped with Versafine (Vintage Sepia), spritzed with blue and gold ink sprays, cut out and lightly shaped before gluing down with 3D glue gel.
Materials:
  • Seashore Scenes, Mermaid Queen and Underwater (for shell embellishments) stamp sets
  • 6 X 6 card blank, 6 X 6 background paper (Crafty Individuals – The Seaside), black card and white stamping card, scrap cartridge paper (for shells)
  • Inkpads: Versafine (Onyx Black and Vintage Sepia)
  • Alcohol ink pen (black)
  • Watercolour pens and pencils
  • Water based inks (yellow, orange)
  • Ink sprays (blue, gold with mica)
  • Colourcraft Expand IT (puff paint)


  The scene looks so different done in an alternative colourway.

Follow the river hanging:
  1. The scene was stamped onto whiteboard with Versafine. A fine tipped pen and additional scene building stamps were used to extend the scene. Drawing Gum was used to mask the gull image while stamping the background images (i.e. grasses behind the gull and post).
  2. The scene was coloured with watercolour paints. Extra details and texture were added with coloured pencils. Drawing gum was used to mask some areas while painting (e.g. clouds, water highlights).
  3. Grey board was trimmed and cut with a rope edger die (top edge) and overlaid with red card cut to match. Holes were punched in the top to tie on the hanging string.
  4. The starfish and shells were stamped onto cartridge paper, coloured with watercolour and mica paints. After shaping they were glued to waste acetate pieces with 3D glue gel to make them more robust (particularly as they overhang the ‘canvas’ edges).
  5. The rope and ships wheel were cut 2-3 times each from Kraftcard, layered up and glued together to make them more robust. Colouring was added using Distress Ink, glaze and glitter pens.
  6. The scene, embellishments and string were glued to the hanging. Finished with PVA pearls and touches of glitter glue.
Materials used:
  • Seashore Scenes, Mermaid Queen and Underwater (for shell and starfish) stamp sets
  • 15 X 10cm whiteboard shape (Chocolate Baroque kit), Grey board, red card, white stamping card, Kraft card, scrap cartridge paper and acetate
  • Watercolour paints and water based paints with mica
  • Coloured pencils
  • Pebeo Drawing Gum
  • Glaze pen (red) and glitter pen (gold)
  • Fine tipped pen (black)
  • Inkpads: Versafine (Onyx Black), Distress Ink (Scattered Straw)
  • PVA pearls and glitter glue (clear)
  • Bakers twine (red & white)
  • Dies to cut ships wheel, rope edge (top of hanger) and rope embellishment

Monday, 8 January 2018

mermaid queen (by Veronica)

 The first post of 2018, so I would like to wish everyone a very happy New Year, even if it is a bit late.
I have a canvas from the last months seaside themed shows to share today.
A 7" canvas board, that started out being sprayed with some very elderly blue and green glimmer mist sprays,,,,,, I was surprised that some of them still worked! I used some pearlescent paste through a wood grain stencil to represent movement in the water, then sprayed again with the blue that worked. I sponged blue acrylic paint through the silhouette palace stencil, then randomly across the canvas below it.
The mermaid queen was  stamped onto white card with black versafine, clear embossed, then painted using equally elderly H2O paints. I fussy cut her out, and also several shells and the starfish to create the foreground. I used micro beads glued below the shells to create the sand on the sea bed, though they don't show up on the photo.
The small mermaid was stamped directly onto the board using distress ink, as I wasn't worried about a clear image. The bubbles were some very ancient pearl drops in silver - it's surprising what you find when you are forced to do a major clear up!
Thee are some lovely ideas coming up from the rest of the team, just what you need to brighten up the dull rainy weather we have now.

Sunday, 7 January 2018

Sea Shell Seahorse (by Penny)

Hello everyone, today we are welcoming Penny Butler as a member of the Design Team. Penny has been a member of our Guest Design Team for some time now, and has also been helping us out with TV samples for our TV shows on Hochanda. Penny's imaginative, vibrant designs, and her love of mixed media are sure to inspire you. I hope that you will join us in welcoming Penny to the Team.


Penny writes:

Hi there and Happy New Year to everyone! I'm Penny and it is my pleasure to bring you this blog post, my first post as a full member of the Design Team! I feel so lucky and privileged to be on this wonderful team, and I hope you enjoy my first project.

Sea Shell Seahorse:

This card was one of my samples for the recent Chocolate Baroque Seaside TV shows. I have used stamps from the Underwater, Mermaid Queen, and Seaside Dreams stamp sets, Aztec Metallic paints, Distress Inks, black Versafine ink, and alcohol pens.

On a piece of white card I stamped and embossed three large focal images in black, then masked them off with masking tissue. I blended three colours of Distress Inks over the whole panel as a background, then stamped a couple of mermaids in second generation ink to add perspective and make them appear to be in the distance. When all of the ink was dry, I removed the masks and painted the images with Aztec paints to give them a pearlescent sheen.

Next, I stamped and embossed the seahorse on a piece of acetate in black. I cut the image out and attached it to the stamped image on the card. I wanted to add some definition and texture. I then added some bubbles with Glossy Accents and left them to dry. I stamped one of the lovely borders along two sides of a white base card and coloured the images with pens, adding Glossy Accents to the bubbles and seaweed. I edged the focal panel with a gold pen and attached it to the base card. To complete the design, I stamped, embossed and cut out a sentiment, then attached it to the card.

Thank you for popping in today, there are more pictures and details on my blog,

Penny.


Saturday, 6 January 2018

Dreaming of the Beach (by Judith)

Hello everyone, I have three projects to share with you today, which I took with me to last month's TV shows on Hochanda to use as demos on the shows. If you watched the shows, you will have seen two of these projects in action, but the third one did not make it to air, because the stamp featured sold out so fast. That's the nature of live TV!

For my first project, I created a watercolour background on a large piece of cartridge paper, and stamped a selection of stamps from the Underwater and Mermaid Queen over the top. I cut a postcard sized piece of cartridge paper, and stamped the seashells from Seaside Dreams, and masked the image. I added a watercolour wash over the background. I coloured the shells once I had removed the mask, using just three colours, blue, yellow and brown, mixing the three colours to create a variety of different shades. I added a sentiment to the bakground.

I created a postcard back by drawing some lines using a fineliner pen, and adding images from the Mail Art stamp set. Once I had completed all of my elements, I assembled the card.

To create my second project, I used the same selection of stamps to decorate some brown paper using brown, orange and red tones of ink. I used the paper to make first some wrapping paper for a present, addng some red hessian and some string as a decorative feature. I stamped and embossed some shell images onto kraft card using gold embossing powder, and added some colour using Distress Ink, before cutting the images out, and attaching them to the parcel. The card was made in exactly the same way.

To create my final project, I made a watercolour wash for a piece of watercolour card using Brushos, and sprinkled sea salt over the background while it was still wet. The salt draws some of the liquid away and creates beautiful patterns. Once the background was dry, I brushed the salt away, and stamped a seaweed image from the Underwater stamp set across the background, using first, second and third generation stamping. I also added a sentiment.

Finally, I stamped the Ammonite image onto cartridge paper using some of the left over diluted Brushos, which I picked up from my craft mat, directly onto the stamp. I used a water brush to draw some of the colour from the outline of the image. I cut the image out, and attached it to the card using 3D foam pads.

I will be back later in the month with more watery inspiration for you. Thanks for stopping by,

Judith xx

Wednesday, 3 January 2018

Mermaid Queen and Underwater (by Marga)

Hello everyone, have you seen the shows Lesley showed you yesterday? Wauww again.

Today I want to show you two cards that I made for the show.


Both cards I stamped with Versafine onyx black. I stamped and cut out some parts and put them on the card. I love the black and white look.

Stamps I used are:

Underwater
Mermaid Queen
Loving Sentiments
Birthday Words

Hugs Marga

Tuesday, 13 September 2016

He Rides The Tide (by Asha)

Good morning, everyone! I'm back on the DT Blog with an Art Journal page for our month-long Texture fest. This project features 2 stamp sets by Chocolate Baroque. The sea elements are from the Underwater A5 sheet. I stamped and coloured these with alcohol markers before fussy cutting and adhering to the page.

The deep sea background is a mix of acrylic paints in shades of blues and greens with a little black to add depth. The seabed is a mix of pale yellow and terracotta paints. To create movement, I used a stamp from the Texture Fragments A4 sheet.

And not forgetting our theme - Texture - I added bubbles with Texture Paste and  and splashed some gesso to finish the project.


I have more pictures and details of tools and products over at my blog. Thank you for stopping by today and come back soon for more amazing creations by the rest of the Design Team.

Beijinhos,
Asha

Tuesday, 13 January 2015

A Bird for all Seasons and Ophelia the Mermaid? (by Judith)

Hello everyone, I hope that you are enjoying the range of projects from the Design Team this month. I have chosen to use some of the new individual cling mounted stamps Song Thrush and Ophelia for my projects for you today.

For my first project, I wanted to show the diversity of this lovely stamp, and how it could be used to create cards all year round, so I have made a Christmas card. I started by embossing the image three times, using white embossing powder on some green scrapbook paper, and colouring the image with pencils. I decoupaged the flowers and bird. I layered the image onto kraft card, using some dark red card as a mat for contrast. I also added some holly die cuts, and some more stamping, using a berry stamp from the Woodland Dreams stamp set which I also coloured with pencils. I tucked some flowers from a spare image under the main frame, along with the holly die cuts. I added some shading around the edge of the kraft background, using Festive Berries Distress Ink. Finally, I added a sentiment taken from the Warm Christmas Greetings clear stamp set.


For my second sample, I stamped Ophelia onto a piece of heavy weight cartridge paper, and then masked the image. I coloured the background by blending three different colours of Distress Inks randomly all over the page. I stamped an image from the Texture Fragments stamp set onto opposite corners, using one of the same colours of Distress Ink. I then flicked water onto the other areas of the page and dried it with a heat gun, to emphasise the watermarks.

I stamped and embossed a seaweed image along the bottom of the page, from the Underwater stamp set,  using a blue/green metallic powder. I then added some flowers which I had cut out and coloured with pencils from the Song Thrush Silhouette image. It just goes to show that you can add flowers to just about anything! Finally, I coloured Ophelia using pencils, and matted the project using toning coloured card.

Thanks for stopping by, Judith xx
Wednesday, 30 April 2014

Guest Post: Under the Sea by Sam

When we put out our call for new Design Team members at the start of the year, we had so many fantastic entries that we really were disappointed we couldn't just take everyone. So we came up with a plan to contact some of the shortlisted people and see if they would do a guest post and today I'm delighted to introduce the first of our guest blog posts.

Our first post is Sam of A Bit of Crafty Genius so without further ado, here is Sam's wonderful sea inspired project.


Hi all, Sam here

I can't begin to tell you all how excited I was to be asked to do a guest post for Chocolate Baroque. I have been drooling over their designs for a long time, since I was introduced to them by a fellow fan. I'm sure you all are with me there, am I right?


When I first received my stamps I couldn't wait to get started. I have only recently come home from holiday to Cancun and Playa del Carmen so I was in tropical mode all the way. I chose the Underwater stamp set and let me tell you, it was full of gorgeous sea elements. When I saw it, I immediately got an idea in my head and went ahead and ordered the Decorative Edges set too, for its bubbles stamp. I am so in love with the faded Harlequin stamp in that set as well, but that's another story!
 
I gathered my supplies which include Tim Holtz distress inks, markers and a waterbrush, various embossing powders, some heat-proof acetate, watercolour paper and a pre-scored pearlescent square card. I also had at hand my water spritzer with pearlescent water, my craft mat, scissors, a heat gun and embossing ink, some gems and an idea-ology glass bottle with cork.
 
I started with my card base. I knew I wanted to have an acetate front so I decided to cut an entire panel from the front of the card. I cut my acetate to size and heat embossed in white my bubbles stamp from the Decorative Edges set. I glued my acetate to the small edge I had left on the front of the card and glued a strip to the bottom of the acetate to give it a bit more stability.
 
Once my base was on its way, I chose to decorate the inside of the card rather than leave it white. I cut a piece of watercolour paper slightly smaller than my card so that I could mount it on the inside. I pressed several colours of blue distress ink on my craft mat and sprayed with my pearlescent water. This created the marbled effect that I pressed my watercolour paper into. I quickly dried my paper and then pressed it in again to give more of a splotchy look. I set this aside to dry.
 
While my background was drying I stamped and heat embossed several images from the Underwater stamp set in different coloured embossing powders. I used metallic ones, and some with sparkle, to give my underwater scene a magical quality to it. Once these were ready I fussy cut them and watercoloured with my distress inks and pens.
 
Having finished my loose elements, I went back to my marbled background and started stamping a scene to be placed behind the acetate. Unfortunately while I was doing this, I was concentrating on what would be visible on the front while the card was closed and failed to remember that the card could be opened and the inside visible on its own. This made it a little bit challenging as I now had to make sure the inside would be just as appealing without the front of the card blocking it. I had also only stamped at the middle/top of the card and the bottom of the card was rather messy. To fix this I heat embossed a mix of embossing powers to create a sandy sea bed. This completed my background which I then adhered to the inside of my card.
 
With the inside of the card finished and the acetate ready to go, I started adhering my sea elements. I found with just the 3 coloured pieces it was looking very sparse so I gathered some gems and stuck those down around the bottom, to give the illusion of treasure on the sea floor. As a final addition to my card I 'aged' a strip of paper which I rolled up and inserted into my glass bottle. I added a bit of the same 'sand' mixture into the bottle and replaced the cork. This I stuck down with glossy accents.
 
Unfortunately all of the glitter and shine of the card is hard to capture on camera (at least for us amateur photographers) so a bit of the magic was lost on film, but I assure you, it's beautiful!


Thank you for taking the time to read my ramblings and thanks to Glenda from Chocolate Baroque, I hope to see you around here again some day. And if you feel so inclined, please feel free to come visit me at my blog over at http://abitofcraftygenius.blogspot.co.uk/ 

Sam


Thanks so much Sam for a great project, we love it!  Please join me in saying a big thanks to Sam by leaving her a comment, I'm sure she would appreciate it!

Monday, 25 February 2013

Crafting on the Edge (posted by Judith)

Hi Folks, I have a couple of samples to show you today showcasing the new Clear Edge stamp sets. In my first sample, I have created a sunny background with an ink wash. I then used a harlequin mask and Pan Pastels to start building up my background. I also stamped a script stamp from the Poppy Butterfly Collage stamp sheet using Versafine Ink, and then swiped Pan Pastels over the top. I added a decoupaged poppy and some butterflies from the same stamp sheet to my card, which I coloured with pencils. I created the border by using the harlequin edge stamp from the new Decorative Edges stamp sheet 


For my second sample, I created a watery background by painting inks onto watercolour paper, and dropping sea salt onto the background while it was still wet. Once it was dry, I brushed the sea salt away. I stamped a seaweed image from the Underwater stamp sheet onto the background. I then stamped a seahorse from the same stamp sheet onto a large Nestie shape, which I coloured and masked off. I coloured the background with Distress Inks, and added some more seaweed images. I then stamped the circle edge along the bottom, and embossed it with white embossing powder, to represent bubbles.


These edge stamps are so versatile, and can be used in so many different ways. Keep popping back to see what my Design Team mates have been creating. Thanks for stopping by, Judith xx