Pin It button on image hover
Showing posts with label Seashore Scenes. Show all posts

Friday, 21 February 2020

Above and Below by Penny

Hello everyone, I hope you're all warm, well and safe today.  With all the horrible weather we're having, the strong winds,the terrible flooding and all the damage to peoples homes I thought I'd share some bright and sunny projects with you.  These are some pages from a couple of calenders I made in 2018 as Christmas presents, having bought them from Chocolate Baroque.


Under The Sea.


The stamps I have used are Mermaid Queen and Underwater Kingdom sets, Distress Ink, Versafine ink, clear EP, pearlescent acrylics, alcohol pens and a stencil from my stash.

I stamped and embossed three images to create an underwater scene then coloured them all in using the paints and pens.  I masked the images then took a stencil from my stash and used blue DI to recreate the currents in the sea.


Sea Palace.

I have used stamps from the Seadragon and Underwater Kingdom sets, and the same products and tools as above.

I stamped and embossed some focal images then coloured them as before.  I then used the same stencil to create the background.  


Sunny Cove.


For this page I used stamps from the Seashore Scenes and Seaside Dreams sets, Versafine sepia ink, Clear EP, and Colouring pencils.

I stamped and embossed a scene  then added a border of shells either side.  I coloured everything with pencils.


Beachside Holiday.


This time I have just used stamps from the Seaside Dreams set,colouring pencils

I stamped and embossed the Beach Huts, and the borders, as before.  I then coloured the images with pencils.


Thank you for stopping by today, I hope my post has cheered up your day .  I shall be back next month with some more crafty fun, in the meantime stay safe.

Take care,


                             x x  Penny  xx

Sunday, 24 November 2019

ephemera

Today I am sharing some pix of a journal I made for the October tv shows.
I don't know about you, but I find that if I try to plan a project out in detail, it always goes wrong - happened again with this journal! It's much safer to just play, get messy and inky and then see what i have got.
I used a Sizzix journal die, and had plans to create a mixed media holiday souvenir journal using all the stamps in the ephemera sets and some older seaside related sets.


The cover went ok, using kraft card as the base with lots of gesso and paint splodged on. and the beach huts stamped in the centre, with the journey word. I also used a mini photo from Creative Individuals
 I ended up salvaging the better of the inner pages to create a slim journal - this one had another  CI image, the beach huts again, ammonite stamp , sea shells and the travel ticket.
I also used the chess stamps, the fountain scene, lighthouse and flower stamps to create the other pages.
 I did have fun - sort of - and next time I won't bother planning it out!


 I also reused an empty coffee can, covering it with kraft card and stamping images using brown ink, adding colour with pencils.


Thursday, 7 November 2019

Beachside Memories and Bright and Grungy by Penny


Hello everyone, I hope you are all well and not too soggy lol!  Yes it's still raining here in the West country so I've brought you a couple of bright and cheerful cards using the beautiful stamps from the October shows. 


Beachside Memories.

For the first card I have used stamps from the Baroque Ephemera 1, Baroque Ephemera 2, Eccentric Edwardian, and Seashore Scenes sets, Distress Inks, and sepia Versafine ink.


I took a piece of copier paper and stamped various images randomly all over it using DIs.  I then spritzed the paper with water and scrunched it up to create a distressed vintage look.  When it was dry I blended ink around the edges and over the ridges in the paper to add to the effect.  I then attached the background paper to an ivory base card.


I took some smooth white stamping card and stamped the post card image and the ticket images a couple of times in Versafine ink and coloured them with DIs.  I stamped a seaside scene onto one of the post cards and coloured it.  I cut out all the images then scuffed, rolled and blended ink around the edges to distress them.  I then stamped a couple more images and treated them in the same way before arranging all of them on the front of the card.  When I was happy with the design I attached them to the card.


Bright and Grungy.

For this card I have used stamps from the Floral Grunge, Baroque Ephemera 1 and Baroque Ephemera 2 sets, Distress Inks, matt spray inks, sepia Versafine ink.


On a piece of smooth white card I stamped the Floral Grunge image in the center and masked it.  I then used two colours of spray inks and spritzed the card.  When the background was dry I stamped several ephemera images using sepia ink.  On a spare piece of card I stamped the floral image again then painted and cut out the flower.     


I attached the spare flower in 3D onto the panel then blended DI around the edges.  I added gold pen around the edges then matted the panel onto brown card.  I took a white base card and blended yellow ink around the edges then attached the focal panel.  I stamped a word onto white card, cut it out and added ink around the edges before attaching it to the card.


Thank you for popping in today, I hope you have enjoyed this post and that I have inspired your crafty mojo a little bit.

Keep well and stay warm till next time,


                                                xx  Penny  xx

Tuesday, 17 July 2018

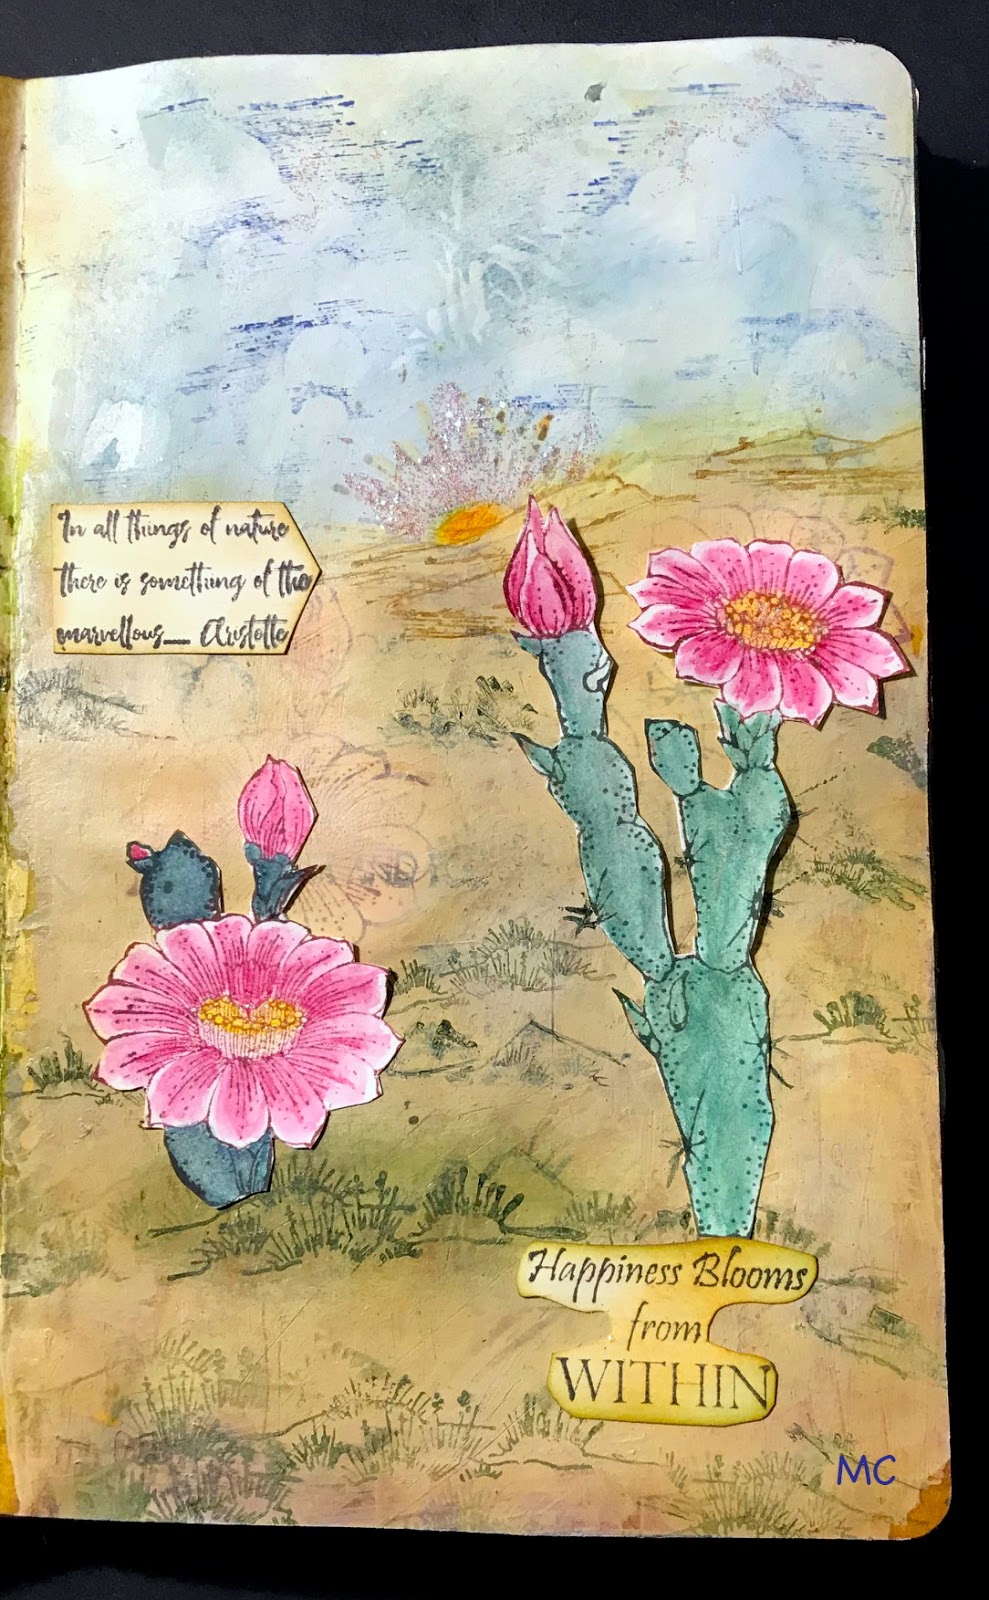
Succulents in arid landscape (by Magda)

This time I have been inspired by the arid land where the succulents grow so well, therefore my project has a sandy tone, a page that reminds me of the desert

1. Trace the horizon line and blend several brown and green shades of Distress Ink Pad for the ground
     and blue shades for the sky.
2.  Stamp with Archival or Versafine the grass in green, the clouds in blue and the sun in red.
     You can find the single stamps in "Seashore Scenes"
3.  Stamp the succulent plants with two archival colours,  pink for the flower and green for the plants
     and the grass
4.  Cover all the page with a very light coat of white gesso and let dry
5.  Repeat gently points 1 and 2
6.  Stamp the succulent plants again on a white cardstock, colour all with Aquarelle Pencils and cut
     the images out.
7.  Colour the sun in orange/yellow
8.  Prepare the sentiment and glue all the single pieces with Zig 2 ways Pen on the page as shown
9.  Add some stickles 


Thank you for saving the date of our next appointment at the end of the month.
Magda

Monday, 29 January 2018

Live in the Sunshine by Brenda


Hello everyone, I hope you are ready for a little more inspiration from the seaside and I hope the thought will warm you all a little during these cold dark January days.

The card above was created my using distress inks and a stencil to make the rope frame, then with the frame still in place I stamped the scene from Seashore Scenes using Versafine black  and coloured the scene with pencils and a little shading using Pan pastels. The quote is from the same stamp set.


Here I have used  a mixture of stamps from Seaside Dreams and Seashore Scenes, stamping all with Versafine black, extending the sky line with a fine marker pen and adding colour with pencils and Pan Pastels. The top sentiment comes from the same sets and the Birthday greeting from Birthday Words.


My final card uses another of the images from Seaside Dreams stamp set, again stamped with Versafine black and coloured in with sparkle pens and matted and layered with coordinating card. The sentiment is from Seashore Scenes.

I hope you all have a good week and find time for some stamping and crafting.

Saturday, 27 January 2018

Seaside Delights (by Julie)


Hello, thanks for popping in. 
I have three seaside themed cards to show you so I will get straight on and show my first card:


The background is Distress inks and then over-stamped with the shell and star fish from Underwater
The main image is a selection of shells stamped and masked from Underwater as before and then whilst all the masks are still in place, stamp the large single cling Ammonite shell over the top. When the masks are removed the large shell will appear to have been stamped behind the other smaller shells. The little star fish was stamped onto separate card, coloured with water-colour and then cut out and mounted onto the main image with 3d pads.
The sentiment is from Birthday Words.


My second card is a very simple stamp and colour card. 
The Ammonite shell was repeatedly stamped over the background and shaded with pencil. The lighthouse and seagull are from Seashore Scenes and were stamped onto separate stamping card with Onyx Black Versafine, before being coloured with pencils, cut out and mounted onto black card-stock.
The card was finished off with a sentiment from Seashore Scenes.


My third and final card is stamped using Seashore Scenes as before along with Mermaid Queen.
I started by creating the underwater background with shades of blue and green Distress inks. I applied the ink with cut n dry foam and used the straight edge of some scrap paper as a guide. Apply Picket Fence Distress Stain to add the highlights.
Next I stamped the mermaid silhouette with Onyx Black Versafine. I also reverse stamped this image by stamping the mermaid onto some plain rubber and then pressing the image down onto the design.
The little seahorse is from Mermaid Queen which was stamped with Versafine and then coloured with coloured pencils. The lighthouse scene is from Seashore Scenes , which I stamped onto spare stamping card, before colouring with pencils and then cutting out with a circle die. Before mounting onto the card with 3d pads I edged the circle with Hickory Smoke Distress ink.

Thanks for looking and please call back for daily Design Team inspiration

Julie xx

Sunday, 21 January 2018

seaside nights (by Veronica)

 Maybe I should have chosen to show you more cheerful cards, considering the horrible grey weather outside!
I love trying to capture night scenes, and here are 3 of my latest efforts for the Chocolate Baroque shows on Hochanda last month
The seaside scene is perfect for this, as it shows a lighthouse and a setting sun - couldn't be better!
I stamped it using black versafine ink onto white card, and coloured it with watercolour pencils and a water brush in greys, adding a touch of yellow and orange to the sun , clouds and sea.
The background uses the big ammonite stamp, stamped in grey ink randomly round the edges of the card blank, with the sentuiment added in black versafine.


The beach huts came next, stamped in black onto pale grey card, shading again with the pencils. I masked off the huts and used distress oxide inks sponged over the sky to create a sunset.
Sentiment stamped in versamark and whitye embossed onto a black card blank, then the beachhuts mounted above it.


Same method for the final card, apart from stamping onto black card, this time with clouds and a moon in the sky.

Thanks for supporting the DT blog, we love to read your comments There are more cheerful samples coming up the the rest of the team, so keep looking - we do try to show you something different!

Tuesday, 16 January 2018

Dreaming of the Beach by Brenda


A very good morning to you all, today I have some more seaside inspired inspiration to share using stamps from last months Hochanda shows.

The card at the top uses elements from Seashore Scenes and Seaside Dreams stamp sets all stamped in Versafine Toffee. After stamping the sky I coloured with Pan Pastels and also stamped the Seagull image. Next I stamped the shell border onto Kraft card, added some white highlights and used a die to cut the aperture to create the frame.......to do this you first cut round the top only of stamped image then place the die onto the card tucking the bottom section behind the stamping as below and it's always a good idea to fix the dies in place with low tack tape to stop them moving..............


You then have a frame with stamping as an integral part to place over the focal image. Finally I mounted onto a base card and added some string.


The focal image on this one is from Seashore Scenes stamped with Versafine black. I placed a sun mask in the skyline before colouring with a mixture of pencils and Pan pastels, added the sentiment from Seaside Dreams stamp set and also some foliage to the fore on the scene using a stamp from the Silhouette Grasses set.


Finally a CAS style card, I used a circle mark to stamp the Seagull from Seashore Scenes stamp set three times using Versafine Toffee, then used the circle from the mask and placed over the stamping and added some soft shading around the aperture using Distress Inks. The sentiment is from Seaside Dreams stamp set.

All of the stamps I have used can be found on the website here or by following the links above.

Thursday, 11 January 2018

Winter Sea (By Magda)

Even in winter the sea has its beauty and I love the sea during any season.  Therefore I want to share with you this journaling page spread with a frozen seahorse and a seashore in a foggy and rainy day.


I used  the following items 

For the left page :
Distress Ink Pad  Iced Spruce, Stormy Sky for the background
Forest Moss for the plants
Fired Brick  for the seahorse
Underwater stamp set
White Embossing Powder for the frozen seahorse
Stencil Seasonal Journey "Winter"
Translucent Paste
Stencil  Well rounded for the frozen crystals dots and stripes

For the right page : 
Seashore Scenes stamp set
Distress Ink Pad  Iced Spruce, Stormy Sky, Forest Moss, Brushed Corduroy for the background
Forest Moss for the plants
Fired Brick  for the lighthouse
Iced Spruce for the clouds, boats
Stencil  Well rounded for the rain 
Translucent Paste
White Gesso, a diluted wash on the page for the fog

What do you think to have a winter week end at the seaside ?
I wish you all a very healthy and crafty 2018,  hugs
Magda

Thursday, 4 January 2018

Take me to the Ocean by Brenda


Good morning and Happy New Year to you all.

Today I am sharing some of my creations made for Lesley's recent Hochanda show which showcases some lovely sea and beach inspired stamps.

Although it didn't occur to me when I made the card at the top, when Lesley mentioned on the show that it reminded her of the postcards which were always on sale in seaside resorts I could see the resemblance. I used various elements from Seashore Dreams and Seaside Scenes stamped in Versfine black coloured with pencils and the backgrounds added with Pan Pastels. 


This litter box had been sitting in my crafts room for a few weeks since one of my daughters in law 'donated' it to me and I thought the Kraft colour lent itself to the beach inspired stamps. All were stamped using elements from  Seashore Dreams and Seaside Scenes stamped onto card which I had colooured with Mica sprays, then cut round to add to all four sides of the box and a further panel on the top. I stamped the lighthouse several times onto shrink plastic, cut out and punched a hole in to top of each piece...............do remember to do this before shrinking as once shrunk it's impossible to punch and cut through, then tied the pieces to the box with twine.

The top of the box


For this one I stamped the main image from Seashore Scenes again using Versafine Black and coloured with pencils and Pan Pastels and fixed behind a circle aperture, added a border round the aperture and a die cut anchor.


This one is a fairly quick and easy card, stamping the image from Seashore Dreams with Distress Ink and dragging out some of the colour, then added some tiny shells collected from a beach in Majorca a year or two ago. The sentiment is from the same stamp sheet.


As always my thanks for popping in today and I hope I have given a little inspiration to get you stamping and thinking ahead to warmer days by the beach.

Friday, 17 February 2017

monchrome bridge (by Veronica)

 I thought I wouold try something different using the lovely bridge stamp from kingfisher song, too nice an image to just use in the background.
i stamped the stones from sticks and stones in the foreground, and then the bridge, with the clouds from the seashore scenes stamp set.
The sky was sponged roughly with distress inks, with white pencil highlights to the moon and clouds.
I used grey brusho powder for the bridge and river, with black and grey watercolour pencils for the trees and stones, with more white pencil highlights.
The second version used a mask for the moon, and the iris leaf stamp repeated across the front to give depth. I added some turquoise brusho powder to the grey this time for the river, and stamped the leaves several times across the base card.
I had great frun doing these, and was pleased with how they turned out, so hope that you like them too.

Monday, 12 September 2016

seaside (by Veronica)

For my second post this month I decided to use a bargain canvas from a supermarket - think the heat must have been affecting my brain, as not my usual thing at all!
I found an old pot of grunge paste, added a little hot water as it had gone very stiff and stirred it in well, then spread the paste round the edges of the canvas. Stamped into the corners using stamps from the harlequin fragments set, then sponged with distress inks when the grunge was dry.
Fish and seaweed from something fishy and gulls and lighthouse from seashore scenes were all stmaped onto white tissue paper using black versafine and coloured with alcohol markers, torn out and added with matt multimedium.- another old pot, seemed a bit discoloured, but then I had no idea what it looked like new, and it worked anyway.
Main image from seashore scenes stamped onto white card, coloured with watercolour pencils then embossed with clear EP, then glued into the centre of the canvas, Small pearls for the bubbles from the shell, then two seashells added to finish it off.

Thursday, 11 August 2016

Seashore by Veronica

Our theme this month is summer, which to be honest is really what you would expect!
My first thought was to use some of my favourite poppy stamps, but they have had a lot of use, so I went for seaside.
My first card uses stamps from seashore scenes, and I tried to create a slightly different scene.
The seagull was stamped first using black versafine ink,, then masked with masking tissue and the scene stamped over him - I didn't ink the stamp all the way to the bottom, as I wanted it to be background. The dunes at the front were stamped using the larger sand/grass stamp stamped several times to form foreground dunes.
Dunes and stump were coloured with alcohol markers, bird and everything else with watercolour pencils..
Base card is 15cm square, stamped with the sentiment several times to form a background using a pale brown inkpad. The scene was matted onto black and gold card.


My second card used the something fishy set of stamps, and the main image was stamped in black versafine, then the larger fish image added beside it.
Simply coloured with watercolour pencils, and glossy accent added to the bubbles from the shell.
Base card this time is A6

My teamies have some smashing ideas to show you, so keep checking, you won't be disappointed!

Sunday, 3 April 2016

Days of Summer (by Julie)


Hello crafters, hope you are having a lovely weekend. I thought I would share a little Summer creation  made with Seashore Scenes in anticipation of the glorious Summer ahead....well we can hope can't we?!


The base of this project is in fact a shop bought decorative plaque that I picked up in the reduced bin of my local super market for 75p......I love a bargain LOL!
I started by covering the plaque with Texture Paste applied through a stencil and once dry I applied a couple of coats of white Gesso. A black gilding wax was lightly applied over the dried Gesso to emphasise the stencilled background followed by the tip of a paint brush dipped into acrylic paint to create the red, white and blue dotty background.
A strip of jute was glued to the background with Glue N Seal, followed by a scrap of corrugated cardboard on top. The Lighthouse scene was stamped with Watering Can Archival Ink onto watercolour card and painted with brush markers and then glued into place with 3D glue gel along with the shells.
White Gesso was added to the cardboard and jute before sticking them into place.

Thank you for taking a peek at my project and please call back for much more Design Team Inspiration.

Thank you
Julie xx

Thursday, 15 January 2015

Colourful Hearts (by Asha)

Good morning, friends! Today I have 3 card projects to show you, featuring the Punky Hearts and Fluttering Hearts stamps.

For my first card, I matched the Punky Hearts and Words Of Comfort & Cheer on this watercolour piece. The clouds in the background are from Seashore Scenes.

Next up is this delicate CAS (ish) number showcasing a stamp from Fluttering Hearts set, which is coloured with alcohol markers. For the background I used texture paste and glitter.

For my third card, the spotlight is on the large heart stamp from the Punky Hearts set.  To make the background I used the little hearts stamp from the same set. I finished the card with an embossed panel, eyelets, liquid pearls and some twine.

There you have it - 3 cards in different styles. I hope you've been inspired to play with your new stamps. Details of inks and colours are available on my blog. Don't forget to swing by regularly for more crafty ideas from the rest of the DT.

Beijinhos,
Asha