Pin It button on image hover
Showing posts with label retro florals. Show all posts

Sunday, 30 May 2021

Marked Retro (By Doreen)

                                                                      Marked Retro


Hello Everyone, welcome to my third post for May, Marked Retro uses 3 stamp sets


 Make Your Mark

 https://www.chocolatebaroque.com/make-your-mark-rubber-stamp-sheet-dl.html

Life Is So Much Better 

https://www.chocolatebaroque.com/life-is-so-much-better-rubber-stamp-sheet-a5.html

Retro Florals   These are available by phoning Chocolate Baroque Direct and speaking to David or Lesley, they are not on the website.


Take an A5 piece of glossy card and randomly splash with Distress Inks ( I unscrewed the tops from sprays and flicked the ink in the tube onto the card, please make sure to cover surfaces as this is quite a messy process) Leave to dry. Once dry randomly use the stamps from the Retro Florals set using  Distress Inkpads squished onto a glass surface or messy mat as this will stop you contaminating your inkpads. Then you may wish to use a stamp press to use the Make Your Mark  stamps as you an achieve a really black mark by inking and stamping until you have the black you require.

Leave to one side to dry thoroughly (this will take a while) 

Take a couple of small scraps of card 1 piece of black and I used a rusty coloured piece of scrap but if you don't have a piece to match ink a piece of white card leave it to dry properly before using it to stamp your sentiment. 

Buff the dry topper using a soft tissue until you achieve a beautiful shine. 

 Mat and layer onto a black card blank. Add mat and layered sentiment.


Thank you for looking today

Love Doreen 


Monday, 24 May 2021

retro notelets


I created two sheets of background card using my craft mat, peeled paint and broken china distress inks and a waterspray. 


I cut pieces to ft the small 4x4" notelet cards and also a larger piece to fit the 6x6" card blank I used as the base for the wallet.

I stamped different flower images from the retro sets  onto the notelets, and also one onto the larger piece along with the sentiment from say it vertically


I also made some tags using the same stamps and sponged and stamped backgrounds and sentiments from Life is so much Better


Sunday, 23 May 2021

Groovy!

 Hello

I'm sharing more of my samples from the April show on The Craft Store

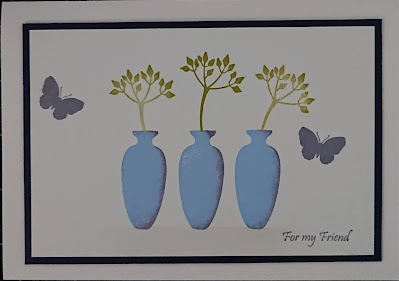
These cards feature the Retro Florals and Retro Vases.  If you were lucky enough to get these stamps you will know that there were over 100 stamps! The stamp sheets were filled with flowers, leaves, vases and geometric shapes. Lots of cutting out, but worth it. I've also added sentiments from Life is So Much Better and Say it Vertically.


For this card I first created a background by blending dye inks. I then stamped some circles and over stamped with flowers in a contrasting colour.


For this card I used a 6x6 card base. I then cut a 6x6 panel and used  Chocolate Baroque Draw and Tear Rulers to make the decorative edges. (I used the rulers to draw a line approx a third of the way in. I cut along the line  and used these two pieces as "pages" for the front of my card.) I decorated each piece with the shapes, the vase and flowers and a sentiment before assembling the card


This very simple, but effective card is made by using the different sized circles from the sets and stamping in Oxide inks. 


For my next card I stamped the trio of flowers and added some leaves. I then die cut a window box for them. I pierced a few holes on the bottom corner to give a little detail whilst still keeping the card clean and simple.


Next, I masked off an area on my card blank and blended some dye inks. I used the same colour to stamp some circles. I removed the mask and stamped the vase and stem. I decorated the vase with one of the stamps also in the set and added some white pen for a highlight. I added a sentiment and a couple of butterflies to finish.


For my last card I inked up the vase in light blue archival ink and added a darker shade to one edge to give some dimension.  I added the leaves, a couple of butterflies and a bit of shading under the vases to ground them.


I really enjoyed these Retro stamps.....can you tell? Hopefully I have given you some inspiration.

Sandra xx

Sunday, 9 May 2021

Retro Meadow ( By Doreen)

Retro Meadow


Hello Everyone, well here we are already into May ... Can you believe it ? 

Today I am sharing this simple but effective technique which is very achievable to the beginner and going forward. It also makes for a rushed card needed quickly and without a fuss.


To make the Landscape style card you will need :

One A4 piece of card folded in half.

Half of an A4 piece of stamping card plus the same in a contrast colour of your choice to mat and layer.

The stamps used are a selection from the Retro Flowers A4 set of stamps, which although are not available on the website can be ordered via a quick call or email if you prefer to Chocolate Baroque where Lesley or David will provide you with any information you require. I have also used a sentiment from Life Is So Much Better

https://www.chocolatebaroque.com/life-is-so-much-better-rubber-stamp-sheet-a5

 I have used a selection VersaFine Clair Inkpads to stamp my images randomly across the width of the card starting with the 1st generation and stamping without re-inking until there is no ink on the stamp,

Then using the stem stamps in the set I have chosen 3 different shades of green to give the long grassy effect starting with the lightest colour and working my way through until happy with the result.

Trim your contrast card to your desired size and then trim the stamped piece accordingly. I am always inclined to glue the contrast card in place and raise the stamped image with foam pads. 

Thanks for Looking in today,

Love Doreen


Saturday, 8 May 2021

Beautiful Florals - By Rachel

 Hello there! I have three makes from Lesley's April shows to share with you today - I am sharing samples made using the retro florals and retro vases sets in the main but I have used the make your mark ones too.

In this first sample I covered some greyboard with a piece of 8x8 paper from one of the Craft Store shows that Lesley did earlier on and then added the flowers to it to make a wreath. I had created the flowers by stamping onto other papers and fussy cutting - same with the leaves. I then added the central sentiment and a little stamping with the make your mark set.

This one was using the retro vases and retro florals and I had a lovely time pattern building in this one - I used different coloured inks and repeated the patterns around the central circle.
And finally my ATC holder/display case. I had this in the cupboard and thought the size of these stamps really lent themselves to ATCs so I first made a masterboard using distress oxides then cut it into ATC sized pieces then decorated each one with different combinations of stamps from the sets. Some I just stamped in black, some I stamped in versamark and added white embossing powder before heat setting and fussy cutting. I painted the frame in black gesso and then assembled the whole piece.

I hope you have a great day and that I have given you some inspiration of ways to use your stamps.

Big hugs

Rachel x

Tuesday, 4 May 2021

my world is full of colour (by Veronica)

Hopefully you all enjoyed the bank holiday weekend - the weather was the usual iffy sort here, so I thought some bright colours might be in order today!

Last month's TV shows on the Craft Store channel featured some very different stamps, retro florals and retro vases, and these were some of my samples.

The first one used circles in different sizes and three old multicolour ink pads. I started with the larger circle stamped once in the red part of the pad then surrounded by more circles in the orange. Trying to get a rainbow, I used smaller circles in the greens and finally in blues. 

The second card used randomly stamped floral images from the two sets using the same dye inkpads. The sentiment on both cards is from the artistic affirmations stamp sheet


 I used some of the solid shapes from the sets arranged on a stamping platform to make the other samples. The first card is a DL, with the stamps inked up using the blue multicolour inkpad and stamped straight onto the card blank.the the sentiment from Life is so much better stamped above.

 I used the same panel this time coloured in rainbow colours using Koh-i-Noor marker pens onto a square of card, then added a sentiment again from Life is so much better stamped below. The background was inked with distress inks and a flower spray from retro florals  randomly stamped using the same inks.