Pin It button on image hover

Sunday 31 December 2017

New Year's Eve Butterfly (by Judith)

Hello everyone, I hope that you all had a lovely Christmas and are enjoying a bit of quiet time over the festive break. This year seems to have gone so fast, and has brought many changes, I even made my first tentative steps onto live TV! Whatever you have done and are looking forward to in the months ahead, I would like to wish you all a very Happy New Year, and a healthy, creative 2018, from all of us on the Design Team. We are looking forward to sharing lots more inspiration with you next year.

I have some cards to share today using stamps featured in last month's TV shows on Hochanda. To create my first card, I made a background using Brushos, spritzed with water. I wanted to create the effect of a Wintery sky, and so I chose shades of blue, purple and grey for the background. I stamped a large butterfly from the Tangled Garden stamp set onto a piece of sparkly acetate, and stuck this to a piece of coloured background that I had in my scrap box. By chance, this was a very similar colour to my Brusho background. I fussy cut the butterfly out, omitting the antennae.

I stamped the sentiment from the Words of Inspiration stamp set, and an image from the Seasonal Fragments stamp set onto the background using Versamark and silver embossing powder. I added a few sparkly gems randomly throughout the fragment images. Just before I stuck the butterfly to the background, I stamped the antennae onto the background, using black ink.


Here are a couple more of my show projects, a pretty gelli plate card using another image from the Tangled garden stamp set:


A necklace and tag using images from the Bold Blooms and Words of Inspiration stamp sets. I have used shrink plastic to create the necklace:

Finally, a card made using Soft Form Relief Paste to create the focal point, adding gilding wax over the top, to pick out the fabulous detail of the stamp:

Thanks for stopping by,


Saturday 30 December 2017

Dreamcatcher (by Magda)

Some days ago, I was reading about the history and the origin of the dreamcatcher and looking later at the Tangled Garden stamps, I have been inspired to make this card.

As you can probably notice, I always used the opposite Aquarelle colour from the colour wheel both for the flower and the leaves. I like the result of this painting so full of popping up contrasts. Remember to use Archival  or Versafine when you colour images with watercolour.


Thank you for passing by.
Magda


Friday 29 December 2017

Bold Blooms Wall Art (by Anne)

Good morning. I used the Bold Blooms and Tangled Garden stamp sets to create this 3D wall art piece.


Materials:
  • Bold Blooms and Tangled Garden stamp sets
  • White Board Shapes – Hearts and Circles sheet, 8 X 8 inch construction acetate (recycled packaging), black card (for decorative die cut frame), mount board (backing and outer frame)
  • StazOn Inkpad (Jet Black) and Versamark
  • Alcohol ink pens (blues and pinks)
  • Gesso (White)
  • Acrylic paint (light blue satin and metallic pearl)
  • Coloured art pens, glitter and metallic pens (blue & pinks)
  • Double sided sticky sheet
  • Embossing powder (clear with sparse fine blue glitter), Ultra thick embossing powder (UTEE - plain clear and clear with mica sheen)
  • Glitter (extra fine clear and chunky black) and glitter glue (silver)
  • Large decorative frame die and texture stencil
How it was made:
  1. The flowers were stamped onto the acetate sheet using StazOn Ink. Alcohol ink pens were used to add colouring to the back of the images (StazOn would bleed with alcohol markers). Some areas were left uncoloured. White gesso was then painted onto some areas to make them opaque (alcohol inks are transparent).
  2. Double sided sticky sheet was then attached to the back and extra fine clear glitter applied with some chunky black glitter around the edges. A decorative die cut frame was then glued to the front.
  3. The shapes were pushed out of the laser cut sheet and the waste was painted with light blue acrylic paint and trimmed around to make an overlay. Images were stamped with StazOn, aligning them carefully with the images on the base acetate sheet. They were coloured with various art pens. Versamark was then applied and a layer of clear embossing powder with fine glitter applied.
  4. Some of the circles were stamped and coloured with art pens. Versamark was applied and they were double heat embossed with UTEE (one layer with mica sheen, one plain clear).
  5. The embellishments were all glued down with 3D glue gel. Silver glitter glue was added around the border and onto elements of the stamped images.
  6. The mount board frame was decorated using pearl blue paint using a texture stencil. The piece was then mounted onto backing board and the outer frame glued in place.

Wednesday 27 December 2017

Floral Wreath (by Rachel)

Hello everyone, today we have the final post this month from our Guest Team Design member Rachel Fisher. Rachel has created a floral wreath, using stamps from the Tangled Garden stamp set:

To create her wreath, Rachel used an MDF base, which she coloured with Distress Inks. She then stamped the flower and butterfly images, also colouring those with Distress Inks and adding accents with sparkle pens. She fussy cut the images before attaching them to the wreath. This pretty wreath would make a great piece of home decor all year round.

Thank you Rachel for your beautiful projects this month. Rachel will be back with more designs next year.


Tuesday 26 December 2017

flower power (by Veronica)

 I hope everyone had an enoyable Christmas, with lots of crafty goodies coming your way! It was nice to be able to sit and watch Lesley on tv on Saturday, even though I should have been sorting stuff out.....

 Here are the last of my samples using  the flower stamps.
I made notelets using kraft card, with white embossed images, coloured using some ancient pots of H2Os.
I made a folder to hold them, just a sheet of card folded into three. The background stamp was stamped using vintage photo distress ink, and the fuchsia stamped and embossed in white onto an oval die cut in brown card.


My final card used the lovely big lily stamp, stamped in black versafine and clear embossed. It was coloured with brusho powders, trying to keep most of the powders in appropriate places -not always successfully.
After spritzing with water I used a paintbrush to spread the colour into the petals. Once dry, the sentiment was stamped and the image trimmed to fit onto a 5"x7" white card blank with a red mat layer.

Monday 25 December 2017

On this Christmas morn (by Lesley)

 
It is Christmas morning and perhaps you are already doing things in the kitchen, unwrapping presents with the family, or getting ready to go out for a super Christmas lunch.

Whatever you are doing today I would just like to take this opportunity to thank you for all your loyal support over this past year.  We started this year by launching on Hochanda, and we have been beamed into your homes frequently during the last twelve months. The response to our products and shows has been immense and we are truly delighted that you have taken us to your hearts.

David and I are constantly pinching ourselves that we are so lucky to be surrounded by our stamping family.  From the wonderfully talented Sue, who designs the most exquisite stamps, to Judith who is head of our amazing Design Team girls, and also our latest tv star, through to all of you. We could not wish, nor want, to be in better company.

We have quite a few new plans for 2018 and some exciting stuff is just around the corner, but until then may all of us at Chocolate Baroque wish all of you a wonderful and joyful Christmas, and may the New Year be good and kind.

Merry Christmas everyone.


Saturday 23 December 2017

Bold Poinsettia (by Judith)

Hello everyone, as Christmas Day draws near, I hope that you are all nearly ready with your plans and preparations, whatever you are doing. I have a festive card to share with you today, using stamps featured on last month's TV shows on Hochanda.

I created an inky background using Distress Inks, which I spritzed with water, and stamped a leafy spray from the Steampunk Christmas stamp set on the background, and added a sentiment from the Let's Get Festive stamp set.

I stamped and embossed some leaves and a flower centre from the Bold Blooms stamp set onto cartridge paper, using gold embossing paper. I coloured the images with ink and a water brush, before fussy cutting them out, and attaching them to the background, to create a poinsettia style flower.

Have a lovely Christmas everyone, and if you get a chance, do try and watch Lesley on Hochanda today. Her shows are on at 12.00 and 3.00. Thanks for stopping by, Judith xx

Friday 22 December 2017

Something floral by Zoe

Good morning Lovelies! It’s my birthday today so it’s nice to share my projects today that featured on Hochanda.

I made a set of 4 ATC’s using spring colours in Distress inks, I used white pen to highlight areas.

Gesso resist technique with Distress inks, decoupaged and also coloured with DIstress inks.

White embossed onto watercolour card, I then watercoloured using watercolour markers.

Heat embossed in black, masked off while I blended Distress inks for the background then finished off by colouring the butterfly with sparkle pen.


Using a scrap of Journal cardstock I watercoloured using sparkle pens, I then used a gel medium to ink up my stamp, once dry I used black hot foil and ran it through a laminator.

Mail art blending with Distress Oxides.

Created a mask with masking tissue from website and just repeat stamped, coloured my flower using Sparkle pens and some blobs of gold glitter glue to the centre.


Thank you for visiting, I hope you like my creations. Have a wonderful day and Happy Christmas xx Zoe xx 

Thursday 21 December 2017

Flight of the Butterfly by Brenda


Hello Peeps, are you all ready for Christmas, I do hope so as suddenly it is almost upon us ? 

It's my turn to share some more inspiration from Lesley's November shows on Hochada which was all about beautiful Blooms and Butterflies. For my card at the top I used Distress Inks to create a really intense background as a backdrop to the Butteflies from Tangled Garden. Onto the background I stenciled some leaves from Useful Leaves and a corner flourish using texture paste. After stamping with Versafine Black I cut out the three Butterflies and coloured them with sparkle pens, added wire antenna, fixed onto the base and stamped a sentiment from Words of Inspiration.


This is another of my backgrounds that I referred to earlier this month, again using acrylic paints and crackle glaze. The focal bloom is from Lily Fuchsia and Hyacinth multibuy stamped with Versafine Black and also leaves from he same set.  I added a little colour to the flower with pencils and matted and layered onto coordinating cardstock. If you have time to make up some backgrounds as I do, then it makes it really quick and easy to assemble a card.


More oxide inks this time using offcuts which I always keep as I am quite keen on triptych style cards. Using Versafine Black I stamped three different flowers from Lily Fuchsia and Hyacinth multibuy, coloured with pencils and added some cord and a sentiment from Birthday Words .


I used regular Distress Inks to create the shaded background onto with I stenciled some flourishes and then stamped the bloom from Breath of Spring, coloured in with pencils, added a sentiment from Birthday Words, some stickles and ribbon.


Using the Versafine Black and the corner stamps from Lily Fuchsia and Hyacinth multibuy I created a frame onto a piece of Design Paper. Into that I stamped the Lily from the same set, coloured in with pencils, added a sentiment from Birthday Words and some ribbon to finish.

As we are only days away from 'the' day I would like to wish you all a very Happy Christmas and a crafty 2018.

Wednesday 20 December 2017

Black and White Christmas Card (by Rachel)

Hello everyone, today sees the second post this month from our Guest Design Team member, Rachel Fisher. Rachel has created a sylish black and white Christmas card for your inspiration:

To create her card, Rachel first stamped the main image using Versafine Onyx Black Ink. She cut around the image and mounted it onto the card blank. She then stamped the snowflakes and sentiment using Versamark, and added white embossing powder.

Rachel will be back next week with her final post of the month.


Tuesday 19 December 2017

Hydrangea (By Marga)

Hello everyone. Today it's my turn to show you a new card.


First I made a background with Distress Ink. Then I stamped the stamp on the background with a brown ink. I also stamped the image on white paper and cut out the flower and put it on the card.
Finally, I used some embossing powder .

Stamps I used: Hydrangea Tag stamp set

Hugs Marga


Monday 18 December 2017

Hyacinths and More (by Julie)

Hi there, thanks for stopping by. Here are three more floral ideas that I made for Lesley's Hochanda TV shows.


My first card is stamped with Breath of Spring. The focal flower was stamped onto water-colour card  with Onyx Black Versafine and coloured with pencils before adding Crystal Stickles. The background is a mixture of Brusho powders and once dried acrylic paint was sponged through a circle stencil. White Gesso was painted around the flower to make it stand out from the background and the card was finished off with a sentiment from Birthday Words.


My second card is made from one of the smallest stamps from the Lily set. I inked up the little foliage stamp with dark green Versafine and repeatedly stamped it in a circle design. No special measuring or positioner was used. The trick is to move the stamp around so the little hook on the end of the design forms a circle which you can see in the centre of the design. The background has been coloured with Distress inks and the sentiment is from Birthday Words.


For my last card I have used the very versatile Hydrangea Tag.
The centre panel was stamped with the script stamp which I inked up with a plum coloured dye ink. I stamped it several times to cover the panel before colouring the background with Distress inks. The little tag design was stamped with the same ink, coloured with Distress inks and then cut out. I threaded silver elastic cord through the tag and around the centre panel before mounting onto the card with foam pads. 
The base card was stamped with the Hyacinth from the Hyacinth set which I inked up using the plum ink as before.

Many thanks for looking.

Best wishes
Julie xx

Sunday 17 December 2017

Near the sea (by Dominike)

Hello,

Christmas holidays are coming and it's always the same thing, for me, holidays is the sea...
So for these beautiful stamps, I prepared cards with blue and gold. In France we send cards overall to celebrate the New Year.

Bonjour,
c'es bientôt les vacances et pour moi, cela signifie, la mer...
Alors, pour ces magnifiques tampons, j'ai réalisé des cartes de voeux, bleu et or.


J'affectionne ces tampons.

This is my last post for 2017. I wish you a Merry Christmas and an Happy New Year. I will be back on January 2018.

Kind regards.

C'est là mon dernier message pour 2017. Je vous souhaite un Joyeux Noël et une Bonne Année. Rendez-vous en janvier.

Portez vous bien. A bientôt.


Saturday 16 December 2017

Flower Cards (by Magda) -

Hello girls,  I want to share with you three cards I made with the lovely stamps that Lesley demonstrated during the December TV Shows.

These projects have used the same technique : I used Versafine Onyx Black for stamping
Hydrangea  Tag
Lily
Breath of Spring 
and coloured the flower with Distress Ink Pad  .  I spritzed the background of the mat with the same Distress colour and stamped again part of the stamp on the background of the card.
I used some  Stickles on the flower and some mica too to lighten the cards


I hope you liked my projects today and I wish you a nice crafting week.
Magda

Friday 15 December 2017

Fifteen Minute Cards

Hello everyone, today sees the last of our Fifteen Minute Blog posts for 2017. We hope that you have enjoyed our monthly dose of inspiration, sharing our top tips and ideas for quick cards and projects made in fifteen minutes or less. We will hopefully continue to inspire you next year, but for now, please enjoy what the Design Team have to offer you this month.

We have a collection of floral cards from Brenda this month, using a range of stamps featured on last month's TV shows on Hochanda. Brenda has created a diverse collection of cards ranging from bold and bright, to pastel and subtle, there is something in her collection for everyone.

Her first two cards were created with Brushos, blowing the watery paints across the card in the first, and colouring the image with the same colours of Brushos:


For her second card, she used the Brushos to create a 'splat' for big impact. She added a stamped image over the top:

For her next card, she masked her background, leaving an oval aperture, which she coloured with Pan Pastels, and stamped the flowers using water based markers.

She used blue ink to stamp the images on her next card, colouring the Fuchsia with sparkle pens:

Another card using masking and Pan Pastels next, this time, she created a band of colour across her card, and while the masks were still in place, she stamped her images over the coloured area.

She created lots of flowers on this card using a selection of the leaves found on the stamp plates. She used water based markers, and spritzed with water to intensify the colours:

Finally, she created a wavy band of colour using masking and Pan Pastels across her card, and added some stencilling. She removed the masks and stamped the butterfly and sentiment:

We have a selection of cards from Rachel next. Her first card was created by stamping the large flower onto black card using clear embossing powder. It was the coloured with metallic crayons, fussy cut, and adhered to the background:

The next card was created by adding alcohol inks onto yupo paper, and stamping the image with Archival Ink:

A kraft card project next; using white embossing, and simply colouring the main hydrangea image:

Finally, she has used film and fibres when stamping the pot and flower image in her last card.

Marga has created a pretty monochrome card, stamping the flowers in matching tones of Distress Ink for her first card:

Her second card, with its colourful background has been made with pigment powders:

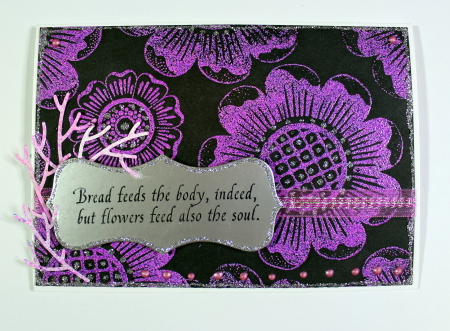
Anne's bold card was created by stamping and embossing the blooms onto black card using a mix of pink and purple embossing powder. The sentiment has been stamped onto metallic card using Stazon. To complete her card, she has added twiggy die cuts, pearls, ribbon and glitter glue:


The first of our Christmas makes come from Gerrina, who has made two fabulous CAS style cards for us. To create her first card, she stamped the trees with Distress Ink, then added the baubles and drew the hills with more Distress Ink and a water brush:

For her second card, she stamped the images with black ink, and then coloured everything in and drew the scenery with Distress Ink and a waterbrush:

Three Christmas projects from Magda next; the first was created by stamping onto a patterned background. We all have remnants in our stash boxes, and this is a great way of using some of those pieces up, especially at this time of year, when we need to make lots of cards.....quickly! Magda has chosen beautiful muted colours, very reminiscent of this time of year:

The last two cards have added texture using gesso, but you could use texture paste, glitter glue, whatever you have lurking around in your craft room:


We have two pretty Birthday cards from Julie next, she has used a combination of stamps to make this first delightful card, which would really put a smile on anyone's face. The ladybird is so cute! The tone on tone background stamping is very clever, filling in the gaps, but giving quite an airy feel to the background.

She has used a lovely combination of colours for her second card, useful as a card at any time of year:

Carole has created a very stylish Christmas card, using a simple colour scheme of red, black and white. She has stamped the pine cone image three times, placing the final image on a die cut circle for added interest. Some red ribbon and subtle matting gives the card a vibrant pop:

Last but not least, we have a very stylish card from Zoe, who has used a shaped card, and added a lovely teasel image:

We will be back with another Fifteen Minute post for you next month. In the meantime, do keep visiting the Design Team blog for a daily dose of inspiration from the Design Team girls. Thanks for stopping by,