Pin It button on image hover
Showing posts with label Patchwork Butterfly. Show all posts

Wednesday, 27 April 2022

Butterflies! (by Christine)

This is my final post on the blog for a little while and you will see there is a bit of a theme running - butterflies!

Chocolate Baroque have many beautiful butterfly designs in their catalogue so I was rather spoilt for choice. For my first project, I used the largest stamp from the Patchwork Butterfly stamp sheet. Using C

Versafine Onyx Black ink, I stamped it straight on to my card. I then used Distress Inks, (Twisted Citron, Abandoned Coral, Salty Ocean), around the edge of the card to give the card a sort of gentle coloured halo, leaving the area closest to the image white, as a highlight. 

I chose watercolour pens to colour the image, finally adding some Glossy Accents along the black body and gold Liquid Pearls on selected areas. I chose not to add a sentiment for the moment - I will add one if I need it for a particular occasion. There are many lovely sentiment stamps on the Chocolate Baroque website.

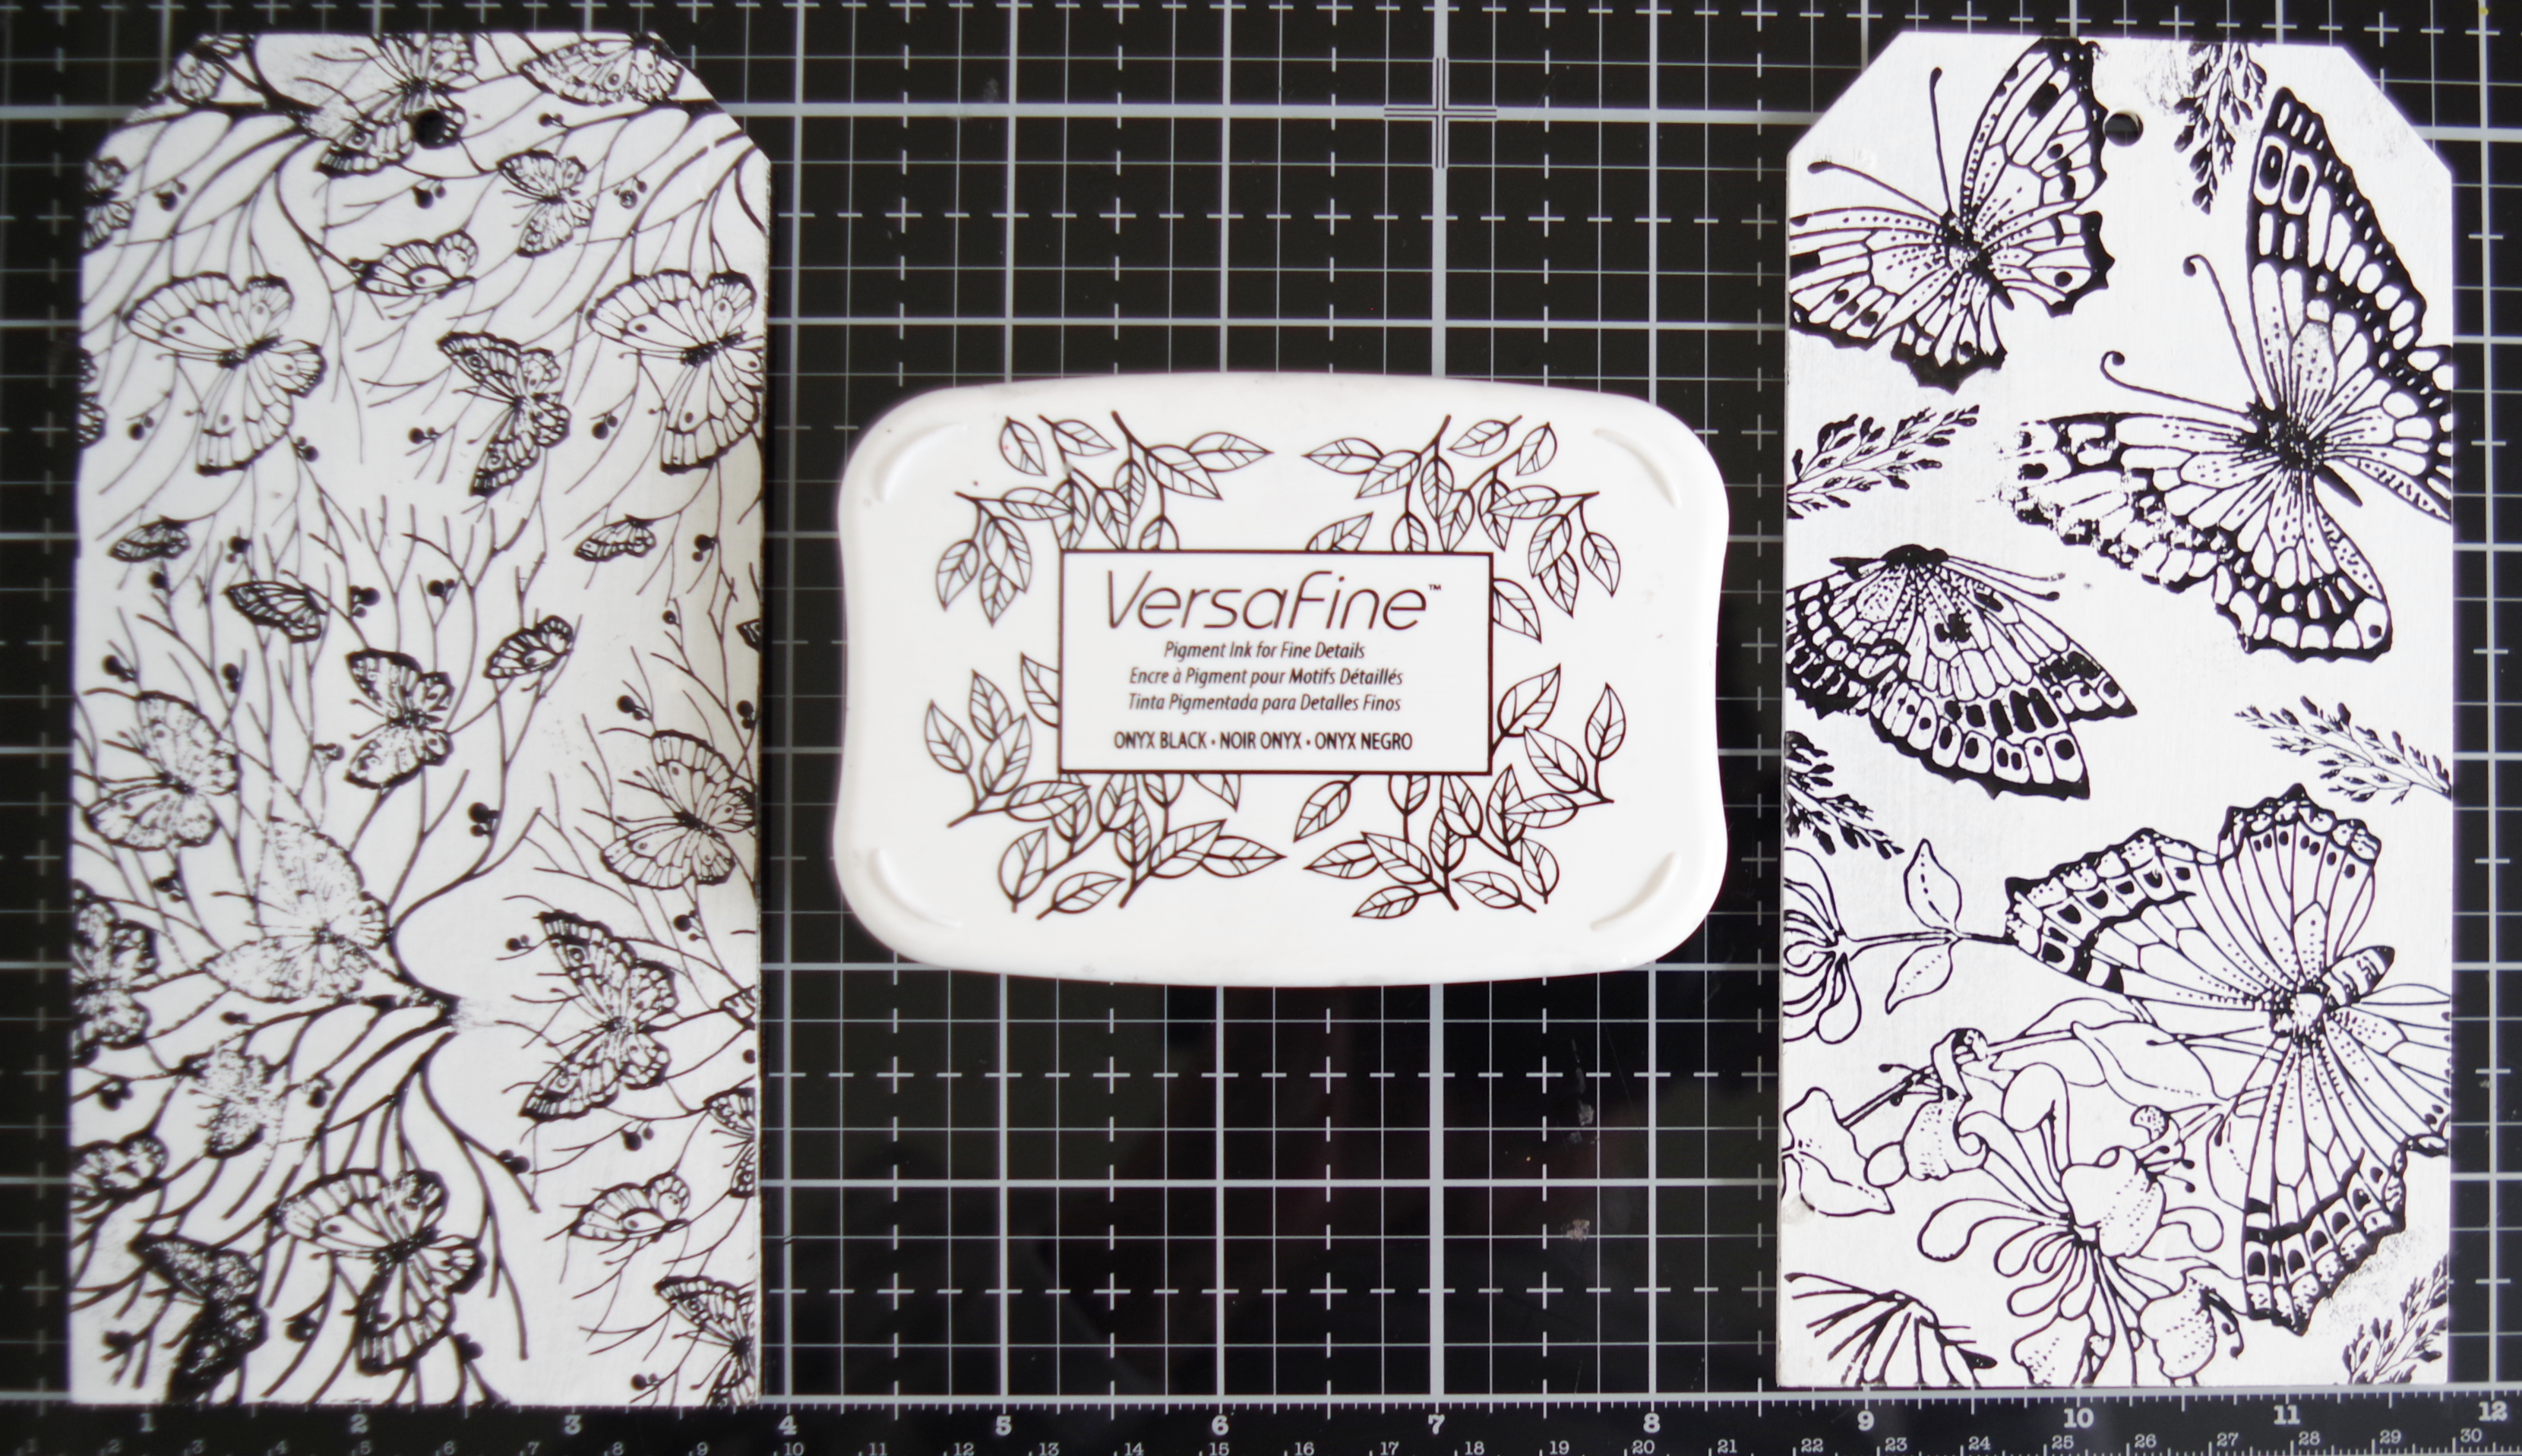
 My second project comprises two tags. One used the Butterfly Tree from the Essence of Nature set, the second a selection of butterflies from the Honeysuckle Butterfly set.

I used Versafine Onyx Black for both tags.


The background for the Honeysuckle stamps was created by spraying purple and yellow inks through a stencil. I used a white gel pen to pick out some areas on the butterflies and then gold paint on others.

The background for the Butterfly Tree was created using acrylic paints and a stencil on my gelli plate and then taking a print straight on to the tag. I used coloured pencils to highlight each of the butterflies and finished them with Glossy Accents.


 I do hope you like the projects.

Happy crafting and take care.

Christine

xx


Monday, 21 February 2022

Having Fun with Backgrounds (by Judith)

Hello everyone, I hope that you are all keeping well. I have a couple of projects to share with you today on an 'Anything Goes' theme. There are so many stamps to choose from in the Chocolate Baroque stamp collection that I had a hard time narrowing down my choices for my final blog post this month!

For my first card, I decided to make a useful Birthday card to add to my stash box, handy for when I need a card in a hurry. I took a piece of fabric and frayed the edges. I painted the fabric using watered down acrylic paint. Using Archival ink, I stamped an image from the Brocade Backgrounds stamp set. I stamped a sentiment from Loving Sentiments onto an inked die cut rectangle. To complete the card, I added some pretty pleated ribbon and some metallic card as a mount.


 For my second card, I had a left over background from a previous project created using Brushos. I stamped the large butterfly from Patchwork Butterfly in one corner. I masked the butterfly using masking tissue, and stamped images from Make your Mark and Numerology over the background, plus the sentiment from Patchwork Butterfly

Once I had built up the background sufficiently, I removed the Masking Tissue, and coloured the image with pencils. I added a couple of grey pencils around the edges of the butterfly to give a shadow and to create the feeling of depth.


I have really had fun dipping into my library of stamps this month, and hope that you have enjoyed my posts. Thanks for stopping by, take care,


Judith xx


Wednesday, 22 September 2021

Butterfly (by Gerrina)

Today my last post this month as a Guest Designer at Chocolate Baroque, so you can see my card/Art Journal page here and at my blog as well. As it looks like we are getting some Summer after some wet summer months, I couldn't resist to use this beautiful big butterfly one more time. I again used an edge liner to draw the stripes and a circle stencil that I have for years to draw the circles. That's how I got a simple background to let the butterfly 'pop'.


Used materials:

Stamps: Patchwork Butterfly

Ink: Versafine Onyx Black

Other: White aquarel paper, black fine pointed brush, straight edge and colour brushes


Creatieve groetjes,


Gerrina


Sunday, 7 March 2021

Beautiful Florals

Hello, I am here today to share some of my cards made for the February show on Hochanda.

These cards feature the main image from Harebell ButterflyThistle ButterflyHoneysuckle Butterfly and Briar Rose Butterfly

My first card I've kept quite simple. I've stamped with Black Archival ink and used watercolour pencils in shades of blue. I've added a sentiment from Patchwork Butterfly and some black and white layers


My next cards use watercolour pencils and markers. I've used stencils in the background and blended around the edges with Distress Inks. I have finished with a sentiments from Artistic Expressions and Artistic Affirmations


Thanks for looking, I'll be back with some more soon.
Sandra x

Monday, 11 May 2020

Lily triptych by Brenda


Hello everyone, I hope you are all well and safe.

I have some more cards to share using the Blueprint Sketch collection of stamps and my first uses the beautiful Cala Lily Blueprint. I created a triptych style base card using a scoreboard and border die, Distress Oxides on the panels and random stamping using elements from Rustic Fragments, the stamping the focal elements with Versafine Clair and adding some colour with watercolour pencils. The Butterfly on the front is Patchwork Butterfly.


The background on this one is brayered acrylic paint, Freesia Blueprint stamped focally and white picket fence Distress Marker used to colour it. I used the lattice from Rustic Fragments around he edge stamping with gesso to achieve a textured finish.


The Magnolia from Happy Flower Day has been stamped onto a Gelli Plate background and the main bloom stamped a second time, coloured and decoupaged.

Enjoy your day and thank you for your visit.

Friday, 27 September 2019

Stylised Houses (Part 2)

Hello
I'm here again to show the remaining cards from the August show on Hochanda featuring the Bookmark Stylised House Collection.

My first card is from the Bridge House set . 
I stamped and water coloured the image. I then cut an aperture out of a piece of card and used a brick stencil and modelling paste to create a view.


My next card is from the Turret House set.
Using a stamp platform I stamped the image in Archival ink. I then re-stamped using a variety of Distress Inks. I added some Brushos to the background and spritzed with water to release the colours. Unpredictable, but a lovely technique!


Finally I made a little Tag Book using the sentiments from the stamp sets.  I also used stamps from Wild Meadow and Patchwork Butterfly.


Thanks for looking,
Sandra x

Wednesday, 24 April 2019

Art Journal Page (by Gerrina)

Hello everyone, Guest Design Team member Gerrina is back for her final post this month, and she has created a pretty Art Journal page featuring some of our butterfly range of stamps. 

Gerrina writes:

Feels so good...it is my turn again to show some things I made for the Guest Designer team at Chocolate Baroque! Three weeks in a row you will find my makes with the beautiful stamps from Chocolate Baroque. This week the last of the month, again an Art Journal page.

I am a big fan of their stamps, so you will see more of them here on my blog.


Used Materials:

Stamps: Chocolate Baroque Patchwork Butterfly
Ink: Versafine Onyx Black, Distress Oxide: Shaded Lilac, Spun Sugar, Squeezed Lemonade, Shabby Shutters, Carved Pumpkin
Other: Watercolour paper and Masking paper, water, Sparkle brush and blending tool

The shine/glimmer from the sparkle brush:

Stamp the butterfly twice and mask both.
Mist some water over the watercolour paper and stamp directly with the lilac, yellow, green and pink inkpads on the paper in a nice pattern. Let dry completely.
Stamp the swirl stamp several times over the paper with the orange and let the stamp go 'over the edge'. Mist the paper and let dry.
Stamp the text and go over the two butterflies with a sparkle brush.
Make a soft edge with the lilac ink by going over the edges with a blending tool.

Creatieve groetjes,

Gerrina


Thursday, 1 November 2018

Pretty in Pink by Brenda


Good morning, Brenda here and it's my pleasure to welcome you to our first post of November. This month myself and the Design Team are showcasing some beautiful Butterfly stamp sets which Lesley launched on Hochanda TV in October.

For my card at the top I used two stamps from Butterfly Daisy Collage, stamping onto a piece of watercolour card lightly coloured with Distress Inks, stamping the first to the left and then lining up the harlequins using a second stamp from the set. I stamped the Butterfly again along with several of the flowers onto a piece of card coloured with the same pink DI, cut out and decoupaged.


I am always rather partial to a floral wreath so used several of the stamps from Harebell ButterflyBrier Rose Butterfly stamping round a circle mask and using Distress Oxide inks, added a little shading around the circle and stamped Artistic Affirmations centrally, inking the stamp with Distress Markers.


And finally a DL card next inking the stamp from Thistle Butterfly with Distress Markers dragging the colour out a little, then stamping the large Butterfly a second time and adding a quote from Patchwork Butterfly and finally adding some background interest with a stencil and DI's. 

My thanks as always for popping in today.

Wednesday, 21 February 2018

Beautiful Ladies (by Carole)

Hello everyone, we are joined today by Guest Design Team member Carole Cann for the second of her posts this month. Carole is sharing two delightful projects featuring two very feminine designs to inspire you. Here is what Carole has to say:

Good morning everyone.
This is my second project for the Guest Design Team slot and I have used one of my favourite stamp sets, Mackintosh Beauty. I really like the Mackintosh style and also Art Nouveau.

Products used: Mackintosh Beauty stamp set
Baroque Orchid- background
Versafine inkpads- Onyx Black, Satin Red
Versamark inkpad
Grey/blue, pink chalk inkpads
Embossing powder- clear, white
Brushos
Die cut
Light silver grey and red card
Clear mica pen

The background is repeat stamped onto an 18cms x 13 cms (7 1/2 x 5 1/2 inch) piece of white card, with the Baroque Orchid image and red ink.
I swiped over the background with a grey/blue inkpad.
When dry, I went over the whole background with a Versamark inkpad and clear embossed the whole piece. I then die cut the centre.
The die could be positioned further to the left to hide the join too, and then there would be more room on the right hand side for a message.
The large flowers were embossed with white embossing powder, and the small corners stamped with red Versafine.
Both of these elements were coloured with Brushos to give the lovely vibrant colours.
The lady is stamped with Onyx Black Versafine and coloured with the pink inkpad.
The message was stamped with red ink onto grey card.
The elements were layered onto red and grey card.

Judith also asked if I would post my next project too, showing a different lady who is equally lovely.

Stamps used: Summer Fayre, Exquisite Edges, Patchwork Butterfly
Wooden 15cm heart
Versafine Onyx Black ink
Watercolour pencils
Clear mica pen
Blue/grey chalk inkpad
Archival black inkpad
Black card or felt
Small silver bead trim
Permanent inkpad suitable for drying on metal
Silver metal
Border punch
Square wooden base 25.5cms x 25.5 cms (10 1/4 x 10 1/4 inch), painted black
Alcohol ink or markers

Background:
I stamped the border frame first with Versafine and cut it down to a square 24cms x 24cms, (9 1/2 x 9 1/2 inch).
The flowers were then coloured and a damp brush used to pull the colour out.
The corners were cut from a strip which was punched with a border punch.
This was then mounted onto the base board.

Heart:
I stamped the main image onto the heart with an archival type black inkpad, you can use any black inkpad that will not bleed into the wood.
Make sure this is dry before colouring with watercolour pencils. Pull the colour out with the mica pen, but do not put too much moisture on the heart or it will bleed.
Ink around the edge of the heart with the blue/grey chalk inkpad and stamp tiny butterflies with the same colour ink onto the background.
Mount the heart onto a piece of black card or felt and cut around the edge, leaving a thin border.
The bead string was stuck onto the border and around the edge of the heart with a good quality, clear drying glue.

Butterfly Embellishment:
My butterfly was made with silver metal sheet, but it could be made with a piece of card.
I stamped the metal with a permanent inkpad and when it was dry it was embossed and cut out.
A little colour was added with alcohol ink.
Everything was then assembled.


I hope that you have enjoyed my projects. I will be back next week with my final contribution for this month.
Thanks for your visit, and happy crafting.

Carole.

Thursday, 6 July 2017

Spring (by Judith)

Hello everyone, I have a couple of projects to share with you today, showcasing some of the fabulous products featured on last month's second show on Hochanda.

For my first project, I used a piece of background watercolour paper from my stash, already coloured with Distress Inks, and added some stencilling, using the Useful Leaves Stencil and two different colours of green ink. I coloured some texture paste with green ink, and spread it through the Seasonal Journey Stencil, choosing the word 'Spring'. Once the paste was dry, I added some green gilding wax to darken the colour slightly, and add some shimmer.

I stamped two butterflies from the Just Butterflies stamp set onto acetate using Versafine Onyx Black Ink, and embossed them with clear embossing powder. I coloured the reverse of the images with alcohol markers,and cut the images out, before attaching them to the background. I chose a bright green card to mat the background.

For my second card, I stamped the lovely Spring Awakening image onto a piece of smooth watercolour paper, and masked the image. I coloured the background with Distress Inks, and added some stencilling with a honeycomb stencil in two opposite corners.

I drew through the twig section of the Seasonal Elements Stencil, using a water based marker, and then added some leaves, using a bright green marker. I used the same green to add the word Spring from the Seasonal Journey Stencil. I added some detail to the leaves with a darker green pencil.

I stamped a bee and butterfly from the Patchwotk Butterfly and The Rose Tree stamp sets onto acetate, embossing and colouring them exactly as I did in my first card. I removed the mask, and coloured the main image with pencils. I added some deeper shading around the edge of the card, and matted the background onto some purple card.

Thanks for stopping by, Judith xx

Friday, 30 June 2017

Butterfly Joy ( by Magda)

I did an interesting investigation and found a large use of butterflies throughout the centuries in Art, no matter in which culture, religion, in drawing or painting.
These little creatures are symbols of an immortal soul, a new start, a change, happiness and colourful joy.
Therefore sending a card with a butterfly fits anyone, man or woman, fits any occasion and means much more than the sentiment you put on the bottom of it.
Here is my card today and the Step by Step :

1. Colour your white card lightly with Distress Ink Pad Antique Linen
2. Stencil randomly part of the 6x6 Cell Theory Template with Distress Ink Pad Old Paper
3. Stamp with Versafine Onyx Black in second generation, the stamp from Silhouette Grasses 
    Rubber Stamp Sheet A5
4. Mask with Masking Tissue part of Katya Single Rubber Stamp A6 stamp it with Versafine
     Deep Lagoon and stencil "Joy" on the background and around Katya's neck.
5.  Ink with Versafine Deep Lagoon and Versafine Toffee the butterfly of Patchwork Butterfly and
     stamp it on Katya's head
6.  Ink with Versafine Deep Lagoon and Versafine Toffee the small butterfly of Just Butterflies Rubber 
     Stamp Sheet DL
7.  Stamp it with Versafine Deep Lagoon the sentiment of Words of Inspiration


I am sure that the beautiful butterflies stamps from Chocolate Baroque will give a unique and precious touch to your cards.  
Magda

Monday, 26 June 2017

Beautiful Butterfly (by Asha)

Hello, friends. Here's one last butterfly project from me. This time I've made a notecard featuring a gorgeous butterfly from the Patchwork Butterfly A4 sheet. It's a simple card, not time-consuming and perfect to accompany a gift for a special person. The finished project measures 2 1/2" x 4 1/2".

I stamped the butterfly on the edge of the card, coloured him with Polychromos and cut around his wing. And every butterfly deserves a garden, so I stencilled one for him. The sentiment is from the Words to Dazzle and Sparkle A5 sheet.


As always, I have details of the tools and products used on my blog. Thank you for stopping by and drop in soon for more designs by the team.

Beijinhos,
Asha

Saturday, 24 June 2017

Mica Butterflies (posted by Claire)

Good morning folks, Claire here with a card made using the beautiful Patchwork Butterfly stamp set and mica powders. I hadn't used mica powders for ages so I had a rummage in my craft room and got them out to have a play.
To make the background I've used black cardstock and stamped the beautiful swirls with versamark before dusting with mica powders. I stamped the pretty scene and the large butterflies on to black glossy card with versamark and again dusted over with mica powders to give a rainbow effect.

Have a lovely weekend and don't forget to keep popping back as my teamies have got lots of inspiration for you
Claire xx

Wednesday, 21 June 2017

Pretty Sunflowers (by Rachel)

Hello everyone, here is another project from our Giest Design Team member Rachel Fisher. She has created a sunny card for your inspiration today.

Rachel writes:


To make the card,  I first created an A4 background using Distress Inks in the following colours: Peeled Paint, Worm Lipstick, and Broken China. I smooshed them on a craft sheet, added water, and dipped the paper in. I created lots of layers in this way and repeated until happy. I cut a piece of the background to size and then stamped in the same inks using the Rustic Fragments stamp set. On another piece of the background, I stamped some flowers and leaves from the Sunny Sunflowers stamp set. I fussy cut them and aranged them on the background card. Finally I added the sentiment.

Rachel will be back with another project next week.


Sunday, 18 June 2017

Molding Paste Butterflies (by Julie)

Hello, lovely to see you. If you would like ideas for molding paste then I have two projects that use molding paste in different ways. My first is this pretty card stamped with the lovely Patchwork Butterfly


I started this card by spreading molding paste over the butterfly stamp and leaving to dry for 24 hours. Next I inked up the large decorative panel with green Versafine ink and stamped onto the square card blank followed by the lovely swirl design. I coloured the flower panel with brush markers and the card background is a mixture of Antique Linen and Old Paper Distress inks which I dabbed with a damp cloth to remove some of the colour. For interest I added highlights with paint pens in red, orange and white.
Once the molding paste has dried, carefully peel away from the stamp, colour with brush markers and mount onto the card with 3D glue gel.


As you can see my second project is a decorative box. The box I used had previously been used to hold tealights so was quite sturdy and perfect to up-cycle.
I started by painting the box and lid with blue and green acrylic paint. Once dry I mixed up some molding paste with the acrylic paint used to paint the box and applied it through the new butterfly stencils that Chocolate Baroque have just added to their range. Whilst the paste was still wet I sprinkled a fine crystal glitter and set aside to dry. 
To finish off I glued some green mesh ribbon around the edge of the box lid.

Thanks for stopping by and please be sure to call back again soon to see more Design Team inspiration.

Julie xx

Friday, 16 June 2017

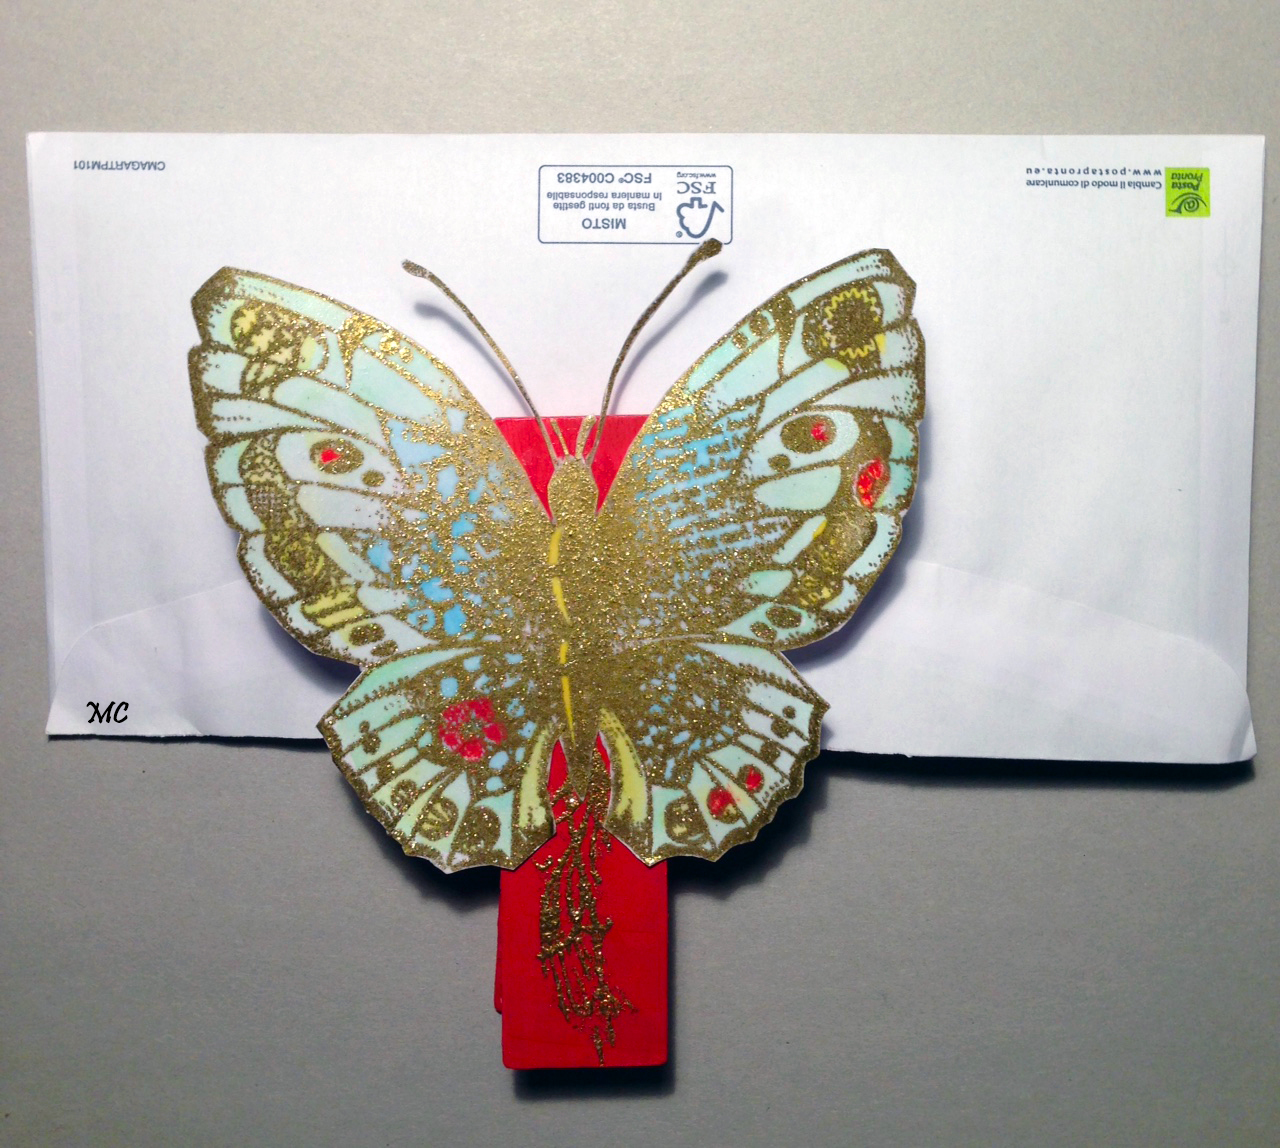
Desk Decoration (by Magda)

Here you will find today a creative way to hold your papers for your desk.

Step by Step
1.  Stamp the large butterfly of Patchwork Butterfly Rubber Sheet A4 with Versamark and heat emboss
     with WOW Embossing Powder Metallic Gold Sparkle
2.  Colour the butterfly with a brush using Distress Ink Pad Broken China, Cracked Pistachio and
     Squeezed Lemonade
3. Glaze the butterfly putting Versamark directly all over the surface with the pad and heat emboss with
    WOW Embossing Powder Clear Gloss
4.  Paint with a piece of Cut'nDry Foam a large peg with Dylusions Acrylic Paint - Post Box and let
     dry
5.  Using the same paint, fill some of the white spaces of the butterfly wings
6.  Cut around the shape of the butterfly
7.  Choose a swirl of Patchwork Butterfly Rubber Sheet A4 as a tail of the butterfly to stamp directly
     on the large peg with Versamark and heat emboss with WOW Embossing Powder Metallic Gold 
     Sparkle
8.  Put the butterfly on the large peg and glue it with Inessentials Glue n Seal 
   

Now the large peg looks perfect and brings a spring atmosphere to your working desk.
Magda