Hello everyone, I hope that you have been enjoying the fabulous artwork from the Design Team this month using the Rustic Fragments/Seasonal Fragments Multibuy stamp set. As we near the end of the month, I wanted to show you another great use for these very versatile stamps; creating masterboards. I have chosen one of the leafy designs and contemporary colours to make a masterboard, which I have then turned into a couple of Christmas cards, showing you that you can use the images all year round for lots of different purposes.
To create the masterboard, I covered a piece of smooth white card with Aqua Adirondack ink, and then stamped the leafy image using a deep red and dark green. I filled in the gaps using the aqua ink to create a softer backdrop for the stronger leafy images.
I covered a 5" x 7" card front with part of the masterboard. I chose a greeting from the Bold Christmas Words stamp set, and stamped this onto a die cut, using red ink. I hand cut a dark red layer to mat the sentiment onto.
I made a couple of flowers using die cuts to complete the card.
I had plenty of the masterboard left over, and decided to make another card in a clean and simple style this time. I used a large white card blank, and cut a strip of dark red card, to which I added a strip of the masterboard, after I had inked the edges with Barn Door Distress Ink. I stamped a sentiment from the Warm Christmas Greetings stamp set on to the card. I stamped and embossed a large poinsettia from the Steampunk Christmas stamp set onto scrapbook papers a couple of times, and cut these out. I then stuck them to the card with some foliage die cuts as before.
Thanks for stopping by, Judith xx
Showing posts with label Warm Christmas Greetings. Show all posts
Monday, 29 June 2015
Tuesday, 13 January 2015
A Bird for all Seasons and Ophelia the Mermaid? (by Judith)
Hello everyone, I hope that you are enjoying the range of projects from the Design Team this month. I have chosen to use some of the new individual cling mounted stamps Song Thrush and Ophelia for my projects for you today.
For my first project, I wanted to show the diversity of this lovely stamp, and how it could be used to create cards all year round, so I have made a Christmas card. I started by embossing the image three times, using white embossing powder on some green scrapbook paper, and colouring the image with pencils. I decoupaged the flowers and bird. I layered the image onto kraft card, using some dark red card as a mat for contrast. I also added some holly die cuts, and some more stamping, using a berry stamp from the Woodland Dreams stamp set which I also coloured with pencils. I tucked some flowers from a spare image under the main frame, along with the holly die cuts. I added some shading around the edge of the kraft background, using Festive Berries Distress Ink. Finally, I added a sentiment taken from the Warm Christmas Greetings clear stamp set.
For my second sample, I stamped Ophelia onto a piece of heavy weight cartridge paper, and then masked the image. I coloured the background by blending three different colours of Distress Inks randomly all over the page. I stamped an image from the Texture Fragments stamp set onto opposite corners, using one of the same colours of Distress Ink. I then flicked water onto the other areas of the page and dried it with a heat gun, to emphasise the watermarks.
I stamped and embossed a seaweed image along the bottom of the page, from the Underwater stamp set, using a blue/green metallic powder. I then added some flowers which I had cut out and coloured with pencils from the Song Thrush Silhouette image. It just goes to show that you can add flowers to just about anything! Finally, I coloured Ophelia using pencils, and matted the project using toning coloured card.
Thanks for stopping by, Judith xx
For my first project, I wanted to show the diversity of this lovely stamp, and how it could be used to create cards all year round, so I have made a Christmas card. I started by embossing the image three times, using white embossing powder on some green scrapbook paper, and colouring the image with pencils. I decoupaged the flowers and bird. I layered the image onto kraft card, using some dark red card as a mat for contrast. I also added some holly die cuts, and some more stamping, using a berry stamp from the Woodland Dreams stamp set which I also coloured with pencils. I tucked some flowers from a spare image under the main frame, along with the holly die cuts. I added some shading around the edge of the kraft background, using Festive Berries Distress Ink. Finally, I added a sentiment taken from the Warm Christmas Greetings clear stamp set.
For my second sample, I stamped Ophelia onto a piece of heavy weight cartridge paper, and then masked the image. I coloured the background by blending three different colours of Distress Inks randomly all over the page. I stamped an image from the Texture Fragments stamp set onto opposite corners, using one of the same colours of Distress Ink. I then flicked water onto the other areas of the page and dried it with a heat gun, to emphasise the watermarks.
I stamped and embossed a seaweed image along the bottom of the page, from the Underwater stamp set, using a blue/green metallic powder. I then added some flowers which I had cut out and coloured with pencils from the Song Thrush Silhouette image. It just goes to show that you can add flowers to just about anything! Finally, I coloured Ophelia using pencils, and matted the project using toning coloured card.
Thanks for stopping by, Judith xx
Thursday, 4 December 2014
Quick and Easy Christmas Cards (by Asha)
Good morning, friends! You've seen the December release stamps and must agree that they are delightful. I'm sure you are having great fun with them.
However, with the deadline to post Christmas cards fast approaching, I've got a few quick and easy festive cards to show you for those last minute makes. So join me as we flip through Chocolate Baroque's holiday archives and ink up stamps from Christmases past.
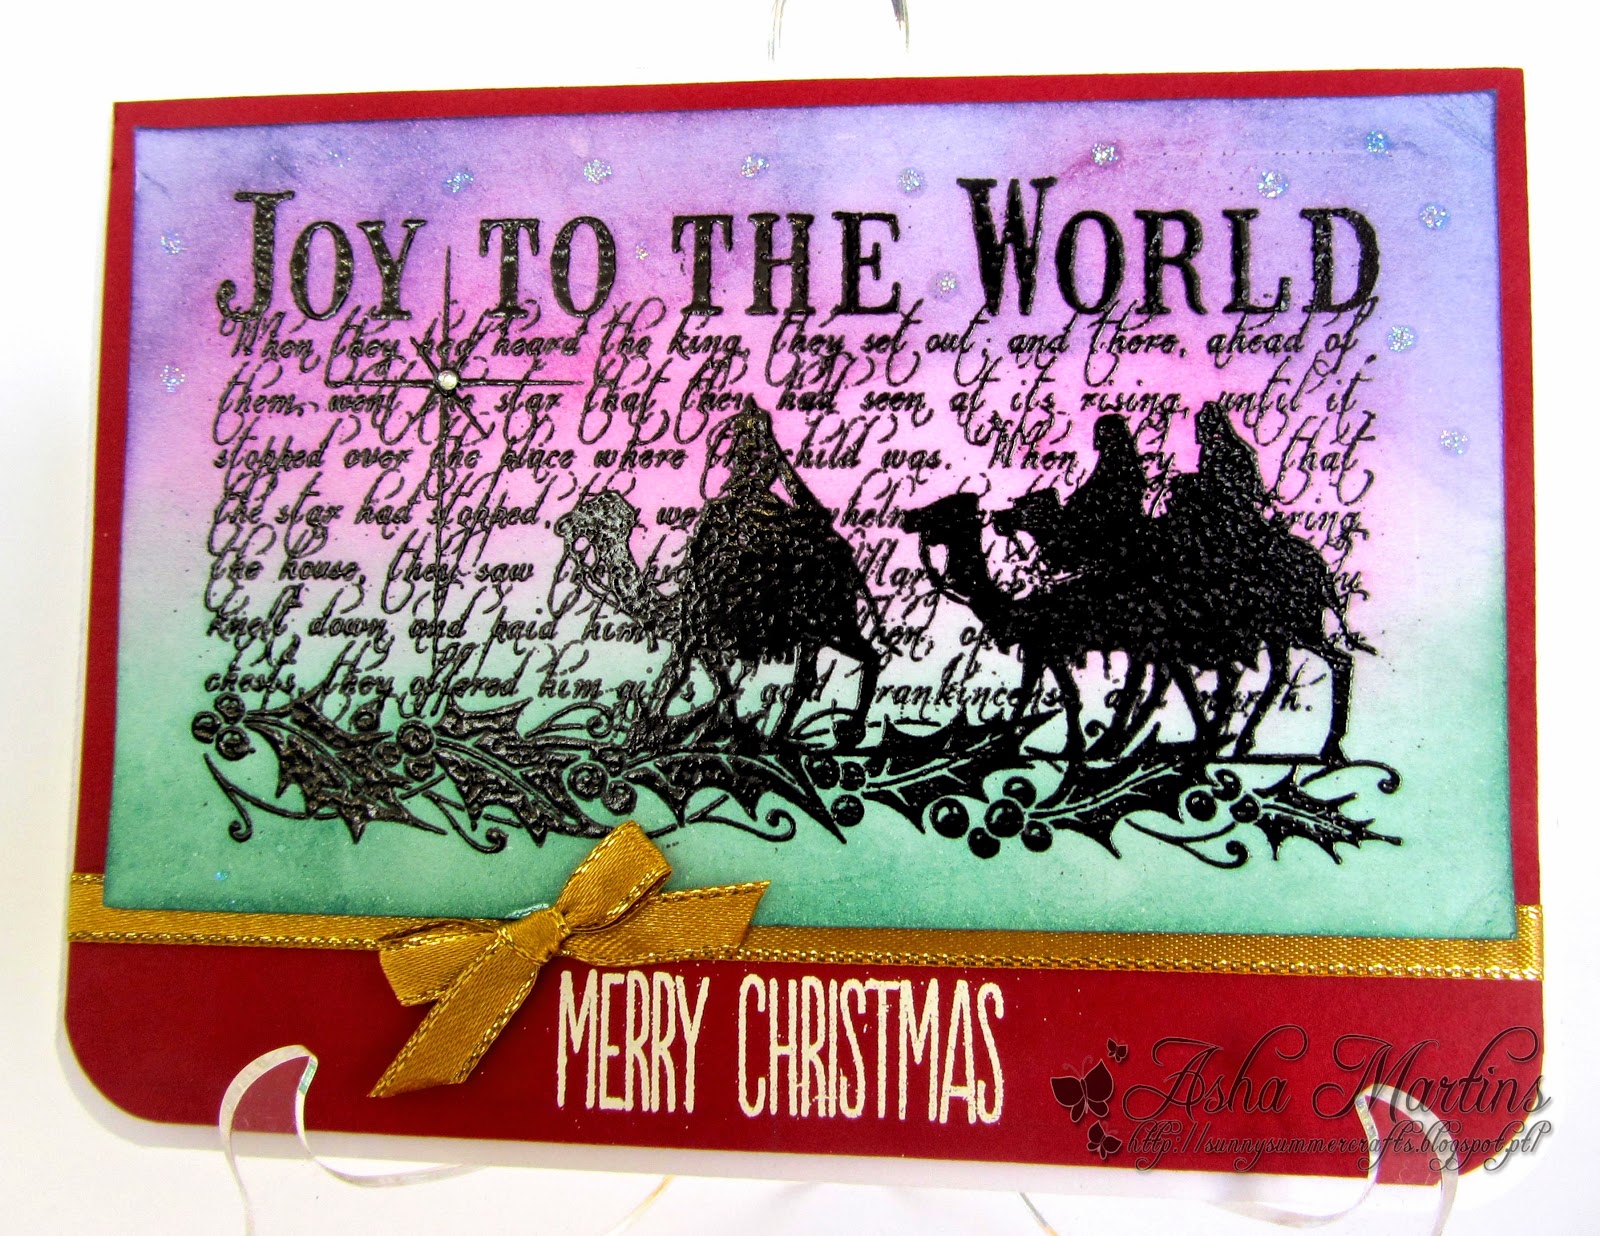
First up is this colourful number showcasing an intricate image from the Peace On Earth A5 sheet released in September 2011. After heat embossing it in black, I blended Distress Inks for the background and added Stickles for some starry sparkle. The greeting is from the Warm Christmas Greetings clear sheet, heat embossed in white.
Next up is a super simple card, perfect for mass producing. This time I'm playing with the Pears and Baubles A4 sheet released in 2012. The bauble is stamped in VersaFine Satin Red, fussy cut and adhered to the dry embossed the background. I dressed the bauble with Liquid Pearls and Stickles. The greeting is from the same sheet.
Our trip down memory lane ends with this enchanting A4 set called The Gift Of Christmas which was released in August 2012. It also happens to be my personal favourite and my very first set from Chocolate Baroque. The silhouette of the cat and dog looking up at the tree sums up Christmas at our home. I've kept it simple by heat embossing the image in black, lightly inking the background with Antique Linen and the tree with Distress Inks in shades of green. To finish I dressed, the tree with Liquid Pearls and Stickles, added a gold star and a red bow. The greeting is from A Child Is Born A4 sheet and the snowflakes are from Holly Bells A5 sheet.
There you have it - 3 surprisingly quick cards made extra special with embossing, Distress Inks and a little sparkle ... couldn't be simpler! I hope you'll some useful ideas from these for your own Christmas projects. Details of tools and products are available on my Blog.
In the meantime, the rest of the girls are having fun with punky sea creatures. Do drop in regularly to see what they've been up to.
Beijinhos,
Asha
However, with the deadline to post Christmas cards fast approaching, I've got a few quick and easy festive cards to show you for those last minute makes. So join me as we flip through Chocolate Baroque's holiday archives and ink up stamps from Christmases past.
*********************
First up is this colourful number showcasing an intricate image from the Peace On Earth A5 sheet released in September 2011. After heat embossing it in black, I blended Distress Inks for the background and added Stickles for some starry sparkle. The greeting is from the Warm Christmas Greetings clear sheet, heat embossed in white.
Next up is a super simple card, perfect for mass producing. This time I'm playing with the Pears and Baubles A4 sheet released in 2012. The bauble is stamped in VersaFine Satin Red, fussy cut and adhered to the dry embossed the background. I dressed the bauble with Liquid Pearls and Stickles. The greeting is from the same sheet.
Our trip down memory lane ends with this enchanting A4 set called The Gift Of Christmas which was released in August 2012. It also happens to be my personal favourite and my very first set from Chocolate Baroque. The silhouette of the cat and dog looking up at the tree sums up Christmas at our home. I've kept it simple by heat embossing the image in black, lightly inking the background with Antique Linen and the tree with Distress Inks in shades of green. To finish I dressed, the tree with Liquid Pearls and Stickles, added a gold star and a red bow. The greeting is from A Child Is Born A4 sheet and the snowflakes are from Holly Bells A5 sheet.
There you have it - 3 surprisingly quick cards made extra special with embossing, Distress Inks and a little sparkle ... couldn't be simpler! I hope you'll some useful ideas from these for your own Christmas projects. Details of tools and products are available on my Blog.
In the meantime, the rest of the girls are having fun with punky sea creatures. Do drop in regularly to see what they've been up to.
Beijinhos,
Asha
Sunday, 24 August 2014
Partridges, Turtle Doves, Pears and an Elegant Tree (by Shirley)
Hello everyone, I hope you are doing well.
I had great fun last month creating Christmas cards and have two designs to show you today that feature stamps from the new Turtle Doves set.
The background above was created with Raspberry & Persimmon Distress Inks using the acrylic block technique. I stamped a flourish from Fancy Flourishes with Raspberry DI.
The pear tree branches & turtle doves from Turtle Doves and pear from Pears and Baubles were stamped with Imperial Purple Versafine ink. I coloured the background branches with Prisma pencils. The pear and birds were coloured with distress inks (using a mat, water & brush), decoupaged and popped up over the background. I also added glitter paint to the larger birds and outlined with a white Gelly Roll pen. Merry Christmas is from Warm Christmas Greetings.
And the card below is in a clean style:
I embossed a tree from the Turtle Doves set with gold and embellished with lots of little half pearls. I added gold embossing to the edge of the background. The die is from Spellbinder - Elegant Labels 4.
This will be my last post here for a couple of months as my husband and I are moving into a new home. We found it was time for us to downsize (or 'rightsize'). We had a lot of work with purging and digging to move garden plants. It's been a very busy time for us and I am very appreciative and thank Glenda & Lesley for allowing me a break while we get settled. I can't wait to be back again working with Chocolate Baroque's gorgeous stamps again this Fall.
Thanks for your visit and have a great day,
Shirley
I had great fun last month creating Christmas cards and have two designs to show you today that feature stamps from the new Turtle Doves set.
The background above was created with Raspberry & Persimmon Distress Inks using the acrylic block technique. I stamped a flourish from Fancy Flourishes with Raspberry DI.
The pear tree branches & turtle doves from Turtle Doves and pear from Pears and Baubles were stamped with Imperial Purple Versafine ink. I coloured the background branches with Prisma pencils. The pear and birds were coloured with distress inks (using a mat, water & brush), decoupaged and popped up over the background. I also added glitter paint to the larger birds and outlined with a white Gelly Roll pen. Merry Christmas is from Warm Christmas Greetings.
And the card below is in a clean style:
I embossed a tree from the Turtle Doves set with gold and embellished with lots of little half pearls. I added gold embossing to the edge of the background. The die is from Spellbinder - Elegant Labels 4.
This will be my last post here for a couple of months as my husband and I are moving into a new home. We found it was time for us to downsize (or 'rightsize'). We had a lot of work with purging and digging to move garden plants. It's been a very busy time for us and I am very appreciative and thank Glenda & Lesley for allowing me a break while we get settled. I can't wait to be back again working with Chocolate Baroque's gorgeous stamps again this Fall.
Thanks for your visit and have a great day,
Shirley
Thursday, 24 July 2014
Snowy Christmas in July (by Shirley)
Hello everyone, I hope you are doing well and ready to see some Christmas designs during the hot months of summer :) At least it's hot where I live in Ontario, Canada which feels great after our long cold and snowy winter.
I like to get started on Christmas cards early and as soon as I saw the Harlequin Fragments I thought they were a great match with Harlequin Christmas.
The background was created by blending Festive Berries and Aged Mahogany Distress Inks. I stamped the fragment from Harlequin Fragments with Festive Berries DI. I stamped the bubble edge from Decorative Edges with Seedless Preserves DI and I coloured them with a white gel pen.
The Harlequin ornament and sentiment from Warm Christmas Greetings were stamped with Cobalt Archival ink. I coloured the ornament with Dylusions inks and cut it out to attach over the background.
I was very happy to see the two new Christmas sets, Snowy Scenes and Turtle Doves. Both sets are full of beautiful smaller designs which have been great fun to use while getting a good start on Christmas cards.
The background above was created a while ago and sitting in my stash. It looks like I used Turquoise Dylusions inks (possibly a 'mop up' sheet) which I stamped with Big Bold Background Snowflake Shadow and coloured the snowflakes a little with a Tombow marker. I stamped the Snowy Scene with Colbalt Archival ink, coloured with Prisma pencils and die cut with an ornament. I was inspired by a design former DT member Elaine created a year & half ago using the same die. As soon as I saw the little scenes in the set, it came to my mind to use my die for the first time. Let it Snow is a clear stamp available on it's own or part of the Big Bold Christmas Words clear set.
I have one more card using the same little Snowy Scene image:
The background above was created with Lime and Green Dylusions inks. I over stamped a little snowflake from the Snowy Scenes set and used TCW Starfall stencil with Distress Ink and TCW Circle Explosion stencil with Viva Mother of Pearl light blue molding cream which has a silver hue. I coloured the main image with Prisma pencils and added lots of glitter to the snow.
Thanks for your visit and have a great day!
Shirley
I like to get started on Christmas cards early and as soon as I saw the Harlequin Fragments I thought they were a great match with Harlequin Christmas.
The background was created by blending Festive Berries and Aged Mahogany Distress Inks. I stamped the fragment from Harlequin Fragments with Festive Berries DI. I stamped the bubble edge from Decorative Edges with Seedless Preserves DI and I coloured them with a white gel pen.
The Harlequin ornament and sentiment from Warm Christmas Greetings were stamped with Cobalt Archival ink. I coloured the ornament with Dylusions inks and cut it out to attach over the background.
I was very happy to see the two new Christmas sets, Snowy Scenes and Turtle Doves. Both sets are full of beautiful smaller designs which have been great fun to use while getting a good start on Christmas cards.
The background above was created a while ago and sitting in my stash. It looks like I used Turquoise Dylusions inks (possibly a 'mop up' sheet) which I stamped with Big Bold Background Snowflake Shadow and coloured the snowflakes a little with a Tombow marker. I stamped the Snowy Scene with Colbalt Archival ink, coloured with Prisma pencils and die cut with an ornament. I was inspired by a design former DT member Elaine created a year & half ago using the same die. As soon as I saw the little scenes in the set, it came to my mind to use my die for the first time. Let it Snow is a clear stamp available on it's own or part of the Big Bold Christmas Words clear set.
I have one more card using the same little Snowy Scene image:
The background above was created with Lime and Green Dylusions inks. I over stamped a little snowflake from the Snowy Scenes set and used TCW Starfall stencil with Distress Ink and TCW Circle Explosion stencil with Viva Mother of Pearl light blue molding cream which has a silver hue. I coloured the main image with Prisma pencils and added lots of glitter to the snow.
Thanks for your visit and have a great day!
Shirley
Thursday, 12 June 2014
Briar Rose Butterfly (by Asha)
Hello friends! Hope you're having fun with the new June release stamps. Today I'm showcasing the Briar Rose Butterfly A5 stamp sheet. These new stamps make stunning summer projects, but I found out they are perfect for Christmas cards too!
For my first sample I stamped the largest briar rose image and coloured it with water colours. For the background, I did some inking with various shades of blue and stamped random snowflakes from Family Christmas. Next, I stamped the twig-like image from Briar Rose Butterfly all around the die-cut window and added some red liquid pearls - suggestion of a wreath of holly berries. To finish a greeting from Warm Christmas Greetings and some glitter on the butterflies.
My second project is also a Christmas card, this time in CAS style. I stamped the briar rose stalk and coloured it with alcohol markers. Next, I inked the background in shades of pale blue and stamped snowflakes and a greeting from Stained Glass Christmas. To finish, some pale blue bling and deep red ribbon.
The Briar Rose Butterfly A5 sheet is perfect for summer projects but they are so versatile that you'll be giving these stamps a good workout all year 'round. Come back soon for another visit because the rest of the team have more fabulous projects to show you... and you don't want to miss out, trust me!
Beijinhos,
Asha
For my first sample I stamped the largest briar rose image and coloured it with water colours. For the background, I did some inking with various shades of blue and stamped random snowflakes from Family Christmas. Next, I stamped the twig-like image from Briar Rose Butterfly all around the die-cut window and added some red liquid pearls - suggestion of a wreath of holly berries. To finish a greeting from Warm Christmas Greetings and some glitter on the butterflies.
My second project is also a Christmas card, this time in CAS style. I stamped the briar rose stalk and coloured it with alcohol markers. Next, I inked the background in shades of pale blue and stamped snowflakes and a greeting from Stained Glass Christmas. To finish, some pale blue bling and deep red ribbon.
The Briar Rose Butterfly A5 sheet is perfect for summer projects but they are so versatile that you'll be giving these stamps a good workout all year 'round. Come back soon for another visit because the rest of the team have more fabulous projects to show you... and you don't want to miss out, trust me!
Beijinhos,
Asha
Friday, 25 October 2013
CAS Christmas Trees (by Shirley)
Hello everyone, I hope you are doing well.
I have a couple of CAS designs using trees from the fabulous new Reindeer Landscape set and a sentiment from Warm Christmas Greetings. Both of these cards are 'quick makes'.
I embossed the trees and sentiment on the above card with gold, coloured the snow and added stickles on the ornaments. I matted as shown and it's done!
For this 2nd card above, I embossed the trees and sentiment with silver holograph embossing powder and added stickles to the 'snow' and ornaments.
Thanks for your visit and have a great day,
Shirley
I have a couple of CAS designs using trees from the fabulous new Reindeer Landscape set and a sentiment from Warm Christmas Greetings. Both of these cards are 'quick makes'.
I embossed the trees and sentiment on the above card with gold, coloured the snow and added stickles on the ornaments. I matted as shown and it's done!
For this 2nd card above, I embossed the trees and sentiment with silver holograph embossing powder and added stickles to the 'snow' and ornaments.
Thanks for your visit and have a great day,
Shirley
Thursday, 3 October 2013
Snowflake Edges with Glitter & Flourishes (by Shirley)
Hello everyone, I hope you are having a terrific week.
I have a few more Christmas designs to show you today using the the new Winter Edges set. The edge stamps are great for quick makes and detailed cards.
To create the background above I sprayed Calypso Teal & Linen Dylusions Inks, spritzed with a little water and added a little sea salt here & there. When dry, I embossed the Snowflake & Village edges from Winter Edges with Wow-Black Twinkle which has lots of glitter. I added little holograph circle stickers to the centers of the snowflakes. Warm Winter Wishes is from Warm Christmas Greetings.
I also used the fabulous Snowflake Ornament from Snowflake Flourish for the card below.
I created the background with Salty Ocean and Mowed Lawn Distress Inks using the Acrylic Block technique. Both snowflakes edge stamps from Winter Edges were stamped with Salty Ocean Distress Ink. I also stamped a snowflake from Snowflake Flourish with Mowed Lawn Distress Ink. The Ornament from Snowflake Flourish was embossed with a blue glitter powder on separate card stock and coloured with a Tombow marker. I added lots of rhinestones to the centers of the snowflakes. Merry Christmas is also from Warm Christmas Greetings.
I have one more design using the Snowflake Flourish & Winter Edges sets.
The background is London Blue & Vibrant Turquoise Dylusions Inks. I stamped the Snowflake edge on the left & right hand sides with Salty Ocean Distress Ink. When dry I embossed the beautiful snowflake flourish with silver. I also embossed the Ornament, coloured with Tombows markers and decoupaged it onto the background. I added lots of Stardust Stickles and rhinestones.
Thanks for stopping by and I hope you can come back often to see what my talented teammates have created.
Have a great day,
Shirley
I have a few more Christmas designs to show you today using the the new Winter Edges set. The edge stamps are great for quick makes and detailed cards.
To create the background above I sprayed Calypso Teal & Linen Dylusions Inks, spritzed with a little water and added a little sea salt here & there. When dry, I embossed the Snowflake & Village edges from Winter Edges with Wow-Black Twinkle which has lots of glitter. I added little holograph circle stickers to the centers of the snowflakes. Warm Winter Wishes is from Warm Christmas Greetings.
I also used the fabulous Snowflake Ornament from Snowflake Flourish for the card below.
I created the background with Salty Ocean and Mowed Lawn Distress Inks using the Acrylic Block technique. Both snowflakes edge stamps from Winter Edges were stamped with Salty Ocean Distress Ink. I also stamped a snowflake from Snowflake Flourish with Mowed Lawn Distress Ink. The Ornament from Snowflake Flourish was embossed with a blue glitter powder on separate card stock and coloured with a Tombow marker. I added lots of rhinestones to the centers of the snowflakes. Merry Christmas is also from Warm Christmas Greetings.
I have one more design using the Snowflake Flourish & Winter Edges sets.
The background is London Blue & Vibrant Turquoise Dylusions Inks. I stamped the Snowflake edge on the left & right hand sides with Salty Ocean Distress Ink. When dry I embossed the beautiful snowflake flourish with silver. I also embossed the Ornament, coloured with Tombows markers and decoupaged it onto the background. I added lots of Stardust Stickles and rhinestones.
Thanks for stopping by and I hope you can come back often to see what my talented teammates have created.
Have a great day,
Shirley
Wednesday, 28 August 2013
Colourful Snowflakes (by Shirley)
Hello everyone !
I've had a great time working with the new Christmas stamps and happy that I've made a solid start on Christmas cards for this year. It's never to early to start !
I used one of the new Big Bold Background stamps - Solid Snowflake to create these cards.
I used Fruitcake Kaleidacolour Dye Ink on the background for the above card. I used a brayer to apply the rainbow ink to get even coverage. Next I added Versamark Ink directly from the pad over the entire background and embossed with a clear holograph Embossing Powder. You can see the sparkle on the close-up at the top of this post. 'Noel' is available as a single clear stamp - CBCL0020 Noel. I added rhinestones to the centres of the snowflakes.
This next card below was quicker to create as I didn't need a brayer to ink up the stamp.
I used both Evergreen Bough and Pine Needles Distress Inks on the background stamp, which gives the variation in colour. I stamped the sentiment from Warm Christmas Greetings with Crimson Red Versafine Ink. Again I added sparkly rhinestones to the centres of the snowflakes.
Thanks for stopping by and I hope you have a great day !
Shirley
I've had a great time working with the new Christmas stamps and happy that I've made a solid start on Christmas cards for this year. It's never to early to start !
I used one of the new Big Bold Background stamps - Solid Snowflake to create these cards.
I used Fruitcake Kaleidacolour Dye Ink on the background for the above card. I used a brayer to apply the rainbow ink to get even coverage. Next I added Versamark Ink directly from the pad over the entire background and embossed with a clear holograph Embossing Powder. You can see the sparkle on the close-up at the top of this post. 'Noel' is available as a single clear stamp - CBCL0020 Noel. I added rhinestones to the centres of the snowflakes.
This next card below was quicker to create as I didn't need a brayer to ink up the stamp.
I used both Evergreen Bough and Pine Needles Distress Inks on the background stamp, which gives the variation in colour. I stamped the sentiment from Warm Christmas Greetings with Crimson Red Versafine Ink. Again I added sparkly rhinestones to the centres of the snowflakes.
Thanks for stopping by and I hope you have a great day !
Shirley
Saturday, 17 November 2012
Snowy Christmas Trees (posted by Judith)
Hi folks, for those of you that like to make batch cards at Christmas, I have a set of samples that I'd like to show you today.
I made a set of masterboards, using a couple of snowflakes from the Damask Reindeer stamp set, which I embossed with white embossing powder over two thirds of each piece of white card. I then stamped the chosen colours of Distress Ink directly onto my craft mat and spritzed them with water, ensuring that I had at least covered an A4 area with colour. I laid my card face down onto the mat to pick the colour up, and patted it around a few times, until I had covered the card with colour, then set it aside to dry.
Once the card was dry, I took a piece of Cut 'N ' Dry foam, and one of the colours of Distress ink, and just blended over each snowflake. This really makes the snowflakes pop. I cut two ovals from the end of card that was free from embossing, and stamped one of the tree images in dark brown ink onto each oval. I left this to dry completely. I then stamped the tree again with Versamark, offsetting it slightly, and embossed it with white embossing powder. It then looks like the tree is covered with snow. The clear stamps are so useful for this, as you can line them up exactly, then just shift them a fraction, to get the snow effect.
From the remaining card section, I cut a large tag shape, and a strip of card 6 cms wide. I matted each oval onto a frilly oval shape that toned with the ink colours, and then placed them onto the cards and tags. I stamped a sentiment from the Warm Christmas Greeting set onto each card, using one of the Distress Ink colours that I had used on the background.
The ribbons that I have used are also available from the Chocolate Baroque website.
Keep checking back for more inspiration from my Design Team mates coming soon, thanks for stopping by, Judith xx
I made a set of masterboards, using a couple of snowflakes from the Damask Reindeer stamp set, which I embossed with white embossing powder over two thirds of each piece of white card. I then stamped the chosen colours of Distress Ink directly onto my craft mat and spritzed them with water, ensuring that I had at least covered an A4 area with colour. I laid my card face down onto the mat to pick the colour up, and patted it around a few times, until I had covered the card with colour, then set it aside to dry.
Once the card was dry, I took a piece of Cut 'N ' Dry foam, and one of the colours of Distress ink, and just blended over each snowflake. This really makes the snowflakes pop. I cut two ovals from the end of card that was free from embossing, and stamped one of the tree images in dark brown ink onto each oval. I left this to dry completely. I then stamped the tree again with Versamark, offsetting it slightly, and embossed it with white embossing powder. It then looks like the tree is covered with snow. The clear stamps are so useful for this, as you can line them up exactly, then just shift them a fraction, to get the snow effect.
From the remaining card section, I cut a large tag shape, and a strip of card 6 cms wide. I matted each oval onto a frilly oval shape that toned with the ink colours, and then placed them onto the cards and tags. I stamped a sentiment from the Warm Christmas Greeting set onto each card, using one of the Distress Ink colours that I had used on the background.
The ribbons that I have used are also available from the Chocolate Baroque website.
Keep checking back for more inspiration from my Design Team mates coming soon, thanks for stopping by, Judith xx
Monday, 15 October 2012
Christmas Candle (posted by Judith)
Hi Folks, here's a sample incorporating some stamps from the new Gothic Fragments stamp plate, and also a sentiment from one of the new clear stamp sets as well.
I stamped the window stamp with Archival Ink, and then stamped the fragment design with Matte Medium, drying this thoroughly with a heat gun. (I washed my stamp straight away, to remove all traces of the matte medium from the stamp.) I coloured the background with Pumice Stone Distress Ink, as a base, before stamping a small stamp from the Texture Fragments stamp set over the top in three different colours, to create a stone effect. I painted the window area with Distress Stains and a watercolour brush, going over the shaded areas with Distress Markers. The Matte Medium creates a great resist, and looks like a stone panel.
I have added a candle from the Christmas Angel of Light stamp set, and some Crealie flowers and leaves.
These windows, arches and spires are useful for so many different occasions. Keep popping back over the coming days to see what my Team mates have created with these fabulous stamps. Thanks for stopping by, Judith xx
I stamped the window stamp with Archival Ink, and then stamped the fragment design with Matte Medium, drying this thoroughly with a heat gun. (I washed my stamp straight away, to remove all traces of the matte medium from the stamp.) I coloured the background with Pumice Stone Distress Ink, as a base, before stamping a small stamp from the Texture Fragments stamp set over the top in three different colours, to create a stone effect. I painted the window area with Distress Stains and a watercolour brush, going over the shaded areas with Distress Markers. The Matte Medium creates a great resist, and looks like a stone panel.
I have added a candle from the Christmas Angel of Light stamp set, and some Crealie flowers and leaves.
These windows, arches and spires are useful for so many different occasions. Keep popping back over the coming days to see what my Team mates have created with these fabulous stamps. Thanks for stopping by, Judith xx
Subscribe to:
Posts (Atom)