Pin It button on image hover
Showing posts with label Scrumptious Succulents. Show all posts

Monday, 15 October 2018

A Collection of Cacti (by Jodie)

Hello everyone, today sees the second of our blog posts from Guest Designer Jodie. She has created a lovely card featuring some of our fabulous cacti range.

Jodie writes:

Good morning everyone, this is my second project for Chocolate Baroque. This time I was inspired to create a card using these cool succulent images.
Because the set contained many great images, it was difficult to choose just one to use on my card, so I didn't!

Supplies:
Stamps- Scrumptious Succulents set
Ink- Ranger's Archival Ink Jet Black
Paint- Distress Paints including Tarnished Brass, Salty Ocean, Spun Sugar & Scattered Straw
Distress Stain- Peeled Paint
Paper- A4 Drawing Cartridge
Liquid Frisket Dip-Nib Set

I stamped the first image onto the paper.
Next I applied the liquid frisket and let this dry completely.
Next I stamped the second image over the first, with the liquid frisket creating a mask.
Finally I applied a bit of liquid frisket over part of the second image, let dry and stamped a third image.
I stamped all images with Archival ink to create a collage of images for the card.
I used the rubber cement pick up tool, picked off the dried liquid frisket and began colouring in the images.
First I used stain to paint the green parts of the succulents.
I watered down the Distress paint, and used that to colour in the remainder of the collage.
Once the card was complete, I added embellishments by dipping the handle of the brush into Distress Paint Tarnished Brass ande added some dots.

Jodie will be back next week with her final project for this month.


Tuesday, 31 July 2018

Black and White collection - by Magda

Hello
Here I am with a quick way to prepare a last minute card for an unexpected circumstance using only black and white pencils and a little colour touch for creating a contrast.

I used the following stamps

Blossom and Grow
Scrumptious Succulents
Texture Fragments


I hope you had fun in following me during my new succulents adventure and liked my projects
Magda

Sunday, 29 July 2018

Positive Thoughts Blossom (by Anne)


Good morning. Today I am sharing the last of my recent Hochanda TV show samples using the Scrumptious Succulents and Blossom and Grow stamp sets.
The blossoms were stamped directly onto a 6 X 6 inch pink card blank using Versamark Ink and heat embossed with detail gold powder. Tip: Stamp the four corners first by stamping then turning the card and stamping again, keeping the stamp and block in the same orientation. Then repeat the process stamping the other blossom in between. I used a stamp press which makes this really quick and easy (not essential but it does help).
The blossoms were coloured with Distress Oxide Ink (Carved Pumpkin), green and gold sparkle pens and a damp brush. Metallic orange/silver and gold gel pens were used to add highlights to the flowers.
Next I created a stamp mask by stamping the cactus onto scrap copy paper and cutting out. I used a few dots of Zig 2 Way glue to give a tacky temporary stick to the reverse to hold the masks in place while stamping. Alternatively you could use the special Masking Tissue to create masks.
The cacti were then stamped onto white stamping card using Versafine (Vintage Sepia), covering images with masks as required so that some images appear to be behind the foreground stamped images. The sentiment was stamped onto pink card.
The cacti were coloured using watercolour pencils and a damp brush to smooth and blend the colour. The topper was then cut out and lightly shaped to give dimension before sticking to the card with foam pads.
The sentiment was cut out using a small decorative panel die. A little Distress Oxide was used to colour the edges. This was mounted with 3D glue gel along with a small die cut flower and sprigs (Tattered Lace).
My next sample was stamped onto a patterned paper using Versafine (Onyx Black). Again I used masks where needed to build up the scene (prepared as above). Coloured with pencils and added a little yellow glaze gel pen to the blossom stamens.
The panel was edged with black alcohol marker to frame before mounting onto white card and gluing to the green card blank (6 X 6 inch).
For my next sample I dug out an inky background paper from my stash. This one was created with ink sprays and Brusho powders. I thought that it would make a lovely tropical background for a scene.
A background panel was created in the same way as my first sample but using Distress Ink (Old Paper) for a subtle effect. A little clear sparkle pen was used to add petal highlights. The panel was edged with green alcohol marker to frame and mounted onto green card before gluing to the card front (6 X 6 inch).
The scene was built up, stamping with Versafine Ink (Onyx Black) onto the coloured panel, using masks where needed (made from copy paper as given above). Images were coloured with Distress Oxide Ink (Carved Pumpkin), watercolour and sparkle pens. The panel was edged with black alcohol marker to frame and glued to the card front with foam pads for added depth.
I had so much fun with these gorgeous stamp sets.
Happy stamping x.

Saturday, 28 July 2018

 Both my cards today use the captivating cacti individual stamp, which is quite a big stamp.
Sorry if you were hoping for a brusho-less card, but the first one is rather less obviously brusho!
I stamped and embossed the image onto white card before sprinkling red, green and orange brusho lightly over the background. I then painted the cacti with red and leaf green brusho using a wet paintbrush to activate the powders.
I stamped the tall cactus from scrumptious succulents across  the white card blank to give a background before adding a mat of black card
My second card is more obviously 'normal' brusho, with a background square of card coloured with red and yellow brusho. I used the same colours after stamping and embossing the image with white embossing powder, trying to get most of the red on the flowers and the yellow on the cacti.
The mat of black card was stamped using the sempervivium?  image from scrumptious succulents stamped randomly using a white ink pad, which doesn't really show up on the scan. I have a large collection of different makes of white ink pad, and am not really happy with any of them so far!

Wednesday, 25 July 2018

Cacti in the Sunset - by Penny


Goodly morning lovely peeps, it's Penny here again with some more craftiness to share with you.  I think this card is especially suitable to the weather we've been enjoying lately, it captures the feel of hot,dry weather.  I also wanted to create a 'mock Terrarium' - we used to have one at home.  
For this project I have used stamps from the Srumptious Succulents set, Distress Inks, Versamark Ink, gold EP, gold gilding wax and an embossing folder from my stash.


To begin this project I stamped the two 'low' succulents in Versafine ink onto cartridge paper and embossed them in gold.  I then masked them and stamped and embossed two cacti images in the same way and masked them.  I created the background by blending inks onto the card.


When everything was dry I removed the masks and painted the images with DIs.  I matted the panel onto dark card then attached it to the base card.  I created the terrarium using strips of black card which I embossed and gilded, and acetate.  I used red liner tape to attach it to the card.   I then  created a sentiment panel in the same way as the background and attached that to the card.


Thank you all for dropping in today and reading my post.  If you'd like more details and pictures of this project then check out my blog.  I shall be back next month with more creations to show and hopefully inspire you,


                                                          x  Penny  x

Thursday, 19 July 2018

Blooming Summer Cactus

Hello, today I have two cards featuring the rather lovely cactus and succulent images.


My first card is stamped with Captivating Cacti, which is a large single image design.
I started by stamping onto white card-stock followed by stamping a couple of extra images onto spare card so that I could cut out the flower heads and add as 3d decoupage. The main image has been coloured with Polychromos pencils and the background is Distress inks. For added interest I have stencilled a dotty design in the background using blue and green Distress inks. White paint pen highlights were added as a finishing touch.


My second card has been stamped with Scrumptious Succulents.
The base card has been stamped with the succulent flower head and coloured with Polychromos pencils. I have also stamped the succulent onto spare card, again coloured with Polychromos pencils, before cutting out and adding as 3d decoupage using foam pads. The rest of the background was then coloured with cut n dry foam and Distress inks.
The flowering cactus image was stamped onto spare card and coloured with the pencils as before. Taking a pair of scissors I then cut around the largest flower head, before placing a metal, circle die around the image and underneath the cut petals so that the image could be cut out with a circle surround and the middle bloom looks like it is peeking out of the design.
The circle design was then mounted onto black card-stock and attached to the front of the card.

Thank you for looking and hope to see you again soon for more daily Design Team inspiration.

Julie xx

Wednesday, 18 July 2018

Blossom and grow, be scrumptious and captivating (by Rachel)

Hello there! I hope you are well! Rachel here today with some more samples from the June TV shows...


This mini canvas and frame were made using the Blossom and Grow stamp set. I stamped on tissue paper and painted the flowers before scrunching and gluing directly to the frame. The canvas was made by stamping the central image, masking then re stamping and then painting with the micaceous paints.


I made these next two pieces using scrumptious succulents and captivating cacti. I loved making this 3D piece using stamps and colouring with sparkle pens before fussy cutting.


For this final piece I used the same stamps to make an eclipse card. I think there is one of the blossom and grow stamps in here too. Lots of masking going on here to create the image and then I used dies to cut the letters before remounting them raised and with black card in the gaps to create a shadow.

I do hope you have enjoyed looking at some of my samples today!

Big hugs

Rachel x

Tuesday, 17 July 2018

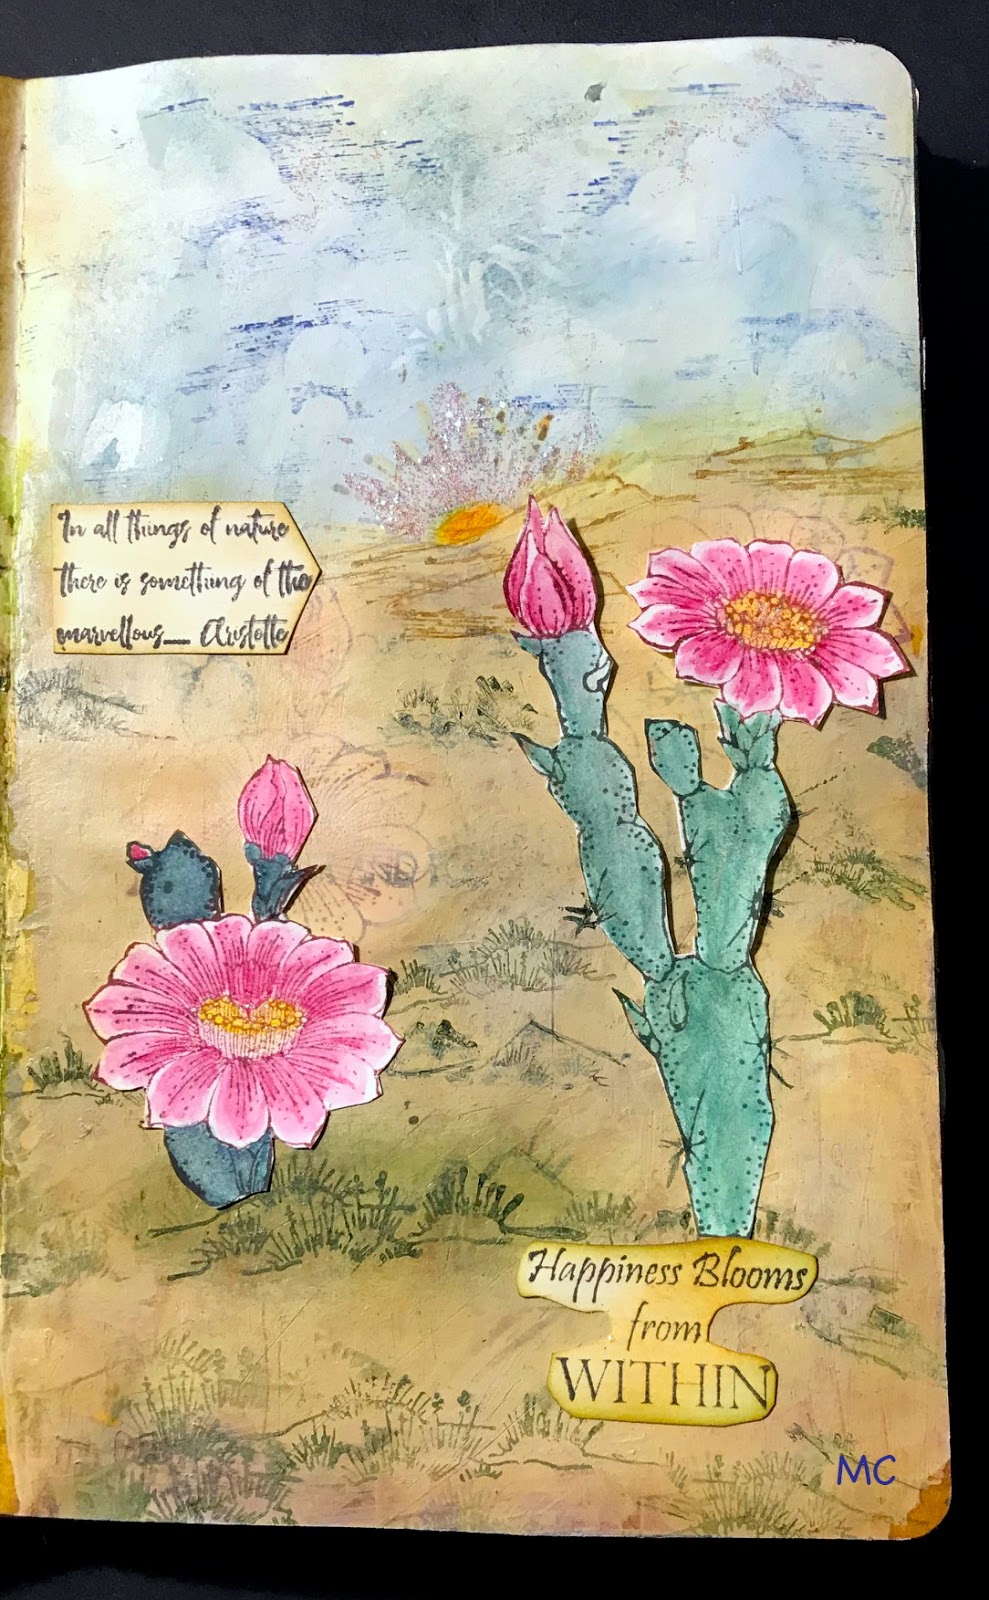
Succulents in arid landscape (by Magda)

This time I have been inspired by the arid land where the succulents grow so well, therefore my project has a sandy tone, a page that reminds me of the desert

1. Trace the horizon line and blend several brown and green shades of Distress Ink Pad for the ground
     and blue shades for the sky.
2.  Stamp with Archival or Versafine the grass in green, the clouds in blue and the sun in red.
     You can find the single stamps in "Seashore Scenes"
3.  Stamp the succulent plants with two archival colours,  pink for the flower and green for the plants
     and the grass
4.  Cover all the page with a very light coat of white gesso and let dry
5.  Repeat gently points 1 and 2
6.  Stamp the succulent plants again on a white cardstock, colour all with Aquarelle Pencils and cut
     the images out.
7.  Colour the sun in orange/yellow
8.  Prepare the sentiment and glue all the single pieces with Zig 2 ways Pen on the page as shown
9.  Add some stickles 


Thank you for saving the date of our next appointment at the end of the month.
Magda

Saturday, 14 July 2018

Blossom and Grow Cacti (by Anne)

Good morning. I created these samples for the recent shows on Hochanda TV using Captivating Cacti, Blossom and Grow and Scrumptious Succulents stamp sets.


My first sample was created using a 5 X 4.5 inch card blank. The lower third of the card blank was embossed using a lacy textured embossing folder. The background was stamped using the Square Bubbles stamp and Distress Ink (Tattered Rose). Distress Ink, purple dye based ink and pink glitter glue were applied over the embossed section to colour and highlight.

The sentiment was stamped from the Blossom and Grow stamp set using purple dye based ink. The card was edged using purple alcohol marker to frame and a ribbon glued down to create a base for the flower pot.

I used a flower pot die to cut the pot from Kraft card. A little colouring was added using watercolour and clear sparkle pens before shaping and gluing to the card front with 3D glue gel.

Cacti from the Scrumptious Succulents set were stamped onto smooth stamping card using Versafine (Onyx Black). Images were then coloured with watercolour pens, dragging out colour and blending using a damp brush, then cut out. The large ‘face on’ cactus image was stamped several times, cut out, shaped and layered up. Elements were shaped using a ball tool and foam mat then glued down with 3D glue gel.


For my second sample I used the gorgeous Captivating Cacti stamp and a sentiment from Blossom and Grow.
I prepared a decorative card blank from a 6 X 6 inch Kraft card blank, extending the edges by adding die cut borders from white pearl card. Finished by adding faux stitching with a fine tipped pen (opaque white) and PVA pearls.
Images were stamped onto textured watercolour card using Versafine (Onyx Black). Watercolour and sparkle pens were used for colouring. Colouring was extended at the base to give the cactus grounding.
A little gold sparkle pen was flicked across the image for added texture. I didn’t intend to do this initially but I had to cover up an accidental splodge! I liked the result, so a ‘happy accident’ as they say – tee hee. The card was edged with dark brown marker to frame before gluing to the card front.


Thursday, 12 July 2018

scrumptious succulent (by Veronica)

This time a flowering cactus from the scrumptious succulents plate and a sentiment from blossom and grow, just to swop things around a bit.....
Afraid it's still brusho though - images stamped with versamark and white embossed before sprinkling leaf green brusho over the background and orange over the flowers and sentiment before spritzing with water. It looked a bit washed out when dry, so i sprinkled more brusho over the stems and the flowers and used a wet paintbrush to add more colour - once everything is dry, just tap off any excess powder.
A mat of black card and mounted onto a 7" square white card blank to finish off.

Tuesday, 10 July 2018

A Burst of Colour (by Judith)

Hello everyone, I am back to share more of my prickly projects with you today, featuring the stamps from last month's TV shows on Hochanda.

To create my first card, I trimmed two pieces of drawing cartridge slightly smaller than A5 in size. I sprinkled Brushos over one piece of card and spritzed the card with water. I then placed the second piece of card over the first, to create two coloured backgrounds. I left both backgrounds to dry. The second background will be useful for a project at a later date.

I stamped three of the images from the Scrumptious Succulents stamp set onto the background, then covered the images with masks that I had already stamped and cut out. I stamped two more images in between the masked images and then drew a line between all of the images to create a landscape, using a fineliner pen. Using the Square Bubbles stamp, I stamped below the landscape line using second generation stamping. The stamp creates a stone effect, which is perfect for the cacti to stand upon.

I used the same colours of Brusho powders to colour the cacti images, adding a couple of additional colours, (red, orange and yellow). I sprinkled a little bit of each colour onto a large acrylic block, but you could use your craft mat, and added a bit of water to them, so that I could use them like watercolours. More water creates a paler colour, but you can then go over the images with a bit of stronger colour to add shading. You can be as creative as you like with the colours, I had a lot of fun creating a vibrant fantasy collection of cacti. I then painted the little stones in the same colours, being completely random. I added a sentiment from the Blossom and Grow stamp set.

My second project is full of colour too. I wanted to create a lovely sunset, and stamped the tall leafy image from the Blossom and Grow stamp set a couple of times first of all. I masked the images and masked an area for the sun, then coloured the background with Distress Inks. I chose vibrant pinks, oranges and yellows, blending them, and adding a spritz of water.

I stamped some foliage from the Wild Meadow and Silhouette Grasses stamp sets, using coloured dye based inks. I added the little birds from Landscape Edges and a sentiment from Scrumptious Succulents. I removed the masks and coloured the foliage with pencils.

I hope that you will be inspired by my projects to try out some of these ideas. Thanks for stopping by,

Judith xx


Monday, 9 July 2018

Glorious Poppies by Brenda


Good morning Peeps, Brenda here with some shares from my samples for Lesley's June shows on Hochanda which featured some beautiful floral and succulent stamps. It occurred to me as I was scheduling this post that today would have been my maternal Grandmothers Birthday, she loved her cottage garden so my cards seem a very fitting tribute to her.

For my top card I repeat stamped what I have decided is a Poppy from Scrumptious Succulents around the borders of my base layer and coloured in with pens. Next an oval aperture at an angle which I edged with a pearl string and stamped a sentiment from Loving Sentiments to fit in the frame.


Here I have a bookmark, the base piece is 600gsm Fabriano which takes water really well without warping so perfect for purpose. After adding Distress Oxides, I stamped the lovely flower which I think looks rather like a Hollyhock from Blossom and Grow.............although there's a bit of atistic licence with the colours..........and coloured in with pens, then stamped part of one of the Cacti from Scrumptious Succulents around the edge using Versamark and heat embossed with details gold.


I have always liked the shape of the boxes and cards using this die set so I decided on another offering using the new stamps, the flowers on the top are from Captivating Cacti, stamped several time, coloured and cut out to build. I then used a mixture of stamps from the three sets mentioned above, colouring all with sparkle pens adding some stenciling and sentiments from the same sets.


My final card today has a background using Distress Inks blended with a little glycerine which seems to give a lovely soft finish, a sponged sun and the blooms from  Blossom and Grow stamped in versfaine black and left un-coloured as I felt there was enough drama in the strong background colours.

My thanks as always for popping in today and I hope I have offered some inspiration to those of you who already have the stamps and if you don't, then I hope you will want to pop over to the shop and treat yourself.


Friday, 6 July 2018

Cup and Saucer (by Rachel)

Hello everyone, today we are welcoming our regular contributor Rachel Fisher as a permanent member of our regular Design Team. Rachel has been a member of our Guest Design Team for a long time, and also supports us by making projects for the TV shows on Hochanda. We are delighted to have Rachel on the Team. You will be able to see inspiration from Rachel such as the fabulous project below cropping up on the Design Team blog each month from now on.

Hello there! Its Rachel here today with my first post for the main design team - I was delighted to be asked - thanks Lesley, David and Judith!

I thought I had better make a ceramic piece my first one - this is the one I painted for the June show using the scrumptious succulents stamp sheet.

To get the images onto the pottery I use a brayer to get a thin layer of glaze then dip the stamp and apply it to the pot. This surface was tricky as its not straight! After doing the stamping I use more glaze to paint the images prior to it getting fired.


The whole pot has a final glaze on top prior to firing but the place I visit to do this - PottyRoos in Morecambe -do this bit! 

Looking forward to seeing you again soon!

Big hugs

Rachel xx

Thursday, 5 July 2018

Fat Plants - by Magda

Hello,
do you like fat plants? To be honest I didn't until I received the new "Succulent and Cacti" stamps from Chocolate Baroque to work with. During this month I will show you the samples I have made.

Just for you card  :  
Stamp the big Captivating Cacti image with Versafine Onyx Black on 250 grams white cardstock and colour the background and the cacti with Brusho watercolour powder diluted in water. The sentiment is from the Words to Dazzle and Sparkle plate


Grow positive thoughts card:
On  250 grams white cardstock stamp the image using Distress Ink Pad  according to the colour that will be used to colour the flower from the Scrumptious Succulents plate.  Use colouring Pencils for the background and the flower. While the frame behind and the background of the sentiment are made with  Distress Inkpad green and brown blended together.  Stamp the sentiment from the Blossom and Grow stamp set with Versafine Onyx Black


S.w.a.l.k. card :
Stamp the flower from Scrumptious Succulents plate on craft paper with Versafine Sepia.  Colour the flower with white and brown pencils; stencil the bricks with Distress Ink Pad Walnut.  You can find the sentiment S.w.a.l.k. among the stamps of the Mail Art rubber plate


Thank you for passing by and see you on the 17th again.
Magda


Wednesday, 4 July 2018

Growing Blossoms (by Anne)


Good morning. Today I am sharing a couple of my samples for the recent shows on Hochanda with the Blossom and Grow and Scrumptious Succulents stamp sets.
This one was created with a 6 X 6 inch Kraft card blank. First the flowers were stamped onto scrap copy paper and cut out to create a mask. A little Zig 2 Way glue was dotted on the back to provide a temporary tac. Alternatively you could use the special masking tissue.
The images were stamped directly onto the card blank using Versamark and embossed with detail white powder. The foreground florals were stamped first, covered with masks before stamping the background foliage.
A little texture was added using a little ‘pricking wheel’ and a ruler. Just something I have in my tools, like a mini pastry crimping texture wheel. Opaque white pen was then used to add faux stitching and dots. Light colouring was brushed over with watercolour pens, using a clear sparkle pen to dilute the colour.
The flower was stamped again onto white stamping card using Versafine (Onyx Black) and coloured with watercolour and sparkle pens. The image was trimmed out and mounted with 3D foam. Finished with PVA pearls.
My second is a wreath created with one of the small flower heads. A 6.5 X 5.5 inch textured card blank was randomly stamped using the Square Bubbles stamp and Versafine (Majestic Blue). I used various dies to cut mats and layers and to build out decorative sides to the card blank (using white and blue card). 
I used the Inkadinkadoo Stamping Gear to stamp the wreath using Versafine (Majestic Blue). This can be done manually by dividing the circle into 8 segments (mark lightly with a pencil). Tip: Stamp the first image and turn the card before stamping the next, keeping the stamp orientation the same as you go. It’s easiest to stamp the 4 quadrants first then go around again and fill in between. Practice on some copy paper.
The flowers were coloured with watercolour pens and clear sparkle pen to dilute out colour and give shading. 3D foam was used to add depth and dimension to layers.

Tuesday, 3 July 2018

in all things of nature (by Veronica)


Good morning everyone, today I have the first of my samples using this lovely spiky flower, and, of course, my favourite brusho powders - very appropriate weather for cacti and succulent stamps, if not for todays show featuring Christmas stamps!
The spiky flower is from the blossom and grow plate, and the sentiment from scrumptious succulents.
A very quick card if you ignore the drying time - both images were stamped with versamark ink and white embossed. A good sprinkling of black brusho powder and a fairly heavy spritzing with water was all that was needed.
Once it was dry, trimmed to size and a mat of bronze/red  card to pick up the colours in the brusho, them mounted on a 7" square white card blank.


Another version, different colours, this time stamped using black versafine and clear embossed with green and orange powders.  An accidental more watery effect, not really cacti-like, but I liked it - think I will try to get the same effect with the mermaid queen stamp.....

Monday, 2 July 2018

Happiness Within Nature by Penny


Hi everyone, it's my turn to share a couple of my samples from last months shows.  Can you believe it's July already?!  Where IS this year going?  Anyway I hope you are all well and enjoying the 'heatwave', on which note my first card has something of a hot, dry theme to it.

The Happiness Within.


For this card I have used stamps from the Blossom and Grow, Captivating Cacti,  Scrumptious Succulents and Large Crackle Background sets, Distress Inks,  gold embossing powder, and Masking Tissue.


I stamped and embossed a couple of images in gold onto a piece of Drawing Cartridge and masked them.  I then blended inks all over the card in colours that would convey a hot, dry enviroment.  I stamped the Large Crackle randomly around the edge of the panel giving a kind of 'cracked earth' effect, and added a sentiment.  I then removed the masks and painted the images.  I matted the focal panel onto dark card, stamped and coloured a single flower in each corner of a white base card before attaching the focal panel to it.