Hello everyone, today we are sharing some of our quick and speedy projects with in you in the first of our Fifteen Minute Cards posts for 2017. We know from your comments last year that you found this feature very useful, and hope that you will continue to find inspiration along the way with us this year as well. The Design Team girls have been busy making some fabulous inspiration for you, so make a cuppa, and enjoy what we have to share with you. You can click on the individual Design Team members' names to visit their blogs where you can see more information about their projects, and also some of the other designs that they have been creating.
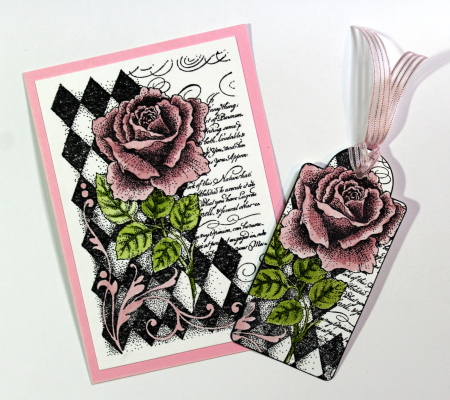
Anne has created some matching cards and tags using an image from the
Harlequin Rose stamp set. As Anne says herself, the composition of the design has already been done for you, and the shading is already there, so the colouring is a breeze too.
She created these makes by stamping the images with Versafine Onyx Black Ink and coloured them using watercolour pens. She applied the strongest colour into the darker shaded areas of the stamped image, dragging out the colour with a water brush. She mounted the images onto coloured card blanks to co-ordinate and frame them. The pre-cut tags were created in the same way. To finish, she simply ran a black marker around the edge and added a co-ordinating ribbon.
Rachel's vibrant card has been made using alcohol inks on Yupo paper. The image also comes from the
Harlequin Rose stamp set. She has stamped the image using Archival Ink, and then wiped the ink away, which created this beautiful effect. The sentiment is from the
Words of Love stamp set:
I have made two very quick cards for you this time. The first, using some kraft card, and a stamp that I have not inked up before, surprisingly! I used Versamark and white embossing powder to stamp the image from the
Pretty Poppies stamp set, before colouring it with water-based markers. I chose earthy tones to tie in with the kraft background. I added a sentiment from the same stamp set, using Plum Archival Ink. Finally, I added a plummy coloured card to mat the background, before adding it to a kraft card blank.
To create my second card, I found a Brusho background in my scrap box, and stamped the
Big Bold Background Leafy Brocade stamp over part of it, using a teal coloured ink. I cut another strip of the background, and stamped the large sentiment from the
Birthday Words stamp set using the same ink. I edged both pieces of card with ink, before attaching them to a white card blank.
Claire's pretty card uses a dramatic colour combination of Brushos to create a romantic background for stamps from the
Fluttering Hearts and
Punky Hearts stamp sets:
We have some cards from
Brenda up next. For her first card, she repeat stamped one of the images from the
Pretty Poppies stamp set onto an offcut of card, using dye based inks. She then cut a vertical section out of a piece of white card, used a pen and ruler to add a contrast edge and placed this over the stamped piece. She mounted the finished piece onto a card blank and added a bow to finish.
To create her second card, Brenda stamped the image from the
Springtime Edges stamp set and coloured the flowers with pencils. She lightly inked the edges and matted the background onto a piece of corrugated card, before adhering it to a card blank.
For her final card, she stamped the willow and crocus images from the
Spring Foliage stamp set, coloured them with pencils, and cut out a circle. She then stamped the willow onto a piece of green card, fixing it behind the background so that the willow lined up.
Magda has created a lovely vintage style card for us, using an image from the
Harlequin Rose stamp set. The soft muted colours create a very romantic feel:
Finally,
Zoe stamped and embossed a butterfly image using black embossing powder. She sprayed the image with mica sprays and decouped the image onto her card, adding a few sequins for decoration:
We hope that you have enjoyed our selection of speedy makes that all took less than fifteen minutes to put together. We will be back later in the month with more inspirational ideas to share with you. Keep visiting the Design Team blog for a daily dose of inspiration from the Design Team.
Thanks for stopping by,


Great inspirations, all so different, and they really help to think out of the confort zone
ReplyDeleteBeautiful cards, thanks for all the lovely inspiration, much appreciated.
ReplyDeleteA fabulous selection of quick cards Judith, always great inspiration. x
ReplyDeleteWonderful selection of beautiful cards, fantastic inspiration, thank you, Kate x
ReplyDeleteThey look so versatile and there are some that really inspire me to get the Chocolate Baroque stamps out and get inky!
ReplyDeleteI'm always so impressed with the 15 minutes card samples, hard to believe they can be that quick and that lovely :)
ReplyDeleteLove all these 15 minute cards. Thank you for sharing these. Lots of ideas there.
ReplyDelete