We are featuring some very romantic cards this month; you may be aware that we have recently been promoting a lot of these stamps due to our TV shows on Hochanda, and so the Design Team have already been working with the stamps. With Valentine's Day coming up, we may be able to help you with some ideas for cards for the loved ones in your life.
Zoe has created a very elegant card using an image from the Harlequin Rose stamp plate. Stylish matting adds a very smart finish to her card:
She has created a colourful tag using a sentiment from the Words of Love stamp plate. This would make a super gift tag for that special someone. She has used Distress Crayons, which she scribbled on to the tag and rubbed in with her fingers. She then inked over the top with Distress Ink and spritzed with water for texture. She inked through a heart shaped stencil and spritzed again with wayer to give a 'less than perfect' shaped heart image. She added some splatters of black ink, added the sentiment, and some chrome highlights.
While Zoe was creating some cards, she had been using bubble wrap to make patterns on her gelli plate. Rather than waste the ink, she blotted this onto a card blank, stamped some flowers and added some sequins and a sentiment, and she had created another quick card.
Brenda's first romantic card was created by stamping a background using two colours of Distress Inks and an acrylic block with gridlines. She then stamped the Rose from the Harlequin Rose stamp set and bleached out the colour before matting the background onto the base card.
For her second card, she created a background using three colours of Distress Ink onto which she repeat stamped the heart from the Harlequin Rose stamp set. She then stamped a sentiment from the Rose Stem Script stamp set and used dies to cut a circle to place in the centre of the hearts.
Claire has used a beautiful stamp from the Parfum de Paris stamp set to create her card. She has used second generation stamping to elongate the stamp. and then added a sentiment from the Words of Love stamp set.
Rachel's first card has been created using alcohol inks on yupo paper. She has used Archival Ink to stamp the image, which she wiped away, revealing a batik effect.
For her next two cards, she has used Archival Ink to stamp the images, Distress Inks for colouring, and lots of matting and layering.
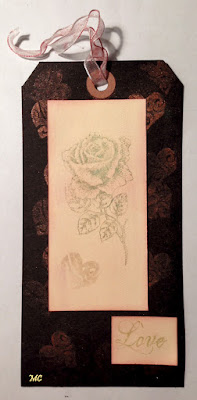
Magda's beautiful tag has been created using Versamark and mica powder. This gives a very rich feel to the background:
Gerrina's first card has been created by stamping partial images of the butterfly and cog fragment from the Steampunk Butterfly stamp set onto watercolour paper. She has coloured her images with alcohol markers, and added lines with a ruler and pencil. Finally, she matted the background onto coloured card stock.
For her second card, she stamped the flowers, covering them with masking paper, drawing lines as before with a ruler and black pencil. She coloured the background with Distress Ink. The images were coloured with alcohol markers.
Penny has created a Valentine card for us by blending Distress Inks onto a background, and faux bleaching the panel. She then edged the panel with gold pen, before matting it onto black card. She stamped the heart, lock and key onto acetate and embossed them with black powder. She cut them out and attached them to the card, adding a sentiment from the Key to my Dreams stamp set.
For her second card, she stamped the flowers onto white card and coloured them with alcohol pens. She then embossed the panel with a frame style embossing folder and blended Distress Inks around the edges and added gold pen. She matted and layered the panel onto a base card and finished with a sentiment panel.
For Penny's final project, she has created a dramatic black tag, die cutting the shape, and edging it with a silver pen. She stamped the images using Versamark, and embossed them using white embossing powder. She painted the images using pearl watercolour paints and added white gel pen. She matted the panel onto white card and cut around the shape before adding a ribbon.
We hope that you will join us next month when we will be back sharing more of our quick makes with you, but please visit the Design Team Blog every day for our regular posts from the Design Team girls. Thanks for stopping by,


Wow, wonderful cards and tags from the DT, the designs and colours are fabulous, marvellous inspiration, thank you, Kate x
ReplyDeleteSo many beautiful cards. Very talented ladies. I still have a lot to learn in using my inks. Thanks to everyone for these helpful instructions.
ReplyDeletewow, such a beautiful series of cards? Chapeau to each and everyone!
ReplyDeleteThese were great and such good inspiration . Thanks for all,you do and share.
ReplyDeleteFabulous inspiration with these quick cards on display today Judith and all beautiful creations. x
ReplyDeleteWonderful compilation of inspiring cards! Great quick works from all the DT ladies!
ReplyDeleteGreat cards and wonderful inspiration. Thank you all.
ReplyDeleteSuch wonderful inspiration - as always :)
ReplyDelete