Pin It button on image hover

Thursday, 31 May 2012

Paper pieced flowers and panpastels (posted by Claire)

The new Sunny Sunflowers themeplate has some gorgeous detailed flower images but as soon as I saw these stamps I thought how useful the plain flower stamp would be for making paper pieced flowers. No matter how many paper flower you have in your stash you sometimes can't find just the right colour. For this project I made flowers to match the papers I used from the Kaisercraft Play Pack 


The focal image was made using PanPastels, its so easy to create a beautiful scene with panpastels I hardly ever seem to use my brayer these days. I masked a moon and used green yellow and blue shades from the tints set, applied in layers with a sofft sponge. I used stamps from some of my all time favourite Chocolate Baroque stamps Nature Table and Autumn Hedgerow stamped with distress inks. PanPastels are perfect with the honesty stamp from Nature Table as you can use a pencil eraser to rub out the colour and leave a lovely white papery finish. The ribbon is also from the Kaisercraft playpack and the swirls were cut with Die-namics fancy flourish die.

I hope your enjoying all the inspiration from my teamies. There's lots more to come too so keep checking in 
Claire xx


Tuesday, 29 May 2012

You are my sunshine (posted by Claire)

Hi there, Claire here with my first sample with the beautiful Sunny Sunflowers stamps. 


To create the flower I stamped the large flower and small flower twice on white card with clear embossing powder and coloured with Diarylide yellow panpastel before cutting out. The flowers are layered up with 3d foam and a little glitter in the centres. These stamps are perfect with PanPastels as they pick up the detail and shade the flowers without any effort at all.

The background was a bit of an experiment, I had some Heidi Swapp Invisibles in my stash which I'd been hoarding for ages. I just swiped Diarylide yellow panpastel over the top and then buffed up with some tissue. I added a computer generated sentiment and a couple of die cut swirls created using  a Die-namics fancy flourish die.

I think you're going to love these new stamps, my very talented teamies have certainly come up with some beautiful artwork so keep popping back so you don't miss out
Claire xx

Monday, 28 May 2012

Sunflower Spool (posted by Judith)

Hi folks, the weather is warming up nicely now, and there's no better time of year to be working with Glenda's fabulous new stamps 'Sunny Sunflowers'. The bold blooms are just lovely for all sorts of projects and full of detail.

I decided for my first project that I would combine the stamps with one of Lesley Wharton's super Downloads; Patterned Spools set 5, which is a lovely gold and plum colour combination. I had a wooden cotton reel that was about the perfect size for the project I had in mind, and I set about firstly priming this with gesso, and painting it a soft lilac colour. I nearly always mix my own colours by combining a cream acrylic paint with a darker colour until I get the colour I want. I make sure that I have enough paint to finish my project though, as you never get the colour the same second time around! I then printed two of the spool sets onto card, and stuck two of the correct size together so that they would fit around the cotton reel. I edged the card with a little bit of Vintage Photo Distress Ink. I then stuck the downloads to the cotton reel.


I stamped three smaller flowers, and several leaves, colouring these with Distress Markers, toning the colours in with the download colours. I also stamped a couple of tiny Butterflies from the 'Just Butterflies' stamp plate, and coloured these in as well. I stuck the flowers around the cotton reel, adding the leaves, and one of the butterflies.

My next step was to move onto shrink plastic, and stamp a larger flower, and two of the smaller flowers. I also stamped two leaves and two more butterflies, choosing a larger size this time. I sanded the shrink plastic before I stamped the images, to give a bit of tooth to the surface. I coloured the images with pencils, and punched a hole in all of them except the large single flower.

I placed the large flower with two leaves that I had coloured on card earlier and the last remaining small butterfly onto the top of the cotton reel over a circle download. I punched a hole into the middle of the download where the hole in the cotton reel was situated.


My Husband very kindly provided me with a metal rod with three wires which he had attached through holes along the top part of the rod. I bent these to look like branches, and stuck beads on the end, and inserted the rod into the hole in the cotton reel, turning it into an earring holder.

I added leftover beads and jewellery findings to the shrink plastic images that I had made and hung these on my little 'tree'.

Here's a close up picture of the earrings:


I hope that I have shown you just how versatile these lovely stamps can be. Keep popping back to see what my Design team mates have made with the stamps over the coming days, Judith xx

Saturday, 26 May 2012

Glitzy Bodices by Debbie

I'll start off by saying, we all know that our irons are not for shirts etc, they are for crafting. I have a drawer with bits of fibres so decided to use them for the bodices of the Dressform from the Haberdashery stamps. I inked the body of the stamp with Black Stazon. With the stamp on the worktop I laid the fibes over it and then covered it with greaseproof paper. The iron was set to a medium/hot heat and I rubbed it over the paper until I could see the outline if the stamp. I repeated with two other combinations of fibes. Then I trimmed off the excess.
The card is a trifold and I used the Love Letters download papers, it comes in eight different colours. I glued the bodices onto the ovals of black. My niece has her eye on this card to stand it in her bedroom, I think I'll pencil in a play day with her during the holidays for her to make her own. I hope this card has given you inspiration to rummage in the cupboards and find stash that hasn't been used for a while.
Debbie

Friday, 25 May 2012

New Sunny Sunflower Stamps and TWO chances of winning a set

Today we are launching a gorgeous new A4 set of stamps called Sunny Sunflowers.  This is a large (A4) set with a mixture of big and small flowers and some gorgeous leaves too.  Altogether there are 17 stamps - enough to build a beautiful garden!


From June we are introducing a regular feature on the Chocolate Baroque website - the "Stamp of the Month" which is an introductory or special price on one stamp set for a whole month.  Our former Guild members are familiar with the concept, but as we are no longer running the Guild, we are making the Stamp of the Month open to all our customers, including our trade stockists.

We will be starting this properly in June with a 'Stamp of the Month' page on the website, but you'll be pleased to know that this particular set is being launched with an introductory price for it's first month!  Click here for details.

We have one set to give away here on the blog and one set on our Facebook page.  Please 'like' our page on Facebook to be in with a chance of winning over there, or leave a comment on this post here.  (Do both and you stand two chances of winning!)  I'll announce the winner on June 1st.

The card shown above was done with Versamark and PanPastels and the sentiment is from one of my most frequently used word sets - Loving Sentiments.

The Design Team have come up with some very creative projects using these stamps - please check back to see what they come up with, or why not become a follower?  You can also keep up on Facebook as we automatically link to all our blog posts over there too.


Thursday, 24 May 2012

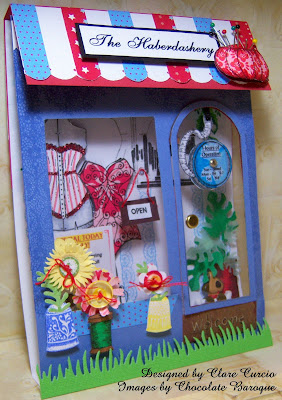
The Haberdashery

I love little shops like this, that are so cozy and warm when you walk in.  There's a little dog to greet you, whose favorite place to chew on his bone is under the Elephant Ear Philadendron.  Everything is in it's place, and there's always a "Special" going on.  Today it's scissor sharpening!  Only $5 per pair!
The stucco on the front of the building even has a "lacey" look and feel to it
This effect was made by using a lace stamp from the Chocolate Baroque set Lace Fragments.
The Store Front - complete with pins in the
pin cushion!  With thimble flower pots,
and a scissor easel, tape measure
for a hours of operation sign, lace
wallpaper, and buttons for flower centers.


The hours of operation sign is hanging on the door, and at
closing time, the proprietor will turn the sign around.  Here's the
"Special of the day!"  I love that blue striped wainscoat wallpaper.
  
For the window and door, I used one of the
Spellbinders plastic containers that
some dies came in.  The door knob is a brad.
There's a stool right there by the window,
if you'd like a seat. 
Please note the wallpaper border,
and be aware of the exit, just in case...
Bone-chewing in the shade,
but still wary and on guard.


A place to write your note to the recipient


Tuesday, 22 May 2012

He Is Risen!

I'm sorry to be so late in blogging about this, but maybe I was saving the "best for last"? lol The shoulder I had fixed three times has been a bit achy, and I haven't been on the computer for a few days.   A lot's been happening around here - too much to mention!   Here is a card I had so much enjoyment in making.
Add caption
 Chocolate Baroque has outdone themselves with the Lace Fragments and Easter Traditions stamp sets! They are "must-haves"!!! I thoroughly enjoyed using these stamps, and the detail is extremely fine and delicate - just like the real thing! The complete directions follow the photos.


A closeup of the dimension the elements have in this card, and the detail of the roses.

This shows the intricate detail of this fan lace stamp. It looks so realistic!


He Is Risen

Supplies –

Chocolate Baroque stamp sets
         Artistic Expressions – “Joy”
         Lace Fragments
         Easter Traditions – small cross,“He is risen”
       
Embossing folder
White cardstock, cut to 5” x 11”
Gray cardstock, scrap for cross
Purple inkpad, I used Stampin’ Ups Baroque Burgundy
Gray inkpad, I used Stampin’ Ups Going Gray
Scoring board
Small & medium white pearls
3 – ¾” purple roses from stash
Diecut leaves from a friend, unknown die
5” white gimp trim, with ends sealed with glue
Dimensionals
Scissors
Spellbinders Cross Collection dies
Diecutter (I used a Cuttlebug)
EK Success “Daisy Scallop” edge punch
Copic marker BV08 Blue Violet

Directions –

Score and fold the white cardstock piece, at the 5 ½” mark lengthwise. Position the embossing folder at the center of one side of the cardstock, towards the fold; run through die cutter to emboss. On a scrap piece of 3 ½” white cardstock, stamp the 1” wide lace that looks like fans, from the Lace Fragments set. Use the gray inkpad. On the front of the card base, below the embossed emblem, about 1 1/4” above the opening edge, stamp using this same stamp and inkpad, across the 5” width, with the straight side of the “lace” on the bottom (fans up). At the top of the card, above the embossing, stamp the open lace in gray. Across the bottom front of the card base, below the stamped lace strip, use the border punch to create the flower pattern. Adhere the white gimp onto the card base between the stamped lace image and the punched border. Use the purple inkpad and the word “joy” from the Artistic Expressions set, and stamp it in the top left corner of the embossed image in square. Use dimensionals to adhere the 3 ½” long piece of “fan lace” parallel to the same on the bottom, about ½ way up card. Trace around the cross die from the Spellbinders die set, Cross Collection, on the gray cardstock and cut out with scissors. Sponge edges with gray ink. Use a piece of white scrap paper, and die cut a cross using this same die. Use dimensional to adhere the white cross centered in the gray cross. On white scrap paper, stamp in purple, the small cross stamp from the Chocolate Baroque set, Easter Traditions. Fussy cut cross out with scissors. Use dimensional to attached this cross in the center of the white cross. Double-up the dimensional on the back of the gray cross and position in the top right corner of the card, with part of the cross’ circle over the end of the stamped lace strip. Use the Copic marker BV08 Blue Violet to color five of the medium-sized pearls. Place on the ends of each cross beam, and in the center of the small cross. Using the smaller pearls, place one in each cross section of the stamped lace on top and bottom, across the bottom of the fan with “He is risen” across it, and the punched border.

Sunday, 20 May 2012

Love Circle

Hello!  I had so much fun working with this scissor stamp from Chocolate Baroque's Haberdashery set!  A positioning tool called a Thing-a-ma-jig was how I lined up all the scissor stamps to create the circle.  I used Memento ink in black.  A complete list of supplies and instructions on how to make this card follows the pictures.

Black and pink go so well together!


Supplies -

Chocolate Baroque Haberdashery stamp set - longer scissors stamp
Chocolate Baroque Artistic Expressions set - "Love"

Spellbinders Grand Scalloped Circle dies
Spellbinders Grand Circle dies
Spellbinders Fancy Labels dies
Flower, leaves and Cheery Lynn Lace Butterfly diecuts given to me by a friend
Copic markers - R81 Rose Pink, R85 Rose Red, RV13 Tender Pink, C1 Cool Gray No. 1, C3 Cool Gray No. 3,
Stampin' Up markers - Pretty in Pink, Going Gray, Black,
Cardstock - Stampin' Up - Pretty in Pink, Rose Pink, Black and White
Pink 1" satin ribbon from stash
Adhesive pearls from Zva
Pop-dots or adhesive squares, 1/8" thick
Memento inkpad in black
Sponge dauber
Tacky glue of choice

Cut one Rose Pink Grand Scalloped Circle using the 3rd largest die.  Score and fold a sheet of the Pretty in Pink cardstock in half, then using removable tape such as Painters Tape, position the next largest Scalloped Circle die with the scalloped edge just on the edge with the opposite side hanging beyond the edge of the folded cardstock.  Sponge edges of scallops with black ink.
 
Find the center of a sheet of 8 ½” X 11” white cardstock and mark with a pencil.  Using the Thing-a-ma-jig, position point of long scissor stamp from the Haberdashery set, on the center spot and stamp in Memento black ink.  Continue to stamp the scissors around in a circle with the scissor point on the center dot, and the beautiful edging on the handle just touching.  You may not have enough space to stamp one more to complete the circle, but that’s OK – you will use the “Love” label to cover it.  Color and shade the scissors as desired.  Using the Circle die that just fits inside the 3rd largest scalloped die used above on the Rose Pink cardstock, center the die on the scissors, and cut out.  Glue “scissor” piece to the Rose Pink cardstock, then that to the Pretty in Pink piece, offsetting the bottom edge scallops.
 
Trace around the outside edge of the Fancy Label die in black cardstock, and cut out.  Stamp “Love” word from Chocolate Baroque Artistic Expressions set on white cardstock using SU’s Going Gray inkpad.  Shade and color in using the Copic markers.  Cut out using the Fancy Label die from white cardstock, centering over the word “Love”.   Using Pop-dots or dimensional, adhere the “Love” label diecut over the space not filled in with a scissor stamp on the white circle.  Position leaves at the center and left of the label, then apply bow (tied with a Bow-easy), using strong adhesive.  Place flower over edge of label and leaves.  Place pearls in place, and add the butterfly diecut.  Decorate inside as desired.

I hope you'll have fun making this for yourself or someone you love!  I think it would be pretty with a sunflower or daisy in the center.  I'm off to try it!

All my best,
Clare


Friday, 18 May 2012

Imagine a Butterfly Cage


Hello, everyone!  These two new stamp sets have really inspired me, and they're right up my alley, too!  I love the old fashionedness of the dressform shown here - it reminds me of the old hoopskirts from, as they say here in the USA, "back in the day."  Originally, I had thought, and did, put a little yellow bird in the cage, but then I happened to find some printed butterfly images that were 3-D, and I thought it looked better than the birdie.  I love to sew, and I love birds, so this was so apropos. 

The original with a yellow bird.

My husband has told me many times that I should have been born in the Victorian era, because I love the jewelry and clothing from that era.  I've never actually used a dressform to make a dress, but maybe I should. 

I've put the directions on how to make this card below.  I've used Chocolate Baroque's newest stamp sets, Haberdashery and Lace Fragments.  I also added the word 'Imagine' from the Chocolate Baroque stamp set Artistic Expressions, which is what you have to do on this card! :)  The background was stamped with the large lace flower in the Lace Fragments set, and colored in with Prismacolor pencils, and I love the way they came out, subtly in the background.  The flowers were made from scraps from different punches, and I used Flower Soft in the center of the yellow ones.  Two dressmaker pins, a green button, and some eyelash trim finished off the embellishments.  The complete directions are below.
Silver embossing powder was used on the scissors stamped with Versamark ink.


Dress Form Birdcage

Supplies –

Stamps from Chocolate Baroque Haberdashery, Baroque Lace, and Artistic Expressions
     Coloring medium of choice (I used Prismacolor Pencils)
     Versafine Onyx and Versamark inkpads, gray and peach inkpads
     Silver embossing powder and heat gun
     Hobby knife
     Printed butterflies from purchased sheet
     White, Silver, yellow, peach and green cardstock
     Dry embossing strip, your choice
     One green button
With butterfly instead of yellow bird
     Eyelash string
     2 dressmaker straight pins
     Fiskars 'Stitch' border punch
     1/8” high pop-up dots
     3-D flowers of choice

     Directions –

Cut white cardstock to 6” high by 9” wide, then score in half to make base card 6” high by 4 ½” wide.  Dry emboss decorative strip on right side of front of card (opening from the right).  Stamp the lacy flower from the Baroque Lace stamp set in various places on front of card, but not over embossing, using the gray inkpad.  Color images in with pencils, using peach, yellow and green.

Stamp the word “Imagine,” from the Artistic Expressions set onto white cardstock, using the black inkpad.  Cut word out leaving a 1 ½” border all around, then use the stitch border punch to make border.  Using a small sponge dauber, dab or rub peach ink onto word piece below the word and on the edges.  Glue to card as shown.  Thread the eyelash string through the holes in the green button and tie into a small bow, then glue to the bottom left corner of the sentiment piece.  While glue is still tacky, push two dressmaker pins, crossed, under the button with ball tips on top.

Scissors – Stamp scissors from the Haberdashery stamp set, using Versamark inkpad onto silver cardstock, and sprinkle with silver embossing powder.  Heat set.  Fussy-cut around outline of scissors, and apply pop-up dots to back.  Set aside.
Dress form birdcage – Using the dress form stamp from the Haberdashery stamp set, stamp it twice on white cardstock using the Versafine Onyx inkpad.  Cut one out on just the very outside lines, and adhere in the center on lacy flower stamped area.  Shade the second one with gray pencil, and fussy-cut out completely, including between the bars of the cage, using hobby knife.  Apply small pieces of pop-up dots to the back.

Cut printed butterflies from sheet, and arrange a larger one along with some flowers to the center of the “birdcage” part of the first image that was adhered to the card.  Apply scissors horizontally on top of card, having points towards the left, to make it appear that the cage is hanging from the shears.  Place the second birdcage over the first, matching all edges, and the scissors should appear to come out of the armholes of the dress form.  The butterfly should “appear” to be hovering in the center of the birdcage.  Apply flowers with glue, and the small butterflies with pop dots. 


Wednesday, 16 May 2012

Paper Pieced Dress form by Debbie

The Haberdashery stamps definately are versatile so that you can play endlessly with them.
I decided to go back to a technique I haven't done for a few year and paper piece the dress form and pin cushion. The papers I used for my card are from the Songbird A4 paper pad. The dress form was stamped with Versafine Onyx Black onto the green background paper and the stand was coloured with brown alcohol pens. I stamped twice more onto different papers from the pad, cut out then glued in place with silicone. I repeated for the pin cushion. The bobbins have been stamped cut out and coloured with pens. I edged the background paper with Brushed Corduroy and pricked around it using my Tim Holtz ruler. The sentiment is my favourite and was stamped onto cream card then die cut. I left the die in place and inked the inside with Adirondack Juniper. Debbie

Monday, 14 May 2012

Lace Scrapbook page (posted by Judith)

Hi folks, I thought I'd show you another use for these lovely Lace Fragment stamps recently released by Glenda. I decided to make an 8" x 8" scrapbook page, as this is a size that I am very comfortable working with. My Design Team mate Debbie is a keen quilter, and has been making some lovely quilts lately, and that is what inspired me to make this sample.

I cut four 8" x 2" strips, and embossed each one with a different stamp, three from this stamp set, and one from the Texture fragment set, using white embossing powder. I then cut the strips into 2" squares. I arranged them into a pleasing pattern, and stuck them together with double sided tape on the back. I sewed them together, using zig zag stitch on my sewing machine. I stuck the cotton ends to the double sided tape on the back, and covered the back with another piece of 8" x 8" card.

I stamped and embossed some of the buttons from the Haberdashery stamp plate, and cut these out. I used a suitable Nestability die to create a frame for my photograph, this is my Daughter and my niece. I then stamped the word 'Love' onto a Nestie shape.

This is such a simple page, but the lace background is so pretty, and makes the page really tactile. The buttons are a great little addition, they are going to be such useful stamps.

Thanks for stopping by, Judith xx

Saturday, 12 May 2012

Hello there,

Today a creation I've made using the 'Haberdashery'sheet. I also used a paper from the  Prima marketing paper called 'Meadow Lark'. Beautiful papers that matches perfectly with each other. I embossed this time with Wow Black Twinkle. you can see a little sparkle in the black........
I also combined the Lace fragments border on this card. I've coloured most of the embossed pieces with Copic markers. Added some feathers and white pen effects.


Well, see you some other creative moment........


Thursday, 10 May 2012

Another Lace Rose by Miranda

Hello there,

Today I have combined the Lace Rose with the beautiful Foxglove of the Honeybee sheet. And again I stamped on Basic Grey paper and gave some accents with Derwent colour pencils.
I've used the swirl from the Artistic Expressions sheet and if you take a closer look you can see the lace fragment on the pink Basic Grey paper background. The Rose is embossed with Wow Black glint embossing powder. It has that lovely subtle sparkle.....


Have a nice day and see you next time!

Tuesday, 8 May 2012

French Dressing Room (posted by Judith)

Hi folks, here's a cheery project combining the Lace Fragments stamp plate and the Haberdashery stamp plate. I used a colour palette of Spun Sugar Distress Ink and Paris Dusk Memento Ink, a very unusual combination for me!

First of all, I used Post it Notes to create stripes on the bottom half of the background, masking areas, and inking inbetween those areas. I dried everything thoroughly, and then I went back and masked everything again, and inked the white areas inbetween with one of the large lace stamps with Spun Sugar Distress Ink. For the top half of the card, I simply coloured the background with Spun Sugar Distress Ink, then stamped the large lace flower with Paris Dusk Memento Ink. I put a piece of dark blue ribbon across the middle. This is from one of the ribbon sets that Glenda sells on the website.

I then stamped the three mannequins with Memento Ink, and coloured them with Distress Stains before cutting them out. I added a simple sentiment from the 'Paris Postcard' stamp plate.

Don't forget to keep popping back to see what the other Design Team members have been making with these fabulous stamp sets, I'll be back in a few days. Thanks for stopping by, Judith xx

Sunday, 6 May 2012

'Lacey' moments by Miranda

Hello there,

Today another one with the new Lace Fragments. This is a bit of a scrap card with different stamped pieces and use of some Nestabilities. I also stamped the Tim Holtz flower die with the Lace fragment. I really like that effect. I kept the colours in warm browns and that gave it a sort of vintage look. I've used Brilliance Chocolate brown and black.

I also used the Elegant Iris sheet as you can see on the main image. I over stamped that on the lace pattern and coloured with Derwent Soft Colour. The word 'Dream' is from the Artistic Expressions sheet.


Well that's my inspiration for today!
Have a nice day and till next time,


Friday, 4 May 2012

A card of buttons (posted by Elaine)

When I saw the lovely downloads Lesley had designed I spotted a match with some really pretty buttons I had recently purchased. I had th idea of trying to make a card with something that looked like a pack of vintage buttons.


I cut out a panel from one of the tag envelope designs from the Chic Script 2 set and aged it with Frayed Burlap Distress Ink.  I matted this onto a brown bckground and then stuck the whole thing onto a piece of recycled corrugated card. This then gave me a nice thick backing to embed my button backs. I stiched them into place on the back to make sure they didn't come loose before matting onto a brown background. I made a label for the button card used one of the Haberdashery stamps on cream card and fixed it into place with a couple of pale green brads.

I finished off with some green paper string, the scissor charm and some die cut vintage lace courtesy of a Tim Holtz die.

Hope you are enjoying looking at these lovely stamps and the gorgeous creations my DT team mates have come up with. These new stamps really are an incredible pleasure to be working with.

Elaine

Wednesday, 2 May 2012

Lace and Haberdashery Winners announced!

Did you think I'd forgotten.  Well things just kept conspiring to keep me away from my computer this week, so the 'weekend' has overrun slightly.

By random number generator, I'm delighted to announce our two winners who are:

Aquarius who wins the Lace Fragments set

These stamps really are 'ab fab' and as you say so on trend. Just love your little 'Etsy labels' too they would grace any hand crafted article.


and Sue's Crafty corner who wins the Haberdashery set

Oh wow, these are gorgeous. They have just found their way to the top of my wish list. Can't wait to see what the design team have made with them.

Sue x
Well done ladies - please can you contact us to just confirm your address and we'll get your stamps sent out pronto!


Steampunk mannequin (posted by Judith)

Hi Folks, here's another offering combining the new Haberdashery stamp plate, and the Lace Fragments stamp plate. I've thrown some old favourites in there as well, and I'll tell you about those as I go along.

I wanted to give a steampunk feel to one of the mannequins, and set about gathering some of the other stamps that I love to use to add to the background. I created a wrinkle free distress background, using Distress Stains in Tumbled Glass and Antique Linen. Then I stamped one of the Lace Fragment stamps all over the background. I added a cog stamp from Steampunk Christmas using Perfect Medium and bronze mica powder, and a script stamp from Eccentric Edwardian. I edged the background with Vintage Photo Distress Ink.

I stamped, coloured and cut out the mannequin, and part of the heart with wings from Punky Romance, it was a perfect fit behind the mannequin.  I stamped the word 'imagine' onto shrink plastic, cut it out with a Nestie shape, and shrunk it down, before sticking it onto a piece of spare coloured background card. I added a cog with some jump rings. I stuck some mini cogs onto the mannequin's skirt. I embossed and coloured a mannequin using an embossing folder, then cut this out.

To finish, I added another metal cog for balance, and matted my background onto brown card. In real life, the wings are very dimensional, and the cogs shine, as the mica really reflects the light.

Thanks for stopping by, Judith xx