Pin It button on image hover

Thursday, 31 October 2013

New Fragment stamps by Glenda

It's that time of the month again- yes I'm talking about palpitations and chocolate cravings ... it's new stamp time! We have two new A4 sets this month to add to our ever popular fragments range.

 Here is Nature Fragments


and here is Abstract Fragments.


Both sets are just fabulous for creating interesting backgrounds.  Try stamping over Distress or Dylusion sprayed backgrounds or go for a little embossing.  Try using them for mark making on Gelli plates and of course the paint you pick up can be used to stamp over another project.

They're great to add an extra touch to die cut shapes - think frosty snowflakes, psychedelic flowers, woodgrained trees and brick lined paths. And the abstract, pattern making nature of both of these means if you pick the right colours, you can very easily use them to make Christmas or other seasonal cards.

Because we use high quality deep etched rubber, these really come into their own when you start working with texture.  They will give super results on polymer or air dry clay, shrink plastic, friendly plastic and deep embossing.

These are the sort of stamps that are surprisingly versatile and they've been a pretty permanent feature on my studio table since we got the first prototypes to test.  I decided to use them on some chipboard baubles which I'd painted in shades of blue.


The deer trio die cut is stuck over one of the frosted crackle backgrounds and the other large bauble is simply stamped with Archival ink, but the two smaller baubles are both done with deep embossing powder.


If you've not tried stamping into deep embossing powder, here's a quick run through of the technique.

After the paint was dry, I patted Versamark over the whole bauble and covered it with a layer of clear UTEE (ultra thick embossing enamel) and heated to melt. I repeated that twice more so I had three layers of UTEE which is a good depth for creating texture.  I used two of the abstract fragments side by side on one acrylic block and inked them up with Versamark.  After heating the final layer of UTEE, I stamped gently into the warm, molten embossing powder and let it harden for 30 seconds before removing the stamp.

I then dusted a little Perfect Pearls over it and turned it over and rubbed gently on a wet wipe.  That left the pearly powder in the crevices, but removed it from the raise surfaces, letting the original painted colour show through.  (I'd started with a purple and blue pattern, so that's what the variation in colour is.)

The second bauble started out as a much more uniform turquoise colour.  I did exactly the same technique, using copper PanPastel to highlight the texture.  However this time, after wiping off the excess, I reheated the UTEE until it went smooth again, leaving the copper image looking as if it is floating on the surface - it has a look of traditional powdered glass enameling.


We couldn't choose between the two sets, so they are both our Stamp of the Month for November which you should know by now means that they are at introductory prices for one month.  And yes, there is a multi-buy deal as well so you can save even more if you want them both.

Let me know what you think of them and don't forget to come back and see what the DT have been getting up to with these stamps.


Wednesday, 30 October 2013

Flutterby Flourishes (posted by Claire)

Good morning folks, Claire here with a quick and easy card using the gorgeous Fancy Flourishes stamps and a little topper made from Tim Holz tissue wrap (you can find it here)

I made the background by blending Dusty Concorde and  Milled Lavender distress inks onto some white cardstock. I stamped the flourish using Imperial Purple Versafine ink, its so easy to position these clear stamps. I made the topped by wrapping a little piece of card with tissue wrap, and adding some colour with more distress inks. I coloured the butterflies with Graph'It Markers and added some tiny dots of stickles to the wings before edging the topper with a gold krylon pen. I've just added a little bow and a die cut butterfly to finish off.

Thanks for visiting today
Claire xx

Tuesday, 29 October 2013

Purple and Gold (posted by Judith)

Hi folks, I have another sample showcasing the Fancy Flourishes clear stamp set for you today. I have created a background by colouring a piece of glossy card with alcohol inks. I then stamped one of the flourish stamps diagonally across the card using gold embossing powder. I used two pieces of mountboard which I cut into oval shapes and coloured with Distress Inks. I stamped these with the crackle stamp from the Echoes of Italy stamp set to give them an aged feel. I stamped the large flourish onto the bigger oval, and a sentiment from the Loving Sentiments stamp set onto the smaller oval.

I punched a hole into each piece of mountboard at this point. I then added three layers of ultra thick embossing enamel to each piece, so that they looked like glazed tiles. I added some jump rings between them, and stuck some gems onto the large flourish.


Thanks for stopping by, Judith xx

Monday, 28 October 2013

Blue Christmas (by Shirley)

Hello everyone, I hope you had a great weekend.

I have two 'Blue' Christmas cards today featuring new stamps along with an older favourite:).   I used the new Reindeer Landscape set for the card below.


I used a favourite Dylusion ink combo (Calypso Teal, After Midnight & White Linen) on the background.  I stamped the trees from Reindeer Landscape with Deep Purple Archival Ink and added lots of glitter.    Believe also from Reindeer Landscape, was stamped with black Versafine Ink.   I used Memory Boxes Dies - Deer Trio & Snowflake Corner (they cut like a charm!) with black cardstock.    The Deer Trio is great as the bottom doesn't cut so you can cut to whatever shape you need for your design.    I added lots of glitter to the trees and snowflakes.


I used the new Fancy Flourishes clear set along with Christmas Flourish  and Bold Christmas Words for the card below.


The above background was created with the same three Dylusion Ink Sprays.    I spritzed a little water to blend, blotted with a paper towel roll and added a little sea salt before it was dry to create 'stars' in the ink.  When dry, I used TCW stencil - Star Fall with Picked Raspberry & Peacock Feathers Distress Inks and white Acrylic Paint.

I stamped the Flourish from the new Fancy Flourishes set with Salty Ocean Distress Ink around the border of the background.    The sentiment from Bold Christmas Words and the Christmas Tree from Christmas Flourish were stamped with Black ink.   I added stickles to the tree. 

Thanks for your visit and have a great day!
Shirley

Saturday, 26 October 2013

Doily look alike (by Debbie)

Hello. The card I have today shows how the small stamp from the Fancy Flourish Clear stamp set can be used to make a look like doily.
I started by cutting a 14cm square and with French Ultramarine Archival ink placed the stamp on each four sides. Next, I stamped in between the first four then stamped from the centre to where the stamps meet. I stamped the sentiment from Birthday Words which is great for the inside or front of a card. The sentiment was die cut and added. I mounted on to a pale blue then attached to the card. Once I had worked out the placing of the stamps they are quick to make. Hopefully the UK weather will be kind this week as the schools are off. Have a good day. Debbie

Friday, 25 October 2013

CAS Christmas Trees (by Shirley)

Hello everyone, I hope you are doing well.

I have a couple of CAS designs using trees from the fabulous new Reindeer Landscape set and a sentiment from Warm Christmas Greetings.   Both of these cards are 'quick makes'.


I embossed the trees and sentiment on the above card with gold, coloured the snow and added stickles on the ornaments.   I matted as shown and it's done! 


For this 2nd card above, I embossed the trees and sentiment with silver holograph embossing powder and added stickles to the 'snow' and ornaments. 

Thanks for your visit and have a great day,
Shirley

Thursday, 24 October 2013

Holly Flourishes (posted by Judith)

Hi Folks, here is a quick little Christmas card using the new Fancy Flourishes clear stamp set. I used the holly flourish to create the impression of a tree branch, by repeatedly stamping the image along one edge of a piece of kraft card. I used a white pen to add a 'shadow' to look like snow on the branches. I stamped the word 'Joy' from the Bold Christmas Words clear stamp set in the top corner, using red ink.

I made a robin by die cutting a bird from dark brown foil and colouring the stomach area with red alcohol ink. I added a little gem for the eye. Finally, I added a red and green layer of card behind the design.


Thanks for stopping by, Judith xx

Wednesday, 23 October 2013

Merry Christmas (posted by Claire)

Good morning, Claire here with a very quick and easy Christmas card using the beautiful new clear stamps, Fancy Flourishes


We always have so many cards to make for Christmas, so its nice to be able to get stamping and have a bit of a 'production line going with some simple but effective designs. The new Fancy Flourishes are fab for creating borders, backgrounds and frames so I thought they would be just the job for a a pretty Christmas design. I stamped the flourishes in Ladybug Memento Ink to create the frame, its so easy to line the clear stamps up. I added the sentiment from Bold Christmas Words and matted on some red card. To finish off I added a little red bow

Thanks for visiting today
Claire xx

Tuesday, 22 October 2013

Fall Flower (by Clare)

Hi, everyone!  I hope you're all doing well, and perhaps enjoying some cooler weather.  The trees have finally started to change after a few nights of cooler weather and rain.  To celebrate this wonderful and colorful time of year, I have made this card in some rich oranges, rusts, brown and green.  Very easy to make with a flower or two from Tangled Garden, and some stuff to put in the center.  The beautiful rusty pattern in the background is a new stamp from the set Fancy Flourishes.  I used some patterned fall paper from my stash.


Be sure to check back often for more beautiful creations from our talented design team gals!  Take care!

Monday, 21 October 2013

Blue & Green Fancy Flourish (by Shirley)

Hello everyone, I hope you had a great weekend.

I've used one of the large designs from the new elegant Clear Stamp set  Fancy Flourishes to create this card.


I stamped the beautiful large Flourish with brown Dye ink on green designer paper that has a slight pattern.   I coloured the image with Prisma Pencils and added lots of bling.      I die cut the paper and layered onto white card stock that I embossed and edged with a gold leaf pen.  I used the same designer paper as one of the mats.

Spellbinder:   S5-160 Opulent Ovals
Embossing Folder:  Cuttlebug Acanthus


Thanks for stopping by and don't forget that Glenda is giving away a Fancy Flourishes set, please visit her Blog Post here to leave a comment for a chance to win, Good Luck!

Have a great day,
Shirley

Sunday, 20 October 2013

Fairy Flourishes (posted by Judith)

Hi Folks, I have a sample to show you today using the new Fancy Flourishes clear stamp set. I created a background by colouring a piece of white card with Mustard Seed Distress Ink, and then stamped the large flourish stamp across the card with black ink. I used the feisty angel from the Gothic Angels stamp set, masking off the areas that I did not want to appear before I inked the stamp, and then peeled the masking tape away before I stamped the image. I was then just left with the head part of the image. I coloured the image with pencils, and added Glossy Accents to the ivy leaves. I added a sentiment from the Fairyland Words clear stamp set.

I made a flower using handmade paper which was sprayed with yellow ink, and cut from Nestability dies. I edged the shapes with black ink for definition. I scrunched each layer, and attached them together with a brad. I glued a cog into the centre, and dropped seed beads into the glue. Finally, I die cut some ivy leaves from green card.

The background reminds me of expensive wallpaper, it would look lovely in a living room or bedroom, wouldn't it? Keep popping back for more samples from my Team mates. Thanks for stopping by, Judith xx

Saturday, 19 October 2013

Pink Christmas Trees (posted by Claire)

Good morning, Claire here with a card featuring the funky trees and snowflakes from Reindeer Landscape


I love pink and white for Christmas cards so I set to with an assortment of pink dye inkpads and a water mister and swooshed them around on my ink blending mat to create the background. Next I stamped the trees and the snowflakes with versamark and embossed with whit embossing powder. I added some colour to the trees with Sakura Glaze pens.

The sentiment is from Bold Christmas Words, again embossed with white embossing powder on pink cardstock and die cut with spellbinders dies. I added some little pearls to the snowflakes and a little white bow to the bauble sentiment. 

Thanks for visiting today
Claire xx

Friday, 18 October 2013

Introducing our Flourish clear stamp set


I'm delighted to announce we have a new set of clear stamps just out - Fancy Flourishes. Read on for details of a giveaway!


I think this is one of those very versatile sets that you can use in conjunction with many other stamps - they're great for edging die cuts and adding detail to corners behind your matting and layering.

In the card below I've used 'second generation' stamping to create a background.  That simply means I've inked my stamp and stamped onto scrap paper, then stamped onto the card without re-inking.  I vary the pressure when I stamp the fully inked stamp on the scrap paper, which means the second stamping has some areas darker and some lighter, which gives it more of an antique, faded look.


 The card below is another very simple card - I stamped the bold flourish with Versamark and rubbed PanPastel over the card to create a tone-on-tone effect.  I stamped the sentiment from Fairyland Words  in Archival (Deep Purple) over the top.


And if you thought corners were just for corners, think again.  Here I've taken the two large corners and stamped them together to make a butterfly.  I hand cut the body then overstamped that with one of the smaller flourishes too.   I stamped with Versamark and embossed with gold sparkle embossing powder then sprinkled a few purple gems around.  The wire antennae help finish off the butterfly illusion.


I have a set to give away, so if you'd like to win this set, please leave a comment below.  So that I don't forget, I've put it in the diary to pick a winner on November 1st which gives you a couple of weeks.


Thursday, 17 October 2013

Butterfly framed gift (by Debbie)

Hello. Something a little different from me today. I'm sure I'm not alone when you see something and think 'I'll use that one day.' I do that a lot. I bought this frame from IKEA quite a while ago and my hubby tried to use it for a photo he'd taken so I hid it with my crafty stash. When I received my Tim Holtz tissue I immediately knew it would look fantastic in the frame.
The frame comes with a mount which I covered with matte multi medium and carefully laid the tissue on to it. When dried, I trimmed out the centre then wrapped around the edges and rubbed with Antique Linen ink. A piece of white card that has been inked around the edges was placed into the aperture. I stamped many butterflies from different sets of Chocolate Baroque sets and placed them randomly on the card. It will be difficult to part with this so I may need to buy more frames to repeat for Christmas gifts. Thanks for stopping by today. Debbie

Wednesday, 16 October 2013

Holly Edges with an Angel (by Shirley)

Hello, I hope everyone is doing well.

I have a design today using the beautiful Holly Edge from the new Christmas Edges and an Angel from Gothic Angels stamp sets.


The background is Seedless Preserves and Festive Berries Distress Ink using the Acrylic Block technique.   When dry I flicked a little water over it.   I stamped the Holly edge and sentiment with Seedless Preserves Distress Inks.  I embossed the pretty Angel with silver and coloured her with Inktense pencils.   I cut her out, attached to the background and added glitter to the bottom of her dress, wings & halo along with the pearls on the background.

Thanks for stopping by and have a great day!
Shirley

Monday, 14 October 2013

Snowflake Edges (by Debbie)

Hello all visiting today. Like many card makers I'm in full on Christmas card making mode at the moment and hoping to leave time to make a few handmade gifts for friend and family.
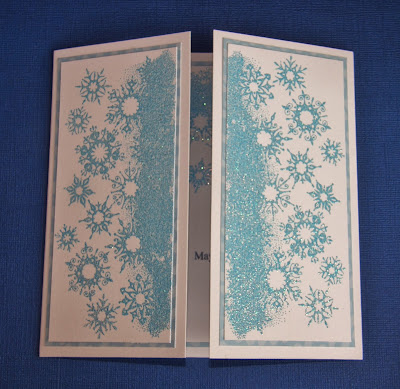
For this trifold square card I stamped the snowflake border from the Winter Edges stamp set three times with Versamark and embossed with Nice Ice Blue embossing powder. I trimmed two of them for panels for the front of the card and the third to fit the inside. I added the sentiment May you days be merry and bright which is great for the inside and front of cards.
Here's another card I made while I had my equipment on the table.
Thanks for visiting. Debbie

Sunday, 13 October 2013

Time to say goodbye (posted by Elaine)

After a lot of soul searching I have decided the time has come to resign from the Chocolate Baroque Design Team. I have been producing samples to showcase the lovely stamps produced by Glenda and Adrian for three and a half years. I recently decided that I want to allow myself more time to experiment with my crafting and learn some new techniques and this has led me to decide it is time to move on from the DT work. My last samples have now been posted for the team.


Over on my blog today, I am allowing myself a little self indulgence with a little retrospective review of some of my favourites among the samples I have produced during this time.

I want to thank Glenda for giving me the chance to be part of a fantastic team of crafters, artisitic spirits who have been a real pleasure to work with and who have taught me so much. I will of course be carrying on enjoying using CB stamps as a customer and I am sure the stamps will continue to feature large in the projects I post on my own blog.

Thanks for all your comments here and on my own blog on my samples showcasing the wonderful range of stamps and products from Chocolate Baroque, they have meant so much.

Elaine x

Saturday, 12 October 2013

Let it Snow by Clare

There's a little chill in the air at night, so I know that winter is right around the corner!  I wish it would snow!  I know you probably think, "She's nuts", but I can't help it!  haha

This card really makes me think of a snowy day in Colorado where I was born and raised.  We'd have some storms that would be blizzard-like, but my favorite is the heavy huge flakes that stick to everything, and are perfect for making a snowman!  The second photo shows the dimension of the snowflake flowers.  I layered some snowflake vellum over the blue cardstock, and stamped the snowflake edge from the new set, "Winter Edges" in glue, then added a lot of sparkly glitter.  The sentiment is from the set, "Bold Christmas Words".  I used a snowflake embossing folder, spread clue across the tops of the raised images from a glue pad, and added more sparkle.  I die cut snowflakes from white cardstock, shaped them with a stylus on a pad, tinted the edges of one with blue, and layered with dimensional dots.  The last touch was the blue rhinestones.  Very easy to make!


In this photo you can really see the sparkle, and the
dimension of the flowers.

Friday, 11 October 2013

Reindeer Landscape (by Shirley)

Hello everyone, I hope you are doing well.

I have a card today featuring stamps from the beautiful new Reindeer Landscape set.

I sprayed Midnight, Teal & Linen Dylusions Inks to created the background.  I over stamped with a snowflake from Reindeer Landscape with Moonlight Brilliance & Peacock Feather Distress Inks.  It's a ltitle difficult to see them in the photo.     I stamped the Reindeer scene on separate smooth water colour paper with black Stazon Ink and coloured with my Tombow markers.   For the sky I added lots of water to create the water marks for clouds.   I also added lots of glitter in the snow, but again it's hard to see in the photo.   I matted it over the background which I edged with a silver leaf pen.

Thanks for stopping by and have a great day !
Shirley 

Thursday, 10 October 2013

Winter Edges (posted by Claire)

Good morning, Claire here with a card using the lovely new Winter Edges. I always enjoy making scenic cards so I just love the silhouette scene on this stamp sheet.


I created the background with PanPastels and stamped in the Edge stamp but instead of using it as one stamp I inked up part of the stamp and stamped part of the image at each side of the card with Sepia Versafine ink. I added the gorgeous large reindeer from Damask Reindeer and watercoloured with distress inks. I added some paper roses dusted with some glitter, some leaves from my stash and some brown organza ribbon.

Hope you're getting in the mood for Christmas, it'll be here before we know it
thanks for visiting today
Claire xx

Wednesday, 9 October 2013

Christmas edges by Miranda


Hi there,

Today a card from me made with the lovely Christmas edges. Chocolate Baroque designs are great to combine with previous stampsheets because often there are similar designs on it which are a perfect match with the new ones. So I've combined this bauble border with the Stained glass and Fat Robin sheet. The baubles on the Stained glass sheet combines so lovely  with  this border , don't you think?


I've blended a bit in the rectangle which I've masked in the left bottom corner with tape. Coloured the robin with pencils and embossed the hanging baubles with silver emboss.powder. Also coloured that with pencils. I've used the sentiment from the 'Warm Christmas greetings'. Only added a lot of gemstones and it was finished, leaving a lot of white this time..........

And another one with the Christmas edges and more ....white space......I've also combined this one with the 'Stained Glass' sheet. The quote is from the new Bold Christmas words.


Thanks for your visit, always enjoy to read your comments and hope to see you next time,

Here a sneak peak of the card I've posted on my blog......so please hop over to my blog( if you did not see it yet) to see this one, also made with the new Christmas edges!

Miranda

Tuesday, 8 October 2013

Bauble Edges (by Debbie)

Hello. Another bauble edges card from me today.
First,I stamped the edges twice with Versamark ink and gold embossing powder then cut them out. The embossing folder is an M-Bossabilities, Petit Framed Labels which I trimmed to make a square card and stamped the sentiment Merry Christmas sentiment. Sticky pads were put on the back of the bauble edges and placed at the top and bottom. Thank you for visiting, Debbie

Monday, 7 October 2013

Reindeer Landscape (posted by Claire)

Good morning, Claire here with a quick and easy card made using stamps from the beautiful new stamps Reindeer Landscape , distress inks and distress markers.

I began by stamping the focal image with Timber Brown Stazon ink, next I stamped the trees to either side of the image. I extended the hills with a dark brown Graph'It Marker and added some depth and shadow with distress markers in Tumbled Glass and Pumice Stone. I added some platinum stickles to the baubles on the tree and once that was dry I used distress inks in Tumbled Glass, Broken Chine and Walnut stain around the edge. I matted the image on white card, then dark brown card and popped it on an 8x8 card blank

Thanks for visiting today, I hope you're enjoying all the gorgeous new stamps
Claire xx

Sunday, 6 October 2013

Snowflake edges (posted by Judith)

Hi Folks, I have a couple of samples to show you today using the Winter Edges stamp set.These stamps are so versatile and can be mixed and matched to make all sorts of cards.

My first card uses the lovely focal stamp from the Reindeer Landscape stamp set, which I have coloured with Splash inks. I have then embossed a few snowflakes over the top, and added some glitter glue to the shaded areas to suggest some fallen snow on the ground.

I have created a long background panel by using one of the snowflake edge stamps, and embossing the image using white embossing powder. I filled the space at the top of the card by turning it around, and just used the top of the stamp again, it fit into the gaps perfectly. I then added several colours of blue Distress Ink to the card, and the white embossing powder acted as a resist, showing through the ink. Once I had assembled my card, I stamped the word 'Believe' in the top corner.


My second card uses the house edge stamp and another of the snowflake edge stampes to create a scene. I stamped these directly onto the front of a square card and filled in the gap between with single snowflake stamps from the same set, using white embossing powder again. I coloured the card using various blue Distress Inks, creating a graduated look. Once I had finished, I spritzed the card with water, to create a mottled effect to add to the snowy feel. I cut a heart shape from the centre of the front of the card, and also from a piece of scrap paper. With the die still in place, and adding the paper mask to the front of the card to protect the card front, I sponged some colour onto the inside of the card through the heart shape. I added a sentiment from the Christmas Sentiments Multibuy stamp set.


I hope that I have given you a couple of ideas for these great stamps and to tackle those Christmas cards. I still have a lot to make! Thanks for stopping by, Judith xx

Saturday, 5 October 2013

Happy Christmas, Winter Wonderland and a Sneak Peek

Hi, Chocolate Baroque friends!  We are in the midst of releasing new winter and Christmas stamps, and I'm sure you're going to love them!  My first card uses elements from three different stamp sets, that go very well together!  Two were made to match! 

I embossed my white cardstock with tiny dots, then sponged red stamp paint around the edges.  At the bottom of the front, I stamped the poinsettia edge in black, from the new set Christmas Edges.  In the centers, I placed some little sparkly stickers.  I touched up around the bottoms of the flowers with a black marker so they'd stand out a little more.  Red satin ribbon was placed around the card where the embossing stopped, and red cording placed over that.  Next, the large poinsettia's from the set Pears & Baubles were stamped twice in black on white cardstock.  I colored in the flowers with a red marker, and used a black marker to touch up parts of the leaves.  I sparkled the flowers up with red stamp paint, then applied yellow rhinestones to the centers.  After cutting them all out, (the second set was cut apart into two separate poinsettias) I used some dimensional foam to pop them up off the card, turning the second set slightly to offset.  "Happy Christmas," from the Joyful Christmas set was stamped in black on white, then layered onto some red patterned paper.  This was a very easy card to make, and the black, red and white is very striking!


Next is a card I call Winter Wonderland, and I have used images from the new Reindeer Landscape set.  This set is fantastic!  The trees were so much fun to color, and I used blue stamp paint to highlight the snowflakes and banner.  The snowflakes were heat-embossed in silver.  The card base is white cardstock, shaded in blues and lavenders, then overlaid with a white cardstock sheet that has been punched out.  The sentiment is a sneaky-peeky to what is coming soon!  I heat-embossed the wording in white on lavender cardstock.  The images were cut out, then popped up with the foam dimensionals, and a lavender ribbon tied around all before mounting it onto the white card base.  The blue snowflake on the bow is from my stash.


These new stamps are certainly getting me in the Christmas mood, and I may start my Christmas gift shopping!  I love this time of the year, but I really want to enjoy the fall colors and cooler weather first.  Watch for more beautiful work from my design team buddies!  Take care!