Thursday, 31 December 2015
Goodbye to 2015 (by Lesley)
Wednesday, 30 December 2015
Rolled PaperTrees (by Debbie)
Tuesday, 29 December 2015
Lattice Orchids (by Julie)
Monday, 28 December 2015
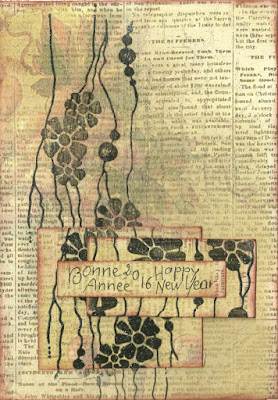
Bonne Année
I hope you all had a wonderful Christmas. It is my last post for this year and it is time to say Happy New Year
In French : Bonne Année.
So I send you all a lot of good vibrations. For this, I made two cards with the beautiful new Chocolate Baroque stamps "Baroque Orchids", "Studded Lattice" and "Floral weaves".
I used a CB digital paper printed on my computer and clear embossing powder on black ink.
Bonjour tout le monde.
J'espère que vous avez passé un joyeux Noël. C'est ma dernière publication pour cette année et il est temps de vous souhaiter une Bonne Année.
Alors je vous envoie plein de bonnes ondes. Pour cela je vous ai préparé deux cartes réalisées avec les magnifiques nouveaux tampons Chocolate Baroque.
Pour cette carte, j'ai utilisé un papier digital imprimé à partir de mon ordinateur. J'ai embossé le tampon avec la poudre transparente sur l'encre noire.
Sunday, 27 December 2015
Art Bag using the new background stamps (by Anne)
I have used recycled curtains to create myself a large Art Carry bag. I used all four of the lovely new background stamps to decorate my fabrics. Now I have a lovely new bag to carry my unframed paintings to exhibition. You could easily adapt the design idea to make a shopping or handbag, or to decorate a ready-made bag. Materials:
- Floral Weave, Open Weave, Studded Lattice and Baroque Orchids stamps
- Recycled blue cotton curtains with cream cotton lining
- Iron on paper backed fabric adhesive (Bondaweb)
- Sewing and machine embroidery threads
- Black iron fix textile paint
- Cut-N-Dry foam and palette knife
- Dies to cut flowers and leaves
How it was made:
- I first made a simple strong bag to fit my board mounted artwork pieces. Simply 2 rectangles sewn together with handles to fit over my shoulder. This is a very large bag so it is easy to decorate and sew on the applique pieces while made up. For smaller bags and shoppers it would be easier to decorate the panels before completing the construction.
- Ironed Bondaweb onto the back of the cream lining. Leaving the paper backing in place cut out flowers and leaves with the dies. Printed the text to create a template for cutting the lettering.
- Stamped all the cut shapes with textile paint using a random mix of all four stamps (see tip). Left overnight to dry and cure.
- Stamped the front of the bag with the Floral Weave stamp. Left overnight to dry then fixed the paints with an iron (this makes the paint permanent and washable).
- Peeled the backing paper off all the cut out shapes and ironed onto the bag. This secures the shapes and heat fixes paints.
- Finally I stitched around all the shapes using a straight stitch and free machine embroidery. This is where you drop the fabric feed dogs and freely move the fabric beneath the needle (like drawing with a sewing machine and thread).
Tip for stamping with paints: I used to use a standard sponge for applying acrylics or textile paint to my stamp. I would apply paint to a palette then pick up with a sponge, dabbing to remove excess paint before applying to my stamp. After a short while the paint would start to dry on the palette. The detail of the stamping was also gradually lost as clumps of paint built up in the stamp crevices after repeat application of paint. When this occurs you need to stop and clean up the stamp before continuing. I now use Cut-N-Dry foam and the results are so much better. I apply plenty of paint directly to the pad and work it well into the foam with a palette knife. The foam can now be used to apply paint to the stamp repeatedly without reloading. Placing the foam paint side down on a craft mat while not using also keeps the paint moist for ages. I find this method gives much sharper printing, uses a lot less paint and is easier to clean up when finished. Clean up well and do not leave paint to dry onto your stamp. I use a little soapy water and a soft tooth brush if needed.
Saturday, 26 December 2015
His and Hers Steampunk (by Asha)
The first card features the Open Weave cling stamp. I heat embossed it in white on a piece of vellum. To create the underwater scene I stamped, coloured, fussy cut and adhered elements form the Funky Fish A5 sheet.
The second card is a girly glitzy number featuring the Baroque Orchid cling stamp. This time I've heat embossed it with Verdegris embossing powder and inked the bckground with Seedless Preserves, Worn Lipstick and Picked Raspberry Distress Inks. The rose is from Steampunk Butterfly, coloured with alcohol markers. And to glam up the card I mounted the design panel on purple glitter foam.
Thanks for stopping by and don't forget to come back for more creative inspiration form the rest of the design team. Happy Holidays!
Beijinhos,
Asha
Friday, 25 December 2015
It's Christmas (by Lesley)
Enjoy this special day.
Thursday, 24 December 2015
Poinsettia Lattice (by Judith)
I have chosen to create a Christmas card for my final offering of the year, and hope that you will accept it as a card from me to you. I would like to thank you all for the lovely comments that you have left over the year on my posts.
I have used the Studded Lattice cling mounted stamp to create the background, and added some poinsettias from the Joyful Christmas stamp set.
Thanks for stopping by, Judith xx
Wednesday, 23 December 2015
Guest Post - Designer Penpot by Rachel Fisher
Rachel
Tuesday, 22 December 2015
Studded Lattice (by Miranda)
Monday, 21 December 2015
pastel steampunk
I covered with hanger with white gesso, then brushed the edges with emulsion paint, using those little tester pots
Once the paint was dry, I stamped the new studded lattice background stamp across the whole shape, using a silver grey ink pad. The butterflies are from the steampunk butterfly set, stamped in dark blue ink, so that the antenna would be there.
I then stamped the butterflies again, once onto a sticky label (thanks Lesley for that tip) and once onto card, fusy cut out and glued over the original stamping. A lilac ribbon completed it.
 The Country Market that I bake for is based at a local ex-Servicemen's club, and they always have loads of beer mats from the brewers, so I also altered some of these to make posher coasters. Same paints and inks, but the cog stamp from the set as a background, and butterflies on sticky labels again.
I did cover the back of the beermats with felt to hide the brewer's logo.
The steampunk set wasn't on my want list when it came out, as I only really loved the one stamp, but I found that it has become quite addictive since I started playing with it...............and you can use it for pretty as opposed to grungy. So don't write off that set you were dubious about - wait until it is on offer and then have a go, you may be as surprised as I was!
Thank you for looking, there is some lovely stuff coming up - best wishes for a happy Christmas
Veronica
Sunday, 20 December 2015
Baroque Orchids (posted by Claire)
Saturday, 19 December 2015
Fabulous new background stamps by Zoe
My second is a 5"x7" canvas, I used Dylusions paints applied with a wet wipe, I stamped using stamps from the Steampunk Butterfly set and Studded Lattice, I used gilding flakes on the cogs stamp from the set, gilding wax around the edge, white gesso using credit card and bottle tops to create some texture, the butterfly was stamped onto tissue and adhered with a gel medium.
I used the Studded Lattice again on the background using my Gelli Plate, I inked it up first using my brayer then stamped the Lattice directly onto the Gelli Plate with a darker pink ink then pulled my print, the Roses from the Steampunk Butterfly set I coloured using pencils to create a metal effect.
Thank you so much for spending your time visiting, please pop along again and see what my fantastic teamies create, have a wonderful Christmas time and Happy New Year xx Zoe xx


